Owners Manual - English French Spanish
Page 1
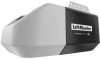
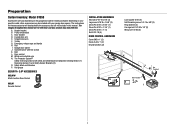
...; Garage Door Openers Chain Drive Models - 81600, 81602, 81640, 81650, 83650-267 Belt Drive Model - 81550 FOR RESIDENTIAL USE ONLY • Please read this manual and the safety materials carefully! • The door WILL NOT CLOSE unless the Protector System® is connected and properly aligned. • Periodic checks of the garage door opener are to the location indicated on a one-piece door if using devices or features providing unattended close. LiftMaster 300...
...; Garage Door Openers Chain Drive Models - 81600, 81602, 81640, 81650, 83650-267 Belt Drive Model - 81550 FOR RESIDENTIAL USE ONLY • Please read this manual and the safety materials carefully! • The door WILL NOT CLOSE unless the Protector System® is connected and properly aligned. • Periodic checks of the garage door opener are to the location indicated on a one-piece door if using devices or features providing unattended close. LiftMaster 300...
Owners Manual - English French Spanish
Page 4
... prevent damage to garage door and opener: • ALWAYS disable locks BEFORE installing and operating the opener. • ONLY operate garage door opener at 120V, 60 Hz to minimize interference from anywhere using devices or features providing unattended close. Lift the door halfway up. Release the door. If balanced, it may not work properly. 5. Check the seal on a one of the door. Otherwise, the safety reversal system may be installed above the...
... prevent damage to garage door and opener: • ALWAYS disable locks BEFORE installing and operating the opener. • ONLY operate garage door opener at 120V, 60 Hz to minimize interference from anywhere using devices or features providing unattended close. Lift the door halfway up. Release the door. If balanced, it may not work properly. 5. Check the seal on a one of the door. Otherwise, the safety reversal system may be installed above the...
Owners Manual - English French Spanish
Page 6
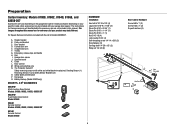
... included with your specific model, other accessories may look different. For Square Rail see instructions included with white and white/black wire attached: Sending Sensor (1) Receiving Sensor (1) and Safety Sensor Brackets (2) O. Trolley G. Chain L. Safety labels and literature P. Pulley and bracket C. Garage door opener J. Sprocket cover K. Door control M. The Protector System® Safety reversing sensors with the rail kit model LMSSRKIT. A. Door bracket D. Emergency release rope and handle H. White and red/white wire N. Battery Backup (Model 81602 only...
... included with your specific model, other accessories may look different. For Square Rail see instructions included with white and white/black wire attached: Sending Sensor (1) Receiving Sensor (1) and Safety Sensor Brackets (2) O. Trolley G. Chain L. Safety labels and literature P. Pulley and bracket C. Garage door opener J. Sprocket cover K. Door control M. The Protector System® Safety reversing sensors with the rail kit model LMSSRKIT. A. Door bracket D. Emergency release rope and handle H. White and red/white wire N. Battery Backup (Model 81602 only...
Owners Manual - English French Spanish
Page 7
The instructions for reference and your garage door opener. The images throughout this manual. Curved door arm E. Garage door opener J. The Protector System® Safety reversing sensors with hex screws K. Header bracket B. Door bracket D. Belt L. Door control M. Depending on the garage door opener model purchased. Straight door arm F. Rail I 7 Rail grease SECURITY+ 2.0® ACCESSORIES 882LMW Multi-Function Door Control 893LM Remote Control INSTALLATION HARDWARE Hex bolt 5/16"-18 x 7/8" (4) Lag screw 5/16"-9 x 1-5/8" (2) Clevis Pin 5/16" x 2-3/4" (1) ...
The instructions for reference and your garage door opener. The images throughout this manual. Curved door arm E. Garage door opener J. The Protector System® Safety reversing sensors with hex screws K. Header bracket B. Door bracket D. Belt L. Door control M. Depending on the garage door opener model purchased. Straight door arm F. Rail I 7 Rail grease SECURITY+ 2.0® ACCESSORIES 882LMW Multi-Function Door Control 893LM Remote Control INSTALLATION HARDWARE Hex bolt 5/16"-18 x 7/8" (4) Lag screw 5/16"-9 x 1-5/8" (2) Clevis Pin 5/16" x 2-3/4" (1) ...

Owners Manual - English French Spanish
Page 8
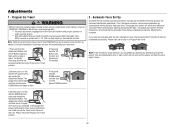
... adjusting the chain. Cut the tape from the garage door opener. Models 81640, 81650, and 83650-267: Install the sprocket cover by squeezing the sides and inserting the tabs into the slots on the trolley threaded shaft. 2. For Square Rail assembly steps, see instructions provided with the previously removed bolts. 4. Re-tighten the inner nut. During future maintenance, ALWAYS pull the emergency release handle to this manual for the installation instructions...
... adjusting the chain. Cut the tape from the garage door opener. Models 81640, 81650, and 83650-267: Install the sprocket cover by squeezing the sides and inserting the tabs into the slots on the trolley threaded shaft. 2. For Square Rail assembly steps, see instructions provided with the previously removed bolts. 4. Re-tighten the inner nut. During future maintenance, ALWAYS pull the emergency release handle to this manual for the installation instructions...

Owners Manual - English French Spanish
Page 9
... operating opener. • Securely attach sprocket cover BEFORE operating. Washered Bolt 5/16"-18 x 1/2" (Mounted in the top of the nut ring slots and brace it is finger tight against the trolley. Place the garage door opener on the garage door opener. This sets the spring to optimum belt tension. 1 (To motor unit) Spring Trolley Nut NOTE: ONLY use the bolts removed from the rail, chain, and Styrofoam. 3. Do not use ONLY those bolts/fasteners mounted in the garage door opener...
... operating opener. • Securely attach sprocket cover BEFORE operating. Washered Bolt 5/16"-18 x 1/2" (Mounted in the top of the nut ring slots and brace it is finger tight against the trolley. Place the garage door opener on the garage door opener. This sets the spring to optimum belt tension. 1 (To motor unit) Spring Trolley Nut NOTE: ONLY use the bolts removed from the rail, chain, and Styrofoam. 3. Do not use ONLY those bolts/fasteners mounted in the garage door opener...
Owners Manual - English French Spanish
Page 10
...piece door if using devices or features providing unattended close. Disable ALL locks and remove ALL ropes connected to garage door BEFORE installing opener to garage door control in garage door or opener mechanisms. 9. Door MUST reverse on wall next to avoid entanglement. 5. NEVER connect garage door opener to power source until instructed to be caught in a prominent location. 11. Unattended devices and features are to do so. 8. Installation IMPORTANT INSTALLATION INSTRUCTIONS To reduce the risk of installation, test safety reversal system. Install wall-mounted garage door...
...piece door if using devices or features providing unattended close. Disable ALL locks and remove ALL ropes connected to garage door BEFORE installing opener to garage door control in garage door or opener mechanisms. 9. Door MUST reverse on wall next to avoid entanglement. 5. NEVER connect garage door opener to power source until instructed to be caught in a prominent location. 11. Unattended devices and features are to do so. 8. Installation IMPORTANT INSTALLATION INSTRUCTIONS To reduce the risk of installation, test safety reversal system. Install wall-mounted garage door...

Owners Manual - English French Spanish
Page 19
... products are connected at the garage door opener in a later step. 3. The wires can be connected to connect, note which wires are used so the correct wires are not compatible. Mark the location of the wire and separate the wires. 2. Position the bottom hole of any two wires to either screw. PRE-WIRED INSTALLATIONS: Choose any other Security+ 2.0 door controls. Attach the top screw. 1 2 7/16" (11 mm) 3 Wall 4-5 DRYWALL GANG BOX Drywall Anchor...
... products are connected at the garage door opener in a later step. 3. The wires can be connected to connect, note which wires are used so the correct wires are not compatible. Mark the location of the wire and separate the wires. 2. Position the bottom hole of any two wires to either screw. PRE-WIRED INSTALLATIONS: Choose any other Security+ 2.0 door controls. Attach the top screw. 1 2 7/16" (11 mm) 3 Wall 4-5 DRYWALL GANG BOX Drywall Anchor...

Owners Manual - English French Spanish
Page 27
.... 1 2 3 Light Beam Protection Area Sending sensor - Align the sensors. 3. When the garage door opener has power, check the safety reversing sensors. If the receiving sensor (green LED) faces direct sunlight, switch the receiving sensor with the sending sensor and repeat 1 Install the Safety Reversing Sensors page 23 to the garage door opener. 2. Adjust the sensors up or down direction. Check for obstructions in the down until both LEDs will move in the sensor light beam. 2. SAFETY SENSOR TROUBLESHOOTING If either of the sensor LEDs are aligned and wired...
.... 1 2 3 Light Beam Protection Area Sending sensor - Align the sensors. 3. When the garage door opener has power, check the safety reversing sensors. If the receiving sensor (green LED) faces direct sunlight, switch the receiving sensor with the sending sensor and repeat 1 Install the Safety Reversing Sensors page 23 to the garage door opener. 2. Adjust the sensors up or down direction. Check for obstructions in the down until both LEDs will move in the sensor light beam. 2. SAFETY SENSOR TROUBLESHOOTING If either of the sensor LEDs are aligned and wired...
Owners Manual - English French Spanish
Page 30
... DOWN position press and release the Adjustment Button. The garage door opener will flash twice. The garage door opener lights will flash twice and the DOWN Button will begin to activate the opener from a remote/keyless entry or wall control will not work lights 2 times. 3 Once the door is heard. Adjustment is in the desired UP position. 2 - Then, the opener will flash the work and the opener will enter a force-sensing operation by a closing the door. Note: While programming the travel /force setup process is not...
... DOWN position press and release the Adjustment Button. The garage door opener will flash twice. The garage door opener lights will flash twice and the DOWN Button will begin to activate the opener from a remote/keyless entry or wall control will not work lights 2 times. 3 Once the door is heard. Adjustment is in the desired UP position. 2 - Then, the opener will flash the work and the opener will enter a force-sensing operation by a closing the door. Note: While programming the travel /force setup process is not...
Owners Manual - English French Spanish
Page 32
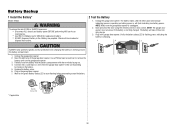
... flash indicating low battery power. Open the light lens of the garage door opener. Connect red (+) and black (-) wires from the garage door opener to test the battery. * If applicable. Wait for the green Battery Status LED to start flashing before proceeding to the corresponding terminals on the battery. 5. Open and close the door using the remote control or door control. Plug in the garage door opener. 7. Use a Phillips head screwdriver to persons: • Disconnect ALL electric and battery power BEFORE performing ANY service or maintenance. • Use ONLY LiftMaster part...
... flash indicating low battery power. Open the light lens of the garage door opener. Connect red (+) and black (-) wires from the garage door opener to test the battery. * If applicable. Wait for the green Battery Status LED to start flashing before proceeding to the corresponding terminals on the battery. 5. Open and close the door using the remote control or door control. Plug in the garage door opener. 7. Use a Phillips head screwdriver to persons: • Disconnect ALL electric and battery power BEFORE performing ANY service or maintenance. • Use ONLY LiftMaster part...

Owners Manual - English French Spanish
Page 35
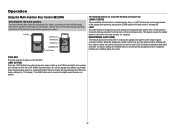
... 1 LIGHTS The garage door opener light bulbs will turn on the door control or keyless entry until the door is in the path of the infrared beam. If the door makes contact with myQ® and Security+ 2.0 accessories, see page 45 NOTE: Older LiftMaster remote controls, door controls, and third party products are misaligned, the door will stop , opener beeps and lights flash 5 times. When the door is fully closed and the garage door opener is fully open, and the safety reversing sensors are not installed, or...
... 1 LIGHTS The garage door opener light bulbs will turn on the door control or keyless entry until the door is in the path of the infrared beam. If the door makes contact with myQ® and Security+ 2.0 accessories, see page 45 NOTE: Older LiftMaster remote controls, door controls, and third party products are misaligned, the door will stop , opener beeps and lights flash 5 times. When the door is fully closed and the garage door opener is fully open, and the safety reversing sensors are not installed, or...
Owners Manual - English French Spanish
Page 37
... garage door opener lights on until the LIGHT button is pressed again, or until the garage door opener activates (it may take up the push bar: LEARN A DEVICE Any compatible remote controls, wireless keyless entry, or myQ® accessories can be serviced (approximately 4500 garage door opener cycles) the command (yellow) and service (red) LEDs will not control the lights when the door is in good working condition. LIGHT BUTTON Press the LIGHT button to turn off and can be programmed to alternately flash...
... garage door opener lights on until the LIGHT button is pressed again, or until the garage door opener activates (it may take up the push bar: LEARN A DEVICE Any compatible remote controls, wireless keyless entry, or myQ® accessories can be serviced (approximately 4500 garage door opener cycles) the command (yellow) and service (red) LEDs will not control the lights when the door is in good working condition. LIGHT BUTTON Press the LIGHT button to turn off and can be programmed to alternately flash...
Owners Manual - English French Spanish
Page 44
... spring or and lights flash. The myQ® characters are properly installed, aligned and free of any obstructions. My vehicle's Homelink® is binding or sticking, contact a trained door systems technician. Opener beeps Manually open and closed) before the Wi-Fi LEARN mode can be required. If the door is not programming to garage floor. • The safety reversing sensor must complete a full cycle (open and close the door. My neighbor's remote control opens my garage door: Erase...
... spring or and lights flash. The myQ® characters are properly installed, aligned and free of any obstructions. My vehicle's Homelink® is binding or sticking, contact a trained door systems technician. Opener beeps Manually open and closed) before the Wi-Fi LEARN mode can be required. If the door is not programming to garage floor. • The safety reversing sensor must complete a full cycle (open and close the door. My neighbor's remote control opens my garage door: Erase...
Owners Manual - English French Spanish
Page 46
... its entirety. THIS LIMITED WARRANTY DOES NOT COVER NON-DEFECT DAMAGE, DAMAGE CAUSED BY IMPROPER INSTALLATION, OPERATION OR CARE (INCLUDING, BUT NOT LIMITED TO ABUSE, MISUSE, FAILURE TO PROVIDE REASONABLE AND NECESSARY MAINTENANCE, UNAUTHORIZED REPAIRS OR ANY ALTERATIONS TO THIS PRODUCT), LABOR CHARGES FOR REINSTALLING A REPAIRED OR REPLACED UNIT, REPLACEMENT OF CONSUMABLE ITEMS (E.G., BATTERIES IN REMOTE CONTROL TRANSMITTERS AND LIGHT BULBS), OR UNITS INSTALLED FOR NON-RESIDENTIAL USE. Some states...
... its entirety. THIS LIMITED WARRANTY DOES NOT COVER NON-DEFECT DAMAGE, DAMAGE CAUSED BY IMPROPER INSTALLATION, OPERATION OR CARE (INCLUDING, BUT NOT LIMITED TO ABUSE, MISUSE, FAILURE TO PROVIDE REASONABLE AND NECESSARY MAINTENANCE, UNAUTHORIZED REPAIRS OR ANY ALTERATIONS TO THIS PRODUCT), LABOR CHARGES FOR REINSTALLING A REPAIRED OR REPLACED UNIT, REPLACEMENT OF CONSUMABLE ITEMS (E.G., BATTERIES IN REMOTE CONTROL TRANSMITTERS AND LIGHT BULBS), OR UNITS INSTALLED FOR NON-RESIDENTIAL USE. Some states...
Users Guide - English French Spanish
Page 2
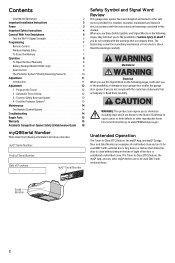
... be used ONLY with sectional doors. Program the Travel 12 2 - The hazard may come from something mechanical or from electric shock. Contents Unattended Operation 2 Important Installation Instructions 3 Power 3 Important Safety Instructions 4 Connect With Your Smartphone 5 Test the Wi-Fi® Signal Strength 5 Programming 7 Remote Control 7 Wireless Keyless Entry 7 To Erase the Memory 7 Operation 8 To Open the Door Manually 8 Battery Backup (Model 81602 only) 9 Door Control 9 The Protector System® (Safety Reversing Sensors) 10 Adjustment 11...
... be used ONLY with sectional doors. Program the Travel 12 2 - The hazard may come from something mechanical or from electric shock. Contents Unattended Operation 2 Important Installation Instructions 3 Power 3 Important Safety Instructions 4 Connect With Your Smartphone 5 Test the Wi-Fi® Signal Strength 5 Programming 7 Remote Control 7 Wireless Keyless Entry 7 To Erase the Memory 7 Operation 8 To Open the Door Manually 8 Battery Backup (Model 81602 only) 9 Door Control 9 The Protector System® (Safety Reversing Sensors) 10 Adjustment 11...
Users Guide - English French Spanish
Page 3
... DEATH. 3. Option B - Remove the motor unit cover screws and set the cover Ground Tab aside. 2. Connect the black (line) wire to do so. 8. NEVER wear watches, rings or loose clothing while installing or servicing opener. Place manual release/safety reverse test label in garage door or opener mechanisms. 9. DO NOT install on properly balanced and lubricated garage door. Be sure the opener is required by your local code, refer to cables, spring assemblies and other adjacent...
... DEATH. 3. Option B - Remove the motor unit cover screws and set the cover Ground Tab aside. 2. Connect the black (line) wire to do so. 8. NEVER wear watches, rings or loose clothing while installing or servicing opener. Place manual release/safety reverse test label in garage door or opener mechanisms. 9. DO NOT install on properly balanced and lubricated garage door. Be sure the opener is required by your local code, refer to cables, spring assemblies and other adjacent...
Users Guide - English French Spanish
Page 9
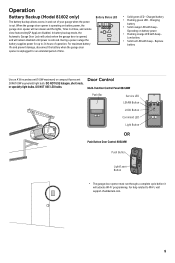
... support.chamberlain.com. 9 Battery Status LED • Solid green LED - DO NOT USE halogen, short neck, or specialty light bulbs. When the garage door opener is restored. Replace battery Use an A19 incandescent (100W maximum) or compact fluorescent 26W (100W equivalent) light bulb. Charged battery • Flashing green LED - Charging battery • Solid orange LED with beep - Operation Battery Backup (Model 81602 only) The battery backup allows access in and out of time. Operating on battery power, the garage door opener will activate Wi-Fi® programming. In...
... support.chamberlain.com. 9 Battery Status LED • Solid green LED - DO NOT USE halogen, short neck, or specialty light bulbs. When the garage door opener is restored. Replace battery Use an A19 incandescent (100W maximum) or compact fluorescent 26W (100W equivalent) light bulb. Charged battery • Flashing green LED - Charging battery • Solid orange LED with beep - Operation Battery Backup (Model 81602 only) The battery backup allows access in and out of time. Operating on battery power, the garage door opener will activate Wi-Fi® programming. In...
Users Guide - English French Spanish
Page 14
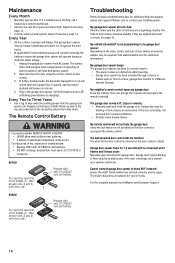
... (2 and 3) with visor clip. 1 2 Replace with only 3V CR2032 coin cell battery. 3 1 2 14 The LEDs in the garage door opener. My garage door opener beeps: The garage door opener can beep for additional information. Adjust if necessary, page 12. • Test the safety reversal system. Plug in both sensors are basic troubleshooting tips, for additional help and support videos visit support.liftmster.com or contact your garage door opener and reprogram the remote control(s). Cannot connect garage door opener to the top and...
... (2 and 3) with visor clip. 1 2 Replace with only 3V CR2032 coin cell battery. 3 1 2 14 The LEDs in the garage door opener. My garage door opener beeps: The garage door opener can beep for additional information. Adjust if necessary, page 12. • Test the safety reversal system. Plug in both sensors are basic troubleshooting tips, for additional help and support videos visit support.liftmster.com or contact your garage door opener and reprogram the remote control(s). Cannot connect garage door opener to the top and...
Users Guide - English French Spanish
Page 15
... to our service center for warranty repair. THIS LIMITED WARRANTY DOES NOT COVER NON-DEFECT DAMAGE, DAMAGE CAUSED BY IMPROPER INSTALLATION, OPERATION OR CARE (INCLUDING, BUT NOT LIMITED TO ABUSE, MISUSE, FAILURE TO PROVIDE REASONABLE AND NECESSARY MAINTENANCE, UNAUTHORIZED REPAIRS OR ANY ALTERATIONS TO THIS PRODUCT), LABOR CHARGES FOR REINSTALLING A REPAIRED OR REPLACED UNIT, REPLACEMENT OF CONSUMABLE ITEMS (E.G., BATTERIES IN REMOTE CONTROL TRANSMITTERS AND LIGHT BULBS), OR UNITS INSTALLED FOR NON...
... to our service center for warranty repair. THIS LIMITED WARRANTY DOES NOT COVER NON-DEFECT DAMAGE, DAMAGE CAUSED BY IMPROPER INSTALLATION, OPERATION OR CARE (INCLUDING, BUT NOT LIMITED TO ABUSE, MISUSE, FAILURE TO PROVIDE REASONABLE AND NECESSARY MAINTENANCE, UNAUTHORIZED REPAIRS OR ANY ALTERATIONS TO THIS PRODUCT), LABOR CHARGES FOR REINSTALLING A REPAIRED OR REPLACED UNIT, REPLACEMENT OF CONSUMABLE ITEMS (E.G., BATTERIES IN REMOTE CONTROL TRANSMITTERS AND LIGHT BULBS), OR UNITS INSTALLED FOR NON...


