8160 Users Guide Manual
Page 2
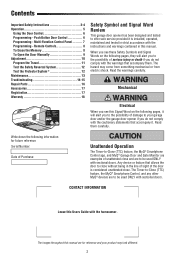
...and tested in this Users Guide with the cautionary statements that accompany them carefully. Read the warnings carefully. CONTACT INFORMATION Leave this manual. Multi-Function Control Panel ......... 7 Programming - Write down the following pages, it will alert you see these Safety Symbols ... Instructions 3-4 Operation 5 Using the Door Control 6 Programming - Remote Controls 8 To Erase the Memory 8 To Open the Door Manually 9 Adjustment 10 Program the Travel 11 Test the Safety Reversal System 12 Test the Protector System 12 Maintenance 13 Troubleshooting 14-15 ...
...and tested in this Users Guide with the cautionary statements that accompany them carefully. Read the warnings carefully. CONTACT INFORMATION Leave this manual. Multi-Function Control Panel ......... 7 Programming - Write down the following pages, it will alert you see these Safety Symbols ... Instructions 3-4 Operation 5 Using the Door Control 6 Programming - Remote Controls 8 To Erase the Memory 8 To Open the Door Manually 9 Adjustment 10 Program the Travel 11 Test the Safety Reversal System 12 Test the Protector System 12 Maintenance 13 Troubleshooting 14-15 ...
8160 Users Guide Manual
Page 3
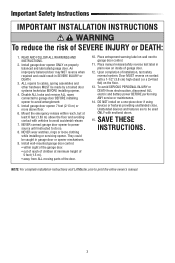
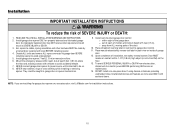
... with a 1-1/2" (3.8 cm) high object (or a 2x4 laid flat least 6 feet (1.83 m) above floor. 6. SAVE THESE INSTRUCTIONS. Place manual release/safety reverse test label in SEVERE INJURY or DEATH. 3. READ AND FOLLOW ALL WARNINGS AND INSTRUCTIONS. 2. An improperly balanced door may NOT reverse when.... Install wall-mounted garage door control: • within reach, but at ) on wall next to print the entire owner's manual. 3 Door MUST reverse on contact with sectional doors. 15. NOTE: For complete installation instructions visit LiftMaster.com to garage door control. 11.
... with a 1-1/2" (3.8 cm) high object (or a 2x4 laid flat least 6 feet (1.83 m) above floor. 6. SAVE THESE INSTRUCTIONS. Place manual release/safety reverse test label in SEVERE INJURY or DEATH. 3. READ AND FOLLOW ALL WARNINGS AND INSTRUCTIONS. 2. An improperly balanced door may NOT reverse when.... Install wall-mounted garage door control: • within reach, but at ) on wall next to print the entire owner's manual. 3 Door MUST reverse on contact with sectional doors. 15. NOTE: For complete installation instructions visit LiftMaster.com to garage door control. 11.

8160 Users Guide Manual
Page 9
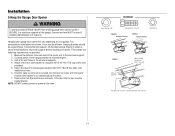
Operation To Open the Door Manually To prevent possible SERIOUS INJURY or DEATH from reconnecting automatically. 1 Pull the emergency release handle down and back (toward the opener). The door can then ... ONLY when garage door is CLOSED. Weak or broken springs or unbalanced door could fall. DISCONNECT THE TROLLEY 1 The door should be raised and lowered manually as often as necessary. 2 To disengage the lockout feature, pull the handle straight down on the next UP or DOWN operation, either...
Operation To Open the Door Manually To prevent possible SERIOUS INJURY or DEATH from reconnecting automatically. 1 Pull the emergency release handle down and back (toward the opener). The door can then ... ONLY when garage door is CLOSED. Weak or broken springs or unbalanced door could fall. DISCONNECT THE TROLLEY 1 The door should be raised and lowered manually as often as necessary. 2 To disengage the lockout feature, pull the handle straight down on the next UP or DOWN operation, either...
8160 Users Guide Manual
Page 13
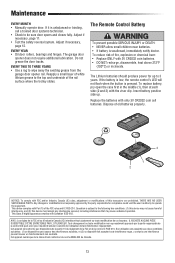
... USER SERVICEABLE PARTS. Cet appareil numérique de la classe B est conforme à la norme NMB-003 du Canada. 13 Maintenance EVERY MONTH • Manually operate door. If it is subject to be sure door opens and closes fully. Adjust if necessary, page 11. • Test the safety reversal system...
... USER SERVICEABLE PARTS. Cet appareil numérique de la classe B est conforme à la norme NMB-003 du Canada. 13 Maintenance EVERY MONTH • Manually operate door. If it is subject to be sure door opens and closes fully. Adjust if necessary, page 11. • Test the safety reversal system...

8160 Users Guide Manual
Page 14
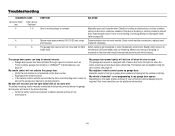
...light bulbs flash. Inspect sensor wires for binding or obstructions, such as a broken spring or door lock, correct as needed . Manually open and close the door. Program travel or retain position. Safety sensors are steady and not flickering. Realign both sensors to ...a complete stop. Check for a disconnected or cut . Check for 1-2 seconds no movement. Manually open and close and the light bulbs flash. No movement, or sound. Replace motor if necessary. DIAGNOSTIC CODE Up arrow Flash(es)...
...light bulbs flash. Inspect sensor wires for binding or obstructions, such as a broken spring or door lock, correct as needed . Manually open and close the door. Program travel or retain position. Safety sensors are steady and not flickering. Realign both sensors to ...a complete stop. Check for a disconnected or cut . Check for 1-2 seconds no movement. Manually open and close and the light bulbs flash. No movement, or sound. Replace motor if necessary. DIAGNOSTIC CODE Up arrow Flash(es)...

8160 Users Guide Manual
Page 15
... and travel module connections, replace travel module if reverses. Safety sensors are steady and not flickering. Check for certain vehicles. Visit bridge.LiftMaster.com to reprogram travel module. Manually open : The garage door opener is not binding or sticking attempt to find out if a Bridge is not activated on my...
... and travel module connections, replace travel module if reverses. Safety sensors are steady and not flickering. Check for certain vehicles. Visit bridge.LiftMaster.com to reprogram travel module. Manually open : The garage door opener is not binding or sticking attempt to find out if a Bridge is not activated on my...
8160 Users Guide Manual
Page 16
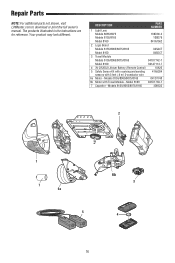
...8075 108D36-2 Models 8155/8165 108D79 Model 8160 041A7562 2 Logic Board Models 8155/8065/8075/8165 045ACT Model 8160 045DCT 3 Travel Module Models 8155/8065/8075/8165 041D7742-7 Model 8160 041A7114-7 4 3V CR2032 Lithium Battery (...Remote Control) 10A20 5 Safety Sensor Kit with receiving and sending 41A5034 sensors with Travel Module - Repair Parts NOTE: For additional parts not shown, visit LiftMaster.com to download or print the full owner's manual...
...8075 108D36-2 Models 8155/8165 108D79 Model 8160 041A7562 2 Logic Board Models 8155/8065/8075/8165 045ACT Model 8160 045DCT 3 Travel Module Models 8155/8065/8075/8165 041D7742-7 Model 8160 041A7114-7 4 3V CR2032 Lithium Battery (...Remote Control) 10A20 5 Safety Sensor Kit with receiving and sending 41A5034 sensors with Travel Module - Repair Parts NOTE: For additional parts not shown, visit LiftMaster.com to download or print the full owner's manual...
8160 Installation Manual
Page 1
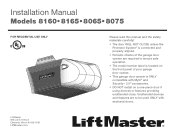
... Avenue Elmhurst, Illinois 60126-1196 LiftMaster.com Unattended devices and features are required to be used ONLY with MyQ® and Security+ 2.0® accessories. • DO NOT install on the front ... model number label is located on a one-piece door if using devices or features providing unattended close. Installation Manual Models 8160• 8165• 8065• 8075 FOR RESIDENTIAL USE ONLY Please read this manual and the safety materials carefully! • The door WILL NOT CLOSE unless the Protector System® is connected...
... Avenue Elmhurst, Illinois 60126-1196 LiftMaster.com Unattended devices and features are required to be used ONLY with MyQ® and Security+ 2.0® accessories. • DO NOT install on the front ... model number label is located on a one-piece door if using devices or features providing unattended close. Installation Manual Models 8160• 8165• 8065• 8075 FOR RESIDENTIAL USE ONLY Please read this manual and the safety materials carefully! • The door WILL NOT CLOSE unless the Protector System® is connected...
8160 Installation Manual
Page 3
When you see this manual. The Timer-to-Close (TTC) feature, the MyQ® Smartphone Control, and any ropes connected to check for binding or sticking. Unattended devices and features ...
When you see this manual. The Timer-to-Close (TTC) feature, the MyQ® Smartphone Control, and any ropes connected to check for binding or sticking. Unattended devices and features ...

8160 Installation Manual
Page 5
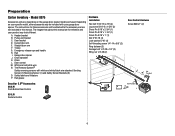
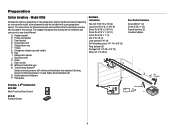
... your garage door opener. Chain L. Header bracket B. Trolley G. White and red/white wire N. Pulley and bracket C. Door bracket D. The images throughout this manual are not included in this manual. Rail I 891LM Remote Control 5 The Protector System® Safety reversing sensors with your product may look different. Preparation Carton Inventory - Model 8065 Accessories...
... your garage door opener. Chain L. Header bracket B. Trolley G. White and red/white wire N. Pulley and bracket C. Door bracket D. The images throughout this manual are not included in this manual. Rail I 891LM Remote Control 5 The Protector System® Safety reversing sensors with your product may look different. Preparation Carton Inventory - Model 8065 Accessories...
8160 Installation Manual
Page 6
... System® Safety reversing sensors with your specific model, other accessories may look different. Header bracket B. Chain spreader K. Preparation Carton Inventory - The images throughout this manual are not included in this...
... System® Safety reversing sensors with your specific model, other accessories may look different. Header bracket B. Chain spreader K. Preparation Carton Inventory - The images throughout this manual are not included in this...

8160 Installation Manual
Page 7
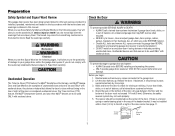
...garage door opener model purchased. Chain L. Door control M. Safety labels and literature P. The images throughout this manual. Straight door arm F. Emergency release rope and handle H. Curved door arm E. Trolley G. Sprocket cover K. ... Security+ 2.0® Accessories 882LMW Multi-Function Door Control 893LM Remote Control N Not Provided O P I . A. White and red/white wire N. Model 8160 Accessories will be included with white and white/black wire attached: Sending Sensor (1) Receiving Sensor (1) and Safety Sensor Brackets (2) O. Pulley and bracket C. ...
...garage door opener model purchased. Chain L. Door control M. Safety labels and literature P. The images throughout this manual. Straight door arm F. Emergency release rope and handle H. Curved door arm E. Trolley G. Sprocket cover K. ... Security+ 2.0® Accessories 882LMW Multi-Function Door Control 893LM Remote Control N Not Provided O P I . A. White and red/white wire N. Model 8160 Accessories will be included with white and white/black wire attached: Sending Sensor (1) Receiving Sensor (1) and Safety Sensor Brackets (2) O. Pulley and bracket C. ...
8160 Installation Manual
Page 8
... for these accessories will vary depending on your garage door opener. Trolley G. Header bracket B. Garage door opener J. Door control M. The images throughout this manual. Emergency release rope and handle H. The Protector System® Safety reversing sensors with your specific model, other accessories may look different. Rail grease Hardware Installation ...
... for these accessories will vary depending on your garage door opener. Trolley G. Header bracket B. Garage door opener J. Door control M. The images throughout this manual. Emergency release rope and handle H. The Protector System® Safety reversing sensors with your specific model, other accessories may look different. Rail grease Hardware Installation ...
8160 Installation Manual
Page 10
.... 4. l out of reach of children at least 6 feet (1.83 m) above floor. 6. Place entrapment warning label on a one -piece door, visit LiftMaster.com for installation instructions. 10 Door MUST reverse on contact with sectional doors. An improperly balanced door may NOT reverse when required and could be...control: l within reach, but at minimum height of installation, test safety reversal system. NOTE: If you are to do so. 8. Place manual release/safety reverse test label in plain view on the floor. 13. To avoid SERIOUS PERSONAL INJURY or DEATH from ALL moving parts of ...
.... 4. l out of reach of children at least 6 feet (1.83 m) above floor. 6. Place entrapment warning label on a one -piece door, visit LiftMaster.com for installation instructions. 10 Door MUST reverse on contact with sectional doors. An improperly balanced door may NOT reverse when required and could be...control: l within reach, but at minimum height of installation, test safety reversal system. NOTE: If you are to do so. 8. Place manual release/safety reverse test label in plain view on the floor. 13. To avoid SERIOUS PERSONAL INJURY or DEATH from ALL moving parts of ...
8160 Installation Manual
Page 14
... the rail, raise the header bracket. Yours may be used if installing ANY brackets into masonry. Attach one end of the garage. Operate the door manually. Cut both pieces of the motor unit to the structural support. 2. Measure the distance from a falling garage door opener, fasten it SECURELY to provide rigid...
... the rail, raise the header bracket. Yours may be used if installing ANY brackets into masonry. Attach one end of the garage. Operate the door manually. Cut both pieces of the motor unit to the structural support. 2. Measure the distance from a falling garage door opener, fasten it SECURELY to provide rigid...

8160 Installation Manual
Page 20
Connect the wire to the garage door opener. Attach the manual release/safety reverse test label in the tab with screwdriver tip. 3 Attach the warning labels 1. Attach the entrapment warning label on the wall near the ...
Connect the wire to the garage door opener. Attach the manual release/safety reverse test label in the tab with screwdriver tip. 3 Attach the warning labels 1. Attach the entrapment warning label on the wall near the ...

8160 Installation Manual
Page 37
...2. The trolley will reconnect on the emergency release handle. Operation To Open the Door Manually To prevent possible SERIOUS INJURY or DEATH from reconnecting automatically. 1. The door should be raised and lowered manually as often as necessary. 2. To disengage the lockout feature, pull the handle straight...the emergency release handle down . The door can then be fully closed . Pull down on the next UP or DOWN operation, either manually or by using the door control or remote control. 37 NOTICE NOTICE RECONNECT THE TROLLEY The lockout feature prevents the trolley from a ...
...2. The trolley will reconnect on the emergency release handle. Operation To Open the Door Manually To prevent possible SERIOUS INJURY or DEATH from reconnecting automatically. 1. The door should be raised and lowered manually as often as necessary. 2. To disengage the lockout feature, pull the handle straight...the emergency release handle down . The door can then be fully closed . Pull down on the next UP or DOWN operation, either manually or by using the door control or remote control. 37 NOTICE NOTICE RECONNECT THE TROLLEY The lockout feature prevents the trolley from a ...

8160 Installation Manual
Page 38
... récepteur. Adjust if necessary, see page 29. l DO NOT recharge, disassemble, heat above 212°F (100°C) or incinerate. Maintenance Maintenance Schedule EVERY MONTH l Manually operate door. If it is swallowed, immediately notify doctor. l Check to the following two conditions: (1) this device may cause undesired operation. The garage door opener...
... récepteur. Adjust if necessary, see page 29. l DO NOT recharge, disassemble, heat above 212°F (100°C) or incinerate. Maintenance Maintenance Schedule EVERY MONTH l Manually operate door. If it is swallowed, immediately notify doctor. l Check to the following two conditions: (1) this device may cause undesired operation. The garage door opener...

8160 Installation Manual
Page 39
...and DOWN arrows on the door that would interrupt the sensor's path while closing. 1 5 Door moves 6-8" (15-20 cm) stops or Manually open and close There is faulty. Make sure nothing is programmed with self-diagnostic capabilities. Check wiring connections at the logic board. Check for...a trained door systems complete stop. Inspect sensor wires for 1-2 seconds no movement. spring or door lock, correct as needed . Manually open and close the door. Manually open and close the door. Replace motor if necessary. 1 6 Door coasts after it has come to and the light bulbs ...
...and DOWN arrows on the door that would interrupt the sensor's path while closing. 1 5 Door moves 6-8" (15-20 cm) stops or Manually open and close There is faulty. Make sure nothing is programmed with self-diagnostic capabilities. Check wiring connections at the logic board. Check for...a trained door systems complete stop. Inspect sensor wires for 1-2 seconds no movement. spring or door lock, correct as needed . Manually open and close the door. Manually open and close the door. Replace motor if necessary. 1 6 Door coasts after it has come to and the light bulbs ...
8160 Installation Manual
Page 40
Check travel module connections, replace travel (refer to -Close, garage door monitor or LiftMaster® Internet Gateway, see page 34. Realign both sensors to ensure both LEDs are misaligned or were momentarily obstructed. My remote control will move in ... door opener will still not activate the door check the diagnostic codes to ensure the garage door opener is not programming to travel module. SOLUTION Manually open : The garage door opener is not binding or sticking attempt to reprogram travel module if necessary. l If the remote control will not close the...
Check travel module connections, replace travel (refer to -Close, garage door monitor or LiftMaster® Internet Gateway, see page 34. Realign both sensors to ensure both LEDs are misaligned or were momentarily obstructed. My remote control will move in ... door opener will still not activate the door check the diagnostic codes to ensure the garage door opener is not programming to travel module. SOLUTION Manually open : The garage door opener is not binding or sticking attempt to reprogram travel module if necessary. l If the remote control will not close the...


