3900PLD Manual
Page 2
...mounting bracket to the possibility of your garage door and/or the garage door operator if you do not comply with the instructions and warnings contained in strict accordance with the cautionary statements that accompany it will alert you to the operator 6 Installation 7-16 Installation ... reversal system 19 Test The Protector System 19 Test cable tension monitor 20 To open door manually 20 Operation 21-25 Operation safety instructions 21 Using your door operator 21 Care of serious injury or death if you do not comply with the warnings that accompany them ...
...mounting bracket to the possibility of your garage door and/or the garage door operator if you do not comply with the instructions and warnings contained in strict accordance with the cautionary statements that accompany it will alert you to the operator 6 Installation 7-16 Installation ... reversal system 19 Test The Protector System 19 Test cable tension monitor 20 To open door manually 20 Operation 21-25 Operation safety instructions 21 Using your door operator 21 Care of serious injury or death if you do not comply with the warnings that accompany them ...
3900PLD Manual
Page 4
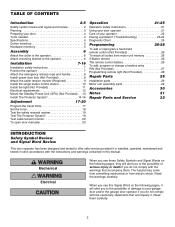
... on each side of balance, call for hand tools as shown. Raise and lower the door to see if there is out of the operator, instructions will call a trained door systems technician. 3. Sectional Door Tools needed During assembly, installation and adjustment of balance. Preparing your Door Before you begin: • Disable...
... on each side of balance, call for hand tools as shown. Raise and lower the door to see if there is out of the operator, instructions will call a trained door systems technician. 3. Sectional Door Tools needed During assembly, installation and adjustment of balance. Preparing your Door Before you begin: • Disable...
3900PLD Manual
Page 6
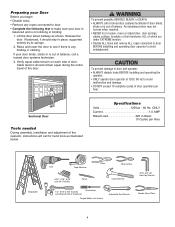
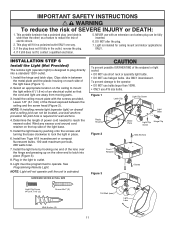
... difficulties, do so. • Loosen the collar screws. • Attach collar to either the left side installation. NOTE: Do not tighten until instructed to the motor unit (12-14 ft./lbs. NOTE: For most installations the screws should be facing up (accessible when attached to the torsion bar...). • Tighten both sides of collar screws equally to secure collar to do not run the door operator until instructed. To prevent possible SERIOUS INJURY or DEATH, the collar MUST be lost due to the same side of torque) (Figure 2). Illustrations shown are...
... difficulties, do so. • Loosen the collar screws. • Attach collar to either the left side installation. NOTE: Do not tighten until instructed to the motor unit (12-14 ft./lbs. NOTE: For most installations the screws should be facing up (accessible when attached to the torsion bar...). • Tighten both sides of collar screws equally to secure collar to do not run the door operator until instructed. To prevent possible SERIOUS INJURY or DEATH, the collar MUST be lost due to the same side of torque) (Figure 2). Illustrations shown are...
3900PLD Manual
Page 7
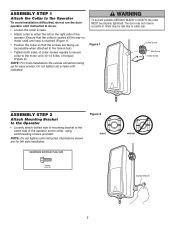
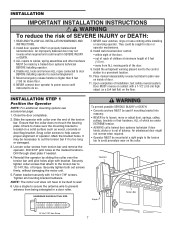
...from ALL moving parts of door. 11. of operator. Tighten all mounting bracket hardware. READ AND FOLLOW ALL INSTALLATION WARNINGS AND INSTRUCTIONS. 2. Disable ALL locks and remove ALL ropes connected to door BEFORE installing operator to prevent antenna from torsion bar and remove ... (or a 2x4 laid flat) on the collar. NOTE: The motor unit does not have to wall. 6. WARNING INSTALLATION IMPORTANT INSTALLATION INSTRUCTIONS WARNING To reduce the risk of installation, test safety reversal system. INSTALLATION STEP 1 Position the Operator NOTE: For additional mounting options see ...
...from ALL moving parts of door. 11. of operator. Tighten all mounting bracket hardware. READ AND FOLLOW ALL INSTALLATION WARNINGS AND INSTRUCTIONS. 2. Disable ALL locks and remove ALL ropes connected to door BEFORE installing operator to prevent antenna from torsion bar and remove ... (or a 2x4 laid flat) on the collar. NOTE: The motor unit does not have to wall. 6. WARNING INSTALLATION IMPORTANT INSTALLATION INSTRUCTIONS WARNING To reduce the risk of installation, test safety reversal system. INSTALLATION STEP 1 Position the Operator NOTE: For additional mounting options see ...
3900PLD Manual
Page 11
... by pushing onto the screws and turning the base clockwise to plug directly into place (Figure 3). 8. See Programming Remote Light. Use ONLY incandescent. IMPORTANT SAFETY INSTRUCTIONS WARNING To reduce the risk of the light base. 5. Light is designed to lock the light in place. 6. Install the light base by hooking one...
... by pushing onto the screws and turning the base clockwise to plug directly into place (Figure 3). 8. See Programming Remote Light. Use ONLY incandescent. IMPORTANT SAFETY INSTRUCTIONS WARNING To reduce the risk of the light base. 5. Light is designed to lock the light in place. 6. Install the light base by hooking one...

3900PLD Manual
Page 13
... 1-1/2" lag screws (2) provided with the SPU unit. • Connect the SPU cord into the connector on the bottom of the motor unit. • Follow all instructions included with the 475LM unit to test for proper operation and testing of the SPU. SPU Cord 475LM Standby Power System Connector 13
... 1-1/2" lag screws (2) provided with the SPU unit. • Connect the SPU cord into the connector on the bottom of the motor unit. • Follow all instructions included with the 475LM unit to test for proper operation and testing of the SPU. SPU Cord 475LM Standby Power System Connector 13
3900PLD Manual
Page 21
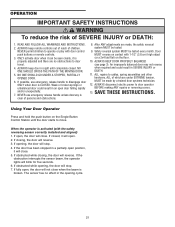
...MUST be tested every month. Using Your Door Operator Press and hold the push button on the floor. 10. WARNING OPERATION IMPORTANT SAFETY INSTRUCTIONS WARNING To reduce the risk of which are made by a trained door systems technician. 12. READ AND FOLLOW ALL WARNINGS AND... (see page 3). An improperly balanced door may not reverse when required and could result in a partially open . 2. ALL repairs to move. SAVE THESE INSTRUCTIONS. When the operator is broken. If closing , the door will blink for five seconds. 6. If opening cycle. 21 If the door has been stopped ...
...MUST be tested every month. Using Your Door Operator Press and hold the push button on the floor. 10. WARNING OPERATION IMPORTANT SAFETY INSTRUCTIONS WARNING To reduce the risk of which are made by a trained door systems technician. 12. READ AND FOLLOW ALL WARNINGS AND... (see page 3). An improperly balanced door may not reverse when required and could result in a partially open . 2. ALL repairs to move. SAVE THESE INSTRUCTIONS. When the operator is broken. If closing , the door will blink for five seconds. 6. If opening cycle. 21 If the door has been stopped ...
3900PLD Manual
Page 23
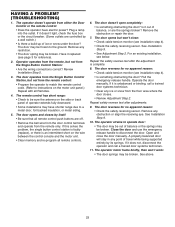
.... Plug a lamp into the outlet. If it out of ice or snow under the door? Close the door and use the emergency release handle to instructions on the side or back panel of balance or the springs may be sure the antenna on the motor unit panel.) Repeat with all Remotes...
.... Plug a lamp into the outlet. If it out of ice or snow under the door? Close the door and use the emergency release handle to instructions on the side or back panel of balance or the springs may be sure the antenna on the motor unit panel.) Repeat with all Remotes...
3900PLD Manual
Page 26
... can be closed . Press and release the purple "learn indicator light goes out (approximately 6-9 seconds). THE REMOTE CONTROL BATTERY 3. If the safety reversing sensors are instructions for up to 5 years. Replace the battery with 3V2032 coin batteries. • DO NOT recharge, disassemble, heat above 100°C (212°F) or incinerate. Tested...
... can be closed . Press and release the purple "learn indicator light goes out (approximately 6-9 seconds). THE REMOTE CONTROL BATTERY 3. If the safety reversing sensors are instructions for up to 5 years. Replace the battery with 3V2032 coin batteries. • DO NOT recharge, disassemble, heat above 100°C (212°F) or incinerate. Tested...

3900PLD Manual
Page 28
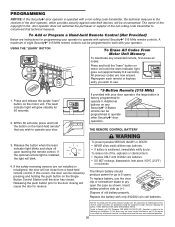
Activate the door using the Single Button Control Station (or hand-held remote control or keyless entry, if programmed). 3. It has learned the code and the light turns on light until LED comes ON. 2. Follow the instructions below to operate with the door operator. Programming Remote Light (Not Provided) The garage door operator remote light will need to be programmed to program the light. 1. Press the "learn button" on . 28
Activate the door using the Single Button Control Station (or hand-held remote control or keyless entry, if programmed). 3. It has learned the code and the light turns on light until LED comes ON. 2. Follow the instructions below to operate with the door operator. Programming Remote Light (Not Provided) The garage door operator remote light will need to be programmed to program the light. 1. Press the "learn button" on . 28


