3800 Manual
Page 2
... Test The Protector System 19 Test cable tension monitor 20 Test power door lock 20 To open door manually 20 Operation 21-25 Operation safety instructions 21 Using your garage door opener 21 Using the wall-mounted control console 22 Care of your garage WARNING door and/or the garage door opener if you do not comply with the warnings that accompany it...
... Test The Protector System 19 Test cable tension monitor 20 Test power door lock 20 To open door manually 20 Operation 21-25 Operation safety instructions 21 Using your garage door opener 21 Using the wall-mounted control console 22 Care of your garage WARNING door and/or the garage door opener if you do not comply with the warnings that accompany it...

3800 Manual
Page 3
... the torsion bar. - Opener can be greatly reduced. Must have minimum of 8" (20.3 cm) between floor Sensor and bottom of the conditions below . - Motor unit Cable Tension Monitor Power Door Lock Remote Light Torsion Spring Drum Wall-mounted Access Door Control Console Safety Reversing Sensor Safety Reversing Gap between the side garage wall (or obstruction) and the...
... the torsion bar. - Opener can be greatly reduced. Must have minimum of 8" (20.3 cm) between floor Sensor and bottom of the conditions below . - Motor unit Cable Tension Monitor Power Door Lock Remote Light Torsion Spring Drum Wall-mounted Access Door Control Console Safety Reversing Sensor Safety Reversing Gap between the side garage wall (or obstruction) and the...
3800 Manual
Page 7
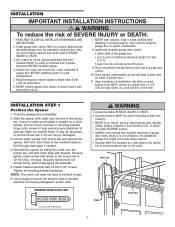
... under EXTREME tension. • ALWAYS call a trained door systems technician if garage door binds, sticks or is located on inside of balance. Install wall-mounted garage door control: • within sight of the garage door. • out of reach of children at minimum ...garage door BEFORE installing opener to 12-14 ft./lbs. NEVER connect garage door opener to power source until pilot holes align with 14-10x1-7/8" screws. Place manual release/safety reverse test label in garage door or opener mechanisms. 8. INSTALLATION STEP 1 Position the Opener 1. Slide the opener...
... under EXTREME tension. • ALWAYS call a trained door systems technician if garage door binds, sticks or is located on inside of balance. Install wall-mounted garage door control: • within sight of the garage door. • out of reach of children at minimum ...garage door BEFORE installing opener to 12-14 ft./lbs. NEVER connect garage door opener to power source until pilot holes align with 14-10x1-7/8" screws. Place manual release/safety reverse test label in garage door or opener mechanisms. 8. INSTALLATION STEP 1 Position the Opener 1. Slide the opener...
3800 Manual
Page 8
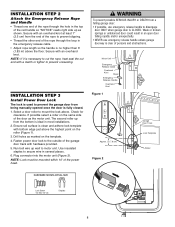
... so "NOTICE" reads right side up wall to prevent unraveling. NOTE: Lock must be mounted within 10' of the garage door track with a match or lighter to motor unit. Run bell wire up as shown. WARNING To prevent possible SERIOUS INJURY or DEATH from being manually opened once the door is CLOSED. Secure with bottom edge...
... so "NOTICE" reads right side up wall to prevent unraveling. NOTE: Lock must be mounted within 10' of the garage door track with a match or lighter to motor unit. Run bell wire up as shown. WARNING To prevent possible SERIOUS INJURY or DEATH from being manually opened once the door is CLOSED. Secure with bottom edge...
3800 Manual
Page 9
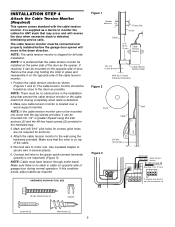
... should be mounted on the same side of door. NOTE: Cable must be connected and properly installed before the garage door opener will reverse the door when excessive slack is supplied as the opener. If this... condition exists, adjust cables as shown (Figures 1 and 2). HARDWARE SHOWN ACTUAL SIZE Figure 1 Opener Torsion Bar Drum Cable 2"-6" (5 cm15 cm) Cable Tension Monitor 1/8"-1/4" (3 mm-6 mm) Cable Tension Monitor Roller With Door Closed Preferred Orientation Figure 2 Wall...
... should be mounted on the same side of door. NOTE: Cable must be connected and properly installed before the garage door opener will reverse the door when excessive slack is supplied as the opener. If this... condition exists, adjust cables as shown (Figures 1 and 2). HARDWARE SHOWN ACTUAL SIZE Figure 1 Opener Torsion Bar Drum Cable 2"-6" (5 cm15 cm) Cable Tension Monitor 1/8"-1/4" (3 mm-6 mm) Cable Tension Monitor Roller With Door Closed Preferred Orientation Figure 2 Wall...
3800 Manual
Page 10
...on back of control console by inserting top tabs first and then snap cover in place. 3. (For standard installations ONLY) Run bell wire up wall and across ceiling to secure wire in new home construction), it may damage the LCD screen. Strip 7/16" (11 mm) of insulation from ...one 398LM can be mounted to use the anchors provided. Fasten with care to temperatures below -22°F (-30°C) may be seen clearly, is properly adjusted and there are desired to operate the same garage door opener, it can be connected to the close position until ...
...on back of control console by inserting top tabs first and then snap cover in place. 3. (For standard installations ONLY) Run bell wire up wall and across ceiling to secure wire in new home construction), it may damage the LCD screen. Strip 7/16" (11 mm) of insulation from ...one 398LM can be mounted to use the anchors provided. Fasten with care to temperatures below -22°F (-30°C) may be seen clearly, is properly adjusted and there are desired to operate the same garage door opener, it can be connected to the close position until ...

3800 Manual
Page 14
... the beam while the door is necessary to mount the units on the left or right of sectional garage doors without additional hardware. Extension brackets (see accessories) are designed to full open position, and the opener lights will stop and reverse to clip onto the track of the door as long as the wall framing. Either can be...
... the beam while the door is necessary to mount the units on the left or right of sectional garage doors without additional hardware. Extension brackets (see accessories) are designed to full open position, and the opener lights will stop and reverse to clip onto the track of the door as long as the wall framing. Either can be...
3800 Manual
Page 15
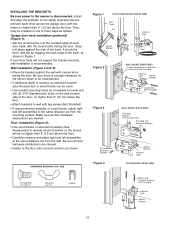
... the lenses will face each other across the garage door, with the beam no higher than 6" (15 cm) above the floor. Garage door track installation (preferred) (Figure 1): • Slip the curved arms over the rounded edge of each side of the door, no higher than 6" (15 cm) above...shown in one of the track. HARDWARE SHOWN ACTUAL SIZE Figure 1 DOOR TRACK MOUNT (RIGHT SIDE) Door Track Lip Indicator Light Sensor Bracket Lens Figure 2 IGWnasairldal ege WALL MOUNT (RIGHT SIDE) Fasten Wood Block to the opener is recommended. Install and align the brackets so the safety reversing ...
... the lenses will face each other across the garage door, with the beam no higher than 6" (15 cm) above the floor. Garage door track installation (preferred) (Figure 1): • Slip the curved arms over the rounded edge of each side of the door, no higher than 6" (15 cm) above...shown in one of the track. HARDWARE SHOWN ACTUAL SIZE Figure 1 DOOR TRACK MOUNT (RIGHT SIDE) Door Track Lip Indicator Light Sensor Bracket Lens Figure 2 IGWnasairldal ege WALL MOUNT (RIGHT SIDE) Fasten Wood Block to the opener is recommended. Install and align the brackets so the safety reversing ...
3800 Manual
Page 21
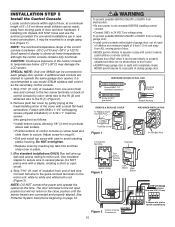
...; The wall-mounted Control Console: Hold the push bar down travel . 4. READ AND FOLLOW ALL WARNINGS AND INSTRUCTIONS. 2. ALWAYS keep garage door in SEVERE INJURY or DEATH. 11. ALWAYS keep remote controls out of reach of SEVERE INJURY or DEATH: 1. SAVE THESE INSTRUCTIONS. If closed . If the door has been stopped in an open door falling rapidly...
...; The wall-mounted Control Console: Hold the push bar down travel . 4. READ AND FOLLOW ALL WARNINGS AND INSTRUCTIONS. 2. ALWAYS keep garage door in SEVERE INJURY or DEATH. 11. ALWAYS keep remote controls out of reach of SEVERE INJURY or DEATH: 1. SAVE THESE INSTRUCTIONS. If closed . If the door has been stopped in an open door falling rapidly...
3800 Manual
Page 22
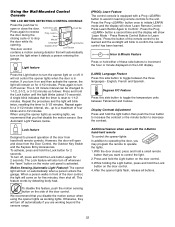
...). We recommend that you want to initiate LEARN mode and the display will come on the light when it detects a person entering the garage. Press the Prog button once to control the light. 2. Press the button of the remote control to be changed to the unit. ... Control Button to 2-1/2 minutes. Using the Wall-Mounted Control Console THE LCD MOTION DETECTING CONTROL CONSOLE Press the push bar to stop the door while it's opening. Press again to reverse the door during the closing cycle or to open and close the door. This door control Automatic Light On/Off Prog Hour Minute...
...). We recommend that you want to initiate LEARN mode and the display will come on the light when it detects a person entering the garage. Press the Prog button once to control the light. 2. Press the button of the remote control to be changed to the unit. ... Control Button to 2-1/2 minutes. Using the Wall-Mounted Control Console THE LCD MOTION DETECTING CONTROL CONSOLE Press the push bar to stop the door while it's opening. Press again to reverse the door during the closing cycle or to open and close the door. This door control Automatic Light On/Off Prog Hour Minute...


