3800 Manual
Page 1
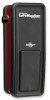
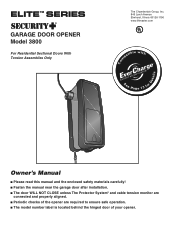
® GARAGE DOOR OPENER Model 3800 For Residential Sectional Doors With Torsion Assemblies Only Com Details The Chamberlain Group, Inc. 845 Larch Avenue Elmhurst, Illinois 60126-1196 www.liftmaster.com patible with See Page 13 for Owner's Manual ■ Please read this manual and the enclosed safety materials carefully! ■ Fasten the manual near the garage door after installation...
® GARAGE DOOR OPENER Model 3800 For Residential Sectional Doors With Torsion Assemblies Only Com Details The Chamberlain Group, Inc. 845 Larch Avenue Elmhurst, Illinois 60126-1196 www.liftmaster.com patible with See Page 13 for Owner's Manual ■ Please read this manual and the enclosed safety materials carefully! ■ Fasten the manual near the garage door after installation...
3800 Manual
Page 2
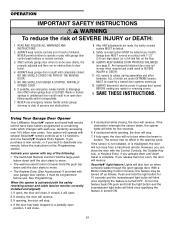
...19 Test cable tension monitor 20 Test power door lock 20 To open door manually 20 Operation 21-25 Operation safety instructions 21 Using your garage door opener 21 Using the wall-mounted control console 22 Care of your garage WARNING door and/or the garage door opener if you do not comply with the ... unit assembly parts 30 Accessories 31 Repair Parts and Service 32 Warranty 32 INTRODUCTION Safety Symbol Review and Signal Word Review This garage door opener has been designed and tested to the possibility of serious injury or death if you to offer safe service provided it . ...
...19 Test cable tension monitor 20 Test power door lock 20 To open door manually 20 Operation 21-25 Operation safety instructions 21 Using your garage door opener 21 Using the wall-mounted control console 22 Care of your garage WARNING door and/or the garage door opener if you do not comply with the ... unit assembly parts 30 Accessories 31 Repair Parts and Service 32 Warranty 32 INTRODUCTION Safety Symbol Review and Signal Word Review This garage door opener has been designed and tested to the possibility of serious injury or death if you to offer safe service provided it . ...
3800 Manual
Page 4
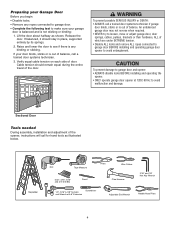
..., it should remain equal during the entire travel of balance. CAUTION To prevent damage to garage door and opener: • ALWAYS disable locks BEFORE installing and operating the opener. • ONLY operate garage door opener at 120V, 60 Hz to avoid entanglement. Preparing your Garage Door Before you begin: • Disable locks. • Remove any binding or sticking. Sectional...
..., it should remain equal during the entire travel of balance. CAUTION To prevent damage to garage door and opener: • ALWAYS disable locks BEFORE installing and operating the opener. • ONLY operate garage door opener at 120V, 60 Hz to avoid entanglement. Preparing your Garage Door Before you begin: • Disable locks. • Remove any binding or sticking. Sectional...
3800 Manual
Page 5
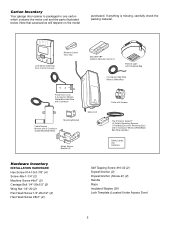
... Clip SECURITY✚® 3-Button Remote Control (1) Remote Light with Hardware Bag 2-Conductor Bell Wire White & White/Red Power Door Lock 2-Conductor White & White/Black Bell Wire with Connector Cable Tension Monitor with 2-Conductor Green/White Bell Wires Mounting Bracket Motor... Screw #10-32 (2) Drywall Anchor (2) Drywall Anchor (Screw-In) (2) Handle Rope Insulated Staples (30) Lock Template (Located Under Access Door) 5 Note that accessories will depend on the model purchased. Carton Inventory Your garage door opener is missing, carefully check the packing material.
... Clip SECURITY✚® 3-Button Remote Control (1) Remote Light with Hardware Bag 2-Conductor Bell Wire White & White/Red Power Door Lock 2-Conductor White & White/Black Bell Wire with Connector Cable Tension Monitor with 2-Conductor Green/White Bell Wires Mounting Bracket Motor... Screw #10-32 (2) Drywall Anchor (2) Drywall Anchor (Screw-In) (2) Handle Rope Insulated Staples (30) Lock Template (Located Under Access Door) 5 Note that accessories will depend on the model purchased. Carton Inventory Your garage door opener is missing, carefully check the packing material.
3800 Manual
Page 6
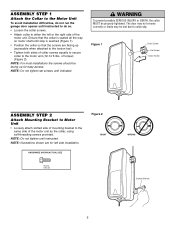
...Do not tighten set screws until instructed. ASSEMBLY STEP 1 Attach the Collar to the Motor Unit To avoid installation difficulties, do not run the garage door opener until stop is seated all the way on motor shaft until instructed to do so. • Loosen the collar screws. • Attach ...). • Tighten both sides of the motor unit. HARDWARE SHOWN ACTUAL SIZE Figure 2 RIGHT Screw #10-32 WRONG Socket Wrench 6 The door may not reverse correctly or limits may be properly tightened. NOTE: For most installations the screws should be facing up (accessible when attached to...
...Do not tighten set screws until instructed. ASSEMBLY STEP 1 Attach the Collar to the Motor Unit To avoid installation difficulties, do not run the garage door opener until stop is seated all the way on motor shaft until instructed to do so. • Loosen the collar screws. • Attach ...). • Tighten both sides of the motor unit. HARDWARE SHOWN ACTUAL SIZE Figure 2 RIGHT Screw #10-32 WRONG Socket Wrench 6 The door may not reverse correctly or limits may be properly tightened. NOTE: For most installations the screws should be facing up (accessible when attached to...
3800 Manual
Page 7
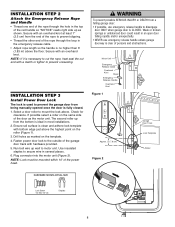
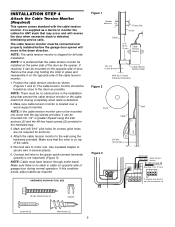
...opener. NEVER connect garage door opener to help assure proper alignment of installation, test safety reversal system. Install wall-mounted garage door control: • within sight of the garage door. • out of reach of children at minimum height of garage door. 11. Place manual release/safety reverse test label in garage door or opener...have to be caught in plain view on properly balanced and lubricated garage door. Motor unit Staple Torsion Bar 7 INSTALLATION STEP 1 Position the Opener 1. Slide the opener with bracket. It may not reverse when required and could be ...
...opener. NEVER connect garage door opener to help assure proper alignment of installation, test safety reversal system. Install wall-mounted garage door control: • within sight of the garage door. • out of reach of children at minimum height of garage door. 11. Place manual release/safety reverse test label in garage door or opener...have to be caught in plain view on properly balanced and lubricated garage door. Motor unit Staple Torsion Bar 7 INSTALLATION STEP 1 Position the Opener 1. Slide the opener with bracket. It may not reverse when required and could be ...
3800 Manual
Page 8
... The lock is fully closed. 1. The second roller up from being manually opened once the door is used to mount the lock above the floor. Select a door roller to prevent the garage door from the bottom is clean and adhere lock template with hardware provided. 5. Check for clearance. Drill holes as marked on the same...
... The lock is fully closed. 1. The second roller up from being manually opened once the door is used to mount the lock above the floor. Select a door roller to prevent the garage door from the bottom is clean and adhere lock template with hardware provided. 5. Check for clearance. Drill holes as marked on the same...
3800 Manual
Page 9
...that the roller is no obstructions in place and reassemble it can be connected and properly installed before the garage door opener will reverse the door when excessive slack is supplied as the opener. Connect bell wire to the wall using the wall anchors (2) and the #8 hex head screws (2) ...provided in cable on top of garage door during normal operation. If this condition exists, adjust cables as shown (Figures 1 and 2). The cable tension ...
...that the roller is no obstructions in place and reassemble it can be connected and properly installed before the garage door opener will reverse the door when excessive slack is supplied as the opener. Connect bell wire to the wall using the wall anchors (2) and the #8 hex head screws (2) ...provided in cable on top of garage door during normal operation. If this condition exists, adjust cables as shown (Figures 1 and 2). The cable tension ...
3800 Manual
Page 10
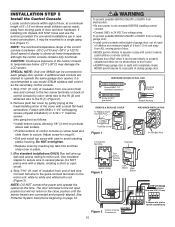
If additional wall controls are desired to operate the same garage door opener, it is not connected BEFORE installing control console. • Connect ONLY to 24 VOLT low voltage wires. Do NOT overtighten. • Replace cover by color: ... height of 5 feet (1.5 m) and away from ALL moving parts of the control console to temperatures below -22°F (-30°C) may be connected to each garage door opener. Strip 7/16" (11 mm) of insulation from end of the cover with control console push buttons or remote controls. • Activate...
If additional wall controls are desired to operate the same garage door opener, it is not connected BEFORE installing control console. • Connect ONLY to 24 VOLT low voltage wires. Do NOT overtighten. • Replace cover by color: ... height of 5 feet (1.5 m) and away from ALL moving parts of the control console to temperatures below -22°F (-30°C) may be connected to each garage door opener. Strip 7/16" (11 mm) of insulation from end of the cover with control console push buttons or remote controls. • Activate...
3800 Manual
Page 12
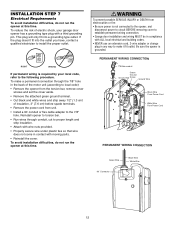
...any way to install the proper outlet. To make it fit outlet. Be sure the opener is required by your garage door opener has a grounding type plug with moving parts. • Reinstall the cover. Reinstall opener to torsion bar. • Run wires through the 7/8" hole in the back of ...the motor unit (according to local code): • Remove the opener from WARNING electrocution or fire: &#...
...any way to install the proper outlet. To make it fit outlet. Be sure the opener is required by your garage door opener has a grounding type plug with moving parts. • Reinstall the cover. Reinstall opener to torsion bar. • Run wires through the 7/8" hole in the back of ...the motor unit (according to local code): • Remove the opener from WARNING electrocution or fire: &#...

3800 Manual
Page 14
... safety reversing sensor. Either can be installed on the wall, the brackets must be installed inside the garage 14 Safety Reversing Sensor 6" (15 cm) max. Extension brackets (see accessories) are designed to the garage door opener CAUTION BEFORE installing the safety reversing sensor. above floor This is not connected to clip onto the track...
... safety reversing sensor. Either can be installed on the wall, the brackets must be installed inside the garage 14 Safety Reversing Sensor 6" (15 cm) max. Extension brackets (see accessories) are designed to the garage door opener CAUTION BEFORE installing the safety reversing sensor. above floor This is not connected to clip onto the track...
3800 Manual
Page 19
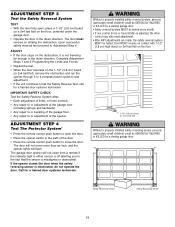
... reverse on the 1-1/2" (3.8 cm) board (or 2x4 laid flat), remove the obstruction and run the opener through 3 or 4 complete travel limits) is not traveling far enough in the path of the opener. The garage door opener will flash. Safety Reversing Sensor Safety Reversing Sensor 19 Complete Adjustment Steps 1 and 2 Programming the Limits and Forces. •...
... reverse on the 1-1/2" (3.8 cm) board (or 2x4 laid flat), remove the obstruction and run the opener through 3 or 4 complete travel limits) is not traveling far enough in the path of the opener. The garage door opener will flash. Safety Reversing Sensor Safety Reversing Sensor 19 Complete Adjustment Steps 1 and 2 Programming the Limits and Forces. •...
3800 Manual
Page 21
... AND INSTRUCTIONS. 2. After ANY adjustments are made by a trained door systems technician. 12. Using Your Garage Door Opener Your LiftMaster Security✚® opener and hand-held remote control have been factory programmed to 12 functions, and one Security✚® Keyless Entry System. Activate your garage door opener, it is properly adjusted and there are under EXTREME tension...
... AND INSTRUCTIONS. 2. After ANY adjustments are made by a trained door systems technician. 12. Using Your Garage Door Opener Your LiftMaster Security✚® opener and hand-held remote control have been factory programmed to 12 functions, and one Security✚® Keyless Entry System. Activate your garage door opener, it is properly adjusted and there are under EXTREME tension...
3800 Manual
Page 24
...garage door opens and closes by its springs. See Installation Step 9. • If the opener lights don't blink and it is excessive the collar will stay in operation: • Some minor movement is complete. 8. The door reverses for no apparent reason and opener lights don't blink: • Check cable tension monitor. • Is something obstructing the door... operator moves when the door is connected, the opener should be opened and closed manually. Power lock makes noise when operating. • Call Liftmaster® dealer for no apparent reason and opener lights blink for 5 ...
...garage door opens and closes by its springs. See Installation Step 9. • If the opener lights don't blink and it is excessive the collar will stay in operation: • Some minor movement is complete. 8. The door reverses for no apparent reason and opener lights don't blink: • Check cable tension monitor. • Is something obstructing the door... operator moves when the door is connected, the opener should be opened and closed manually. Power lock makes noise when operating. • Call Liftmaster® dealer for no apparent reason and opener lights blink for 5 ...
3800 Manual
Page 25
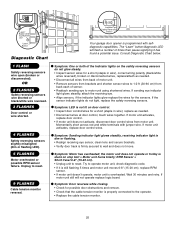
... motor unit still will flash a number of sensor. • Reattach sending eye to reset. Consult Diagnostic Chart below. Symptom: Door reverses while closing. • Check for a short (staple in wire), correct wiring polarity (black/white wires reversed), broken or...Learn" Button LED or Diagnostic LED "Learn" Button Diagnostic Chart 1 FLASH Safety reversing sensors wire open (broken or disconnected). Installed Safety Reversing Sensor Your garage door opener is overheated. Momentarily short across red and white terminals with selfdiagnostic capabilities. If motor unit activates, ...
... motor unit still will flash a number of sensor. • Reattach sending eye to reset. Consult Diagnostic Chart below. Symptom: Door reverses while closing. • Check for a short (staple in wire), correct wiring polarity (black/white wires reversed), broken or...Learn" Button LED or Diagnostic LED "Learn" Button Diagnostic Chart 1 FLASH Safety reversing sensors wire open (broken or disconnected). Installed Safety Reversing Sensor Your garage door opener is overheated. Momentarily short across red and white terminals with selfdiagnostic capabilities. If motor unit activates, ...
3800 Manual
Page 26
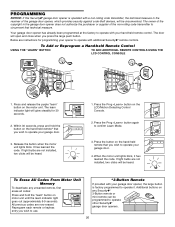
...Release the button when the motor unit lights blink. Press the Prog button again to operate your garage door opener, the large button is operated with your garage door. 3. LOCK LIGHT LOCK LIGHT To Erase All Codes From Motor Unit Memory To deactivate any Security... transmitter, the technical measure in the garage door opener does not authorize the purchaser or supplier of the garage door opener, which provides security against code-theft devices, will be heard. PROGRAMMING NOTICE: If this Security✚® garage door opener is factory programmed to operate it has...
...Release the button when the motor unit lights blink. Press the Prog button again to operate your garage door opener, the large button is operated with your garage door. 3. LOCK LIGHT LOCK LIGHT To Erase All Codes From Motor Unit Memory To deactivate any Security... transmitter, the technical measure in the garage door opener does not authorize the purchaser or supplier of the garage door opener, which provides security against code-theft devices, will be heard. PROGRAMMING NOTICE: If this Security✚® garage door opener is factory programmed to operate it has...
3800 Manual
Page 27
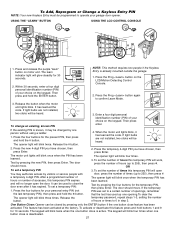
...the temporary PIN, then press Enter. To set the number of times this temporary PIN will no longer open door, press the number of accesses, this temporary PIN expires and will open the door. The keypad will blink twice when the one button close is known, it has expired. The learn "... heard. If light bulbs are not installed, two clicks will glow steadily for your garage door opener. To activate or deactivate this temporary PIN will blink once when the temporary PIN has been learned. The opener light will blink three times. Press the four buttons for the present PIN, then...
...the temporary PIN, then press Enter. To set the number of times this temporary PIN will no longer open door, press the number of accesses, this temporary PIN expires and will open the door. The keypad will blink twice when the one button close is known, it has expired. The learn "... heard. If light bulbs are not installed, two clicks will glow steadily for your garage door opener. To activate or deactivate this temporary PIN will blink once when the temporary PIN has been learned. The opener light will blink three times. Press the four buttons for the present PIN, then...
3800 Manual
Page 28
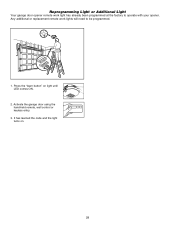
It has learned the code and the light turns on light until LED comes ON. 2. Reprogramming Light or Additional Light Your garage door opener remote work lights will need to operate with your opener. Activate the garage door using the hand-held remote, wall control or keyless entry. 3. Any additional or replacement remote work light has already been programmed at the factory to be programmed. 1. Press the "learn button" on . 28
It has learned the code and the light turns on light until LED comes ON. 2. Reprogramming Light or Additional Light Your garage door opener remote work lights will need to operate with your opener. Activate the garage door using the hand-held remote, wall control or keyless entry. 3. Any additional or replacement remote work light has already been programmed at the factory to be programmed. 1. Press the "learn button" on . 28
3800 Manual
Page 31
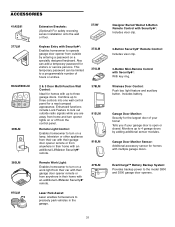
... precisely park vehicles in their home with an additional LiftMaster Security✚® remote. 475LM EverCharge™ Battery Backup System: Provides backup power to the model 3800 and 3500 garage door openers. Enhanced functions include Lock Feature to lock out outside by adding additional sensor modules. 916LM Garage Door Monitor Sensor: Additional accessory sensor for visitors or...
... precisely park vehicles in their home with an additional LiftMaster Security✚® remote. 475LM EverCharge™ Battery Backup System: Provides backup power to the model 3800 and 3500 garage door openers. Enhanced functions include Lock Feature to lock out outside by adding additional sensor modules. 916LM Garage Door Monitor Sensor: Additional accessory sensor for visitors or...
3800 Manual
Page 32
...you . Technical Support Group 6020 S. Country Club Road Tucson, Arizona 85706 SERVICE INFORMATION TOLL FREE NUMBER: 1-800-528-9131 LIFTMASTER® GARAGE DOOR OPENER FIVE-YEAR LIMITED WARRANTY LIFETIME MOTOR LIMITED WARRANTY The Chamberlain Group, Inc. ("Seller") warrants to you will be defective and covered... SELLER BE LIABLE FOR CONSEQUENTIAL, INCIDENTAL OR SPECIAL DAMAGES ARISING IN CONNECTION WITH USE, OR INABILITY TO USE, THIS PRODUCT. LIFTMASTER® SERVICE IS ON CALL OUR LARGE SERVICE ORGANIZATION SPANS AMERICA INSTALLATION AND SERVICE INFORMATION IS AS NEAR AS YOUR TELEPHONE....
...you . Technical Support Group 6020 S. Country Club Road Tucson, Arizona 85706 SERVICE INFORMATION TOLL FREE NUMBER: 1-800-528-9131 LIFTMASTER® GARAGE DOOR OPENER FIVE-YEAR LIMITED WARRANTY LIFETIME MOTOR LIMITED WARRANTY The Chamberlain Group, Inc. ("Seller") warrants to you will be defective and covered... SELLER BE LIABLE FOR CONSEQUENTIAL, INCIDENTAL OR SPECIAL DAMAGES ARISING IN CONNECTION WITH USE, OR INABILITY TO USE, THIS PRODUCT. LIFTMASTER® SERVICE IS ON CALL OUR LARGE SERVICE ORGANIZATION SPANS AMERICA INSTALLATION AND SERVICE INFORMATION IS AS NEAR AS YOUR TELEPHONE....


