3800 Manual
Page 2
...or additional work light . . . . . .28 Repair Parts 29-30 Installation parts 29 Motor unit assembly parts 30 Accessories 31 Repair Parts and Service 32 Warranty 32 INTRODUCTION Safety Symbol Review and Signal Word Review This garage door opener has been ...Planning 3 Preparing your garage door 4 Tools 4 Carton inventory 5 Hardware inventory 5 Assembly 6 Attach the collar to the motor unit 6 Attach mounting bracket to the motor unit 6 Installation 7-16 Installation safety instructions 7 Position the opener 7 Attach the emergency release rope and handle 8 Install the ...
...or additional work light . . . . . .28 Repair Parts 29-30 Installation parts 29 Motor unit assembly parts 30 Accessories 31 Repair Parts and Service 32 Warranty 32 INTRODUCTION Safety Symbol Review and Signal Word Review This garage door opener has been ...Planning 3 Preparing your garage door 4 Tools 4 Carton inventory 5 Hardware inventory 5 Assembly 6 Attach the collar to the motor unit 6 Attach mounting bracket to the motor unit 6 Installation 7-16 Installation safety instructions 7 Position the opener 7 Attach the emergency release rope and handle 8 Install the ...
3800 Manual
Page 5
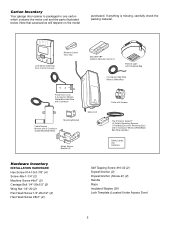
If anything is packaged in one carton which contains the motor unit and the parts illustrated below. Note that accessories will depend on the model purchased. LOCK LIGHT LCD Motion Detecting Door Control Console Remote Control Visor Clip SECURITY&#...White/Red Power Door Lock 2-Conductor White & White/Black Bell Wire with Connector Cable Tension Monitor with 2-Conductor Green/White Bell Wires Mounting Bracket Motor Unit Safety Sensor Bracket (2) Collar with Screws The Protector System® (2) Safety Reversing Sensors (1 Sending Eye and 1 Receiving Eye) with 2-Conductor White &...
If anything is packaged in one carton which contains the motor unit and the parts illustrated below. Note that accessories will depend on the model purchased. LOCK LIGHT LCD Motion Detecting Door Control Console Remote Control Visor Clip SECURITY&#...White/Red Power Door Lock 2-Conductor White & White/Black Bell Wire with Connector Cable Tension Monitor with 2-Conductor Green/White Bell Wires Mounting Bracket Motor Unit Safety Sensor Bracket (2) Collar with Screws The Protector System® (2) Safety Reversing Sensors (1 Sending Eye and 1 Receiving Eye) with 2-Conductor White &...

3800 Manual
Page 14
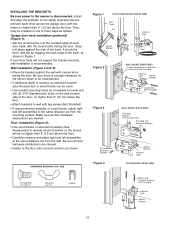
... connect and align the safety reversing sensor. Either can be installed on the wall, the brackets must be installed inside the garage 14 Safety Reversing Sensor 6" (15 cm) max. The mounting brackets are available if needed. This required safety device MUST NOT be disabled. • Install the...sun never shines directly into the receiving eye lens. No part of sectional garage doors without additional hardware. above floor Extension brackets (see accessories) are designed to the receiving eye (with an amber indicator light) transmits an invisible light beam to clip onto the ...
... connect and align the safety reversing sensor. Either can be installed on the wall, the brackets must be installed inside the garage 14 Safety Reversing Sensor 6" (15 cm) max. The mounting brackets are available if needed. This required safety device MUST NOT be disabled. • Install the...sun never shines directly into the receiving eye lens. No part of sectional garage doors without additional hardware. above floor Extension brackets (see accessories) are designed to the receiving eye (with an amber indicator light) transmits an invisible light beam to clip onto the ...
3800 Manual
Page 15
...for the sensor beam to be unobstructed. • If additional depth is needed, an extension bracket (See Accessories) or wood blocks can be used. • Use bracket mounting holes as shown in one of the door, no higher than 6" (15 cm) above...Lag Screws (Not Provided) Indicator Light Sensor Bracket Lag Screws (Not Provided) Lens Figure 3 IGWnasairldal ege WALL MOUNT (RIGHT SIDE) Extension Bracket (See Accessories) (Provided with Extension Bracket) (Provided with Extension Bracket) Figure 4 Lens Sensor Bracket Indicator Light FLOOR MOUNT (RIGHT SIDE) Carriage Bolt 1/4"-20x1/2" ...
...for the sensor beam to be unobstructed. • If additional depth is needed, an extension bracket (See Accessories) or wood blocks can be used. • Use bracket mounting holes as shown in one of the door, no higher than 6" (15 cm) above...Lag Screws (Not Provided) Indicator Light Sensor Bracket Lag Screws (Not Provided) Lens Figure 3 IGWnasairldal ege WALL MOUNT (RIGHT SIDE) Extension Bracket (See Accessories) (Provided with Extension Bracket) (Provided with Extension Bracket) Figure 4 Lens Sensor Bracket Indicator Light FLOOR MOUNT (RIGHT SIDE) Carriage Bolt 1/4"-20x1/2" ...


