3585 Elite Series Manual
Page 2
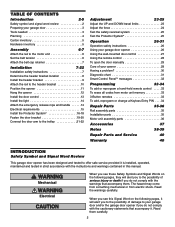
... 5 Assembly 6-7 Attach the rail to the motor unit 6 Set the belt tension 6 Attach the belt cap retainer 7 Installation 7-22 Installation safety instructions 7 Determine the header bracket location 8 Install the header bracket 9 Attach the rail to the header bracket 10 Position the opener 11 Hang the opener...limits 23 Adjust the force 24 Test the safety reversal system 25 Test the Protector System 25 Operation 26-31 Operation safety instructions 26 Using your garage door opener 26 Using the wall-mounted door control 27 Using the remote control 28 To open ...
... 5 Assembly 6-7 Attach the rail to the motor unit 6 Set the belt tension 6 Attach the belt cap retainer 7 Installation 7-22 Installation safety instructions 7 Determine the header bracket location 8 Install the header bracket 9 Attach the rail to the header bracket 10 Position the opener 11 Hang the opener...limits 23 Adjust the force 24 Test the safety reversal system 25 Test the Protector System 25 Operation 26-31 Operation safety instructions 26 Using your garage door opener 26 Using the wall-mounted door control 27 Using the remote control 28 To open ...

3585 Elite Series Manual
Page 3
... reverse when required. • NEVER try to loosen, move or adjust garage door, door springs, cables, pulleys, brackets or their hardware, all of the opener, instructions will call a trained door systems technician if garage door binds, sticks, or is any ropes connected to garage door. • Complete the following test to...
... reverse when required. • NEVER try to loosen, move or adjust garage door, door springs, cables, pulleys, brackets or their hardware, all of the opener, instructions will call a trained door systems technician if garage door binds, sticks, or is any ropes connected to garage door. • Complete the following test to...
3585 Elite Series Manual
Page 6
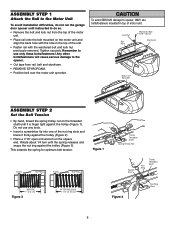
...the bolt mounted on the square end. Rotate about 1/4 turn until it firmly against the trolley (Figure 3). The Chamberlain Group, Inc. Liftmaster Synchro Drive • Cut tape from the top of motor unit. ASSEMBLY STEP 1 Attach the Rail to the Motor Unit To avoid installation... difficulties, do not run the garage door opener until instructed to do so. • Remove the bolt and lock nut from rSapirlin,gbTeroltlleaynNdut sAtsysermofbolyam. 3/5/92 - 5/16 /92 - 5/21/92 - ...
...the bolt mounted on the square end. Rotate about 1/4 turn until it firmly against the trolley (Figure 3). The Chamberlain Group, Inc. Liftmaster Synchro Drive • Cut tape from the top of motor unit. ASSEMBLY STEP 1 Attach the Rail to the Motor Unit To avoid installation... difficulties, do not run the garage door opener until instructed to do so. • Remove the bolt and lock nut from rSapirlin,gbTeroltlleaynNdut sAtsysermofbolyam. 3/5/92 - 5/16 /92 - 5/21/92 - ...
3585 Elite Series Manual
Page 7
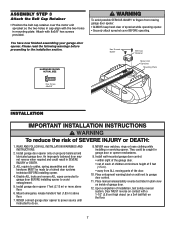
...floor. 6. Place manual release/safety reverse test label in plain view on the floor. 7. NEVER connect garage door opener to power source until instructed to cables, spring assemblies and other (1.5 m). They could result in SEVERE INJURY or DEATH. • within sight of the garage door....door. 12. Hex Screws 8x3/8" Belt Cap Retainer Motor Unit Sprocket Mounting Plate Hex Screw #8x3/8" INSTALLATION WARNING IMPORTANT INSTALLATION INSTRUCTIONS WARNING To reduce the risk of installation, test safety reversal system. Disable ALL locks and remove ALL ropes connected to garage ...
...floor. 6. Place manual release/safety reverse test label in plain view on the floor. 7. NEVER connect garage door opener to power source until instructed to cables, spring assemblies and other (1.5 m). They could result in SEVERE INJURY or DEATH. • within sight of the garage door....door. 12. Hex Screws 8x3/8" Belt Cap Retainer Motor Unit Sprocket Mounting Plate Hex Screw #8x3/8" INSTALLATION WARNING IMPORTANT INSTALLATION INSTRUCTIONS WARNING To reduce the risk of installation, test safety reversal system. Disable ALL locks and remove ALL ropes connected to garage ...
3585 Elite Series Manual
Page 8
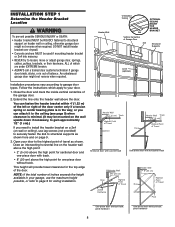
... bracket over drywall. • Concrete anchors MUST be used if mounting header bracket or 2x4 into masonry. • NEVER try to your door. 1. Follow the instructions which apply to loosen, move or adjust garage door, springs, cables, pulleys, brackets, or their hardware, ALL of which are under EXTREME tension. • ALWAYS...
... bracket over drywall. • Concrete anchors MUST be used if mounting header bracket or 2x4 into masonry. • NEVER try to your door. 1. Follow the instructions which apply to loosen, move or adjust garage door, springs, cables, pulleys, brackets, or their hardware, ALL of which are under EXTREME tension. • ALWAYS...
3585 Elite Series Manual
Page 9
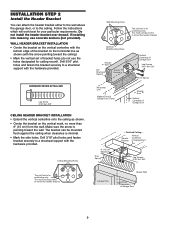
... securely to a structural support with the hardware provided. Wall Mounting Holes CEILING MOUNT ONLY UP The nail hole is for your particular requirements. Follow the instructions which will work best for positioning only. Drill 3/16" pilot holes and fasten the bracket securely to a structural support with the hardware provided. You must...
... securely to a structural support with the hardware provided. Wall Mounting Holes CEILING MOUNT ONLY UP The nail hole is for your particular requirements. Follow the instructions which will work best for positioning only. Drill 3/16" pilot holes and fasten the bracket securely to a structural support with the hardware provided. You must...
3585 Elite Series Manual
Page 11
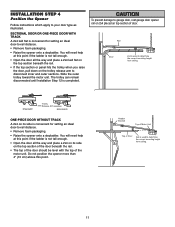
.... SECTIONAL DOOR OR ONE-PIECE DOOR WITH TRACK A 2x4 laid flat is used to your door type as illustrated. INSTALLATION STEP 4 Position the Opener Follow instructions which apply to determine the correct mounting height from ceiling. 11
.... SECTIONAL DOOR OR ONE-PIECE DOOR WITH TRACK A 2x4 laid flat is used to your door type as illustrated. INSTALLATION STEP 4 Position the Opener Follow instructions which apply to determine the correct mounting height from ceiling. 11
3585 Elite Series Manual
Page 19
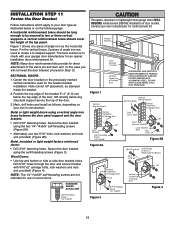
...; Alternately, use on the following page. NOTE: Many door reinforcement kits provide for the header bracket installation. INSTALLATION STEP 11 Fasten the Door Bracket Follow instructions which apply to two or three vertical supports. Secure the door bracket using the self-threading screws (Figure 3). Drill 5/16" holes through the door and...
...; Alternately, use on the following page. NOTE: Many door reinforcement kits provide for the header bracket installation. INSTALLATION STEP 11 Fasten the Door Bracket Follow instructions which apply to two or three vertical supports. Secure the door bracket using the self-threading screws (Figure 3). Drill 5/16" holes through the door and...

3585 Elite Series Manual
Page 20
... Door Optional Placement METAL DOOR Lock Washer 5/16" Top of Door (Inside Garage) Top Edge of the door, in line with the warnings and reinforcement instructions on the top of Door Optional Placement Carriage Bolt 5/16"x2" (Not Provided) WOOD DOOR 20 They apply to fasten door bracket.
... Door Optional Placement METAL DOOR Lock Washer 5/16" Top of Door (Inside Garage) Top Edge of the door, in line with the warnings and reinforcement instructions on the top of Door Optional Placement Carriage Bolt 5/16"x2" (Not Provided) WOOD DOOR 20 They apply to fasten door bracket.

3585 Elite Series Manual
Page 21
INSTALLATION STEP 12 Connect Door Arm to Trolley Follow instructions which apply to your door type as shown in Figures 1, 2 and 3. Reconnect to trolley with bolts, lock washers and nuts. Trolley will re-engage automatically ...
INSTALLATION STEP 12 Connect Door Arm to Trolley Follow instructions which apply to your door type as shown in Figures 1, 2 and 3. Reconnect to trolley with bolts, lock washers and nuts. Trolley will re-engage automatically ...
3585 Elite Series Manual
Page 26
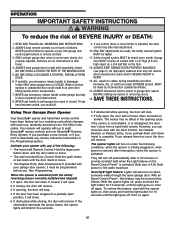
... light when the Light feature on , then off , press and hold the light button for five seconds. 6. WARNING OPERATION IMPORTANT SAFETY INSTRUCTIONS WARNING To reduce the risk of children. Garage door MUST reverse on contact with any of persons and obstructions. 8. See Programming. If...; remote controls and one control (force or travel . 4. NEVER permit children to garage door opener BEFORE making any remote, follow the instructions in a partially open door falling rapidly and/or unexpectedly. 7. ALWAYS KEEP GARAGE DOOR PROPERLY BALANCED (see page 3). If opening cycle. ...
... light when the Light feature on , then off , press and hold the light button for five seconds. 6. WARNING OPERATION IMPORTANT SAFETY INSTRUCTIONS WARNING To reduce the risk of children. Garage door MUST reverse on contact with any of persons and obstructions. 8. See Programming. If...; remote controls and one control (force or travel . 4. NEVER permit children to garage door opener BEFORE making any remote, follow the instructions in a partially open door falling rapidly and/or unexpectedly. 7. ALWAYS KEEP GARAGE DOOR PROPERLY BALANCED (see page 3). If opening cycle. ...

3585 Elite Series Manual
Page 29
... or broken springs or unbalanced door could fall. To disengage the lockout feature, pull the handle straight down and back (toward the opener). Follow the instructions carefully. To reconnect the door to the limit and force adjustments. If it is unbalanced or binding, call a trained door systems technician. • Check to...
... or broken springs or unbalanced door could fall. To disengage the lockout feature, pull the handle straight down and back (toward the opener). Follow the instructions carefully. To reconnect the door to the limit and force adjustments. If it is unbalanced or binding, call a trained door systems technician. • Check to...

3585 Elite Series Manual
Page 30
... it is normal. Weather conditions in the down travel limits. My door will not close and the light bulbs blink on the following the programming instructions. Refer to Adjustment Step 2, Adjust the Force. 4. Refer to Diagnostic Chart on my motor unit: The safety reversing sensor must be connected and aligned correctly... by turning down limit adjustment screw clockwise. 6. If the trolley re-engages with a security light feature. This feature activates the light on the following the instructions for flashes on motor unit then refer to Operation section;
... it is normal. Weather conditions in the down travel limits. My door will not close and the light bulbs blink on the following the programming instructions. Refer to Adjustment Step 2, Adjust the Force. 4. Refer to Diagnostic Chart on my motor unit: The safety reversing sensor must be connected and aligned correctly... by turning down limit adjustment screw clockwise. 6. If the trolley re-engages with a security light feature. This feature activates the light on the following the instructions for flashes on motor unit then refer to Operation section;

3585 Elite Series Manual
Page 33
The door will be heard. 1. If light bulbs are instructions for 30 seconds. 2. Press the PROG button on the motor unit. When the motor unit lights blink, it . Reprogram each remote or keyless entry you ...
The door will be heard. 1. If light bulbs are instructions for 30 seconds. 2. Press the PROG button on the motor unit. When the motor unit lights blink, it . Reprogram each remote or keyless entry you ...
3585 Elite Series Manual
Page 40
... LIMITED WARRANTY ALSO DOES NOT COVER ANY PROBLEMS CAUSED BY INTERFERENCE. SIMPLY DIAL OUR TOLL FREE NUMBER: 1-800-528-9131 www.liftmaster.com For professional installation, parts and service, contact your area. Technical Support Group 6050 S. This limited warranty gives you specific ... covered by this product is originally installed, that the motor and belt are confirmed to be repaired or replaced with the instructions regarding installation, operation, maintenance and testing. Products returned to Seller for warranty repair. IN NO EVENT SHALL SELLER'S LIABILITY FOR...
... LIMITED WARRANTY ALSO DOES NOT COVER ANY PROBLEMS CAUSED BY INTERFERENCE. SIMPLY DIAL OUR TOLL FREE NUMBER: 1-800-528-9131 www.liftmaster.com For professional installation, parts and service, contact your area. Technical Support Group 6050 S. This limited warranty gives you specific ... covered by this product is originally installed, that the motor and belt are confirmed to be repaired or replaced with the instructions regarding installation, operation, maintenance and testing. Products returned to Seller for warranty repair. IN NO EVENT SHALL SELLER'S LIABILITY FOR...


