3585 Elite Series Manual
Page 2
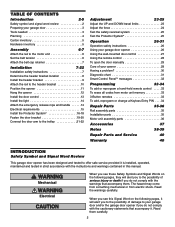
...To add, reprogram or change a Keyless Entry PIN . . . .34 Repair Parts 35-36 Rail assembly parts 35 Installation parts 35 Motor unit assembly parts 36 Accessories 37 Notes 38-39 Repair Parts and Service 40 Warranty 40 INTRODUCTION Safety Symbol and ... 2-5 Safety symbol and signal word review 2 Preparing your garage door 3 Tools needed 3 Planning 4 Carton inventory 5 Hardware inventory 5 Assembly 6-7 Attach the rail to the motor unit 6 Set the belt tension 6 Attach the belt cap retainer 7 Installation 7-22 Installation safety instructions 7 Determine the...
...To add, reprogram or change a Keyless Entry PIN . . . .34 Repair Parts 35-36 Rail assembly parts 35 Installation parts 35 Motor unit assembly parts 36 Accessories 37 Notes 38-39 Repair Parts and Service 40 Warranty 40 INTRODUCTION Safety Symbol and ... 2-5 Safety symbol and signal word review 2 Preparing your garage door 3 Tools needed 3 Planning 4 Carton inventory 5 Hardware inventory 5 Assembly 6-7 Attach the rail to the motor unit 6 Set the belt tension 6 Attach the belt cap retainer 7 Installation 7-22 Installation safety instructions 7 Determine the...
3585 Elite Series Manual
Page 6
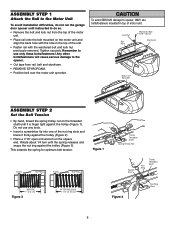
Remember to the opener. The Chamberlain Group, Inc. Liftmaster Synchro Drive • Cut tape from the top of the motor unit. • Place rail onto the bolt mounted on the motor unit and align the back hole with the hole in top of motor unit. To ...gbTeroltlleaynNdut sAtsysermofbolyam. 3/5/92 - 5/16 /92 - 5/21/92 - 6/2/92 • REMOVE STY6R/1O1/9F2OAM. • Position belt over the motor unit sprocket. ASSEMBLY STEP 1 Attach the Rail to the Motor Unit To avoid installation difficulties, do not run the garage door opener until the spring releases and snaps the nut ring...
Remember to the opener. The Chamberlain Group, Inc. Liftmaster Synchro Drive • Cut tape from the top of the motor unit. • Place rail onto the bolt mounted on the motor unit and align the back hole with the hole in top of motor unit. To ...gbTeroltlleaynNdut sAtsysermofbolyam. 3/5/92 - 5/16 /92 - 5/21/92 - 6/2/92 • REMOVE STY6R/1O1/9F2OAM. • Position belt over the motor unit sprocket. ASSEMBLY STEP 1 Attach the Rail to the Motor Unit To avoid installation difficulties, do not run the garage door opener until the spring releases and snaps the nut ring...
3585 Elite Series Manual
Page 35
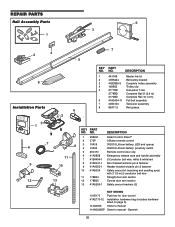
...hardware 14 listed on page 5). 114A3396 Owner's manual 114A3396SP Owner's manual - Spanish 35 REPAIR PARTS Rail Assembly Parts 6 3 1 7 2 4 5 KEY PART NO. NO. DESCRIPTION 8 Installation Parts 55 42 1 4A1008 Master link... kit 2 41B5424 Belt pulley bracket 3 41B3869-3 Complete trolley assembly 4 109B33 Trolley clip 5 2777BD One-piece T-rail 2778BD Complete Rail 8' (2.4 m) 2770BD Complete Rail 10' (3 m) 6 41A5434-11 Full belt assembly 7 41B4103 Tensioner assembly 8 83A11-2 Rail grease LOCK LIGHT 3 1 6 NOTICE CEILING MOUNT ONLY UP...
...hardware 14 listed on page 5). 114A3396 Owner's manual 114A3396SP Owner's manual - Spanish 35 REPAIR PARTS Rail Assembly Parts 6 3 1 7 2 4 5 KEY PART NO. NO. DESCRIPTION 8 Installation Parts 55 42 1 4A1008 Master link... kit 2 41B5424 Belt pulley bracket 3 41B3869-3 Complete trolley assembly 4 109B33 Trolley clip 5 2777BD One-piece T-rail 2778BD Complete Rail 8' (2.4 m) 2770BD Complete Rail 10' (3 m) 6 41A5434-11 Full belt assembly 7 41B4103 Tensioner assembly 8 83A11-2 Rail grease LOCK LIGHT 3 1 6 NOTICE CEILING MOUNT ONLY UP...


