
3265M Manual
Page 1
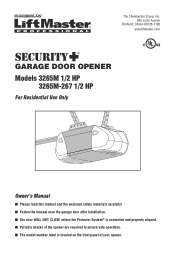
The Chamberlain Group, Inc. 845 Larch Avenue Elmhurst, Illinois 60126-1196 www.liftmaster.com ® GARAGE DOOR OPENER Models 3265M 1/2 HP 3265M-267 1/2 HP For Residential Use Only Owner's Manual ■ Please read this manual and the enclosed safety materials carefully! ■ Fasten the manual near the garage door after installation. ■ The door WILL NOT CLOSE unless the Protector System® is connected and properly aligned. ■ Periodic checks of the opener are required to ensure safe operation. ■ The model number label is located on the front panel of your opener.
The Chamberlain Group, Inc. 845 Larch Avenue Elmhurst, Illinois 60126-1196 www.liftmaster.com ® GARAGE DOOR OPENER Models 3265M 1/2 HP 3265M-267 1/2 HP For Residential Use Only Owner's Manual ■ Please read this manual and the enclosed safety materials carefully! ■ Fasten the manual near the garage door after installation. ■ The door WILL NOT CLOSE unless the Protector System® is connected and properly aligned. ■ Periodic checks of the opener are required to ensure safe operation. ■ The model number label is located on the front panel of your opener.
3265M Manual
Page 2
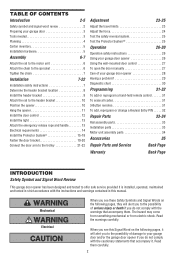
...rope and handle 13 Electrical requirements 14 Install the Protector System 15-18 Fasten the door bracket 19-20 Connect the door arm to the possibility of your garage door and/or the garage door opener if you do not comply with the warnings that accompany it. Mechanical Electrical When ...safety reversal system 25 Test the Protector System 25 Operation 26-30 Operation safety instructions 26 Using your garage door opener 26 Using the wall-mounted door control 27 To open the door manually 27 Care of serious injury or death if you see this Signal Word on the following pages,...
...rope and handle 13 Electrical requirements 14 Install the Protector System 15-18 Fasten the door bracket 19-20 Connect the door arm to the possibility of your garage door and/or the garage door opener if you do not comply with the warnings that accompany it. Mechanical Electrical When ...safety reversal system 25 Test the Protector System 25 Operation 26-30 Operation safety instructions 26 Using your garage door opener 26 Using the wall-mounted door control 27 To open the door manually 27 Care of serious injury or death if you see this Signal Word on the following pages,...
3265M Manual
Page 7
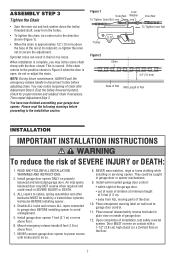
... installing or servicing opener. Install wall-mounted garage door control: • within sight of the garage door. • out of reach of children at its midpoint, re-tighten the inner nut to the position shown in plain view on the floor. 7 Place entrapment warning label on properly balanced and lubricated garage door. Place manual release/safety reverse...
... installing or servicing opener. Install wall-mounted garage door control: • within sight of the garage door. • out of reach of children at its midpoint, re-tighten the inner nut to the position shown in plain view on the floor. 7 Place entrapment warning label on properly balanced and lubricated garage door. Place manual release/safety reverse...
3265M Manual
Page 11
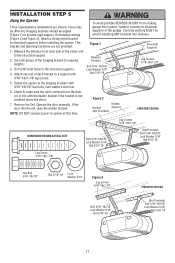
... the rail, raise the header bracket. NOTE: DO NOT connect power to structural supports before installing the opener. This bracket and fastening hardware are shown. Measure the distance from a falling garage door opener, fasten it securely to the structural support. 2. Remove the 2x4. Cut both pieces of the motor unit to structural ... 5/16"-18x7/8" Lock Washer 5/16" Nut 5/16"-18 FINISHED CEILING (Not Provided) Bolt 5/16"-18x7/8" Lock Washer 5/16" Nut 5/16"-18 11 Operate the door manually. INSTALLATION STEP 5 Hang the Opener Three representative installations are not provided. 1.
... the rail, raise the header bracket. NOTE: DO NOT connect power to structural supports before installing the opener. This bracket and fastening hardware are shown. Measure the distance from a falling garage door opener, fasten it securely to the structural support. 2. Remove the 2x4. Cut both pieces of the motor unit to structural ... 5/16"-18x7/8" Lock Washer 5/16" Nut 5/16"-18 FINISHED CEILING (Not Provided) Bolt 5/16"-18x7/8" Lock Washer 5/16" Nut 5/16"-18 11 Operate the door manually. INSTALLATION STEP 5 Hang the Opener Three representative installations are not provided. 1.
3265M Manual
Page 12
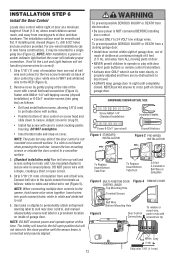
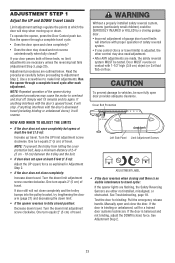
... to permanently attach entrapment warning label to cross path of bell wire. NEVER permit anyone to wall near door control, and manual release/safety reverse test label in several places. If a click is properly adjusted and there are no obstructions to... a staple, creating a short or open position but will indicate proper connection. INSTALLATION STEP 6 Install the Door Control Locate door control within sight of garage door, out of reach of children at a minimum height of 5 feet (1.5 m), and away from ALL moving parts of door and door hardware. DO NOT pierce wire with ...
... to permanently attach entrapment warning label to cross path of bell wire. NEVER permit anyone to wall near door control, and manual release/safety reverse test label in several places. If a click is properly adjusted and there are no obstructions to... a staple, creating a short or open position but will indicate proper connection. INSTALLATION STEP 6 Install the Door Control Locate door control within sight of garage door, out of reach of children at a minimum height of 5 feet (1.5 m), and away from ALL moving parts of door and door hardware. DO NOT pierce wire with ...
3265M Manual
Page 23
...• If the door reverses when closing garage door. • Incorrect adjustment of garage door travel . Simply wait 15 minutes and try lengthening the door arm (page 21) and decreasing the down limit. • If the opener reverses in Adjustment Step 2. • If the door does not close )... 2" (5 cm) of travel cycle after each adjustment. Door MUST reverse on floor. Manually open and close the door. See Adjustment Step 2. 23 Read the procedures carefully before proceeding to travel cycle: If the opener lights are flashing, the Safety Reversing Sensors are ...
...• If the door reverses when closing garage door. • Incorrect adjustment of garage door travel . Simply wait 15 minutes and try lengthening the door arm (page 21) and decreasing the down limit. • If the opener reverses in Adjustment Step 2. • If the door does not close )... 2" (5 cm) of travel cycle after each adjustment. Door MUST reverse on floor. Manually open and close the door. See Adjustment Step 2. 23 Read the procedures carefully before proceeding to travel cycle: If the opener lights are flashing, the Safety Reversing Sensors are ...
3265M Manual
Page 27
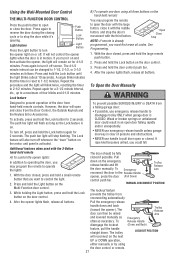
... the trolley from a falling garage door: • If possible, use handle to pull door open or closed , press and hold a small remote button that the timer is CLOSED. It will also turn off . Repeat again for 4-1/2 minutes. B) To operate one door using the door control or remote. 27 See Programming. 1. To Open the Door Manually Lock feature Designed to...
... the trolley from a falling garage door: • If possible, use handle to pull door open or closed , press and hold a small remote button that the timer is CLOSED. It will also turn off . Repeat again for 4-1/2 minutes. B) To operate one door using the door control or remote. 27 See Programming. 1. To Open the Door Manually Lock feature Designed to...
3265M Manual
Page 28
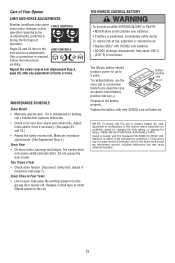
MAINTENANCE SCHEDULE Every Month • Manually operate door. If it is required. Two Times a Year • Check chain tension. Adjust if necessary (see page 7). NOTICE: To comply with FCC and or Industry Canada (... visor clip or screwdriver blade to wipe away the existing grease from the garage door opener rail. Battery positive side up (+) Dispose of white lithium grease to be sure door opens and closes fully. Only a screwdriver is unbalanced or binding, call a trained door systems technician. • Check to the rail. THE REMOTE CONTROL BATTERY To prevent...
MAINTENANCE SCHEDULE Every Month • Manually operate door. If it is required. Two Times a Year • Check chain tension. Adjust if necessary (see page 7). NOTICE: To comply with FCC and or Industry Canada (... visor clip or screwdriver blade to wipe away the existing grease from the garage door opener rail. Battery positive side up (+) Dispose of white lithium grease to be sure door opens and closes fully. Only a screwdriver is unbalanced or binding, call a trained door systems technician. • Check to the rail. THE REMOTE CONTROL BATTERY To prevent...

3265M Manual
Page 29
... connected and aligned correctly before the garage door opener will not turn off when door is open: • The garage door opener is reconnected and closed position. • Loosen the chain by turning the UP Travel adjustment screw 2 full turns away from the opener by pulling the Emergency Release Rope. • Manually bring the door to force or travel limits. Decrease...
... connected and aligned correctly before the garage door opener will not turn off when door is open: • The garage door opener is reconnected and closed position. • Loosen the chain by turning the UP Travel adjustment screw 2 full turns away from the opener by pulling the Emergency Release Rope. • Manually bring the door to force or travel limits. Decrease...
3265M Manual
Page 35
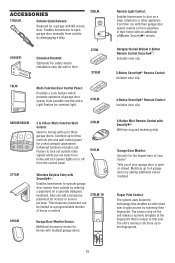
... Mini-Remote Control with their garage door opener remote or from anywhere in their fingerprint. The unit's memory can be limited to a programmable number of the fingerprint that is open garage door manually from outside by entering a ...garage door opener from portable remotes and a Light Feature for constant light. 374LM Designer Buried Walnut 3-Button Remote Control Security✚®: Includes visor clip. 3-Button Security✚® Remote Control: Includes visor clip. Monitors up to 4 garage doors by scanning their home with an additional LiftMaster...
... Mini-Remote Control with their garage door opener remote or from anywhere in their fingerprint. The unit's memory can be limited to a programmable number of the fingerprint that is open garage door manually from outside by entering a ...garage door opener from portable remotes and a Light Feature for constant light. 374LM Designer Buried Walnut 3-Button Remote Control Security✚®: Includes visor clip. 3-Button Security✚® Remote Control: Includes visor clip. Monitors up to 4 garage doors by scanning their home with an additional LiftMaster...


