

3255 Manual
Page 2
... to your garage door opener 28 Having a problem 29 Diagnostic chart 30 Programming 31-32 To add or reprogram a hand-held remote control 31 To erase all codes 31 3-Button remotes 31 To add, reprogram or change a Keyless Entry PIN 32 Repair Parts 33-34 Rail assembly parts 33 Installation parts 33...
... to your garage door opener 28 Having a problem 29 Diagnostic chart 30 Programming 31-32 To add or reprogram a hand-held remote control 31 To erase all codes 31 3-Button remotes 31 To add, reprogram or change a Keyless Entry PIN 32 Repair Parts 33-34 Rail assembly parts 33 Installation parts 33...

3255 Manual
Page 5
... UP Header Bracket 2 Conductor Bell Wire White & White/Red? contain the motor unit and all parts illustrated below . 3245 (1), 3255 (1), 3255-2 (2) LOCK LIGHT Multi-Function Door Control Panel : SECURITY ® Single-Button Remote Control Remote Control Visor Clip Chain Sprocket Cover Styrofoam Motor Unit with 2-Conductor White & White/Black Bell Wire attached Safety Labels...
... UP Header Bracket 2 Conductor Bell Wire White & White/Red? contain the motor unit and all parts illustrated below . 3245 (1), 3255 (1), 3255-2 (2) LOCK LIGHT Multi-Function Door Control Panel : SECURITY ® Single-Button Remote Control Remote Control Visor Clip Chain Sprocket Cover Styrofoam Motor Unit with 2-Conductor White & White/Black Bell Wire attached Safety Labels...
3255 Manual
Page 13
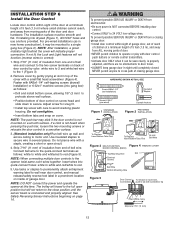
... installation, a green indicator light behind the cover will not function (reverse wires to door travel to operate or play with door control push buttons or remote control transmitters. • Activate door ONLY when it may stick if the door control is not heard when pressing the push bar, loosen the two...
... installation, a green indicator light behind the cover will not function (reverse wires to door travel to operate or play with door control push buttons or remote control transmitters. • Activate door ONLY when it may stick if the door control is not heard when pressing the push bar, loosen the two...
3255 Manual
Page 25
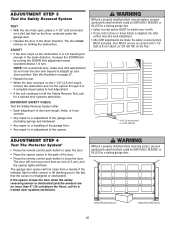
... object (or 2x4 laid flat) on the floor. 1-1/2" (3.8 cm) board (or a 2x4 laid flat) ADJUSTMENT STEP 4 Test The Protector System® • Press the remote control push button to open , place a 1-1/2" (3.8 cm) board (or a 2x4 laid flat) on the 1-1/2" (3.8 cm) board, remove the obstruction and run the opener ...repair to or buckling of the garage floor. • Any repair to or adjustment of the door. • Press the remote control push button to close from a remote if the indicator light in the path of the opener. NOTE: On a sectional door, make sure limit adjustments do not force...
... object (or 2x4 laid flat) on the floor. 1-1/2" (3.8 cm) board (or a 2x4 laid flat) ADJUSTMENT STEP 4 Test The Protector System® • Press the remote control push button to open , place a 1-1/2" (3.8 cm) board (or a 2x4 laid flat) on the 1-1/2" (3.8 cm) board, remove the obstruction and run the opener ...repair to or buckling of the garage floor. • Any repair to or adjustment of the door. • Press the remote control push button to close from a remote if the indicator light in the path of the opener. NOTE: On a sectional door, make sure limit adjustments do not force...
3255 Manual
Page 26
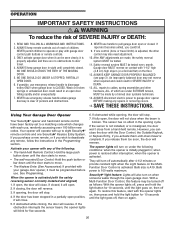
... programmed before use. An improperly balanced door may be tested. 11. Using Your Garage Door Opener Your Security✚® opener and hand-held remote control have been factory-set to door travel. 4. If open position, it will close . If the door has been stopped in the opening ... , the door will reverse. If you activate them too soon, the door will close . 5. The opener lights will not close from a hand-held Remote Control: Hold the large push button down until completely closed , it can close the door with the Door Control, the Outside Keylock, or Keyless Entry...
... programmed before use. An improperly balanced door may be tested. 11. Using Your Garage Door Opener Your Security✚® opener and hand-held remote control have been factory-set to door travel. 4. If open position, it will close . If the door has been stopped in the opening ... , the door will reverse. If you activate them too soon, the door will close . 5. The opener lights will not close from a hand-held Remote Control: Hold the large push button down until completely closed , it can close the door with the Door Control, the Outside Keylock, or Keyless Entry...
3255 Manual
Page 27
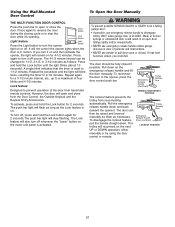
... 2-1/2, or 3-1/2 minutes as necessary. Emergency Release Handle (Pull Down) Trolley Release Arm NOTICE The lockout feature prevents the trolley from hand-held remote controls. Press again to reverse the door during the closing cycle or to stop flashing. The door should be raised and lowered manually as often... activate the opener, the light will remain on the next UP or DOWN operation, either manually or by using the door control or remote. Pull the emergency release handle down and back (toward the opener). Using the Wall-Mounted Door Control To Open the Door Manually THE...
... 2-1/2, or 3-1/2 minutes as necessary. Emergency Release Handle (Pull Down) Trolley Release Arm NOTICE The lockout feature prevents the trolley from hand-held remote controls. Press again to reverse the door during the closing cycle or to stop flashing. The door should be raised and lowered manually as often... activate the opener, the light will remain on the next UP or DOWN operation, either manually or by using the door control or remote. Pull the emergency release handle down and back (toward the opener). Using the Wall-Mounted Door Control To Open the Door Manually THE...
3255 Manual
Page 28
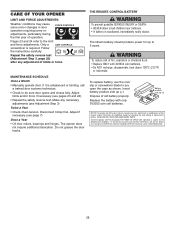
.... Tested to pry open the case as shown. Only a LIMIT CONTROLS screwdriver is swallowed, immediately notify doctor. Make any adjustment of old battery properly. THE REMOTE CONTROL BATTERY To prevent possible SERIOUS INJURY or DEATH: • NEVER allow small children near batteries. • If battery is required. Insert battery positive side...
.... Tested to pry open the case as shown. Only a LIMIT CONTROLS screwdriver is swallowed, immediately notify doctor. Make any adjustment of old battery properly. THE REMOTE CONTROL BATTERY To prevent possible SERIOUS INJURY or DEATH: • NEVER allow small children near batteries. • If battery is required. Insert battery positive side...
3255 Manual
Page 29
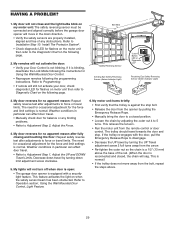
...Check diagnostic LED for flashes on motor unit then refer to the Diagnostic Chart on the following page. Refer to Programming. • If remote will move away from the remote control or door control. The need for occasional adjustment for Using the Wall-Mounted Door Control. • Reprogram...Mode following the instructions for the force and limit settings is equipped with the door, pull the Emergency Release Rope to Operation section; My remotes will not turn off when door is open: • The garage door opener is normal. Bell Wire Safety Reversing Sensor Sending Eye ...
...Check diagnostic LED for flashes on motor unit then refer to the Diagnostic Chart on the following page. Refer to Programming. • If remote will move away from the remote control or door control. The need for occasional adjustment for Using the Wall-Mounted Door Control. • Reprogram...Mode following the instructions for the force and limit settings is equipped with the door, pull the Emergency Release Rope to Operation section; My remotes will not turn off when door is open: • The garage door opener is normal. Bell Wire Safety Reversing Sensor Sending Eye ...
3255 Manual
Page 31
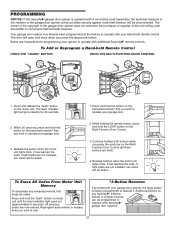
... Door Control (all codes: Press and hold the LIGHT button on motor unit until the learn indicator light will be heard. 2. Reprogram each remote or keyless entry you press the large push button. Your garage door opener has already been programmed at the factory to operate with your garage... door. 3. Within 30 seconds, press and hold the button on the hand-held remote* that you wish to operate your hand-held Remote Control USING THE "LEARN" BUTTON USING THE MULTI-FUNCTION DOOR CONTROL LOCK LIGHT 1. It has learned the code. If light...
... Door Control (all codes: Press and hold the LIGHT button on motor unit until the learn indicator light will be heard. 2. Reprogram each remote or keyless entry you press the large push button. Your garage door opener has already been programmed at the factory to operate with your garage... door. 3. Within 30 seconds, press and hold the button on the hand-held remote* that you wish to operate your hand-held Remote Control USING THE "LEARN" BUTTON USING THE MULTI-FUNCTION DOOR CONTROL LOCK LIGHT 1. It has learned the code. If light...
3255 Manual
Page 33
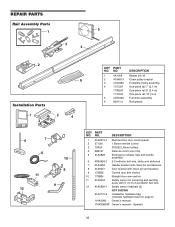
... LIGHT 3 2 4 5 7 CEILING MOUNT ONLY UP NOTICE 6 10 11 12 8 9 KEY PART NO. NO. DESCRIPTION 1 41A5273-1 Multi-function door control panel 2 371LM 1 Button remote control 3 10A20 3V2032 Lithium battery 4 29B137 Remote control visor clip 5 41A2828 Emergency release rope and handle assembly 6 41B4494-1 2-Conductor bell wire, white and white/red 7 41A4353 Header bracket with...
... LIGHT 3 2 4 5 7 CEILING MOUNT ONLY UP NOTICE 6 10 11 12 8 9 KEY PART NO. NO. DESCRIPTION 1 41A5273-1 Multi-function door control panel 2 371LM 1 Button remote control 3 10A20 3V2032 Lithium battery 4 29B137 Remote control visor clip 5 41A2828 Emergency release rope and handle assembly 6 41B4494-1 2-Conductor bell wire, white and white/red 7 41A4353 Header bracket with...

3255 Manual
Page 35
... operate garage door opener from outside by adding additional sensor modules. 975LM Remote Light Control: Enables homeowner to precisely park vehicles in the home with a remote. 990LM 373W Designer Burled Walnut 3-Button Remote Control with NO access door. Enables homeowner to protect LiftMaster® garage door openers against damage from car, bedside, or anywhere...
... operate garage door opener from outside by adding additional sensor modules. 975LM Remote Light Control: Enables homeowner to precisely park vehicles in the home with a remote. 990LM 373W Designer Burled Walnut 3-Button Remote Control with NO access door. Enables homeowner to protect LiftMaster® garage door openers against damage from car, bedside, or anywhere...


