
3240 Manual
Page 2
...word review 2 Preparing your garage door 3 Tools needed 3 Planning 4 Carton inventory 5 Hardware inventory 5 Assembly 6 Fasten rail to the motor unit 6 Installation 7-22 Installation safety instructions 7 Determine the header bracket location 8 Install the header bracket 9 Attach the...To add, reprogram or change a Keyless Entry PIN . . . . . 32 Repair Parts 33-34 Rail assembly parts 33 Installation parts 33 Motor unit assembly parts 34 Accessories 35 Repair Parts and Service Back page Warranty Back page INTRODUCTION Safety Symbol and Signal Word Review This garage ...
...word review 2 Preparing your garage door 3 Tools needed 3 Planning 4 Carton inventory 5 Hardware inventory 5 Assembly 6 Fasten rail to the motor unit 6 Installation 7-22 Installation safety instructions 7 Determine the header bracket location 8 Install the header bracket 9 Attach the...To add, reprogram or change a Keyless Entry PIN . . . . . 32 Repair Parts 33-34 Rail assembly parts 33 Installation parts 33 Motor unit assembly parts 34 Accessories 35 Repair Parts and Service Back page Warranty Back page INTRODUCTION Safety Symbol and Signal Word Review This garage ...
3240 Manual
Page 5
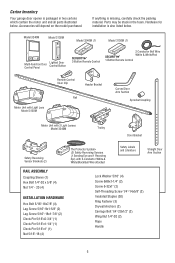
Carton Inventory Your garage door opener is packaged in the foam. Parts may be stuck in two cartons which contain the motor unit and all parts illustrated below . Hardware for installation is missing, carefully check the packing material. Model 3240M Model... Safety Reversing Sensors (1 Sending Eye and 1 Receiving Eye) with 2-Conductor White & White/Black Bell Wire attached Safety Labels and Literature Straight Door Arm Section RAIL ASSEMBLY Coupling Sleeve (1) Hex Bolt 1/4"-20 x 5/8" (4) Nut 1/4" - 20 (4) INSTALLATION HARDWARE Hex Bolt 5/16"-18x7/8" (4) Lag Screw 5/16"-9x1-5/8" ...
Carton Inventory Your garage door opener is packaged in the foam. Parts may be stuck in two cartons which contain the motor unit and all parts illustrated below . Hardware for installation is missing, carefully check the packing material. Model 3240M Model... Safety Reversing Sensors (1 Sending Eye and 1 Receiving Eye) with 2-Conductor White & White/Black Bell Wire attached Safety Labels and Literature Straight Door Arm Section RAIL ASSEMBLY Coupling Sleeve (1) Hex Bolt 1/4"-20 x 5/8" (4) Nut 1/4" - 20 (4) INSTALLATION HARDWARE Hex Bolt 5/16"-18x7/8" (4) Lag Screw 5/16"-9x1-5/8" ...

3240 Manual
Page 16
...ACTUAL SIZE • Drill and install bottom screw, allowing 1/8" (3 mm) to motor unit. To prevent possible SERIOUS INJURY or DEATH from moving parts of wires. Adjust screw for snug fit. • Install top screw with screwdriver tip at this wire with 6ABx1-1/2" self-threading screws. Use ...Control Connections To release or insert wire, push in new home construction), it can be smooth and flat a minimum height of the rail. Multi-function: Remove white cover by gently prying at slot in sight until the sensor beam is connected and properly aligned. NOTE: After...
...ACTUAL SIZE • Drill and install bottom screw, allowing 1/8" (3 mm) to motor unit. To prevent possible SERIOUS INJURY or DEATH from moving parts of wires. Adjust screw for snug fit. • Install top screw with screwdriver tip at this wire with 6ABx1-1/2" self-threading screws. Use ...Control Connections To release or insert wire, push in new home construction), it can be smooth and flat a minimum height of the rail. Multi-function: Remove white cover by gently prying at slot in sight until the sensor beam is connected and properly aligned. NOTE: After...

3240 Manual
Page 33
... Rack 3 41A6262 Complete trolley assembly 4 3077SD Screw Drive one-piece rail 7' (2.1 m) 5 3088SD Screw Drive one-piece rail 8' (2.4 m) 6 41A4836 Drive sprocket kit 7 25C20 Coupling 8 41A6312 Rail end bracket NOT SHOWN 28A143 Wire clips Installation Parts 3 1 2 4 5 6 6 7 8 9 10 11 CEILING MOUNT ONLY UP 12 14 13 KEY PART NO. NO. 1 41A5273-1 2 41A4166 3 41A2828 4 371LM 5 ...white/red Curved door arm section NOT SHOWN Installation hardware bag (see page 3) Owner's manual Owner's manual-Spanish 33 NO. REPAIR PARTS Rail Assembly Parts 5 3 6 1 7 2 4 KEY PART NO.
... Rack 3 41A6262 Complete trolley assembly 4 3077SD Screw Drive one-piece rail 7' (2.1 m) 5 3088SD Screw Drive one-piece rail 8' (2.4 m) 6 41A4836 Drive sprocket kit 7 25C20 Coupling 8 41A6312 Rail end bracket NOT SHOWN 28A143 Wire clips Installation Parts 3 1 2 4 5 6 6 7 8 9 10 11 CEILING MOUNT ONLY UP 12 14 13 KEY PART NO. NO. 1 41A5273-1 2 41A4166 3 41A2828 4 371LM 5 ...white/red Curved door arm section NOT SHOWN Installation hardware bag (see page 3) Owner's manual Owner's manual-Spanish 33 NO. REPAIR PARTS Rail Assembly Parts 5 3 6 1 7 2 4 KEY PART NO.


