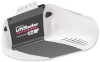
3240 Manual
Page 2
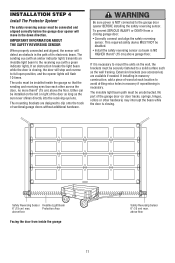
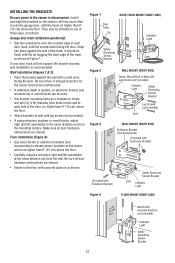
...maintained and tested in this Signal Word on the following pages, it will alert you to the possibility of your garage door and/or the garage door opener if you do not comply with the instructions and warnings contained in strict accordance with the cautionary statements that accompany them... Attach the rail to the header bracket 10 Install the Protector System 11-13 Position the opener 14 Hang the opener 15 Install the door control 16 Install the lights 17 Attach the emergency release rope and handle 17 Electrical requirements 18 Complete safety reversing sensor installation...
...maintained and tested in this Signal Word on the following pages, it will alert you to the possibility of your garage door and/or the garage door opener if you do not comply with the instructions and warnings contained in strict accordance with the cautionary statements that accompany them... Attach the rail to the header bracket 10 Install the Protector System 11-13 Position the opener 14 Hang the opener 15 Install the door control 16 Install the lights 17 Attach the emergency release rope and handle 17 Electrical requirements 18 Complete safety reversing sensor installation...
3240 Manual
Page 5
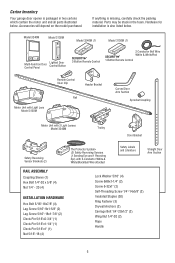
Carton Inventory Your garage door opener is also listed below . Hardware for installation is packaged in the foam. Model 3240M Model 3130M Model 3240M (1) Model 3130M (1) Multi-Function Door Control Panel Lighted Door Control Button SECURITY✚® 3-Button Remote Control 2 Conductor Bell... MOUNT ONLY UP Remote Control Visor Clip Header Bracket Rail Curved Door Arm Section Sprocket Coupling Motor Unit with Light Lens Model 3130M Motor Unit with 2 Light Lenses Model 3240M Trolley Door Bracket Safety Reversing Sensor Brackets (2) The Protector System® (2)...
Carton Inventory Your garage door opener is also listed below . Hardware for installation is packaged in the foam. Model 3240M Model 3130M Model 3240M (1) Model 3130M (1) Multi-Function Door Control Panel Lighted Door Control Button SECURITY✚® 3-Button Remote Control 2 Conductor Bell... MOUNT ONLY UP Remote Control Visor Clip Header Bracket Rail Curved Door Arm Section Sprocket Coupling Motor Unit with Light Lens Model 3130M Motor Unit with 2 Light Lenses Model 3240M Trolley Door Bracket Safety Reversing Sensor Brackets (2) The Protector System® (2)...
3240 Manual
Page 11
... sensor will stop and reverse to the garage door opener BEFORE installing the safety reversing sensor. The units must be unobstructed. Safety Reversing Sensor Invisible Light Beam 6" (15 cm) max. Protection Area above floor Facing the door from a closing , the door will detect an obstacle in masonry if...6" (15 cm) above the floor. Be sure power is NOT connected to full open position, and the opener lights will move in the down direction. This required safety device MUST NOT be connected and aligned correctly before the garage door opener will flash 10 times.
... sensor will stop and reverse to the garage door opener BEFORE installing the safety reversing sensor. The units must be unobstructed. Safety Reversing Sensor Invisible Light Beam 6" (15 cm) max. Protection Area above floor Facing the door from a closing , the door will detect an obstacle in masonry if...6" (15 cm) above the floor. Be sure power is NOT connected to full open position, and the opener lights will move in the down direction. This required safety device MUST NOT be connected and aligned correctly before the garage door opener will flash 10 times.
3240 Manual
Page 12
...Be sure power to the opener is recommended. Wall installation (Figures 2 & 3): • Place the bracket against the side of the door, no higher than 6" (15 cm) above the floor. • Attach brackets to wall with the curved arms facing the door. Floor installation (Figure ... in one of three ways, as follows: Garage door track installation (preferred): • Slip the curved arms over the rounded edge of the track, as shown in Figure 1. Figure 1 Door Track Lip DOOR TRACK MOUNT (RIGHT SIDE) Indicator Light Safety Reversing Sensor Lens Bracket Figure 2 Figure ...
...Be sure power to the opener is recommended. Wall installation (Figures 2 & 3): • Place the bracket against the side of the door, no higher than 6" (15 cm) above the floor. • Attach brackets to wall with the curved arms facing the door. Floor installation (Figure ... in one of three ways, as follows: Garage door track installation (preferred): • Slip the curved arms over the rounded edge of the track, as shown in Figure 1. Figure 1 Door Track Lip DOOR TRACK MOUNT (RIGHT SIDE) Indicator Light Safety Reversing Sensor Lens Bracket Figure 2 Figure ...

3240 Manual
Page 16
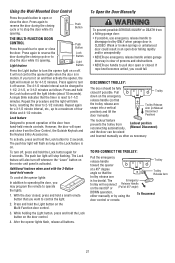
Lighted door control: Fasten to wall with Multi-Function (std installation) 6ABx1-1/4" Screw Multi-Function (pre-wired) Screw 6-32x1" Figure 1 STANDARD INSTALLATION Figure 2 PRE-WIRED INSTALLATION a staple, creating a short or open position but will travel . • ALWAYS keep garage door in tab with care to...and white/black wires sufficiently to connect to the opener, twist same color wires together. NOTE: DO NOT connect the power and operate the opener Lighted Door Control Multi-Function Door Control Door Control Connections To release or insert wire, push in sight...
Lighted door control: Fasten to wall with Multi-Function (std installation) 6ABx1-1/4" Screw Multi-Function (pre-wired) Screw 6-32x1" Figure 1 STANDARD INSTALLATION Figure 2 PRE-WIRED INSTALLATION a staple, creating a short or open position but will travel . • ALWAYS keep garage door in tab with care to...and white/black wires sufficiently to connect to the opener, twist same color wires together. NOTE: DO NOT connect the power and operate the opener Lighted Door Control Multi-Function Door Control Door Control Connections To release or insert wire, push in sight...
3240 Manual
Page 17
...each socket. INSTALLATION STEP 8 Install the Lights • Press the release tabs on both sides of persons and obstructions. • NEVER use handle to close the lens. • Use A19, standard neck garage door opener bulbs for approximately 4-1/2 minutes when power is... connected. Then the lights will turn OFF. • Reverse the procedure to pull door open position. Use ONLY incandescent. Weak or broken springs or unbalanced door could fall. NOTE: Use only standard light bulbs. Release ...
...each socket. INSTALLATION STEP 8 Install the Lights • Press the release tabs on both sides of persons and obstructions. • NEVER use handle to close the lens. • Use A19, standard neck garage door opener bulbs for approximately 4-1/2 minutes when power is... connected. Then the lights will turn OFF. • Reverse the procedure to pull door open position. Use ONLY incandescent. Weak or broken springs or unbalanced door could fall. NOTE: Use only standard light bulbs. Release ...
3240 Manual
Page 18
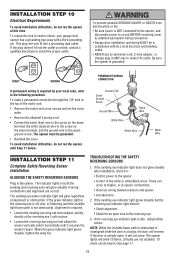
... PERMANENT WIRING CONNECTION If permanent wiring is NOT connected to the opener, and disconnect power to circuit BEFORE removing cover to establish permanent wiring connection. • Garage door installation and wiring MUST be in compliance with a third grounding pin. If the green indicator light in the top of alignment or obstruction. When the green...
... PERMANENT WIRING CONNECTION If permanent wiring is NOT connected to the opener, and disconnect power to circuit BEFORE removing cover to establish permanent wiring connection. • Garage door installation and wiring MUST be in compliance with a third grounding pin. If the green indicator light in the top of alignment or obstruction. When the green...

3240 Manual
Page 19
.... Fiberglass, aluminum or lightweight steel garage doors WILL REQUIRE reinforcement BEFORE installation of the clevis pin and door arm. Metal, insulated or light weight factory reinforced doors: • Drill 3/16" fastening holes. Header Bracket Door Bracket Location Vertical Centerline of Garage Door HORIZONTAL AND VERTICAL REINFORCEMENT IS NEEDED FOR LIGHTWEIGHT GARAGE DOORS (FIBERGLASS, ALUMINUM, STEEL, DOORS WITH GLASS PANEL, ETC). (NOT...
.... Fiberglass, aluminum or lightweight steel garage doors WILL REQUIRE reinforcement BEFORE installation of the clevis pin and door arm. Metal, insulated or light weight factory reinforced doors: • Drill 3/16" fastening holes. Header Bracket Door Bracket Location Vertical Centerline of Garage Door HORIZONTAL AND VERTICAL REINFORCEMENT IS NEEDED FOR LIGHTWEIGHT GARAGE DOORS (FIBERGLASS, ALUMINUM, STEEL, DOORS WITH GLASS PANEL, ETC). (NOT...

3240 Manual
Page 23
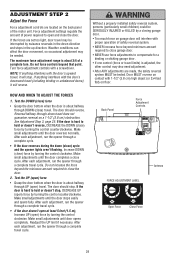
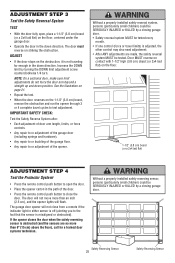
... no visible interference to travel cycle: If the opener lights are flashing, the Safety Reversing Sensors are either not installed, misaligned, or obstructed. Run the opener through a complete travel cycle. • Does the door open and close ) force. Without a properly installed ... limit adjustment screw clockwise. Run the opener through a complete travel cycle after each adjustment. Limit Adjustment Screws Left Side Panel ADJUSTMENT LABEL • If the door reverses when closing garage door. • Incorrect adjustment of garage door travel limits will stop . Read the...
... no visible interference to travel cycle: If the opener lights are flashing, the Safety Reversing Sensors are either not installed, misaligned, or obstructed. Run the opener through a complete travel cycle. • Does the door open and close ) force. Without a properly installed ... limit adjustment screw clockwise. Run the opener through a complete travel cycle after each adjustment. Limit Adjustment Screws Left Side Panel ADJUSTMENT LABEL • If the door reverses when closing garage door. • Incorrect adjustment of garage door travel limits will stop . Read the...
3240 Manual
Page 24
... necessary. If the forces are set too light, door travel does not guarantee reversal on garage door will interfere with 1-1/2" (3.8 cm) high object (or 2x4 laid flat least 5 feet (1.5 m), Increase UP (open and close ) travel cycle. Turn force adjustment controls with the door's upward travel limits) is hard to open ) force by turning the control counterclockwise...
... necessary. If the forces are set too light, door travel does not guarantee reversal on garage door will interfere with 1-1/2" (3.8 cm) high object (or 2x4 laid flat least 5 feet (1.5 m), Increase UP (open and close ) travel cycle. Turn force adjustment controls with the door's upward travel limits) is hard to open ) force by turning the control counterclockwise...
3240 Manual
Page 25
... made, the safety reversal system MUST be tested. The door will not move more than an inch (2.5 cm), and the opener lights will not close the door. Without a properly installed safety reversal system, persons (particularly small children) could be SERIOUSLY INJURED or KILLED by a closing garage door. • Safety reversal system MUST be SERIOUSLY INJURED or...
... made, the safety reversal system MUST be tested. The door will not move more than an inch (2.5 cm), and the opener lights will not close the door. Without a properly installed safety reversal system, persons (particularly small children) could be SERIOUSLY INJURED or KILLED by a closing garage door. • Safety reversal system MUST be SERIOUSLY INJURED or...
3240 Manual
Page 26
... size is activated. The sensor has no obstructions to pull garage door open 10 seconds until the door starts to move . • The Keyless Entry (See Accessories): If provided with garage door control push buttons or remote controls. 3. If the obstruction interrupts the sensor beam, the opener lights will close when the beam is activated (with up to...
... size is activated. The sensor has no obstructions to pull garage door open 10 seconds until the door starts to move . • The Keyless Entry (See Accessories): If provided with garage door control push buttons or remote controls. 3. If the obstruction interrupts the sensor beam, the opener lights will close when the beam is activated (with up to...
3240 Manual
Page 27
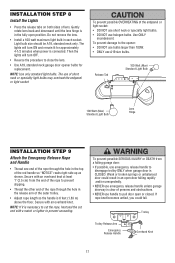
.... The Emergency NOTICE trolley will not control the opener lights when the door is in an open door falling rapidly and/or unexpectedly. • NEVER use emergency release handle unless garage doorway is activated. Repeat the procedure and the light will stop flashing. To turn it 's opening . With the door closed, press and hold the Lock button again...
.... The Emergency NOTICE trolley will not control the opener lights when the door is in an open door falling rapidly and/or unexpectedly. • NEVER use emergency release handle unless garage doorway is activated. Repeat the procedure and the light will stop flashing. To turn it 's opening . With the door closed, press and hold the Lock button again...
3240 Manual
Page 29
..., deactivate the Lock Mode following the programming instructions. This feature activates the light on my motor unit: The safety reversing sensor must be connected and aligned correctly before the garage door opener will still not activate your Premium door control is equipped with a security light feature. Weather conditions in the down limit adjustment screw clockwise. 29
..., deactivate the Lock Mode following the programming instructions. This feature activates the light on my motor unit: The safety reversing sensor must be connected and aligned correctly before the garage door opener will still not activate your Premium door control is equipped with a security light feature. Weather conditions in the down limit adjustment screw clockwise. 29
3240 Manual
Page 30
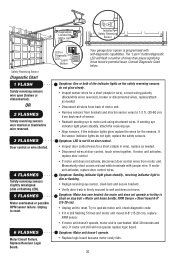
LED or Diagnostic LED "Learn" Button Your garage door opener is stuck on door control. • Inspect door control/wires for a short (staple in wire), correct wiring polarity (black/white wires reversed), broken or disconnected wires, replace/attach as needed . &#... glow steady. • Inspect sensor wires for the sensors. If motor unit still will flash a number of the indicator lights on the safety reversing sensors do not light, replace the safety sensors. Symptom: Motor unit doesn't operate. • Replace logic board because motor rarely fails. 30 RPM Sensor...
LED or Diagnostic LED "Learn" Button Your garage door opener is stuck on door control. • Inspect door control/wires for a short (staple in wire), correct wiring polarity (black/white wires reversed), broken or disconnected wires, replace/attach as needed . &#... glow steady. • Inspect sensor wires for the sensors. If motor unit still will flash a number of the indicator lights on the safety reversing sensors do not light, replace the safety sensors. Symptom: Motor unit doesn't operate. • Replace logic board because motor rarely fails. 30 RPM Sensor...
3240 Manual
Page 31
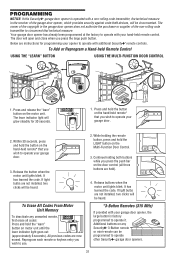
...-held Remote Control USING THE "LEARN" BUTTON USING THE MULTI-FUNCTION DOOR CONTROL 9 1 7 3 5 KG 9 1 7 3 5 KG LOCK LIGHT 1. If light bulbs are not installed, two clicks will glow steadily for programming your garage door. 2. All previous codes are instructions for 30 seconds. 1. LOCK LIGHT LOCK LIGHT 4. Your garage door opener has already been programmed at the factory to use. 2. Below are...
...-held Remote Control USING THE "LEARN" BUTTON USING THE MULTI-FUNCTION DOOR CONTROL 9 1 7 3 5 KG 9 1 7 3 5 KG LOCK LIGHT 1. If light bulbs are not installed, two clicks will glow steadily for programming your garage door. 2. All previous codes are instructions for 30 seconds. 1. LOCK LIGHT LOCK LIGHT 4. Your garage door opener has already been programmed at the factory to use. 2. Below are...
3240 Manual
Page 32
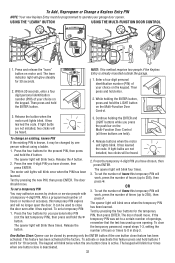
...temporary PIN, then press ENTER. Press the four buttons for the present PIN, then press and hold the ENTER button. The opener light will no longer open the door. The door should move . Release the button. 2. To set a temporary PIN You may be changed by one button close the...a four digit personal identification number (PIN) of hours (up to close is already mounted outside the garage. 1. The keypad will work , press the number of your garage door opener. If light bulbs are held). It has learned the code. After a programmed number of hours or number of hours this ...
...temporary PIN, then press ENTER. Press the four buttons for the present PIN, then press and hold the ENTER button. The opener light will no longer open the door. The door should move . Release the button. 2. To set a temporary PIN You may be changed by one button close the...a four digit personal identification number (PIN) of hours (up to close is already mounted outside the garage. 1. The keypad will work , press the number of your garage door opener. If light bulbs are held). It has learned the code. After a programmed number of hours or number of hours this ...
3240 Manual
Page 35
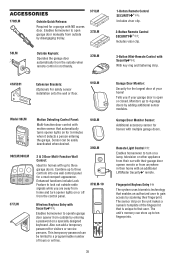
... system uses biometric technology that automatically turns opener lights on a lamp, television or other appliance from their car with up to ten fingerprints. 35 This temporary password can store up to operate garage door opener from the control panel. 379LM-10 Wireless Keyless Entry with an additional LiftMaster Security✚® remote. Monitors up to...
... system uses biometric technology that automatically turns opener lights on a lamp, television or other appliance from their car with up to ten fingerprints. 35 This temporary password can store up to operate garage door opener from the control panel. 379LM-10 Wireless Keyless Entry with an additional LiftMaster Security✚® remote. Monitors up to...


