
3240 Manual
Page 1
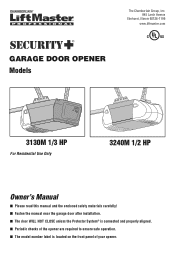
® GARAGE DOOR OPENER Models The Chamberlain Group, Inc. 845 Larch Avenue Elmhurst, Illinois 60126-1196 www.liftmaster.com 3130M 1/3 HP For Residential Use Only 3240M 1/2 HP Owner's Manual ■ Please read this manual and the enclosed safety materials carefully! ■ Fasten the manual near the garage door after installation. ■ The door WILL NOT CLOSE unless the Protector System® is connected and properly aligned. ■ Periodic checks of the opener are required to ensure safe operation. ■ The model number label is located on the front panel of your opener.
® GARAGE DOOR OPENER Models The Chamberlain Group, Inc. 845 Larch Avenue Elmhurst, Illinois 60126-1196 www.liftmaster.com 3130M 1/3 HP For Residential Use Only 3240M 1/2 HP Owner's Manual ■ Please read this manual and the enclosed safety materials carefully! ■ Fasten the manual near the garage door after installation. ■ The door WILL NOT CLOSE unless the Protector System® is connected and properly aligned. ■ Periodic checks of the opener are required to ensure safe operation. ■ The model number label is located on the front panel of your opener.
3240 Manual
Page 2
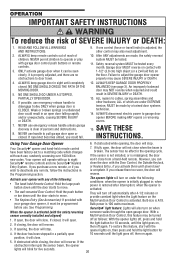
... and Signal Words on the following pages, they will alert you to the possibility of damage to the possibility of your garage door and/or the garage door opener if you do not comply with the cautionary statements that accompany them carefully. 2 TABLE OF CONTENTS Introduction 2-5 Safety symbol ... reversal system 25 Test the Protector System 25 Operation 26-30 Operation safety instructions 26 Using your garage door opener 26 Using the wall-mounted door control 27 To open the door manually 27 Care of serious injury or death if you do not comply with the warnings that ...
... and Signal Words on the following pages, they will alert you to the possibility of damage to the possibility of your garage door and/or the garage door opener if you do not comply with the cautionary statements that accompany them carefully. 2 TABLE OF CONTENTS Introduction 2-5 Safety symbol ... reversal system 25 Test the Protector System 25 Operation 26-30 Operation safety instructions 26 Using your garage door opener 26 Using the wall-mounted door control 27 To open the door manually 27 Care of serious injury or death if you do not comply with the warnings that ...
3240 Manual
Page 3
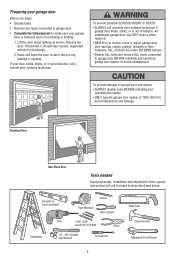
... not sticking or binding: 1. To prevent damage to garage door and opener: • ALWAYS disable locks BEFORE installing and operating the opener. • ONLY operate garage door opener at 120V, 60 Hz to avoid entanglement. Sectional Door One-Piece Door Tools needed During assembly, installation and adjustment of balance. Preparing your garage door Before you begin: • Disable locks. • Remove...
... not sticking or binding: 1. To prevent damage to garage door and opener: • ALWAYS disable locks BEFORE installing and operating the opener. • ONLY operate garage door opener at 120V, 60 Hz to avoid entanglement. Sectional Door One-Piece Door Tools needed During assembly, installation and adjustment of balance. Preparing your garage door Before you begin: • Disable locks. • Remove...
3240 Manual
Page 4
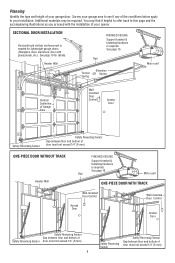
... Reversing Sensor Gap between floor and bottom of your garage door. See page 19 for lightweight garage doors (fiberglass, steel, aluminum, door with the installation of door must not exceed 1/4" (6 mm). Safety Reversing Sensor Safety Reversing Sensor Gap between floor and bottom of your opener. See page 15. Planning Identify the type and height...
... Reversing Sensor Gap between floor and bottom of your garage door. See page 19 for lightweight garage doors (fiberglass, steel, aluminum, door with the installation of door must not exceed 1/4" (6 mm). Safety Reversing Sensor Safety Reversing Sensor Gap between floor and bottom of your opener. See page 15. Planning Identify the type and height...
3240 Manual
Page 5
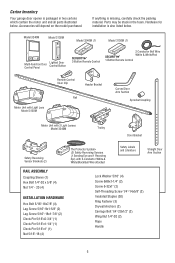
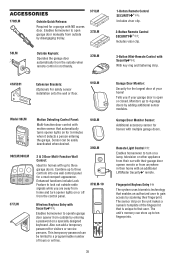
... (2) The Protector System® (2) Safety Reversing Sensors (1 Sending Eye and 1 Receiving Eye) with 2-Conductor White & White/Black Bell Wire attached Safety Labels and Literature Straight Door Arm Section RAIL ASSEMBLY Coupling Sleeve (1) Hex Bolt 1/4"-20 x 5/8" (4) Nut 1/4" - 20 (4) INSTALLATION HARDWARE Hex Bolt 5/16"-18x7/8" (4) Lag Screw 5/16"-9x1-5/8" ...) Ring Fastener (3) Drywall Anchors (2) Carriage Bolt 1/4"-20x1/2" (2) Wing Nut 1/4"-20 (2) Rope Handle 5 Accessories will depend on the model purchased. Carton Inventory Your garage door opener is packaged in the foam.
... (2) The Protector System® (2) Safety Reversing Sensors (1 Sending Eye and 1 Receiving Eye) with 2-Conductor White & White/Black Bell Wire attached Safety Labels and Literature Straight Door Arm Section RAIL ASSEMBLY Coupling Sleeve (1) Hex Bolt 1/4"-20 x 5/8" (4) Nut 1/4" - 20 (4) INSTALLATION HARDWARE Hex Bolt 5/16"-18x7/8" (4) Lag Screw 5/16"-9x1-5/8" ...) Ring Fastener (3) Drywall Anchors (2) Carriage Bolt 1/4"-20x1/2" (2) Wing Nut 1/4"-20 (2) Rope Handle 5 Accessories will depend on the model purchased. Carton Inventory Your garage door opener is packaged in the foam.

3240 Manual
Page 6
... unit. ASSEMBLY STEP 1 Fasten the Rail to the Motor Unit To avoid installation difficulties, do so. Be certain to do not run the garage door opener until instructed to install it after Installation Step 4. • Working on a level surface, align the rail assembly with the motor unit, as shown. • Slip...
... unit. ASSEMBLY STEP 1 Fasten the Rail to the Motor Unit To avoid installation difficulties, do so. Be certain to do not run the garage door opener until instructed to install it after Installation Step 4. • Working on a level surface, align the rail assembly with the motor unit, as shown. • Slip...
3240 Manual
Page 7
... installation, test safety reversal system. READ AND FOLLOW ALL INSTALLATION WARNINGS AND INSTRUCTIONS. 2. ALL repairs to avoid entanglement. 5. Install garage door opener ONLY on inside of the door. 10. Install garage door opener 7 feet (2.1 m) or more above floor. 7. Door MUST reverse on wall next to do so. 8. Mount emergency release handle 6 feet (1.8 m) above floor. 6. An improperly...
... installation, test safety reversal system. READ AND FOLLOW ALL INSTALLATION WARNINGS AND INSTRUCTIONS. 2. ALL repairs to avoid entanglement. 5. Install garage door opener ONLY on inside of the door. 10. Install garage door opener 7 feet (2.1 m) or more above floor. 7. Door MUST reverse on wall next to do so. 8. Mount emergency release handle 6 feet (1.8 m) above floor. 6. An improperly...

3240 Manual
Page 8
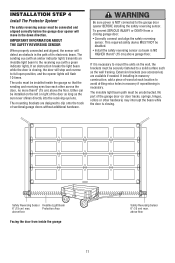
... or right of Travel Pivot One-piece door without track: One-piece door without track. Open your door. 1. INSTALLATION STEP 1 Determine the Header Bracket Location To prevent possible SERIOUS INJURY or DEATH: • Header bracket MUST be RIGIDLY fastened to structural support on header wall or ceiling, otherwise garage door might NOT reverse when required. Installation...
... or right of Travel Pivot One-piece door without track: One-piece door without track. Open your door. 1. INSTALLATION STEP 1 Determine the Header Bracket Location To prevent possible SERIOUS INJURY or DEATH: • Header bracket MUST be RIGIDLY fastened to structural support on header wall or ceiling, otherwise garage door might NOT reverse when required. Installation...
3240 Manual
Page 11
...installing in masonry if repositioning is NO HIGHER than 6" (15 cm) above garage floor. This required safety device MUST NOT be connected and aligned correctly before the garage door opener will stop and reverse to avoid drilling extra holes in masonry construction, add ...a piece of sectional garage doors without additional hardware. Extension brackets (see accessories) are designed to the ...
...installing in masonry if repositioning is NO HIGHER than 6" (15 cm) above garage floor. This required safety device MUST NOT be connected and aligned correctly before the garage door opener will stop and reverse to avoid drilling extra holes in masonry construction, add ...a piece of sectional garage doors without additional hardware. Extension brackets (see accessories) are designed to the ...
3240 Manual
Page 14
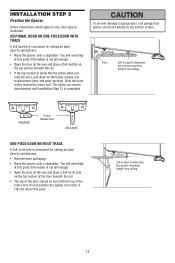
...section of the motor unit. Top of Door 2x4 is used to your door type as illustrated. Do not position the opener more than 4" (10 cm) above this point if the ladder is convenient for setting an ideal door-to garage door, rest garage door opener rail on 2x4 placed on the top ...section of the door beneath the rail. • The top of the door should be level with the top of door. Top of Door Door 2x4 is used to disconnect inner and outer sections...
...section of the motor unit. Top of Door 2x4 is used to your door type as illustrated. Do not position the opener more than 4" (10 cm) above this point if the ladder is convenient for setting an ideal door-to garage door, rest garage door opener rail on 2x4 placed on the top ...section of the door beneath the rail. • The top of the door should be level with the top of door. Top of Door Door 2x4 is used to disconnect inner and outer sections...
3240 Manual
Page 15
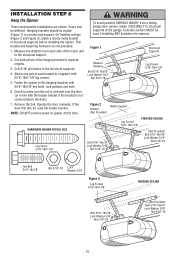
... a support with 5/16"-18x7/8" hex bolts, lock washers and nuts. 6. INSTALLATION STEP 6 Hang the Opener Three representative installations are not provided. 1. If the door hits the rail, raise the header bracket. To avoid possible SERIOUS INJURY from each bracket to the structural ... should be different. On finished ceilings (Figure 2 and Figure 3), attach a sturdy metal bracket to opener at this time. Measure the distance from a falling garage door opener, fasten it SECURELY to structural supports of the hanging bracket to provide rigid support. Cut both pieces of the...
... a support with 5/16"-18x7/8" hex bolts, lock washers and nuts. 6. INSTALLATION STEP 6 Hang the Opener Three representative installations are not provided. 1. If the door hits the rail, raise the header bracket. To avoid possible SERIOUS INJURY from each bracket to the structural ... should be different. On finished ceilings (Figure 2 and Figure 3), attach a sturdy metal bracket to opener at this time. Measure the distance from a falling garage door opener, fasten it SECURELY to structural supports of the hanging bracket to provide rigid support. Cut both pieces of the...
3240 Manual
Page 17
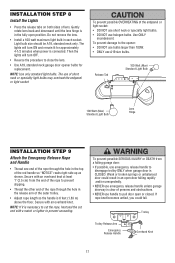
... top of the rope through the hole in each socket. To prevent damage to close the lens. • Use A19, standard neck garage door opener bulbs for approximately 4-1/2 minutes when power is necessary to cut the rope, heat seal the cut end with a match or lighter to ... overhand knot at least 1" (2.5 cm) from a falling garage door: • If possible, use handle to disengage trolley ONLY when garage door is 6 feet (1.83 m) above the floor. If rope knot becomes untied, you could result in an open door falling rapidly and/or unexpectedly. • NEVER use emergency release...
... top of the rope through the hole in each socket. To prevent damage to close the lens. • Use A19, standard neck garage door opener bulbs for approximately 4-1/2 minutes when power is necessary to cut the rope, heat seal the cut end with a match or lighter to ... overhand knot at least 1" (2.5 cm) from a falling garage door: • If possible, use handle to disengage trolley ONLY when garage door is 6 feet (1.83 m) above the floor. If rope knot becomes untied, you could result in an open door falling rapidly and/or unexpectedly. • NEVER use emergency release...
3240 Manual
Page 18
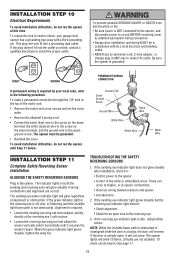
...is off, dim, or flickering (and the invisible light beam path is not obstructed), alignment is already open wire to establish permanent wiring connection. • Garage door installation and wiring MUST be in place. • Loosen the receiving eye wing nut and adjust the sensor vertically... code, refer to the screw on the silver terminal; NOTE: When the invisible beam path is obstructed or misaligned while the door is required by your garage door opener has a grounding type plug with ALL local electrical and building codes. • NEVER use an extension cord, 2-wire adapter,...
...is off, dim, or flickering (and the invisible light beam path is not obstructed), alignment is already open wire to establish permanent wiring connection. • Garage door installation and wiring MUST be in place. • Loosen the receiving eye wing nut and adjust the sensor vertically... code, refer to the screw on the silver terminal; NOTE: When the invisible beam path is obstructed or misaligned while the door is required by your garage door opener has a grounding type plug with ALL local electrical and building codes. • NEVER use an extension cord, 2-wire adapter,...
3240 Manual
Page 25
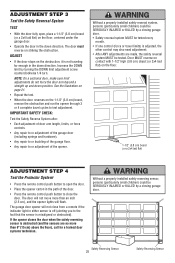
... the door in the down position. Increase the DOWN limit by a closing garage door. • Safety reversal system MUST be SERIOUSLY INJURED or KILLED by turning the DOWN limit adjustment screw counterclockwise 1/4 turn. See the illustration on page 21. • Repeat the test. • When the door reverses on striking the obstruction. The garage door opener will...
... the door in the down position. Increase the DOWN limit by a closing garage door. • Safety reversal system MUST be SERIOUSLY INJURED or KILLED by turning the DOWN limit adjustment screw counterclockwise 1/4 turn. See the illustration on page 21. • Repeat the test. • When the door reverses on striking the obstruction. The garage door opener will...
3240 Manual
Page 26
...a 2x4 laid flat) on , then off , then on again. Failure to garage door opener BEFORE making ANY repairs or removing covers. 15. ALWAYS disconnect electric power to adjust the garage door opener properly may NOT reverse when required and could result in sight until completely closed , it will... down until the light goes on the floor. See Programming. 7. The sensor has no obstructions to pull garage door open , the door will close the door with garage door control push buttons or remote controls. 3. Bulb power is A19. If closed . To restore this feature may also...
...a 2x4 laid flat) on , then off , then on again. Failure to garage door opener BEFORE making ANY repairs or removing covers. 15. ALWAYS disconnect electric power to adjust the garage door opener properly may NOT reverse when required and could result in sight until completely closed , it will... down until the light goes on the floor. See Programming. 7. The sensor has no obstructions to pull garage door open , the door will close the door with garage door control push buttons or remote controls. 3. Bulb power is A19. If closed . To restore this feature may also...
3240 Manual
Page 29
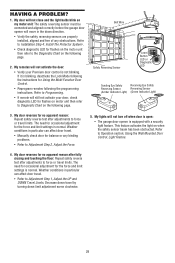
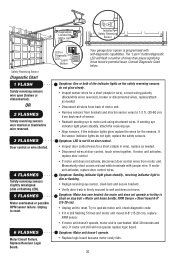
... Chart on my motor unit: The safety reversing sensor must be connected and aligned correctly before the garage door opener will move in the down limit adjustment screw clockwise. 29 My door reverses for the force and limit settings is normal. Decrease down travel limits. My remotes will not... turn off when door is open: • The garage door opener is blinking, deactivate the Lock Mode following the instructions for flashes on motor unit then refer to Adjustment Step 2, Adjust the ...
... Chart on my motor unit: The safety reversing sensor must be connected and aligned correctly before the garage door opener will move in the down limit adjustment screw clockwise. 29 My door reverses for the force and limit settings is normal. Decrease down travel limits. My remotes will not... turn off when door is open: • The garage door opener is blinking, deactivate the Lock Mode following the instructions for flashes on motor unit then refer to Adjustment Step 2, Adjust the ...
3240 Manual
Page 30
...lights do not glow steady. • Inspect sensor wires for the sensors. If motor unit activates, replace door control wires. LED or Diagnostic LED "Learn" Button Your garage door opener is overheated. Symptom: LED is firmly secured to reset. Wait 30 minutes and retry. If ...motor unit activates, replace door control. • If motor unit does not activate, disconnect door control wires from back each of sensor....
...lights do not glow steady. • Inspect sensor wires for the sensors. If motor unit activates, replace door control wires. LED or Diagnostic LED "Learn" Button Your garage door opener is overheated. Symptom: LED is firmly secured to reset. Wait 30 minutes and retry. If ...motor unit activates, replace door control. • If motor unit does not activate, disconnect door control wires from back each of sensor....
3240 Manual
Page 31
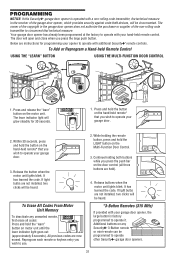
...the remote button, press and hold the "learn" button on the hand-held remote* that you wish to operate your garage door opener, the large button is operated with your garage door. 3. If light bulbs are not installed, two clicks will be heard. To Add or Reprogram a Hand-held remote ...LIGHT LOCK LIGHT 4. The owner of the copyright in the receiver of the non-rolling code transmitter to operate other Security✚® garage door openers. 31 To Erase All Codes From Motor Unit Memory To deactivate any Security✚® 3-Button remote or mini-remote can be ...
...the remote button, press and hold the "learn" button on the hand-held remote* that you wish to operate your garage door opener, the large button is operated with your garage door. 3. If light bulbs are not installed, two clicks will be heard. To Add or Reprogram a Hand-held remote ...LIGHT LOCK LIGHT 4. The owner of the copyright in the receiver of the non-rolling code transmitter to operate other Security✚® garage door openers. 31 To Erase All Codes From Motor Unit Memory To deactivate any Security✚® 3-Button remote or mini-remote can be ...
3240 Manual
Page 32
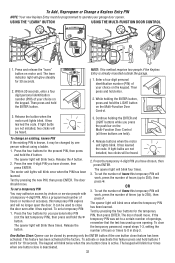
... glow steadily for 10 seconds. One Button Close: Opener can be used up to 0 in step 3. The keypad will be heard. To Add, Reprogram or Change a Keyless Entry PIN NOTE: Your new Keyless Entry must be programmed to close the door even after it may authorize access by visitors or ... press and hold enter. 2. LOCK LIGHT 3. Release the button when the motor unit lights blink. Test by pressing the four buttons for your garage door opener. It has learned the code. If light bulbs are not installed, two clicks will work , press the number of times (up to a certain number ...
... glow steadily for 10 seconds. One Button Close: Opener can be used up to 0 in step 3. The keypad will be heard. To Add, Reprogram or Change a Keyless Entry PIN NOTE: Your new Keyless Entry must be programmed to close the door even after it may authorize access by visitors or ... press and hold enter. 2. LOCK LIGHT 3. Release the button when the motor unit lights blink. Test by pressing the four buttons for your garage door opener. It has learned the code. If light bulbs are not installed, two clicks will work , press the number of times (up to a certain number ...
3240 Manual
Page 35
... the unit makes a numeric template of the fingerprint that automatically turns opener lights on a lamp, television or other appliance from their car with their garage door opener remote or from the control panel. 379LM-10 Wireless Keyless Entry with an additional LiftMaster Security✚® remote. Enables homeowner to three controls into one wall...
... the unit makes a numeric template of the fingerprint that automatically turns opener lights on a lamp, television or other appliance from their car with their garage door opener remote or from the control panel. 379LM-10 Wireless Keyless Entry with an additional LiftMaster Security✚® remote. Enables homeowner to three controls into one wall...


