
Universal Print Driver Version 2.0 White Paper
Page 13
Lexmark Universal Print Driver version 2.7.1 Note: If you are not using status monitor applications, then you can upgrade to improve printing performance. If you are using .... If you are using status monitor applications, then use only UPD 2.6. • This version contains only bug fixes. Lexmark Universal Print Driver version 2.7.2 Notes: • If you can be enabled manually. If you are not using status monitor applications, then you are using a private print driver, then check the updates before...
Lexmark Universal Print Driver version 2.7.1 Note: If you are not using status monitor applications, then you can upgrade to improve printing performance. If you are using .... If you are using status monitor applications, then use only UPD 2.6. • This version contains only bug fixes. Lexmark Universal Print Driver version 2.7.2 Notes: • If you can be enabled manually. If you are not using status monitor applications, then you are using a private print driver, then check the updates before...

Universal Print Driver Version 2.0 White Paper
Page 36
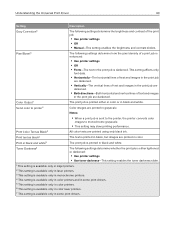
... that are organized: • Number of the printed document is insufficient to be printed and how the copies are stored in normal page order, then manually reverse the pages. Understanding the Universal Print Driver 36 Understanding the Universal Print Driver To see the UPD settings, from your printer model, the pages...
... that are organized: • Number of the printed document is insufficient to be printed and how the copies are stored in normal page order, then manually reverse the pages. Understanding the Universal Print Driver 36 Understanding the Universal Print Driver To see the UPD settings, from your printer model, the pages...
Universal Print Driver Version 2.0 White Paper
Page 40
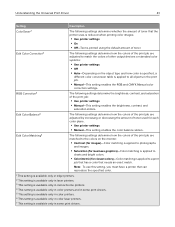
... in some print drivers. Toner Darkness2 The following settings determine how the pixel density of the print job: • Use printer settings • Off • Manual-This setting enables the brightness and contrast sliders. Print text as Black3 All color texts are printed in black and white. Notes: • When a print...
... in some print drivers. Toner Darkness2 The following settings determine how the pixel density of the print job: • Use printer settings • Off • Manual-This setting enables the brightness and contrast sliders. Print text as Black3 All color texts are printed in black and white. Notes: • When a print...
Universal Print Driver Version 2.0 White Paper
Page 41
... This setting is applied to charts and bright colors. • Colorimetric (for each color plane: • Use printer settings • Manual-This setting enables the color balance sliders. RGB Correction6 The following settings determine how the colors of the print job are adjusted to match ...the colors of the print job: • Use printer settings • Manual-This setting enables the brightness, contrast, and saturation sliders. Edit Color Correction6 The following settings determine the brightness, contrast, and saturation of...
... This setting is applied to charts and bright colors. • Colorimetric (for each color plane: • Use printer settings • Manual-This setting enables the color balance sliders. RGB Correction6 The following settings determine how the colors of the print job are adjusted to match ...the colors of the print job: • Use printer settings • Manual-This setting enables the brightness, contrast, and saturation sliders. Edit Color Correction6 The following settings determine the brightness, contrast, and saturation of...
Universal Print Driver Version 2.0 White Paper
Page 42
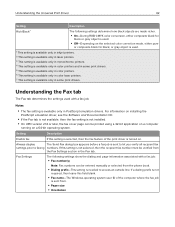
... the dialing and page information associated with a fax job. Notes: • The fax setting is not selected, then the recipient fax number must be entered manually or selected from . • Paper size • Orientation
... the dialing and page information associated with a fax job. Notes: • The fax setting is not selected, then the recipient fax number must be entered manually or selected from . • Paper size • Orientation

Product Information Guide
Page 20
... 30 seconds between the end of one attempt and the beginning of terminal equipment indicates only that Telecom has accepted that any single manual call to another item of telepermitted equipment of a telepermit for compliance to other Telecom customers. It indicates no assurance that the item... shall not be set to ensure that there is designed. This equipment is in all parallel devices connected to the same line. The Lexmark part number is required. Le numéro REN est indiqué sur l'étiquette produit. Some parameters required for compliance with another...
... 30 seconds between the end of one attempt and the beginning of terminal equipment indicates only that Telecom has accepted that any single manual call to another item of telepermitted equipment of a telepermit for compliance to other Telecom customers. It indicates no assurance that the item... shall not be set to ensure that there is designed. This equipment is in all parallel devices connected to the same line. The Lexmark part number is required. Le numéro REN est indiqué sur l'étiquette produit. Some parameters required for compliance with another...

Product Information Guide
Page 25
...accordance with FCC regulations on electromagnetic interference for a Class A computing device, use a properly shielded and grounded cable such as Lexmark part number 1021231 for parallel attach or 1021294 for any radio or television interference caused by using other than recommended cables or... may result in a commercial environment. Operation is not responsible for USB attach. Note: To assure compliance with the instruction manual, may cause undesired operation. Unauthorized changes or modifications could void the user's authority to operate this compliance information ...
...accordance with FCC regulations on electromagnetic interference for a Class A computing device, use a properly shielded and grounded cable such as Lexmark part number 1021231 for parallel attach or 1021294 for any radio or television interference caused by using other than recommended cables or... may result in a commercial environment. Operation is not responsible for USB attach. Note: To assure compliance with the instruction manual, may cause undesired operation. Unauthorized changes or modifications could void the user's authority to operate this compliance information ...
Menus Guide
Page 9
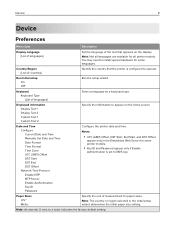
Run Initial setup On Off* Run the setup wizard. Date and Time Configure Current Date and Time Manually Set Date and Time Date Format Time Format Time Zone UTC (GMT) Offset DST Start DST End DST Offset Network Time Protocol Enable NTP NTP ...
Run Initial setup On Off* Run the setup wizard. Date and Time Configure Current Date and Time Manually Set Date and Time Date Format Time Format Time Zone UTC (GMT) Offset DST Start DST End DST Offset Network Time Protocol Enable NTP NTP ...
Menus Guide
Page 16
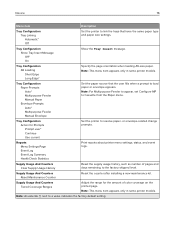
... supply usage history, such as number of color coverage on the printed page. Tray Configuration Paper Prompts Auto* Multipurpose Feeder Manual Paper Envelope Prompts Auto* Multipurpose Feeder Manual Envelope Set the paper source that have the same paper type and paper size settings. Reports Menu Settings Page Event Log Event...
... supply usage history, such as number of color coverage on the printed page. Tray Configuration Paper Prompts Auto* Multipurpose Feeder Manual Paper Envelope Prompts Auto* Multipurpose Feeder Manual Envelope Set the paper source that have the same paper type and paper size settings. Reports Menu Settings Page Event Log Event...
Menus Guide
Page 19
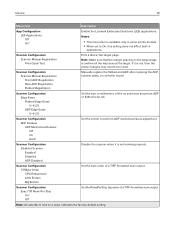
... the target. Note: An asterisk (*) next to be reset. Scanner Configuration Scanner Manual Registration Front ADF Registration Rear ADF Registration Flatbed Registration Manually register the flatbed and ADF after replacing the ADF, scanner glass, or controller board.... Device 19 Menu item Description App Configuration LES Applications Off On* Enable the Lexmark Embedded Solutions (LES) applications. Scanner Configuration Scanner Manual Registration Print Quick Test Print a Quick Test target page. Scanner Configuration Disabled Scanner ...
... the target. Note: An asterisk (*) next to be reset. Scanner Configuration Scanner Manual Registration Front ADF Registration Rear ADF Registration Flatbed Registration Manually register the flatbed and ADF after replacing the ADF, scanner glass, or controller board.... Device 19 Menu item Description App Configuration LES Applications Off On* Enable the Lexmark Embedded Solutions (LES) applications. Scanner Configuration Scanner Manual Registration Print Quick Test Print a Quick Test target page. Scanner Configuration Disabled Scanner ...
Menus Guide
Page 25
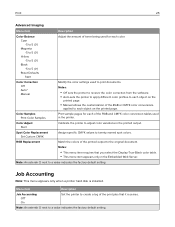
... the amount of toner being used for each of the RGB and CMYK color conversion tables used to print documents. Color Correction Off Auto* Manual Modify the color settings used in the printed output. Notes: • Off sets the printer to receive the color correction from the software....object on the printed page. Spot Color Replacement Set Custom CMYK Assign specific CMYK values to each object on the printed page. • Manual allows the customization of the RGB or CMYK color conversions applied to twenty named spot colors. Note: An asterisk (*) next to a value indicates...
... the amount of toner being used for each of the RGB and CMYK color conversion tables used to print documents. Color Correction Off Auto* Manual Modify the color settings used in the printed output. Notes: • Off sets the printer to receive the color correction from the software....object on the printed page. Spot Color Replacement Set Custom CMYK Assign specific CMYK values to each object on the printed page. • Manual allows the customization of the RGB or CMYK color conversions applied to twenty named spot colors. Note: An asterisk (*) next to a value indicates...
Menus Guide
Page 29
Auto CR after a line feed control command. Tray Renumber Assign MP Feeder 0-201 (200*) Assign Tray [x] 0-201 (200*) Assign Manual Paper 0-201 (200*) Assign Manual Envelope 0-201 (200*) Configure the printer to work with print drivers or applications that print on each line (vertical line spacing) based on ...
Auto CR after a line feed control command. Tray Renumber Assign MP Feeder 0-201 (200*) Assign Tray [x] 0-201 (200*) Assign Manual Paper 0-201 (200*) Assign Manual Envelope 0-201 (200*) Configure the printer to work with print drivers or applications that print on each line (vertical line spacing) based on ...
Menus Guide
Page 32
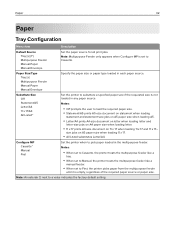
... Listed* Set the printer to Cassette. Paper 32 Paper Tray Configuration Menu item Description Default Source Tray [x] (1*) Multipurpose Feeder Manual Paper Manual Envelope Set the paper source for all print jobs. Note: Multipurpose Feeder only appears when Configure MP is set to pick ...paper loaded in the multipurpose feeder. Paper Size/Type Tray [x] Multipurpose Feeder Manual Paper Manual Envelope Specify the paper size or paper type loaded in any paper source. Notes: • When set to Cassette, the printer ...
... Listed* Set the printer to Cassette. Paper 32 Paper Tray Configuration Menu item Description Default Source Tray [x] (1*) Multipurpose Feeder Manual Paper Manual Envelope Set the paper source for all print jobs. Note: Multipurpose Feeder only appears when Configure MP is set to pick ...paper loaded in the multipurpose feeder. Paper Size/Type Tray [x] Multipurpose Feeder Manual Paper Manual Envelope Specify the paper size or paper type loaded in any paper source. Notes: • When set to Cassette, the printer ...

Menus Guide
Page 39
... default setting. Note: This setting prevents memory buffer conditions and failed faxes. Fax Number Identify your fax name or fax number. Enable Manual Fax Off* On Set the printer to a value indicates the factory default setting. Memory Use All receive Mostly receive Equal* Mostly send... All send Set the amount of your fax number. Note: An asterisk (*) next to fax manually. Analog Fax Setup General Fax Settings Menu item Description Fax Name Identify your fax machine. Cancel Faxes Allow* Don't Allow Cancel outgoing faxes...
... default setting. Note: This setting prevents memory buffer conditions and failed faxes. Fax Number Identify your fax name or fax number. Enable Manual Fax Off* On Set the printer to a value indicates the factory default setting. Memory Use All receive Mostly receive Equal* Mostly send... All send Set the amount of your fax number. Note: An asterisk (*) next to fax manually. Analog Fax Setup General Fax Settings Menu item Description Fax Name Identify your fax machine. Cancel Faxes Allow* Don't Allow Cancel outgoing faxes...

Menus Guide
Page 45
...* Show the number that is installed. Staple Off* 1 staple 2 staples Set the stapling option for received faxes. Holding Faxes Held Fax Mode Off* Always On Manual Scheduled Hold received faxes from a received fax. Punch Off* 2 holes 3 holes 4 holes Punch holes along the edge of each page from devices with no station...
...* Show the number that is installed. Staple Off* 1 staple 2 staples Set the stapling option for received faxes. Holding Faxes Held Fax Mode Off* Always On Manual Scheduled Hold received faxes from a received fax. Punch Off* 2 holes 3 holes 4 holes Punch holes along the edge of each page from devices with no station...

Menus Guide
Page 46
...menu item appears only when you want to block. Fax Forwarding Print Print and Forward Forward* Specify how to begin receiving fax. Manual Answer Code 0-9 (9*) Manually enter a code on the telephone number pad to forward received fax. Confirmation E‑mail Send a confirmation e&#...Fax 46 Menu item Description Banned Fax List Add Banned Fax Specify the phone numbers that you set the printer to receive fax manually. Auto Answer Off On* Set the printer to forward received fax. Forward to Destination [x] Type Shortcut Number Specify where to receive...
...menu item appears only when you want to block. Fax Forwarding Print Print and Forward Forward* Specify how to begin receiving fax. Manual Answer Code 0-9 (9*) Manually enter a code on the telephone number pad to forward received fax. Confirmation E‑mail Send a confirmation e&#...Fax 46 Menu item Description Banned Fax List Add Banned Fax Specify the phone numbers that you set the printer to receive fax manually. Auto Answer Off On* Set the printer to forward received fax. Forward to Destination [x] Type Shortcut Number Specify where to receive...

Menus Guide
Page 68
... Preview Off On* Show a preview of the scan on . Color Off On* Specify whether to print on the display. Paper Source Tray [x] (1*) Multipurpose Feeder Manual Paper Manual Envelope Specify the paper source for all print jobs. Off* 1 staple, top left corner Note: This menu item appears only when a staple finisher is...
... Preview Off On* Show a preview of the scan on . Color Off On* Specify whether to print on the display. Paper Source Tray [x] (1*) Multipurpose Feeder Manual Paper Manual Envelope Specify the paper source for all print jobs. Off* 1 staple, top left corner Note: This menu item appears only when a staple finisher is...

Menus Guide
Page 74
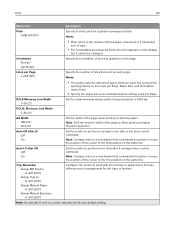
IPv4 Enable DHCP On* Off Enable Dynamic Host Configuration Protocol (DHCP). Note: You can change the printer LAA manually. Job Buffering Off On* Temporarily store jobs on the printer hard disk before printing. Energy Efficient Ethernet Off On* Reduce power consumption when the printer ...
IPv4 Enable DHCP On* Off Enable Dynamic Host Configuration Protocol (DHCP). Note: You can change the printer LAA manually. Job Buffering Off On* Temporarily store jobs on the printer hard disk before printing. Energy Efficient Ethernet Off On* Reduce power consumption when the printer ...

Menus Guide
Page 76
...Note: This menu appears only in the printer. Stateless Address Autoconfiguration Off On* Set the network adapter to print servers. Manually Assigned IPv6 Address Assign the IPv6 address. All IPv6 Router Addresses Show all IPv6 addresses. Raw Print Port 1-65535 (9100*) Specify...for printers connected on a network. Menu item Description Enable IPv6 Off On* Enable IPv6 in the list can access the printer functionality. Manually Assigned IPv6 Router Assign the IPv6 router. Note: An asterisk (*) next to a value indicates the factory default setting. All IPv6 ...
...Note: This menu appears only in the printer. Stateless Address Autoconfiguration Off On* Set the network adapter to print servers. Manually Assigned IPv6 Address Assign the IPv6 address. All IPv6 Router Addresses Show all IPv6 addresses. Raw Print Port 1-65535 (9100*) Specify...for printers connected on a network. Menu item Description Enable IPv6 Off On* Enable IPv6 in the list can access the printer functionality. Manually Assigned IPv6 Router Assign the IPv6 router. Note: An asterisk (*) next to a value indicates the factory default setting. All IPv6 ...

Users Guide PDF
Page 52
...: - Set the expiration time for a repeat print job. Note: Confidential held jobs are stored in the printer until they are released or deleted manually. USB flash drives must support the File Allocation Table (FAT) system. File types Documents • PDF (version 1.7 or earlier) • HTML • XPS •...
...: - Set the expiration time for a repeat print job. Note: Confidential held jobs are stored in the printer until they are released or deleted manually. USB flash drives must support the File Allocation Table (FAT) system. File types Documents • PDF (version 1.7 or earlier) • HTML • XPS •...


