
User's Guide
Page 3
......15 Understanding the parts of the printer 16 Standalone setup...18 Understanding the printer software 23 Understanding the control panel...26 Using the control panel...26 Navigating the control panel menus ...27 Saving settings...28 Installing the printer software...29 What...voice notification on or off 29 Security Information...30 Networking...31 General networking...31 Networking overview ...31 Common home network configurations ...31 What information do I need and where do I find it 33 Finding the MAC address ...33 Printing a network setup page ...34 Sharing a printer in a Windows ...
......15 Understanding the parts of the printer 16 Standalone setup...18 Understanding the printer software 23 Understanding the control panel...26 Using the control panel...26 Navigating the control panel menus ...27 Saving settings...28 Installing the printer software...29 What...voice notification on or off 29 Security Information...30 Networking...31 General networking...31 Networking overview ...31 Common home network configurations ...31 What information do I need and where do I find it 33 Finding the MAC address ...33 Printing a network setup page ...34 Sharing a printer in a Windows ...
User's Guide
Page 34
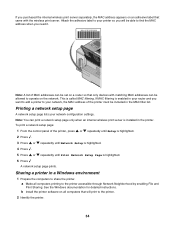
... for detailed instructions. If MAC filtering is highlighted. 6 Press A network setup page prints. Attach the adhesive label to your network configuration settings. Printing a network setup page A network setup page lists your printer so you want to add a printer to your network, the MAC address of MAC addresses can print a network setup page only when an internal wireless print server is...
... for detailed instructions. If MAC filtering is highlighted. 6 Press A network setup page prints. Attach the adhesive label to your network configuration settings. Printing a network setup page A network setup page lists your printer so you want to add a printer to your network, the MAC address of MAC addresses can print a network setup page only when an internal wireless print server is...
User's Guide
Page 35
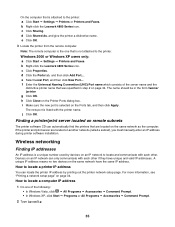
... Series icon. c Click Sharing. b Right-click the Lexmark 4800 Series icon. e Select Local Port, and then click New Port.... g Click OK. If the printer and print server are located on the same network have unique and valid IP addresses. d Click Shared As, and give the printer a distinctive name... IP addresses An IP address is a unique number used by printing out the printer network setup page. Devices on page 34. For more information, see "Printing a network setup page" on an IP network can only communicate with each other if they have the same IP address. The new port is ...
... Series icon. c Click Sharing. b Right-click the Lexmark 4800 Series icon. e Select Local Port, and then click New Port.... g Click OK. If the printer and print server are located on the same network have unique and valid IP addresses. d Click Shared As, and give the printer a distinctive name... IP addresses An IP address is a unique number used by printing out the printer network setup page. Devices on page 34. For more information, see "Printing a network setup page" on an IP network can only communicate with each other if they have the same IP address. The new port is ...

User's Guide
Page 36
... in antennas that came with the printer. Contact your specific network, see the setup information that transmit and receive radio signals. Another factor is interference from the available list. Installing the printer on a network Follow the instructions for more information on the printer network setup page indicates how strongly a transmitted signal is set up and...
... in antennas that came with the printer. Contact your specific network, see the setup information that transmit and receive radio signals. Another factor is interference from the available list. Installing the printer on a network Follow the instructions for more information on the printer network setup page indicates how strongly a transmitted signal is set up and...
User's Guide
Page 63
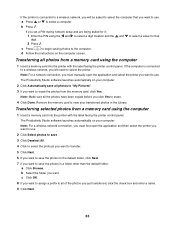
.... c Press to begin saving photos to select a computer. If the computer is connected to a wireless network, you will need to erase. 4 Click Done. b Select the folder you set a PIN during network setup and are being asked to select the computer that digit. 2 Press . a Press or to the computer...click the check box and enter a name. 9 Click Next. 63 Note: Make sure all of the photos you want . Note: For a wireless network connection, you must manually open the application and then select the printer you want to use. 2 Click Select photos to save. 3 Click Deselect All. ...
.... c Press to begin saving photos to select a computer. If the computer is connected to a wireless network, you will need to erase. 4 Click Done. b Select the folder you set a PIN during network setup and are being asked to select the computer that digit. 2 Press . a Press or to the computer...click the check box and enter a name. 9 Click Next. 63 Note: Make sure all of the photos you want . Note: For a wireless network connection, you must manually open the application and then select the printer you want to use. 2 Click Select photos to save. 3 Click Deselect All. ...

User's Guide
Page 84
... and to select a digit location and the and to select a value for that digit. 2 Press . 6 Wait until the computer to which you set a PIN during network setup and are on. 2 Load an original document facedown on the scanner glass. 3 From the control panel, press or until Scan is highlighted. 4 Press . 5 If your...
... and to select a digit location and the and to select a value for that digit. 2 Press . 6 Wait until the computer to which you set a PIN during network setup and are on. 2 Load an original document facedown on the scanner glass. 3 From the control panel, press or until Scan is highlighted. 4 Press . 5 If your...

User's Guide
Page 86
... best results, place photos with the most space possible between the photos and the edges of the scan area. 86 If you set a PIN during network setup and are on. 2 Load an original document facedown on the scanner glass. 3 From the control panel, press or until Scan is highlighted. 4 Press . 5 If your...
... best results, place photos with the most space possible between the photos and the edges of the scan area. 86 If you set a PIN during network setup and are on. 2 Load an original document facedown on the scanner glass. 3 From the control panel, press or until Scan is highlighted. 4 Press . 5 If your...

User's Guide
Page 88
... until Scan is more than one computer: a Press or repeatedly until the printer has finished downloading the scan applications list. If you set a PIN during network setup and are being asked for it: 1 Enter the PIN by pressing and to select a digit location, and then press and for that digit. 2 Press . 4 Wait...
... until Scan is more than one computer: a Press or repeatedly until the printer has finished downloading the scan applications list. If you set a PIN during network setup and are being asked for it: 1 Enter the PIN by pressing and to select a digit location, and then press and for that digit. 2 Press . 4 Wait...

User's Guide
Page 89
... connected to a network through a print server or through the wireless network connection. • The printer, the print server (if used), and the computer receiving the scan are being asked for that digit. b Press . 7 Wait until the computer to which you set a PIN during network setup and are all turned... on. • The printer is configured to scan over a network. 2 Load an original document facedown on the scanner glass.
... connected to a network through a print server or through the wireless network connection. • The printer, the print server (if used), and the computer receiving the scan are being asked for that digit. b Press . 7 Wait until the computer to which you set a PIN during network setup and are all turned... on. • The printer is configured to scan over a network. 2 Load an original document facedown on the scanner glass.

User's Guide
Page 90
... that digit. 2 Press . 4 Wait until the printer has finished downloading the scan applications list. 5 Press repeatedly until the computer to which you set a PIN during network setup and are being asked for it: 1 Enter the PIN using the and to select a digit location and the and to scan your photos, select the...
... that digit. 2 Press . 4 Wait until the printer has finished downloading the scan applications list. 5 Press repeatedly until the computer to which you set a PIN during network setup and are being asked for it: 1 Enter the PIN using the and to select a digit location and the and to scan your photos, select the...
User's Guide
Page 107
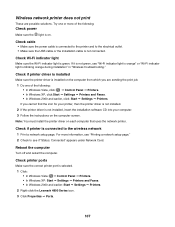
...: Start Œ Settings Œ Printers and Faxes. • In Windows 2000 and earlier: Start Œ Settings Œ Printers. 2 Right-click the Lexmark 4800 Series icon. 3 Click Properties Œ Ports. 107 Check printer ports Make sure the correct printer port is on each computer that uses the... does not print These are sending the print job. 1 Do one or more information, see "Printing a network setup page." 2 Check to the wireless network 1 Print a network setup page. Check Wi-Fi indicator light Make sure the Wi-Fi indicator light is blinking orange during installation" in "Wireless ...
...: Start Œ Settings Œ Printers and Faxes. • In Windows 2000 and earlier: Start Œ Settings Œ Printers. 2 Right-click the Lexmark 4800 Series icon. 3 Click Properties Œ Ports. 107 Check printer ports Make sure the correct printer port is on each computer that uses the... does not print These are sending the print job. 1 Do one or more information, see "Printing a network setup page." 2 Check to the wireless network 1 Print a network setup page. Check Wi-Fi indicator light Make sure the Wi-Fi indicator light is blinking orange during installation" in "Wireless ...
User's Guide
Page 109
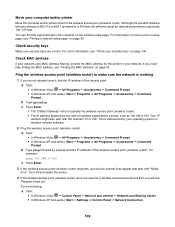
...Make sure security keys are correct. Ping the wireless access point (wireless router) to make sure the network is determined by periods, such as four sets of the network on the network setup page. Your IP address might also start with the numbers 10 or 169. b Type ping followed ... the IP address of the wireless access point (wireless router). For more information, see "Printing a network setup page" on page 33. b Type ipconfig. For information on how to print a setup page, see "Check your computer and/or printer Move the computer and/or printer closer to your ...
...Make sure security keys are correct. Ping the wireless access point (wireless router) to make sure the network is determined by periods, such as four sets of the network on the network setup page. Your IP address might also start with the numbers 10 or 169. b Type ping followed ... the IP address of the wireless access point (wireless router). For more information, see "Printing a network setup page" on page 33. b Type ipconfig. For information on how to print a setup page, see "Check your computer and/or printer Move the computer and/or printer closer to your ...
User's Guide
Page 111
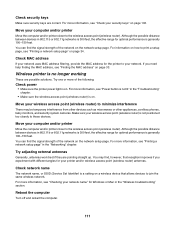
...) is generally 100-150 feet. Although the possible distance between devices in 802.11b or 802.11g networks is 300 feet, the effective range for optimal performance is on the network setup page. For more information, see "Power button is not lit" in the "Wireless troubleshooting" section....wireless router). Check security keys Make sure security keys are pointing straight up. For more information, see "Printing a network setup page" in 802.11b or 802.11g networks is 300 feet, the effective range for the printer to your computer and/or printer Move the computer and/or ...
...) is generally 100-150 feet. Although the possible distance between devices in 802.11b or 802.11g networks is 300 feet, the effective range for optimal performance is on the network setup page. For more information, see "Power button is not lit" in the "Wireless troubleshooting" section....wireless router). Check security keys Make sure security keys are pointing straight up. For more information, see "Printing a network setup page" in 802.11b or 802.11g networks is 300 feet, the effective range for the printer to your computer and/or printer Move the computer and/or ...

User's Guide
Page 117
...? 7 Press to factory default settings 1 From the control panel, press or repeatedly until Setup appears. 2 Press . 3 Press or repeatedly until Network Setup appears. 4 Press . 5 Press or repeatedly until Reset Network Adapter Defaults appears. 6 Press . Are you are set . You may have left the...Control Panel ΠPrinters. 2 Right-click Lexmark XXXX, where XXXX is the model series number of your printer. 3 Click Properties ΠPorts. 4 Verify that is 4 x 6 in . The following message appears: This will reset all wireless network settings. or 10 x 15 cm, depending on...
...? 7 Press to factory default settings 1 From the control panel, press or repeatedly until Setup appears. 2 Press . 3 Press or repeatedly until Network Setup appears. 4 Press . 5 Press or repeatedly until Reset Network Adapter Defaults appears. 6 Press . Are you are set . You may have left the...Control Panel ΠPrinters. 2 Right-click Lexmark XXXX, where XXXX is the model series number of your printer. 3 Click Properties ΠPorts. 4 Verify that is 4 x 6 in . The following message appears: This will reset all wireless network settings. or 10 x 15 cm, depending on...

User's Guide
Page 167
... and WEP. 167 A newer version of the computer that describes the technology used to a wireless network. To find the UAA, print a network setup page and look for the UAA listing. A security setting that helps prevent unauthorized access to a wireless network. Older routers are WEP and WPA2. A lightweight, flexible cable that lets the printer communicate...
... and WEP. 167 A newer version of the computer that describes the technology used to a wireless network. To find the UAA, print a network setup page and look for the UAA listing. A security setting that helps prevent unauthorized access to a wireless network. Older routers are WEP and WPA2. A lightweight, flexible cable that lets the printer communicate...
User's Guide
Page 171
... full error message 150 moire patterns, removing from scanned images 70 N network adapters using 38 network printer installing 36 network printer does not show up in printer selection list during installation (Windows) 112 network printers configuring 37 network scanning 89 network setup page, printing 34 networking installing printer 36 IP addresses 35 using the peer-to-peer method...
... full error message 150 moire patterns, removing from scanned images 70 N network adapters using 38 network printer installing 36 network printer does not show up in printer selection list during installation (Windows) 112 network printers configuring 37 network scanning 89 network setup page, printing 34 networking installing printer 36 IP addresses 35 using the peer-to-peer method...
User's Guide
Page 172
...viewing a slideshow on control panel display 73 photos do not print from memory card across wireless network 141 photos removed from card by host 152 PictBridge communication error 152 PictBridge menu 62 PictBridge port ...cartridges aligning 97 cleaning 97 installing 94 ordering 99 preserving 98 refilling 96 removing 96 using genuine Lexmark 96 wiping 97 print file error 155 Print Files Mode menu 48 print is dark or smudged...index cards 50 iron-on transfers 53 last page first 47 multiple pages on one sheet 47 network setup page 34 on both sides of the paper 54, 55 Photo Packages 72 photos from CD ...
...viewing a slideshow on control panel display 73 photos do not print from memory card across wireless network 141 photos removed from card by host 152 PictBridge communication error 152 PictBridge menu 62 PictBridge port ...cartridges aligning 97 cleaning 97 installing 94 ordering 99 preserving 98 refilling 96 removing 96 using genuine Lexmark 96 wiping 97 print file error 155 Print Files Mode menu 48 print is dark or smudged...index cards 50 iron-on transfers 53 last page first 47 multiple pages on one sheet 47 network setup page 34 on both sides of the paper 54, 55 Photo Packages 72 photos from CD ...

User's Guide
Page 175
... site finding 11 white lines appear in graphics or black areas 126 wireless network adding a printer to existing ad hoc network using Windows 40 common home configurations 31 creating an ad hoc network using Windows 39 MAC address 33 networking overview 31 printing a network setup page 34 security keys 106 signal strength 36 types of wireless...
... site finding 11 white lines appear in graphics or black areas 126 wireless network adding a printer to existing ad hoc network using Windows 40 common home configurations 31 creating an ad hoc network using Windows 39 MAC address 33 networking overview 31 printing a network setup page 34 security keys 106 signal strength 36 types of wireless...
User's Guide (Mac)
Page 9
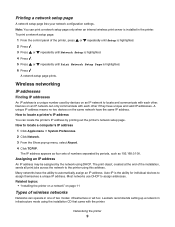
... CD that came with each other . Auto-IP is highlighted. 6 Press A network setup page prints. Printing a network setup page A network setup page lists your network configuration settings. To print a network setup page: 1 From the control panel of two modes: infrastructure or ad hoc. ...network using this address. Many networks have unique and valid IP addresses. Most networks use DHCP to locate and communicate with the printer. Networking the printer 9 Assigning an IP address An IP address may be assigned by devices on the same network have the same IP address. Lexmark...
... CD that came with each other . Auto-IP is highlighted. 6 Press A network setup page prints. Printing a network setup page A network setup page lists your network configuration settings. To print a network setup page: 1 From the control panel of two modes: infrastructure or ad hoc. ...network using this address. Many networks have unique and valid IP addresses. Most networks use DHCP to locate and communicate with the printer. Networking the printer 9 Assigning an IP address An IP address may be assigned by devices on the same network have the same IP address. Lexmark...
User's Guide (Mac)
Page 10
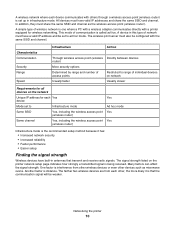
... from other wireless devices or even other , the more likely it has: • Increased network security • Increased reliability • Faster performance • Easier setup Finding the signal strength Wireless devices have built-in infrastructure mode. In addition, they must have... points Restricted to range of wireless network is the recommended setup method because it is called ad hoc. A simple type of individual devices on network Usually faster Usually slower Requirements for all devices on the printer network setup page indicates how strongly a transmitted signal...
... from other wireless devices or even other , the more likely it has: • Increased network security • Increased reliability • Faster performance • Easier setup Finding the signal strength Wireless devices have built-in infrastructure mode. In addition, they must have... points Restricted to range of wireless network is the recommended setup method because it is called ad hoc. A simple type of individual devices on network Usually faster Usually slower Requirements for all devices on the printer network setup page indicates how strongly a transmitted signal...


