
User's Guide
Page 6
...printer 95 Maintaining print cartridges...95 Installing print cartridges...95 Removing a used print cartridge ...96 Refilling print cartridges...97 Using genuine Lexmark print cartridges...97 Aligning print cartridges ...98 Cleaning the print cartridge nozzles...98 Checking ink levels...99 Wiping the print cartridge nozzles and contacts ...100 Preserving the print cartridges... Wireless troubleshooting...111 Wireless troubleshooting checklist ...111 Printing a network setup page ...112 Wireless configuration does not continue after the USB cable is attached 112 Cannot print over wireless ...
...printer 95 Maintaining print cartridges...95 Installing print cartridges...95 Removing a used print cartridge ...96 Refilling print cartridges...97 Using genuine Lexmark print cartridges...97 Aligning print cartridges ...98 Cleaning the print cartridge nozzles...98 Checking ink levels...99 Wiping the print cartridge nozzles and contacts ...100 Preserving the print cartridges... Wireless troubleshooting...111 Wireless troubleshooting checklist ...111 Printing a network setup page ...112 Wireless configuration does not continue after the USB cable is attached 112 Cannot print over wireless ...
User's Guide
Page 13
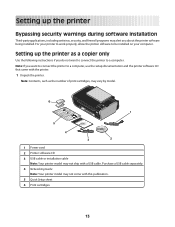
... following instructions if you about the printer software being installed. Setting up the printer as the number of print cartridges, may vary by model. 6 1 2 3 WI F I PRINTING 1 5 4 3 2 1 Power cord 2 Printer software CD 3 USB cable or installation cable Note: Your printer model may not ship with the printer. 1 Unpack the printer. Setting up the printer Bypassing security warnings during software...
... following instructions if you about the printer software being installed. Setting up the printer as the number of print cartridges, may vary by model. 6 1 2 3 WI F I PRINTING 1 5 4 3 2 1 Power cord 2 Printer software CD 3 USB cable or installation cable Note: Your printer model may not ship with the printer. 1 Unpack the printer. Setting up the printer Bypassing security warnings during software...

User's Guide
Page 16
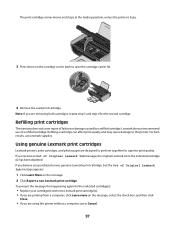
9 Open the printer, and then press down on the print cartridge carrier levers. 10 Open the color cartridge foil, and then remove the cartridge from the pack. 11 If a storage unit is included, remove the color cartridge from the storage unit. 2 1 16
9 Open the printer, and then press down on the print cartridge carrier levers. 10 Open the color cartridge foil, and then remove the cartridge from the pack. 11 If a storage unit is included, remove the color cartridge from the storage unit. 2 1 16

User's Guide
Page 17
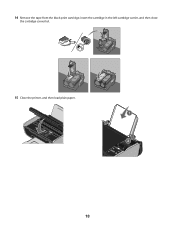
12 Remove the tape from the color print cartridge, insert the cartridge in the right carrier, and then close the color cartridge lid. 13 If a black print cartridge is included in the box contents, open the black cartridge foil, and then remove the cartridge from the pack. Note: You may need to purchase a black print cartridge separately. 17
12 Remove the tape from the color print cartridge, insert the cartridge in the right carrier, and then close the color cartridge lid. 13 If a black print cartridge is included in the box contents, open the black cartridge foil, and then remove the cartridge from the pack. Note: You may need to purchase a black print cartridge separately. 17
User's Guide
Page 18
14 Remove the tape from the black print cartridge, insert the cartridge in the left cartridge carrier, and then close the cartridge carrier lid. 15 Close the printer, and then load plain paper. 1 2 18
14 Remove the tape from the black print cartridge, insert the cartridge in the left cartridge carrier, and then close the cartridge carrier lid. 15 Close the printer, and then load plain paper. 1 2 18

User's Guide
Page 21
...the To 1 Scanner glass Scan and copy photos and documents. 2 Scanner unit • Access the print cartridges. • Remove paper jams. 3 Print cartridge carrier Install, replace, or remove a print cartridge. 4 Rear USB port Connect the printer to a desktop computer using a Note: Do not use this print server. 21 Use the 8 Paper exit... in or removing a USB cable or installation cable. 5 Power supply with the USB cable. Quick Connect laptop port. Note: Your printer model may not have wireless capability and may not have this port simultaneously with port Connect the...
...the To 1 Scanner glass Scan and copy photos and documents. 2 Scanner unit • Access the print cartridges. • Remove paper jams. 3 Print cartridge carrier Install, replace, or remove a print cartridge. 4 Rear USB port Connect the printer to a desktop computer using a Note: Do not use this print server. 21 Use the 8 Paper exit... in or removing a USB cable or installation cable. 5 Power supply with the USB cable. Quick Connect laptop port. Note: Your printer model may not have wireless capability and may not have this port simultaneously with port Connect the...
User's Guide
Page 24
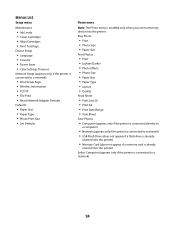
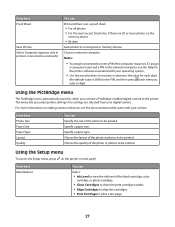
... Setup menu Maintenance • Ink Levels • Clean Cartridges • Align Cartridges • Print Test Page Device Setup • Language • Country • Power Saver • Clear Settings Timeout Network Setup (appears only if the printer is connected to a network) • Print Setup Page • Wireless Information • TCP/IP • File Print •...
... Setup menu Maintenance • Ink Levels • Clean Cartridges • Align Cartridges • Print Test Page Device Setup • Language • Country • Power Saver • Clear Settings Timeout Network Setup (appears only if the printer is connected to a network) • Print Setup Page • Wireless Information • TCP/IP • File Print •...
User's Guide
Page 27
...the network computer, see the documentation that came with your operating system. • Use the arrow buttons to the printer. Using the PictBridge menu The PictBridge menu automatically launches when you connect a PictBridge-enabled digital camera to increase or decrease the ...default value is 0000) in printers connected to a network) You can Select: • Ink Level to view the ink level of the black cartridge, color cartridge, or photo cartridge. • Clean Cartridges to clean the print cartridge nozzles. • Align Cartridges to align the cartridges. • Print Test Page...
...the network computer, see the documentation that came with your operating system. • Use the arrow buttons to the printer. Using the PictBridge menu The PictBridge menu automatically launches when you connect a PictBridge-enabled digital camera to increase or decrease the ...default value is 0000) in printers connected to a network) You can Select: • Ink Level to view the ink level of the black cartridge, color cartridge, or photo cartridge. • Clean Cartridges to clean the print cartridge nozzles. • Align Cartridges to align the cartridges. • Print Test Page...
User's Guide
Page 34
...the desktop computer may not come with cartridge installation. • Print a test page. • Print an alignment page. • Clean the print cartridge nozzles. • Order ink or supplies. • Register the printer. • Contact customer support. Lexmark Printer Utility • Get help with these...front of a memory device inserted into a network printer. • Transfer photos and documents from a memory device to the printer through the rear USB port and you decide to connect a laptop computer to the computer over a network. Lexmark Wireless Setup Assistant Set up the...
...the desktop computer may not come with cartridge installation. • Print a test page. • Print an alignment page. • Clean the print cartridge nozzles. • Order ink or supplies. • Register the printer. • Contact customer support. Lexmark Printer Utility • Get help with these...front of a memory device inserted into a network printer. • Transfer photos and documents from a memory device to the printer through the rear USB port and you decide to connect a laptop computer to the computer over a network. Lexmark Wireless Setup Assistant Set up the...
User's Guide
Page 95
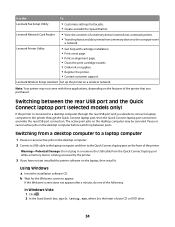
Maintaining the printer Maintaining print cartridges Installing print cartridges 1 Open the printer, and then press down on the bottom of the color cartridge, insert the cartridge in the right carrier, and then close the color cartridge carrier lid. Warning-Potential Damage: Do not touch the gold contact area on the back or the metal nozzles on the cartridge carrier levers. 2 Remove the used print cartridge or cartridges. 3 If you are installing new print cartridges, remove the tape from the back and bottom of the cartridge. 95
Maintaining the printer Maintaining print cartridges Installing print cartridges 1 Open the printer, and then press down on the bottom of the color cartridge, insert the cartridge in the right carrier, and then close the color cartridge carrier lid. Warning-Potential Damage: Do not touch the gold contact area on the back or the metal nozzles on the cartridge carrier levers. 2 Remove the used print cartridge or cartridges. 3 If you are installing new print cartridges, remove the tape from the back and bottom of the cartridge. 95
User's Guide
Page 96
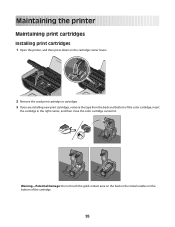
Removing a used print cartridge 1 Make sure the printer is included in the left carrier, and then close the black cartridge carrier lid. Warning-Potential Damage: Do not touch the gold contact area on the back or the metal nozzles on . 2 Lift the scanner unit. 96 4 If a black cartridge is on the bottom of the cartridge. 5 Close the printer, making sure to keep your hands out from the back and bottom of the black cartridge, insert the cartridge in the box contents, remove the tape from underneath the scanner unit.
Removing a used print cartridge 1 Make sure the printer is included in the left carrier, and then close the black cartridge carrier lid. Warning-Potential Damage: Do not touch the gold contact area on the back or the metal nozzles on . 2 Lift the scanner unit. 96 4 If a black cartridge is on the bottom of the cartridge. 5 Close the printer, making sure to keep your hands out from the back and bottom of the black cartridge, insert the cartridge in the box contents, remove the tape from underneath the scanner unit.
User's Guide
Page 97
... 4 Remove the used print cartridge. If you purchased a new, genuine Lexmark print cartridge, but the Out of Original Lexmark Ink message, the original Lexmark ink in the indicated cartridge (s) has been depleted. Refilling a cartridge can affect print quality and may cause damage to perform together for the second cartridge. Using genuine Lexmark print cartridges Lexmark printers, print cartridges, and photo paper are removing...
... 4 Remove the used print cartridge. If you purchased a new, genuine Lexmark print cartridge, but the Out of Original Lexmark Ink message, the original Lexmark ink in the indicated cartridge (s) has been depleted. Refilling a cartridge can affect print quality and may cause damage to perform together for the second cartridge. Using genuine Lexmark print cartridges Lexmark printers, print cartridges, and photo paper are removing...

User's Guide
Page 98
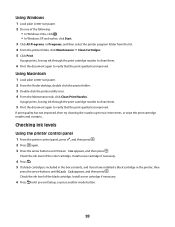
... , and then press . 3 Press the arrow buttons until Align Cartridges appears, and then press . Aligning print cartridges Using the printer control panel 1 Load plain Letter-size paper. 2 From the printer control panel, press , and then press . 3 Press the arrow buttons until Clean Cartridges appears, and then press . Lexmark's warranty does not cover damage caused by non...
... , and then press . 3 Press the arrow buttons until Align Cartridges appears, and then press . Aligning print cartridges Using the printer control panel 1 Load plain Letter-size paper. 2 From the printer control panel, press , and then press . 3 Press the arrow buttons until Clean Cartridges appears, and then press . Lexmark's warranty does not cover damage caused by non...
User's Guide
Page 99
... panel, press , and then press . 2 Press again. 3 Press the arrow buttons until Black Ink appears, and then press . Install a new cartridge if necessary. 4 Press . 5 If a black cartridge is included in the printer, then press the arrow buttons until Color Ink appears, and then press . If print quality has not improved, then try cleaning...
... panel, press , and then press . 2 Press again. 3 Press the arrow buttons until Black Ink appears, and then press . Install a new cartridge if necessary. 4 Press . 5 If a black cartridge is included in the printer, then press the arrow buttons until Color Ink appears, and then press . If print quality has not improved, then try cleaning...
User's Guide
Page 100
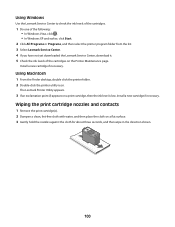
... and earlier, click Start. 2 Click All Programs or Programs, and then select the printer program folder from the list. 3 Select Lexmark Service Center. 4 If you have not yet downloaded the Lexmark Service Center, download it. 5 Check the ink levels of the cartridges on a flat surface. 3 Gently hold the nozzles against the cloth for about...
... and earlier, click Start. 2 Click All Programs or Programs, and then select the printer program folder from the list. 3 Select Lexmark Service Center. 4 If you have not yet downloaded the Lexmark Service Center, download it. 5 Check the ink levels of the cartridges on a flat surface. 3 Gently hold the nozzles against the cloth for about...
User's Guide
Page 101
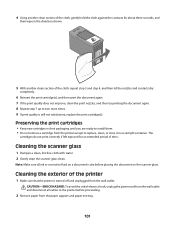
... cloth, gently hold the cloth against the contacts for an extended period of the printer 1 Make sure that the printer is dry before proceeding. 2 Remove paper from the wall outlet. The cartridges do not print correctly if left exposed for about three seconds, and then wipe...an airtight container. Cleaning the exterior of time. Preserving the print cartridges • Keep new cartridges in their packaging until you are ready to install them. • Do not remove a cartridge from the printer except to the printer before placing the document on a document is turned off and ...
... cloth, gently hold the cloth against the contacts for an extended period of the printer 1 Make sure that the printer is dry before proceeding. 2 Remove paper from the wall outlet. The cartridges do not print correctly if left exposed for about three seconds, and then wipe...an airtight container. Cleaning the exterior of time. Preserving the print cartridges • Keep new cartridges in their packaging until you are ready to install them. • Do not remove a cartridge from the printer except to the printer before placing the document on a document is turned off and ...

User's Guide
Page 102
.... 2 Licensed Return Program Cartridge Lexmark 3690 and Lexmark 4690 models Item Part number Average cartridge standard page yield is up to1 Black cartridge 4A Black cartridge2 4 Color cartridge 5A Page yield values available at www.lexmark.com/pageyields. Warning-Potential Damage: Using a damp cloth to clean the interior may damage the finish of the printer. 4 Wipe only the...
.... 2 Licensed Return Program Cartridge Lexmark 3690 and Lexmark 4690 models Item Part number Average cartridge standard page yield is up to1 Black cartridge 4A Black cartridge2 4 Color cartridge 5A Page yield values available at www.lexmark.com/pageyields. Warning-Potential Damage: Using a damp cloth to clean the interior may damage the finish of the printer. 4 Wipe only the...
User's Guide
Page 103
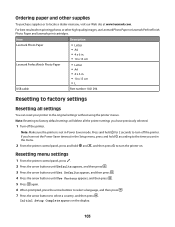
... the display. 103 Ordering paper and other high-quality images, use Lexmark Photo Paper or Lexmark PerfectFinish Photo Paper and Lexmark print cartridges. Note: Resetting to locate a dealer near you, visit our Web site at www.lexmark.com. Resetting menu settings 1 From the printer control panel, press . 2 Press the arrow buttons until Defaults appears, and then...
... the display. 103 Ordering paper and other high-quality images, use Lexmark Photo Paper or Lexmark PerfectFinish Photo Paper and Lexmark print cartridges. Note: Resetting to locate a dealer near you, visit our Web site at www.lexmark.com. Resetting menu settings 1 From the printer control panel, press . 2 Press the arrow buttons until Defaults appears, and then...
User's Guide
Page 106
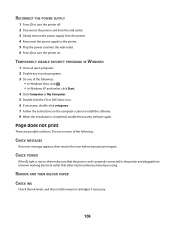
...trying to print again. REMOVE AND THEN RELOAD PAPER CHECK INK Check the ink levels, and then install new print cartridges if necessary. 106 RECONNECT THE POWER SUPPLY 1 Press to turn the printer off. 2 Disconnect the power cord from the wall outlet. 3 Gently remove the power supply from the...7 Follow the instructions on the computer screen to install the software. 8 When the installation is properly connected to the printer and plugged into the wall outlet. 6 Press to turn the printer on , then make sure that other electrical devices have been using. CHECK POWER If the light is not on ....
...trying to print again. REMOVE AND THEN RELOAD PAPER CHECK INK Check the ink levels, and then install new print cartridges if necessary. 106 RECONNECT THE POWER SUPPLY 1 Press to turn the printer off. 2 Disconnect the power cord from the wall outlet. 3 Gently remove the power supply from the...7 Follow the instructions on the computer screen to install the software. 8 When the installation is properly connected to the printer and plugged into the wall outlet. 6 Press to turn the printer on , then make sure that other electrical devices have been using. CHECK POWER If the light is not on ....
User's Guide
Page 107
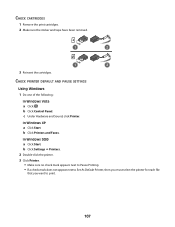
... one of the following: In Windows Vista a Click . CHECK CARTRIDGES 1 Remove the print cartridges. 2 Make sure the sticker and tape have been removed. 1 2 1 2 3 Reinsert the cartridges. In Windows XP a Click Start. c Under Hardware and Sound, click Printer. b Click Settings Œ Printers. 2 Double-click the printer. 3 Click Printer. • Make sure no check mark appears next to Pause...
... one of the following: In Windows Vista a Click . CHECK CARTRIDGES 1 Remove the print cartridges. 2 Make sure the sticker and tape have been removed. 1 2 1 2 3 Reinsert the cartridges. In Windows XP a Click Start. c Under Hardware and Sound, click Printer. b Click Settings Œ Printers. 2 Double-click the printer. 3 Click Printer. • Make sure no check mark appears next to Pause...


