
Troubleshooting Guide
Page 1
... and reinstalling the drivers software If the software is only available on the X342n. Software will not install If the software does not launch automatically when you...XP, click Start to the Ready prompt. Unable to connect over a network is not functioning properly or a communications error message appears, you insert the CD: 1 Close all the...USB hub or switch box. 2 Directly connect the cable to complete the installation. Lexmark™ X34x Troubleshooting Guide Setup troubleshooting Incorrect language appears on the display 1 Press Menu. 2 Press or repeatedly until ...
... and reinstalling the drivers software If the software is only available on the X342n. Software will not install If the software does not launch automatically when you...XP, click Start to the Ready prompt. Unable to connect over a network is not functioning properly or a communications error message appears, you insert the CD: 1 Close all the...USB hub or switch box. 2 Directly connect the cable to complete the installation. Lexmark™ X34x Troubleshooting Guide Setup troubleshooting Incorrect language appears on the display 1 Press Menu. 2 Press or repeatedly until ...

Troubleshooting Guide
Page 2
... edges on both sides of paper into the MFP. or Click Start Control Panel Printers and Other Hardware Printers and Faxes. 2 Double-click the Lexmark X340/X340n/ X342n icon. 3 Click Printer, and make sure the guides are scanning a document, wait until Toner Dark appears. 5 Press . ...paper. • Prepare the stack of paper for loading by shaking the toner cartridge. • Install a new toner cartridge. Print quality troubleshooting Light or faded print AaBbCc AaBbCc AaBbCc AaBbCc AaBbCc • You may be able to Set As Default. • Make sure the ...
... edges on both sides of paper into the MFP. or Click Start Control Panel Printers and Other Hardware Printers and Faxes. 2 Double-click the Lexmark X340/X340n/ X342n icon. 3 Click Printer, and make sure the guides are scanning a document, wait until Toner Dark appears. 5 Press . ...paper. • Prepare the stack of paper for loading by shaking the toner cartridge. • Install a new toner cartridge. Print quality troubleshooting Light or faded print AaBbCc AaBbCc AaBbCc AaBbCc AaBbCc • You may be able to Set As Default. • Make sure the ...

Troubleshooting Guide
Page 4
...Close all applications not in use . 3 Click Edit. 4 Under Resolution, select a lower number. 5 Click OK. 6 Click Scan Now. Fax troubleshooting Cannot send or receive a fax • Check the display. Power supply - For more information, see whether Fax Forwarding is loaded correctly into the ...paused. 1 Click Start Settings Printers and Faxes or Printers. or Click Start Control Panel Printers and Other Hardware Printers and Faxes. 2 Double-click the Lexmark X340/X340n/ X342n icon. 3 Click Printer, and make sure that have been stored in the ...
...Close all applications not in use . 3 Click Edit. 4 Under Resolution, select a lower number. 5 Click OK. 6 Click Scan Now. Fax troubleshooting Cannot send or receive a fax • Check the display. Power supply - For more information, see whether Fax Forwarding is loaded correctly into the ...paused. 1 Click Start Settings Printers and Faxes or Printers. or Click Start Control Panel Printers and Other Hardware Printers and Faxes. 2 Double-click the Lexmark X340/X340n/ X342n icon. 3 Click Printer, and make sure that have been stored in the ...

User's Guide
Page 5
... MFP 67 Cleaning the inside of the MFP 68 Ordering supplies ...70 Recycling Lexmark products 70 Chapter 10: Troubleshooting 71 Setup troubleshooting ...72 Removing and reinstalling the drivers software 74 Jams and misfeeds troubleshooting 75 Clearing a paper jam 76 Print and copy troubleshooting 84 Print quality troubleshooting 85 Scan troubleshooting ...88 Fax troubleshooting ...89 Error messages troubleshooting 91 Contents 5
... MFP 67 Cleaning the inside of the MFP 68 Ordering supplies ...70 Recycling Lexmark products 70 Chapter 10: Troubleshooting 71 Setup troubleshooting ...72 Removing and reinstalling the drivers software 74 Jams and misfeeds troubleshooting 75 Clearing a paper jam 76 Print and copy troubleshooting 84 Print quality troubleshooting 85 Scan troubleshooting ...88 Fax troubleshooting ...89 Error messages troubleshooting 91 Contents 5
User's Guide
Page 7
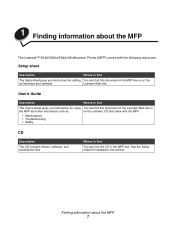
... the MFP and other information such as: on the up hardware and software. Lexmark Web site. Finding information about the MFP The Lexmark™ X340/X340n/X342n Multifunction Printer (MFP) comes with the following resources: Setup sheet Description Where to find The... Setup sheet gives you instructions for using You can find this CD in the MFP box or on the software CD that came with the MFP. • Maintenance • Troubleshooting...
... the MFP and other information such as: on the up hardware and software. Lexmark Web site. Finding information about the MFP The Lexmark™ X340/X340n/X342n Multifunction Printer (MFP) comes with the following resources: Setup sheet Description Where to find The... Setup sheet gives you instructions for using You can find this CD in the MFP box or on the software CD that came with the MFP. • Maintenance • Troubleshooting...

User's Guide
Page 14
If problems occur, see Setup troubleshooting on the computer screen to equipment such as a telephone, an answering machine, or a computer modem. Note: The printer is required. You do not need to attach the printer to a computer, but you do need to connect it to a telephone line to the public switched telephone ... (RJ-11) cord when connecting this product to send and receive faxes. Connect the MFP directly to a telephone wall jack to set up the printer. If you have a telephone cord and a telephone wall jack. 2 Connect one end of the telephone cord into the LINE port of the MFP...
If problems occur, see Setup troubleshooting on the computer screen to equipment such as a telephone, an answering machine, or a computer modem. Note: The printer is required. You do not need to attach the printer to a computer, but you do need to connect it to a telephone line to the public switched telephone ... (RJ-11) cord when connecting this product to send and receive faxes. Connect the MFP directly to a telephone wall jack to set up the printer. If you have a telephone cord and a telephone wall jack. 2 Connect one end of the telephone cord into the LINE port of the MFP...
User's Guide
Page 71
10 Troubleshooting • Setup troubleshooting on page 72 • Jams and misfeeds troubleshooting on page 75 • Print and copy troubleshooting on page 84 • Print quality troubleshooting on page 85 • Scan troubleshooting on page 88 • Fax troubleshooting on page 89 • Error messages troubleshooting on page 91 Troubleshooting 71
10 Troubleshooting • Setup troubleshooting on page 72 • Jams and misfeeds troubleshooting on page 75 • Print and copy troubleshooting on page 84 • Print quality troubleshooting on page 85 • Scan troubleshooting on page 88 • Fax troubleshooting on page 89 • Error messages troubleshooting on page 91 Troubleshooting 71
User's Guide
Page 72
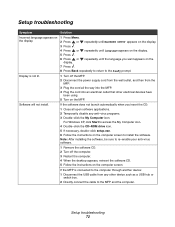
Setup troubleshooting 72 Setup troubleshooting Symptom Solution Incorrect language appears on the display. 1 Press Menu. 2 Press or repeatedly until MACHINE SETUP appears on the display. 3 Press . 4 Press or repeatedly until ...
Setup troubleshooting 72 Setup troubleshooting Symptom Solution Incorrect language appears on the display. 1 Press Menu. 2 Press or repeatedly until MACHINE SETUP appears on the display. 3 Press . 4 Press or repeatedly until ...

User's Guide
Page 73
Setup troubleshooting 73 For more information, see Setting the network options (X342n only). Note: Connecting over a network Solution Make sure you are properly configured. Symptom Unable to connect over a network is securely connected, and the network options are using the correct cable, that it is only available on the X342n.
Setup troubleshooting 73 For more information, see Setting the network options (X342n only). Note: Connecting over a network Solution Make sure you are properly configured. Symptom Unable to connect over a network is securely connected, and the network options are using the correct cable, that it is only available on the X342n.
User's Guide
Page 74
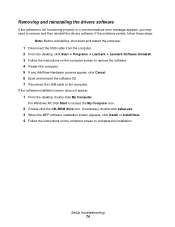
... Eject and reinsert the software CD. 7 Reconnect the USB cable to complete the installation. Setup troubleshooting 74 For Windows XP, click Start to remove and then reinstall the drivers software. Removing and ...reinstalling the drivers software If the software is not functioning properly or a communications error message appears, you may need to access the My Computer ...From the desktop, click Start Æ Programs Æ Lexmark Æ Lexmark Software Uninstall. 3 Follow the instructions on the computer screen to the computer.
... Eject and reinsert the software CD. 7 Reconnect the USB cable to complete the installation. Setup troubleshooting 74 For Windows XP, click Start to remove and then reinstall the drivers software. Removing and ...reinstalling the drivers software If the software is not functioning properly or a communications error message appears, you may need to access the My Computer ...From the desktop, click Start Æ Programs Æ Lexmark Æ Lexmark Software Uninstall. 3 Follow the instructions on the computer screen to the computer.
User's Guide
Page 75
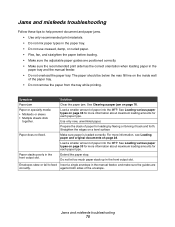
Prepare the stack of the envelope. Paper stacks poorly in the front output slot. Jams and misfeeds troubleshooting 75 Make sure paper is loaded correctly. See Loading various paper types on page 33 for more information about maximum loading amounts for ...guides are correctly. Load a smaller amount of the paper tray. • Do not remove the paper from the tray while printing. Jams and misfeeds troubleshooting Follow these tips to feed Insert a single envelope in the manual feeder, and make sure the guides are positioned correctly. • Make sure the recommended...
Prepare the stack of the envelope. Paper stacks poorly in the front output slot. Jams and misfeeds troubleshooting 75 Make sure paper is loaded correctly. See Loading various paper types on page 33 for more information about maximum loading amounts for ...guides are correctly. Load a smaller amount of the paper tray. • Do not remove the paper from the tray while printing. Jams and misfeeds troubleshooting Follow these tips to feed Insert a single envelope in the manual feeder, and make sure the guides are positioned correctly. • Make sure the recommended...

User's Guide
Page 76
... page 82 290/291/292 Scanner Jam on page 83 Note: xx represents numbers specific to locate and clear the paper jam. Jams and misfeeds troubleshooting 76
... page 82 290/291/292 Scanner Jam on page 83 Note: xx represents numbers specific to locate and clear the paper jam. Jams and misfeeds troubleshooting 76
User's Guide
Page 77
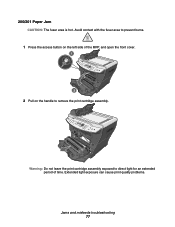
200/201 Paper Jam CAUTION: The fuser area is hot. Extended light exposure can cause print quality problems. Jams and misfeeds troubleshooting 77 Avoid contact with the fuser area to remove the print cartridge assembly. Warning: Do not leave the print cartridge assembly exposed to direct light for an extended period of the MFP, and open the front cover. 1 2 2 Pull on the handle to prevent burns. 1 Press the access button on the left side of time.
200/201 Paper Jam CAUTION: The fuser area is hot. Extended light exposure can cause print quality problems. Jams and misfeeds troubleshooting 77 Avoid contact with the fuser area to remove the print cartridge assembly. Warning: Do not leave the print cartridge assembly exposed to direct light for an extended period of the MFP, and open the front cover. 1 2 2 Pull on the handle to prevent burns. 1 Press the access button on the left side of time.
User's Guide
Page 78
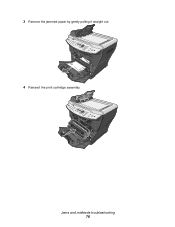
Jams and misfeeds troubleshooting 78 3 Remove the jammed paper by gently pulling it straight out. 4 Reinsert the print cartridge assembly.
Jams and misfeeds troubleshooting 78 3 Remove the jammed paper by gently pulling it straight out. 4 Reinsert the print cartridge assembly.
User's Guide
Page 79
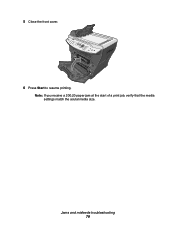
Note: If you receive a 200.20 paper jam at the start of a print job, verify that the media settings match the acutal media size. Jams and misfeeds troubleshooting 79 5 Close the front cover. 6 Press Start to resume printing.
Note: If you receive a 200.20 paper jam at the start of a print job, verify that the media settings match the acutal media size. Jams and misfeeds troubleshooting 79 5 Close the front cover. 6 Press Start to resume printing.
User's Guide
Page 80
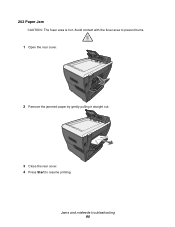
Jams and misfeeds troubleshooting 80 202 Paper Jam CAUTION: The fuser area is hot. Avoid contact with the fuser area to prevent burns. 1 Open the rear cover. 2 Remove the jammed paper by gently pulling it straight out. 3 Close the rear cover. 4 Press Start to resume printing.
Jams and misfeeds troubleshooting 80 202 Paper Jam CAUTION: The fuser area is hot. Avoid contact with the fuser area to prevent burns. 1 Open the rear cover. 2 Remove the jammed paper by gently pulling it straight out. 3 Close the rear cover. 4 Press Start to resume printing.
User's Guide
Page 81
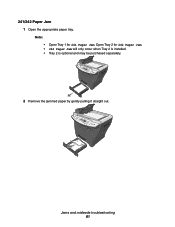
Jams and misfeeds troubleshooting 81 Note: • Open Tray 1 for 242 Paper Jam. • 242 Paper Jam will only occur when Tray 2 is installed. • Tray 2 is optional and may be purchased separately. 2 Remove the jammed paper by gently pulling it straight out. Open Tray 2 for 241 Paper Jam. 241/242 Paper Jam 1 Open the appropriate paper tray.
Jams and misfeeds troubleshooting 81 Note: • Open Tray 1 for 242 Paper Jam. • 242 Paper Jam will only occur when Tray 2 is installed. • Tray 2 is optional and may be purchased separately. 2 Remove the jammed paper by gently pulling it straight out. Open Tray 2 for 241 Paper Jam. 241/242 Paper Jam 1 Open the appropriate paper tray.
User's Guide
Page 82
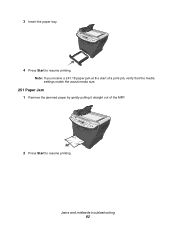
Note: If you receive a 241.18 paper jam at the start of a print job, verify that the media settings match the acutal media size. 251 Paper Jam 1 Remove the jammed paper by gently pulling it straight out of the MFP. 2 Press Start to resume printing. Jams and misfeeds troubleshooting 82 3 Insert the paper tray. 4 Press Start to resume printing.
Note: If you receive a 241.18 paper jam at the start of a print job, verify that the media settings match the acutal media size. 251 Paper Jam 1 Remove the jammed paper by gently pulling it straight out of the MFP. 2 Press Start to resume printing. Jams and misfeeds troubleshooting 82 3 Insert the paper tray. 4 Press Start to resume printing.

User's Guide
Page 83
290/291/292 Scanner Jam 1 Open the ADF top cover. 2 Remove the jammed paper by gently pulling it straight out. 3 Close the ADF top cover, and then load the documents back into the ADF. Note: To prevent document jams, use the scanner glass rather than the ADF for thick, thin, or a mixed set of documents. 4 Press Start to resume. Jams and misfeeds troubleshooting 83
290/291/292 Scanner Jam 1 Open the ADF top cover. 2 Remove the jammed paper by gently pulling it straight out. 3 Close the ADF top cover, and then load the documents back into the ADF. Note: To prevent document jams, use the scanner glass rather than the ADF for thick, thin, or a mixed set of documents. 4 Press Start to resume. Jams and misfeeds troubleshooting 83
User's Guide
Page 84
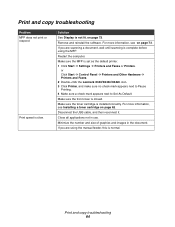
... before using the manual feeder, this is slow. or Click Start Æ Control Panel Æ Printers and Other Hardware Æ Printers and Faxes. 2 Double-click the Lexmark X340/X340n/X342n icon. 3 Click Printer, and make sure no check mark appears next to Pause Printing. 4 Make sure a check mark ... in use. For more information, see Installing a toner cartridge on page 62. If you are using the MFP. Print and copy troubleshooting 84 on page 73. Disconnect the USB cable, and then reconnect it. Make sure the front cover is installed correctly. For more information...
... before using the manual feeder, this is slow. or Click Start Æ Control Panel Æ Printers and Other Hardware Æ Printers and Faxes. 2 Double-click the Lexmark X340/X340n/X342n icon. 3 Click Printer, and make sure no check mark appears next to Pause Printing. 4 Make sure a check mark ... in use. For more information, see Installing a toner cartridge on page 62. If you are using the MFP. Print and copy troubleshooting 84 on page 73. Disconnect the USB cable, and then reconnect it. Make sure the front cover is installed correctly. For more information...


