
User's Guide
Page 22
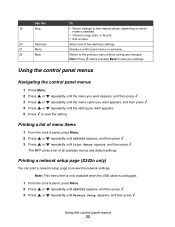
Printing a network setup page (X342n only) You can print a network setup page to the previous menu without saving any changes. Using the control panel menus 22 Note: This menu item ... appears, and then press . 4 Press or repeatedly until Network Setup appears, and then press . Select one of all available menus and default settings. Return to review the network settings. The MFP prints a list of five darkness settings. Using the control panel menus Navigating the control panel menus 1 Press Menu. 2 Press or...
Printing a network setup page (X342n only) You can print a network setup page to the previous menu without saving any changes. Using the control panel menus 22 Note: This menu item ... appears, and then press . 4 Press or repeatedly until Network Setup appears, and then press . Select one of all available menus and default settings. Return to review the network settings. The MFP prints a list of five darkness settings. Using the control panel menus Navigating the control panel menus 1 Press Menu. 2 Press or...

User's Guide
Page 58
...Lexmark X34x Series Æ QLINK. 2 Select the destination you are ready to scan your documents. Scanning over a network 58 a Go to PC screen. The profile name is the name that will appear on the Scan Profile list on the MFP control panel when the scan button is pressed. 7 Click Submit. 8 Review... Select a location for saving the scanned output file somewhere on the network setup page. For more information, see Printing a network setup page (X342n only) 2 Click Scan Profile. 3 Click Create Scan Profile. 4 Select your computer. 6 Enter a profile name. A shortcut number was ...
...Lexmark X34x Series Æ QLINK. 2 Select the destination you are ready to scan your documents. Scanning over a network 58 a Go to PC screen. The profile name is the name that will appear on the Scan Profile list on the MFP control panel when the scan button is pressed. 7 Click Submit. 8 Review... Select a location for saving the scanned output file somewhere on the network setup page. For more information, see Printing a network setup page (X342n only) 2 Click Scan Profile. 3 Click Create Scan Profile. 4 Select your computer. 6 Enter a profile name. A shortcut number was ...