
User's Guide
Page 68
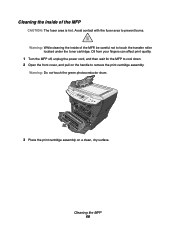
..., and pull on a clean, dry surface. Avoid contact with the fuser area to remove the print cartridge assembly. Warning: Do not touch the green photoconductor drum. 3 Place the print cartridge assembly on the handle to prevent burns.
..., and pull on a clean, dry surface. Avoid contact with the fuser area to remove the print cartridge assembly. Warning: Do not touch the green photoconductor drum. 3 Place the print cartridge assembly on the handle to prevent burns.
Service Manual
Page 54
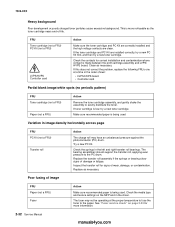
...are clean. If this does not correct the problem, replace the following FRUs one at the proper temperature to fuse the toner to the PC drum. Try a new PC Kit. Check the springs in the driver. Check the media type and texture settings on page 2-23 for more noticeable... horizontally across page FRU PC Kit (not a FRU) Transfer roll Action The charge roll may have an unbalanced pressure against the photoconductor (PC) drum. Check the contacts for signs of damage or fatigue. 7003-XXX Heavy background Poor development or poorly charged toner particles cause excessive background. Clean as...
...are clean. If this does not correct the problem, replace the following FRUs one at the proper temperature to fuse the toner to the PC drum. Try a new PC Kit. Check the springs in the driver. Check the media type and texture settings on page 2-23 for more noticeable... horizontally across page FRU PC Kit (not a FRU) Transfer roll Action The charge roll may have an unbalanced pressure against the photoconductor (PC) drum. Check the contacts for signs of damage or fatigue. 7003-XXX Heavy background Poor development or poorly charged toner particles cause excessive background. Clean as...


