
Troubleshooting Guide
Page 6
... off on the sides, top, or bottom of the print is Class B. • Replace the charge rolls. • Replace the print cartridge. • Replace the photoconductor kit. Ghost images appear • Make sure the Paper Type setting in your software application.
... off on the sides, top, or bottom of the print is Class B. • Replace the charge rolls. • Replace the print cartridge. • Replace the photoconductor kit. Ghost images appear • Make sure the Paper Type setting in your software application.
User's Guide
Page 4
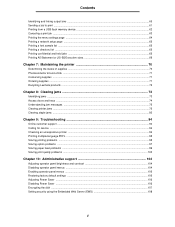
... A5/Statement or JIS-B5/Executive sizes 69 Chapter 7: Maintaining the printer 70 Determining the status of supplies ...70 Photoconductor kit end-of-life ...71 Conserving supplies ...71 Ordering supplies ...71 Recycling Lexmark products ...72 Chapter 8: Clearing jams 73 Identifying jams ...73 Access doors and trays ...74 Understanding jam messages ...75 Clearing...
... A5/Statement or JIS-B5/Executive sizes 69 Chapter 7: Maintaining the printer 70 Determining the status of supplies ...70 Photoconductor kit end-of-life ...71 Conserving supplies ...71 Ordering supplies ...71 Recycling Lexmark products ...72 Chapter 8: Clearing jams 73 Identifying jams ...73 Access doors and trays ...74 Understanding jam messages ...75 Clearing...
User's Guide
Page 71
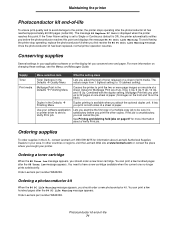
...you print up to send a Verify Print job. You need to 10 (darkest setting). Order Lexmark part number W84030H. To avoid having the printer stop operating, replace the photoconductor kit when you should order a new toner cartridge. Combined with the duplex setting, Multipage Print... and deleting held jobs on the back). Conserving supplies Several settings in the U.S., contact Lexmark at www.lexmark.com or contact the place where you should order a new photoconductor kit. Photoconductor kit end-of paper (16 images on the front and 16 on page 67 for Multipage...
...you print up to send a Verify Print job. You need to 10 (darkest setting). Order Lexmark part number W84030H. To avoid having the printer stop operating, replace the photoconductor kit when you should order a new toner cartridge. Combined with the duplex setting, Multipage Print... and deleting held jobs on the back). Conserving supplies Several settings in the U.S., contact Lexmark at www.lexmark.com or contact the place where you should order a new photoconductor kit. Photoconductor kit end-of paper (16 images on the front and 16 on page 67 for Multipage...
User's Guide
Page 100
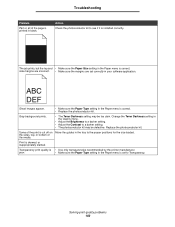
... and Paper Texture settings in the Paper menu. • Verify the print media is being used. If the problem continues, contact the Lexmark Customer Support Center at http://support.lexmark.com. Open and close the printer top front cover to be low. • Change the Toner Darkness setting in the Quality menu...; Change the Contrast setting in the Quality menu. • If you are printing on page 35 for service. Toner fog or background • Check the photoconductor kit to make sure it is on the back of the job to run the printer setup cycle and clean the transfer roll. Toner is...
... and Paper Texture settings in the Paper menu. • Verify the print media is being used. If the problem continues, contact the Lexmark Customer Support Center at http://support.lexmark.com. Open and close the printer top front cover to be low. • Change the Toner Darkness setting in the Quality menu...; Change the Contrast setting in the Quality menu. • If you are printing on page 35 for service. Toner fog or background • Check the photoconductor kit to make sure it is on the back of the job to run the printer setup cycle and clean the transfer roll. Toner is...

User's Guide
Page 101
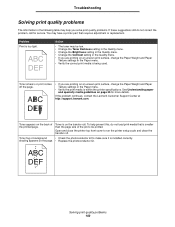
... Note: Macintosh computer users should make sure the ink can withstand temperatures of 230°C (446°F). • Replace the photoconductor kit or toner cartridge. Solving print quality problems 101 Characters have jagged or uneven edges. • Change the Print Resolution setting in... appear on the page. DEF Printing is white. Action • Make sure the packaging material is installed correctly. • Replace the photoconductor kit. ABC DEF • Change the Toner Darkness setting in the Quality menu. • Change the Brightness setting in the Quality menu...
... Note: Macintosh computer users should make sure the ink can withstand temperatures of 230°C (446°F). • Replace the photoconductor kit or toner cartridge. Solving print quality problems 101 Characters have jagged or uneven edges. • Change the Print Resolution setting in... appear on the page. DEF Printing is white. Action • Make sure the packaging material is installed correctly. • Replace the photoconductor kit. ABC DEF • Change the Toner Darkness setting in the Quality menu. • Change the Brightness setting in the Quality menu...
User's Guide
Page 102
...in the Quality menu. • Adjust the Brightness to a darker setting. • Adjust the Contrast to a darker setting. • The photoconductor kit may be defective. side margins are incorrect. • Make sure the margins are set to Transparency. Transparency print quality is skewed, or inappropriately...printer manufacturer. ABC DEF Ghost images appear. • Make sure the Paper Type setting in the Paper menu is correct. Replace the photoconductor kit. the sides, top, or bottom of the media. Solving print quality problems 102 The job prints, but the top and ...
...in the Quality menu. • Adjust the Brightness to a darker setting. • Adjust the Contrast to a darker setting. • The photoconductor kit may be defective. side margins are incorrect. • Make sure the margins are set to Transparency. Transparency print quality is skewed, or inappropriately...printer manufacturer. ABC DEF Ghost images appear. • Make sure the Paper Type setting in the Paper menu is correct. Replace the photoconductor kit. the sides, top, or bottom of the media. Solving print quality problems 102 The job prints, but the top and ...
User's Guide
Page 118
... menus 105 ordering, toner cartridge 71 P panel, operator 9 paper letterhead 44 preprinted forms 44 recommended types 42 unsatisfactory types 43 paper tray adjustment 50, 55 photoconductor ordering 71 PIN entering at the printer 67 entering from the driver 65 for confidential jobs 65 Power Saver, adjusting 106 preprinted forms 44 print...
... menus 105 ordering, toner cartridge 71 P panel, operator 9 paper letterhead 44 preprinted forms 44 recommended types 42 unsatisfactory types 43 paper tray adjustment 50, 55 photoconductor ordering 71 PIN entering at the printer 67 entering from the driver 65 for confidential jobs 65 Power Saver, adjusting 106 preprinted forms 44 print...

Menus and Messages
Page 46
... Continue appears, 84 Replace PC unit • To clear the message, and continue printing, press and then press . • Replace the photoconductor unit. The printer discards any operations that require a hard disk. 62 Disk full • To clear the message and continue processing, press... press and then press . until Continue appears, • Format the disk. until Continue appears, 84 PC unit abnormal • Replace the photoconductor unit. 88 Toner is not set to resume printing. until Continue appears, 88 Replace toner • Replace the toner cartridge. • To...
... Continue appears, 84 Replace PC unit • To clear the message, and continue printing, press and then press . • Replace the photoconductor unit. The printer discards any operations that require a hard disk. 62 Disk full • To clear the message and continue processing, press... press and then press . until Continue appears, • Format the disk. until Continue appears, 84 PC unit abnormal • Replace the photoconductor unit. 88 Toner is not set to resume printing. until Continue appears, 88 Replace toner • Replace the toner cartridge. • To...
Help Menu Pages
Page 15
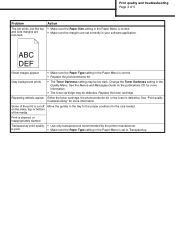
... in the Paper Menu is skewed, or inappropriately slanted. Repeating defects appear Either the toner cartridge, the photoconductor kit, or the fuser is set correctly in your software application. Print is correct. • Replace the photoconductor kit. See the Menus and Messages Guide on the sides, top, or bottom of the media...
... in the Paper Menu is skewed, or inappropriately slanted. Repeating defects appear Either the toner cartridge, the photoconductor kit, or the fuser is set correctly in your software application. Print is correct. • Replace the photoconductor kit. See the Menus and Messages Guide on the sides, top, or bottom of the media...

Help Menu Pages
Page 16
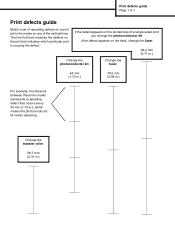
...Config Menu. 3 Press ∨ until all the pages print. Measurement Print quality defect repeats at every 15 units. Replace the photoconductor kit. Print quality defect repeats at every 7 or 8 units. Once the pages print, use the defect spacing chart as follows...to the left of print quality problem exists, see the Troubleshooting chapter in the User's Guide on . Problem Photoconductor kit Photoconductor kit Toner cartridge Fuser Solution Replace the photoconductor kit. The pages are formatted. To obtain the defect spacing measurement, count the number of 5 Print quality ...
...Config Menu. 3 Press ∨ until all the pages print. Measurement Print quality defect repeats at every 15 units. Replace the photoconductor kit. Print quality defect repeats at every 7 or 8 units. Once the pages print, use the defect spacing chart as follows...to the left of print quality problem exists, see the Troubleshooting chapter in the User's Guide on . Problem Photoconductor kit Photoconductor kit Toner cartridge Fuser Solution Replace the photoconductor kit. The pages are formatted. To obtain the defect spacing measurement, count the number of 5 Print quality ...
Help Menu Pages
Page 17
...the printed side of the vertical lines. Change the transfer roller. 58.7 mm (2.31 in.) If the defect appears on the back, change the photoconductor kit. The line that occurs every 44 mm (1.73 in.), which particular part is causing the defect. Change the fuser. 44 mm (1.73 in...in.) For example, the distance between these two marks represents a repeating defect that best matches the defects on the print job indicates which means the photoconductor kit needs replacing. Print defects guide Page 1 of 1 Print defects guide Match a set of repeating defects on a print job to the marks on...
...the printed side of the vertical lines. Change the transfer roller. 58.7 mm (2.31 in.) If the defect appears on the back, change the photoconductor kit. The line that occurs every 44 mm (1.73 in.), which particular part is causing the defect. Change the fuser. 44 mm (1.73 in...in.) For example, the distance between these two marks represents a repeating defect that best matches the defects on the print job indicates which means the photoconductor kit needs replacing. Print defects guide Page 1 of 1 Print defects guide Match a set of repeating defects on a print job to the marks on...

Help Menu Pages
Page 18
Supplies guide Page 1 of 1 Supplies guide The following table lists the part numbers for ordering supply items: Part name High Yield Toner Cartridge Photoconductor Kit Maintenance kit (low voltage) Maintenance kit (high voltage) Staple Cartridge Part number W84020H W84030H 25A0014 25A0015 25A0013 For information about conserving supplies, see the User's Guide on the publications CD.
Supplies guide Page 1 of 1 Supplies guide The following table lists the part numbers for ordering supply items: Part name High Yield Toner Cartridge Photoconductor Kit Maintenance kit (low voltage) Maintenance kit (high voltage) Staple Cartridge Part number W84020H W84030H 25A0014 25A0015 25A0013 For information about conserving supplies, see the User's Guide on the publications CD.


