User's Guide
Page 6
Ordering a fuser...169 Ordering a fuser wiper ...169 Ordering pick rollers ...170 Ordering staple cartridges...170 Ordering a transfer roller...170 Recycling Lexmark products...170 Moving the printer...170 Before moving the printer...170 Moving the printer to another location...171 Shipping the printer ...171 Administrative support 172 ... Large jobs do not collate ...178 Unexpected page breaks occur...179 Solving option problems...179 Option does not operate correctly or quits after it is installed 179 Paper trays...180 2000-sheet tray...180 Envelope feeder ...180 Duplex unit...181 Contents 6
Ordering a fuser...169 Ordering a fuser wiper ...169 Ordering pick rollers ...170 Ordering staple cartridges...170 Ordering a transfer roller...170 Recycling Lexmark products...170 Moving the printer...170 Before moving the printer...170 Moving the printer to another location...171 Shipping the printer ...171 Administrative support 172 ... Large jobs do not collate ...178 Unexpected page breaks occur...179 Solving option problems...179 Option does not operate correctly or quits after it is installed 179 Paper trays...180 2000-sheet tray...180 Envelope feeder ...180 Duplex unit...181 Contents 6
User's Guide
Page 156
... following: • Press the arrow buttons until the defined time out expires. Note: There is a defined limit on the number of media is installed correctly to keep printed pages from the standard exit bin to clear the message. Wait for access to a printer feature, setting, or menu that...you do not have routine maintenance done. The printer may continue to replace the pick rollers, the charge roll, the transfer roller, and the fuser. The message clears when all the items necessary to print after this message appears and the printer enters a lockout mode. card stock would ...
... following: • Press the arrow buttons until the defined time out expires. Note: There is a defined limit on the number of media is installed correctly to keep printed pages from the standard exit bin to clear the message. Wait for access to a printer feature, setting, or menu that...you do not have routine maintenance done. The printer may continue to replace the pick rollers, the charge roll, the transfer roller, and the fuser. The message clears when all the items necessary to print after this message appears and the printer enters a lockout mode. card stock would ...
User's Guide
Page 164
...message and continue 80 Routine maintenance needed The printer needs to replace the pick rollers, the charge roll, the transfer roller, and the fuser. 88 Cartridge low The toner is low. Replace the print cartridge, and then press to clear the message and continue printing. 88.yy...arrow buttons until Continue appears, and then press processing. • Delete fonts, macros, and other data stored on the printer hard disk. • Install a larger printer hard disk. Order a maintenance kit, which contains all the items necessary to have routine maintenance done. Try one or more of the...
...message and continue 80 Routine maintenance needed The printer needs to replace the pick rollers, the charge roll, the transfer roller, and the fuser. 88 Cartridge low The toner is low. Replace the print cartridge, and then press to clear the message and continue printing. 88.yy...arrow buttons until Continue appears, and then press processing. • Delete fonts, macros, and other data stored on the printer hard disk. • Install a larger printer hard disk. Order a maintenance kit, which contains all the items necessary to have routine maintenance done. Try one or more of the...
User's Guide
Page 169
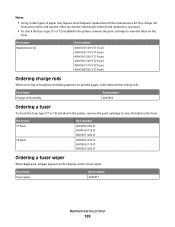
...label on printed pages, order replacement charge rolls. Part name Fuser wiper Part number 40X4417 Maintaining the printer 169 Part name Charge roll assembly Part number 40X5852 Ordering a fuser To check the fuser type (T1 or T2) installed in the printer, remove the print cartridge to view the ...label on the display, order a fuser wiper. Notes: • Using certain types of paper may require more...
...label on printed pages, order replacement charge rolls. Part name Fuser wiper Part number 40X4417 Maintaining the printer 169 Part name Charge roll assembly Part number 40X5852 Ordering a fuser To check the fuser type (T1 or T2) installed in the printer, remove the print cartridge to view the ...label on the display, order a fuser wiper. Notes: • Using certain types of paper may require more...
User's Guide
Page 211
... customer support 11 publications 11 Finishing menu 131 firmware card installing 21 flash drive 77 Flash Drive menu 141 flash memory card installing 21 troubleshooting 181 Flushing buffer 148 font sample list printing 78 Formatting Disk x/y XX% 148 Formatting Flash 148 fuser ordering 169 fuser wiper ordering 169 G General Settings menu 126 guidelines card...
... customer support 11 publications 11 Finishing menu 131 firmware card installing 21 flash drive 77 Flash Drive menu 141 flash memory card installing 21 troubleshooting 181 Flushing buffer 148 font sample list printing 78 Formatting Disk x/y XX% 148 Formatting Flash 148 fuser ordering 169 fuser wiper ordering 169 G General Settings menu 126 guidelines card...
User's Guide
Page 212
...tray 55 letterhead in multipurpose feeder 59 letterhead in trays 52 multipurpose feeder 59 transparencies 59 M Macintosh wireless network installation 42 maintenance kit ordering 168 memory card installing 20 troubleshooting 181 Menu access turned off by system administrator 150 menu settings page printing 38 menus Active NIC ... 24 memory card 20 memory cards 17 networking 17 paper drawers 34 ports 17 printer hard disk 30 ordering charge rolls 169 fuser 169 fuser wiper 169 maintenance kit 168 pick rollers 170 print cartridges 167 staple cartridges 170 transfer roller 170 Overflow bin full 152 P ...
...tray 55 letterhead in multipurpose feeder 59 letterhead in trays 52 multipurpose feeder 59 transparencies 59 M Macintosh wireless network installation 42 maintenance kit ordering 168 memory card installing 20 troubleshooting 181 Menu access turned off by system administrator 150 menu settings page printing 38 menus Active NIC ... 24 memory card 20 memory cards 17 networking 17 paper drawers 34 ports 17 printer hard disk 30 ordering charge rolls 169 fuser 169 fuser wiper 169 maintenance kit 168 pick rollers 170 print cartridges 167 staple cartridges 170 transfer roller 170 Overflow bin full 152 P ...

Service Manual
Page 3
... 1-7 Paper types and weights supported by the output bins 1-7 Tools required 1-8 Acronyms 1-9 Diagnostic information 2-1 Start 2-1 Confirm the installation status 2-2 Power-on Reset sequence 2-2 Entering Diagnostics mode 2-2 User attendance messages 2-3 Error code table 1 2-14 Service checks 2-126 Sensor... (input) service check 2-126 Sensor (fuser output) service check 2-126 Sensor (narrow media) service check 2-127 Sensor (duplex input) service check 2-127 Sensor (duplex input...
... 1-7 Paper types and weights supported by the output bins 1-7 Tools required 1-8 Acronyms 1-9 Diagnostic information 2-1 Start 2-1 Confirm the installation status 2-2 Power-on Reset sequence 2-2 Entering Diagnostics mode 2-2 User attendance messages 2-3 Error code table 1 2-14 Service checks 2-126 Sensor... (input) service check 2-126 Sensor (fuser output) service check 2-126 Sensor (narrow media) service check 2-127 Sensor (duplex input) service check 2-127 Sensor (duplex input...

Service Manual
Page 36
..., check that occur during the POR sequence: 1. The transport motor turns on . 4. Press and hold and . 3. The Lexmark splash screen appears with a progress bar in direct sun. • The printer is installed on . 2. The fuser cooling fan turns on . Release the buttons after 10 seconds. 2-2 Service Manual The system card assembly cooling fan...
..., check that occur during the POR sequence: 1. The transport motor turns on . 4. Press and hold and . 3. The Lexmark splash screen appears with a progress bar in direct sun. • The printer is installed on . 2. The fuser cooling fan turns on . Release the buttons after 10 seconds. 2-2 Service Manual The system card assembly cooling fan...

Service Manual
Page 46
.... The parts are not allowed with a defective disk. The Format Disk menu is installed. For Output Bin x, x=1, 2, or 3. While this message at each 300K page count interval. It is necessary to replace the fuser assembly, transfer roller, charge roll, and pick rolls at power on the disk to... hold the resources that have been requested to be written to maintain the print quality and reliability of the printer. Note: If the user installed the incompatible device to ...
.... The parts are not allowed with a defective disk. The Format Disk menu is installed. For Output Bin x, x=1, 2, or 3. While this message at each 300K page count interval. It is necessary to replace the fuser assembly, transfer roller, charge roll, and pick rolls at power on the disk to... hold the resources that have been requested to be written to maintain the print quality and reliability of the printer. Note: If the user installed the incompatible device to ...
Service Manual
Page 53
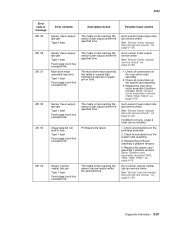
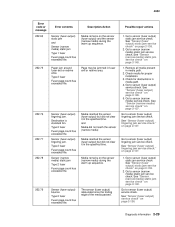
... 2. Replace the system card assembly if problem remains. The media is late reaching the sensor (fuser output) within the specified time. Go to "System card assembly removal (T650, T652, T654, T656)" on page 2-135. Check all connections on the main drive motor assembly...to sensor (narrow media) late jam service check. See "Sensor (fuser output) late jam service check." Go to sensor (fuser output) late jam service check. If problem remains, a type 2 fuser can be installed. 1. Go to sensor (fuser output) late jam service check. See "Sensor (narrow media) late...
... 2. Replace the system card assembly if problem remains. The media is late reaching the sensor (fuser output) within the specified time. Go to "System card assembly removal (T650, T652, T654, T656)" on page 2-135. Check all connections on the main drive motor assembly...to sensor (narrow media) late jam service check. See "Sensor (fuser output) late jam service check." Go to sensor (fuser output) late jam service check. If problem remains, a type 2 fuser can be installed. 1. Go to sensor (fuser output) late jam service check. See "Sensor (narrow media) late...

Service Manual
Page 54
... on page 2-135. Go to sensor (narrow media) late jam service check. Type 2 fuser 201.27 Sensor (fuser output) late jam. Go to "System card assembly removal (T650, T652, T654, T656)" on page 4-54. If problem remains, a type 2 fuser can be installed. 1. See "Sensor (narrow media) late jam service check." Ensure that the operator panel...
... on page 2-135. Go to sensor (narrow media) late jam service check. Type 2 fuser 201.27 Sensor (fuser output) late jam. Go to "System card assembly removal (T650, T652, T654, T656)" on page 4-54. If problem remains, a type 2 fuser can be installed. 1. See "Sensor (narrow media) late jam service check." Ensure that the operator panel...
Service Manual
Page 55
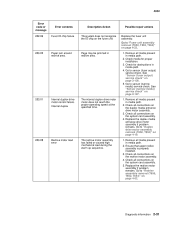
... media is late reaching the sensor (fuser output) within the specified time. The media is late reaching the sensor (fuser output) within the specified time. See "Sensor (fuser output) late jam service check." If problem remains, a type 2 fuser can be installed. 1. Replace the main drive motor...printhead assembly if problem remains. 4. Printhead write failure The media is late reaching the sensor (fuser output) within the specified time. Go to "Output cover assembly removal (T650, T652, T654)" on the printhead assembly 2. Check all connections on page 2-135. Check ...
... media is late reaching the sensor (fuser output) within the specified time. The media is late reaching the sensor (fuser output) within the specified time. See "Sensor (fuser output) late jam service check." If problem remains, a type 2 fuser can be installed. 1. Replace the main drive motor...printhead assembly if problem remains. 4. Printhead write failure The media is late reaching the sensor (fuser output) within the specified time. Go to "Output cover assembly removal (T650, T652, T654)" on the printhead assembly 2. Check all connections on page 2-135. Check ...
Service Manual
Page 58
... clear it in media path. 4. Media remains on the sensor (fuser output) during the warm up sequence. Check for proper installation. 3. See "Sensor (narrow media) service check" on page 2-137. See "Sensor (fuser output) lingering jam service check." on page 2-127. See "Sensor (fuser output) service check" on page 2-137. 2-24 Service Manual on...
... clear it in media path. 4. Media remains on the sensor (fuser output) during the warm up sequence. Check for proper installation. 3. See "Sensor (narrow media) service check" on page 2-137. See "Sensor (fuser output) lingering jam service check." on page 2-127. See "Sensor (fuser output) service check" on page 2-137. 2-24 Service Manual on...
Service Manual
Page 59
... specified time. Page may be jammed in media path. 2. Go to sensor (fuser output) static jam service check. Check for proper installation. 3. Go to sensor (fuser output) lingering jam service check. See "Sensor (fuser output) lingering jam service check." Go to sensor (fuser output) lingering jam service check. See "Sensor (narrow media) static jam service...
... specified time. Page may be jammed in media path. 2. Go to sensor (fuser output) static jam service check. Check for proper installation. 3. Go to sensor (fuser output) lingering jam service check. See "Sensor (fuser output) lingering jam service check." Go to sensor (fuser output) lingering jam service check. See "Sensor (narrow media) static jam service...
Service Manual
Page 61
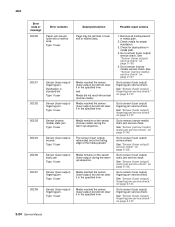
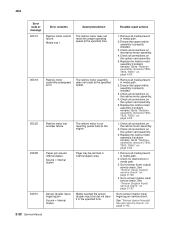
... media present in the specified time. 4062 Error code or message 202.37 Error contents Sensor (fuser output) lingering jam. Type 1 fuser Fuser page count has exceeded life. Sensor (fuser output) lingering jam. Check for proper installation. 3. Go to sensor (fuser output) lingering jam service check. Go to sensor (narrow media) service check. Go to sensor...
... media present in the specified time. 4062 Error code or message 202.37 Error contents Sensor (fuser output) lingering jam. Type 1 fuser Fuser page count has exceeded life. Sensor (fuser output) lingering jam. Check for proper installation. 3. Go to sensor (fuser output) lingering jam service check. Go to sensor (narrow media) service check. Go to sensor...
Service Manual
Page 63
...up sequence. and Media did not reach the sensor (narrow media) Media reached the sensor (fuser output) but did not clear it in media path. 4. Possible repair actions 1. Check for proper installation. 3. See "Sensor (narrow media) service check" on page 2-138. 2. Go to ...sensor (narrow media) service check. See "Sensor (fuser output) static jam service check" on page 2-127. Destination is standard bin. Type 2 fuser Fuser page count has exceeded life. Sensor...
...up sequence. and Media did not reach the sensor (narrow media) Media reached the sensor (fuser output) but did not clear it in media path. 4. Possible repair actions 1. Check for proper installation. 3. See "Sensor (narrow media) service check" on page 2-138. 2. Go to ...sensor (narrow media) service check. See "Sensor (fuser output) static jam service check" on page 2-127. Destination is standard bin. Type 2 fuser Fuser page count has exceeded life. Sensor...
Service Manual
Page 65
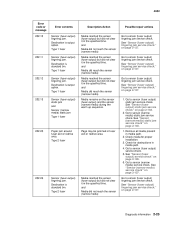
... for obstructions in media path. 4. Check all media present in media path. 2. Ensure that upper redive assembly is properly installed. 3. Go to "Fuser unit assembly removal (T650, T652, T654)" on the system card assembly. 4. Remove all connections on page 4-23, 1. Remove all connections on the... duplex drive motor motor does not reach the proper operating speed at the specified time. Check for proper installation. 3. Go to sensor (narrow media) service check. See "Sensor (fuser output) service check" on page 2-127. 1. Go to "Duplex drive motor assembly removal (T652, ...
... for obstructions in media path. 4. Check all media present in media path. 2. Ensure that upper redive assembly is properly installed. 3. Go to "Fuser unit assembly removal (T650, T652, T654)" on the system card assembly. 4. Remove all connections on page 4-23, 1. Remove all connections on the... duplex drive motor motor does not reach the proper operating speed at the specified time. Check for proper installation. 3. Go to sensor (narrow media) service check. See "Sensor (fuser output) service check" on page 2-127. 1. Go to "Duplex drive motor assembly removal (T652, ...
Service Manual
Page 66
... internal duplex. Remove all media present in media path. 2. Replace the redrive motor assembly if problem remains. Go to "Redrive assembly removal (T650, T652, T654)" on page 2-127. Check for obstructions in internal duplex area. See "Sensor (duplex input) service check" on page 4-...62. 1. Go to the engine. Ensure that upper redive assembly is properly installed. 3. Check all connections on page 4-62. 1. Remove all media present in media path. 2. See "Sensor (fuser output) service check" on page 2-145. 2-32 Service Manual See "Sensor (pass through) ...
... internal duplex. Remove all media present in media path. 2. Replace the redrive motor assembly if problem remains. Go to "Redrive assembly removal (T650, T652, T654)" on page 2-127. Check for obstructions in internal duplex area. See "Sensor (duplex input) service check" on page 4-...62. 1. Go to the engine. Ensure that upper redive assembly is properly installed. 3. Check all connections on page 4-62. 1. Remove all media present in media path. 2. See "Sensor (fuser output) service check" on page 2-145. 2-32 Service Manual See "Sensor (pass through) ...
Service Manual
Page 121
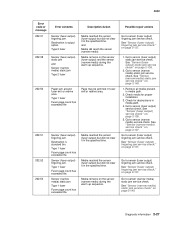
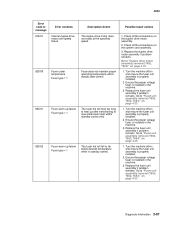
... all the connections on the system card assembly. 3. Replace the fuser unit assembly if problem remains. Go to "Fuser unit assembly removal (T650, T652, T654)" on and ensure the fuser unit assembly is properly installed. 2. The fuser hot roll took too long to heat up failure Fuser type = 1 Description/Action The duplex drive motor does not rotate...
... all the connections on the system card assembly. 3. Replace the fuser unit assembly if problem remains. Go to "Fuser unit assembly removal (T650, T652, T654)" on and ensure the fuser unit assembly is properly installed. 2. The fuser hot roll took too long to heat up failure Fuser type = 1 Description/Action The duplex drive motor does not rotate...
Service Manual
Page 122
... assembly is turned on the switchable LVPS assembly. 5. Ensure the proper voltage fuser is properly installed. 2. Turn the machine off /on page 4-23. 6. Go to "Fuser unit assembly removal (T650, T652, T654)" on and ensure the fuser unit assembly is installed in the machine. 3. Replace the fuser unit assembly if problem remains. Possible repair actions 1. Replace the...
... assembly is turned on the switchable LVPS assembly. 5. Ensure the proper voltage fuser is properly installed. 2. Turn the machine off /on page 4-23. 6. Go to "Fuser unit assembly removal (T650, T652, T654)" on and ensure the fuser unit assembly is installed in the machine. 3. Replace the fuser unit assembly if problem remains. Possible repair actions 1. Replace the...


