User's Guide
Page 3
...15 UNIX/Linux ...16 Chapter 3: Installing drivers for network printing 17 Printing a network setup page ...17 Assigning a printer IP address ...17 Verifying the IP settings ...18 Windows ...18 Macintosh ...22 UNIX/Linux ...24 NetWare ...24 ...options 25 Installing input options ...25 Installing a duplex unit ...27 Installing memory or option cards ...28 Accessing the printer system board ...28 Installing or removing a memory card ...30 Installing or removing a flash memory or firmware card...and held jobs ...40 Printing on specialty media ...43 Loading standard trays and optional trays ...44 3
...15 UNIX/Linux ...16 Chapter 3: Installing drivers for network printing 17 Printing a network setup page ...17 Assigning a printer IP address ...17 Verifying the IP settings ...18 Windows ...18 Macintosh ...22 UNIX/Linux ...24 NetWare ...24 ...options 25 Installing input options ...25 Installing a duplex unit ...27 Installing memory or option cards ...28 Accessing the printer system board ...28 Installing or removing a memory card ...30 Installing or removing a flash memory or firmware card...and held jobs ...40 Printing on specialty media ...43 Loading standard trays and optional trays ...44 3
User's Guide
Page 4
......75 Conserving supplies ...75 Ordering supplies ...76 Recycling Lexmark products ...78 Moving the printer ...79 Chapter 8: Clearing jams 80 Identifying jams ...80 Access doors and trays ...81 Understanding jam messages ...82 Clearing printer jams ...82 Clearing staple jams ...93 Chapter 9: ...99 Setting security using the Embedded Web Server (EWS 99 Chapter 10: Troubleshooting 103 Understanding printer messages ...103 Online technical support ...103 Checking an unresponsive printer ...103 Printing multi-language PDFs ...104 Solving printing problems ...104 Solving option problems ...106...
......75 Conserving supplies ...75 Ordering supplies ...76 Recycling Lexmark products ...78 Moving the printer ...79 Chapter 8: Clearing jams 80 Identifying jams ...80 Access doors and trays ...81 Understanding jam messages ...82 Clearing printer jams ...82 Clearing staple jams ...93 Chapter 9: ...99 Setting security using the Embedded Web Server (EWS 99 Chapter 10: Troubleshooting 103 Understanding printer messages ...103 Online technical support ...103 Checking an unresponsive printer ...103 Printing multi-language PDFs ...104 Solving printing problems ...104 Solving option problems ...106...

User's Guide
Page 7
...Tray 1 (integrated tray or standard tray) Multipurpose feeder Tray 1 (integrated tray or standard tray) The standard tray holds 250 sheets for the T640 and 500 sheets for stability. Learning about the printer ...Configured models The following illustrations show a standard network and fully configured printer. Items denoted with an asterisk (*) are using a 2000-sheet drawer, a duplex unit and an input option, or more information. See www.lexmark...
...Tray 1 (integrated tray or standard tray) Multipurpose feeder Tray 1 (integrated tray or standard tray) The standard tray holds 250 sheets for the T640 and 500 sheets for stability. Learning about the printer ...Configured models The following illustrations show a standard network and fully configured printer. Items denoted with an asterisk (*) are using a 2000-sheet drawer, a duplex unit and an input option, or more information. See www.lexmark...

User's Guide
Page 10
... header line. It will delete additional entries. Learning about the printer Button Navigation buttons USB Direct interface Numeric pad 1 2 3 4 5 6 789 0 # Display panel Status / Supplies Ready Tray 1 low View Supplies Tell me screen Remove tray; The Left or Right buttons are used to delete the number... to connect a PC or other three lines of the screen. The host USB Direct interface on the back of the printer to the left of the ...
... header line. It will delete additional entries. Learning about the printer Button Navigation buttons USB Direct interface Numeric pad 1 2 3 4 5 6 789 0 # Display panel Status / Supplies Ready Tray 1 low View Supplies Tell me screen Remove tray; The Left or Right buttons are used to delete the number... to connect a PC or other three lines of the screen. The host USB Direct interface on the back of the printer to the left of the ...
User's Guide
Page 26
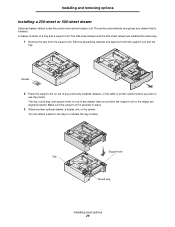
...the support unit. Decals 2 Place the support unit on top of any drawer help you plan to indicate the tray number. You can attach a label to the trays to use the printer. Square hole Tab Round peg Installing input options 26 Make sure the support unit is installed. A drawer consists of... recognizes any previously installed drawers, or the table or printer cabinet where you position the support unit so the edges are installed the same way. 1 Remove the tray from both the support unit and the tray. The 250-sheet drawer and the 500-sheet drawer are aligned properly. The tab, round...
...the support unit. Decals 2 Place the support unit on top of any drawer help you plan to indicate the tray number. You can attach a label to the trays to use the printer. Square hole Tab Round peg Installing input options 26 Make sure the support unit is installed. A drawer consists of... recognizes any previously installed drawers, or the table or printer cabinet where you position the support unit so the edges are installed the same way. 1 Remove the tray from both the support unit and the tray. The 250-sheet drawer and the 500-sheet drawer are aligned properly. The tab, round...

User's Guide
Page 27
... a duplex unit 27 The 250-sheet duplex unit only works with printers that have a 250-sheet standard tray, and the 500-sheet duplex unit only works with printers that have the appropriate duplex unit for the tray size installed in place. Installing and removing options Installing a duplex unit... The duplex unit attaches under the printer, below the standard tray and above any installed drawers or the table or printer cabinet where you have a 500sheet standard tray. Make sure it is securely in the printer. 1 Place the duplex unit on top of any drawers. ...
... a duplex unit 27 The 250-sheet duplex unit only works with printers that have a 250-sheet standard tray, and the 500-sheet duplex unit only works with printers that have the appropriate duplex unit for the tray size installed in place. Installing and removing options Installing a duplex unit... The duplex unit attaches under the printer, below the standard tray and above any installed drawers or the table or printer cabinet where you have a 500sheet standard tray. Make sure it is securely in the printer. 1 Place the duplex unit on top of any drawers. ...
User's Guide
Page 43
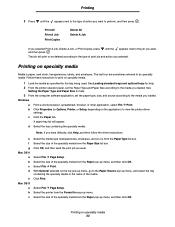
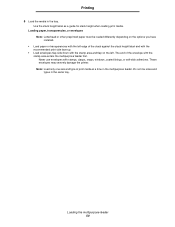
... media. 1 Load the media as specified for help . 2 From the printer operator panel, set the paper type, size, and source according to as usual. Follow these instructions to view the printer driver settings. A paper tray list will print or be deleted according to the Paper Source pop-up menu..., and select the tray containing the specialty media or the name of the specialty media from the Paper ...
... media. 1 Load the media as specified for help . 2 From the printer operator panel, set the paper type, size, and source according to as usual. Follow these instructions to view the printer driver settings. A paper tray list will print or be deleted according to the Paper Source pop-up menu..., and select the tray containing the specialty media or the name of the specialty media from the Paper ...
User's Guide
Page 44
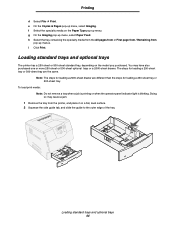
...File Æ Print. e On the Copies & Pages pop-up menus. i Click Print. h Select the tray containing the specialty media from the All pages from or First page from / Remaining from the printer, and place it on a flat, level surface. 2 Squeeze the side guide tab, and slide the guide ...or more 250-sheet or 500-sheet optional trays or a 2000-sheet drawer. Loading standard trays and optional trays 44 f Select the specialty media on the model you purchased. Loading standard trays and optional trays The printer has a 250-sheet or 500-sheet standard tray, depending on the Paper Type pop-up menu...
...File Æ Print. e On the Copies & Pages pop-up menus. i Click Print. h Select the tray containing the specialty media from the All pages from or First page from / Remaining from the printer, and place it on a flat, level surface. 2 Squeeze the side guide tab, and slide the guide ...or more 250-sheet or 500-sheet optional trays or a 2000-sheet drawer. Loading standard trays and optional trays 44 f Select the specialty media on the model you purchased. Loading standard trays and optional trays The printer has a 250-sheet or 500-sheet standard tray, depending on the Paper Type pop-up menu...

User's Guide
Page 45
Size indicators Loading standard trays and optional trays 45 Printing 3 Squeeze the rear guide tab, and slide the guide to the correct position for the size media you are loading. 4 Flex the sheets back and forth to loosen them, then fan them. Do not fold or crease the print media. Straighten the edges on a level surface.
Size indicators Loading standard trays and optional trays 45 Printing 3 Squeeze the rear guide tab, and slide the guide to the correct position for the size media you are loading. 4 Flex the sheets back and forth to loosen them, then fan them. Do not fold or crease the print media. Straighten the edges on a level surface.
User's Guide
Page 46
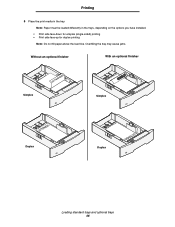
Overfilling the tray may cause jams. Without an optional finisher With an optional finisher Simplex Simplex Duplex Duplex Loading standard trays and optional trays 46 Printing 5 Place the print media in the tray: Note: Paper must be loaded differently in the trays, depending on the options you have installed. • Print side face-down for simplex (single-sided) printing • Print side face-up for duplex printing Note: Do not fill paper above the load line.
Overfilling the tray may cause jams. Without an optional finisher With an optional finisher Simplex Simplex Duplex Duplex Loading standard trays and optional trays 46 Printing 5 Place the print media in the tray: Note: Paper must be loaded differently in the trays, depending on the options you have installed. • Print side face-down for simplex (single-sided) printing • Print side face-up for duplex printing Note: Do not fill paper above the load line.

User's Guide
Page 47
... saves this setting as the new user default, and the printer returns to use, and then press . Setting the Paper Type and Paper Size 47 Printing 6 Squeeze the side guide tab, and slide the guide toward the inside of the tray until the appears next to the paper type you want to... Type and Paper Size After setting the Paper Type and Paper Size to the correct values for the type and size used in the trays, then any trays containing the same size and type are loading is on. 2 Press on the operator panel. 3 Press until the appears next to Paper Menu, and...
... saves this setting as the new user default, and the printer returns to use, and then press . Setting the Paper Type and Paper Size 47 Printing 6 Squeeze the side guide tab, and slide the guide toward the inside of the tray until the appears next to the paper type you want to... Type and Paper Size After setting the Paper Type and Paper Size to the correct values for the type and size used in the trays, then any trays containing the same size and type are loading is on. 2 Press on the operator panel. 3 Press until the appears next to Paper Menu, and...
User's Guide
Page 48
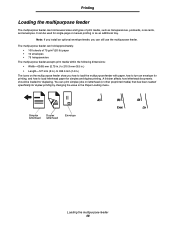
....9 mm (8.5 in.) • Length-127 mm (5 in the Paper Loading menu. You can hold approximately: • 100 sheets of print media, such as an additional tray. Simplex letterhead Duplex letterhead Envelope Loading the multipurpose feeder 48 Printing Loading the multipurpose feeder The multipurpose feeder can print simplex jobs on the multipurpose...
....9 mm (8.5 in.) • Length-127 mm (5 in the Paper Loading menu. You can hold approximately: • 100 sheets of print media, such as an additional tray. Simplex letterhead Duplex letterhead Envelope Loading the multipurpose feeder 48 Printing Loading the multipurpose feeder The multipurpose feeder can print simplex jobs on the multipurpose...

User's Guide
Page 49
... down or applying excessive force on the multipurpose feeder. Doing so may cause a jam. 1 Push the release latch, and lower the multipurpose feeder. 2 Pull the tray extension out. Note: Hold transparencies by the edges and avoid touching the print side. Printing To load print media: Note: Do not add or remove...
... down or applying excessive force on the multipurpose feeder. Doing so may cause a jam. 1 Push the release latch, and lower the multipurpose feeder. 2 Pull the tray extension out. Note: Hold transparencies by the edges and avoid touching the print side. Printing To load print media: Note: Do not add or remove...
User's Guide
Page 50
... 5 Load the media in the multipurpose feeder. Do not mix sizes and types in the same tray. Never use envelopes with the stamp area enters the multipurpose feeder first. These envelopes may severely damage the printer. Loading the multipurpose feeder 50 Use the stack height label as a guide for stack height when...
... 5 Load the media in the multipurpose feeder. Do not mix sizes and types in the same tray. Never use envelopes with the stamp area enters the multipurpose feeder first. These envelopes may severely damage the printer. Loading the multipurpose feeder 50 Use the stack height label as a guide for stack height when...

User's Guide
Page 51
Printing Loading letterhead or preprinted paper • Follow the illustrations for loading the paper according to your options. • Do not fill paper above the load line. Overfilling the tray may cause jams. Without a finisher attached With a finisher attached Simplex (single sided) Simplex (single sided) Duplex Duplex Loading the multipurpose feeder 51
Printing Loading letterhead or preprinted paper • Follow the illustrations for loading the paper according to your options. • Do not fill paper above the load line. Overfilling the tray may cause jams. Without a finisher attached With a finisher attached Simplex (single sided) Simplex (single sided) Duplex Duplex Loading the multipurpose feeder 51

User's Guide
Page 52
The printer returns to MP Feeder Size/Type, and then press . Printing 6 Slide the side ..., and then press . a Press on the operator panel. g Press until it lightly rests against the edge of the tray until the appears next to the media type you loaded, and then press . Closing the multipurpose feeder 1 Remove print media... from the multipurpose feeder. 2 Push the extension tray in. 3 Close the multipurpose feeder cover. b Press until the appears next to Paper Menu, and then press . c Press...
The printer returns to MP Feeder Size/Type, and then press . Printing 6 Slide the side ..., and then press . a Press on the operator panel. g Press until it lightly rests against the edge of the tray until the appears next to the media type you loaded, and then press . Closing the multipurpose feeder 1 Remove print media... from the multipurpose feeder. 2 Push the extension tray in. 3 Close the multipurpose feeder cover. b Press until the appears next to Paper Menu, and then press . c Press...

User's Guide
Page 53
...; Do not fold or crease the paper. • Do not mix sizes or weights in the lowered position, push the elevator button to lower the tray. 2 Flex the sheets back and forth to loosen them, then fan them. Do not fold or crease the print media. If the elevator... tray is not already in the same source. • Do not open the door or remove any print media when a job is printing or when the ...
...; Do not fold or crease the paper. • Do not mix sizes or weights in the lowered position, push the elevator button to lower the tray. 2 Flex the sheets back and forth to loosen them, then fan them. Do not fold or crease the print media. If the elevator... tray is not already in the same source. • Do not open the door or remove any print media when a job is printing or when the ...

User's Guide
Page 54
... not load print media above the load line. Note: When loading more than one ream of paper, we recommend you load it on the elevator tray with the preferred print side facing down. Carefully align each stack as shown, and place it to the back of the drawer. Simplex (single sided...
... not load print media above the load line. Note: When loading more than one ream of paper, we recommend you load it on the elevator tray with the preferred print side facing down. Carefully align each stack as shown, and place it to the back of the drawer. Simplex (single sided...
User's Guide
Page 57
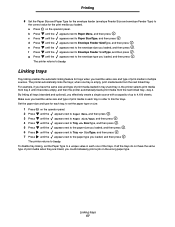
...) to the correct value for each tray, to set the Paper Type to a unique value in tray 2 and tray 4, the printer selects print media from tray 2 until it becomes empty, and then the printer automatically feeds print media from the next linked tray. Linking trays Tray linking enables the automatic linking feature for trays when you load the same size...
...) to the correct value for each tray, to set the Paper Type to a unique value in tray 2 and tray 4, the printer selects print media from tray 2 until it becomes empty, and then the printer automatically feeds print media from the next linked tray. Linking trays Tray linking enables the automatic linking feature for trays when you load the same size...
User's Guide
Page 60
You must consider a number of paper and specialty media the printer supports, see the Card Stock & Label Guide available on standard and optional sources for both input and output trays and bins. • Print media sizes • Print media types • Print media weights • Media... a print media size not listed, select the next larger size. Supported print media The following tables provide information on our Lexmark Web site at www.lexmark.com. 6 Understanding paper and specialty media guidelines Print media is paper, card stock, transparencies, labels, and envelopes. This ...
You must consider a number of paper and specialty media the printer supports, see the Card Stock & Label Guide available on standard and optional sources for both input and output trays and bins. • Print media sizes • Print media types • Print media weights • Media... a print media size not listed, select the next larger size. Supported print media The following tables provide information on our Lexmark Web site at www.lexmark.com. 6 Understanding paper and specialty media guidelines Print media is paper, card stock, transparencies, labels, and envelopes. This ...


