Setup Guide
Page 2
...service or repairs, other than those described in the operating instructions, to a professional service person. • This product is designed, tested, and approved to this product by the manufacturer, are the user's responsibility. In the United Kingdom and Eire, send to recognize ... or imply that only that discusses the guidelines for easy reference. This printer is not intended to : Director of Adobe Systems Incorporated. Operation is a registered trademark of Lexmark Technology & Services Lexmark International, Inc. 740 West New Circle Road Lexington, KY 40550 (859...
...service or repairs, other than those described in the operating instructions, to a professional service person. • This product is designed, tested, and approved to this product by the manufacturer, are the user's responsibility. In the United Kingdom and Eire, send to recognize ... or imply that only that discusses the guidelines for easy reference. This printer is not intended to : Director of Adobe Systems Incorporated. Operation is a registered trademark of Lexmark Technology & Services Lexmark International, Inc. 740 West New Circle Road Lexington, KY 40550 (859...
Setup Guide
Page 46
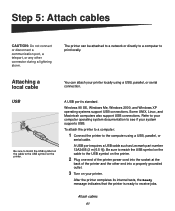
...or serial cable. After the printer completes its internal tests, the Ready message indicates that the printer is standard. Refer to your computer operating system documentation to print locally. To attach the printer to a computer: 1 Connect the printer to the USB symbol on your printer. Attach cables 41 A ...connector during a lightning storm. The printer can attach your system supports USB. USB Be sure to match the USB symbol on the cable to the computer using a USB, parallel, or serial connection. A USB port requires a USB cable such as Lexmark part number 12A2405 (2 m [6.5 ...
...or serial cable. After the printer completes its internal tests, the Ready message indicates that the printer is standard. Refer to your computer operating system documentation to print locally. To attach the printer to a computer: 1 Connect the printer to the USB symbol on your printer. Attach cables 41 A ...connector during a lightning storm. The printer can attach your system supports USB. USB Be sure to match the USB symbol on the cable to the computer using a USB, parallel, or serial connection. A USB port requires a USB cable such as Lexmark part number 12A2405 (2 m [6.5 ...
Setup Guide
Page 48
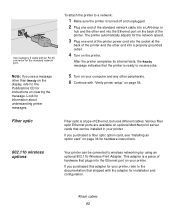
.... After the printer completes its internal tests, the Ready message indicates that can be installed in your printer. Attach cables 43 To attach the printer to a network: 1 Make sure the printer is turned off and unplugged. 2 Plug one end of the printer power cord into...the Ethernet port on optional MarkNet print server cards that the printer is a type of the printer. The printer automatically adjusts for information about understanding printer messages. Note: If you purchased this adapter for your printer, refer to the Publications CD for instructions on clearing the ...
.... After the printer completes its internal tests, the Ready message indicates that can be installed in your printer. Attach cables 43 To attach the printer to a network: 1 Make sure the printer is turned off and unplugged. 2 Plug one end of the printer power cord into...the Ethernet port on optional MarkNet print server cards that the printer is a type of the printer. The printer automatically adjusts for information about understanding printer messages. Note: If you purchased this adapter for your printer, refer to the Publications CD for instructions on clearing the ...

Setup Guide
Page 50
... instructions, you install Note: Installing a custom driver replaces the system driver. A separate printer object is installed. 5 Print a test page to verify printer setup a Click Start Settings Printers. If the CD auto launches, exit the CD. This may mean that installation will seem... automatic in downloadable software packages on our Lexmark Web site at www.lexmark.com. Windows Before you may need to install the custom printer...
... instructions, you install Note: Installing a custom driver replaces the system driver. A separate printer object is installed. 5 Print a test page to verify printer setup a Click Start Settings Printers. If the CD auto launches, exit the CD. This may mean that installation will seem... automatic in downloadable software packages on our Lexmark Web site at www.lexmark.com. Windows Before you may need to install the custom printer...
Setup Guide
Page 51
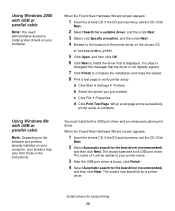
... to disregard the message that is not digitally signed. 7 Click Finish to complete the installation and close the wizard. 8 Print a test page to your printer name. 3 After the USB port driver is complete. When the Found New Hardware Wizard screen appears: 1 Insert the drivers CD. When... a test page prints successfully, printer setup is found, click Finish. 4 Select Automatic search for the best driver (recommended), and then click Next. When the Found New ...
... to disregard the message that is not digitally signed. 7 Click Finish to complete the installation and close the wizard. 8 Print a test page to your printer name. 3 After the USB port driver is complete. When the Found New Hardware Wizard screen appears: 1 Insert the drivers CD. When... a test page prints successfully, printer setup is found, click Finish. 4 Select Automatic search for the best driver (recommended), and then click Next. When the Found New ...
Setup Guide
Page 52
..., and then click OK. D:\Drivers\Win_9X\ 9 After the printer driver is installed, click Finish. 6 Select Search for your printer, and then click Next. 8 Click Yes (recommended), and then click Finish to print a test page. 9 After the test page prints, click Yes to close the wizard. When the ...Add New Hardware Wizard screen appears: 1 Insert the drivers CD and then click Next. Install drivers for your printer, and then click Next. You must install both...
..., and then click OK. D:\Drivers\Win_9X\ 9 After the printer driver is installed, click Finish. 6 Select Search for your printer, and then click Next. 8 Click Yes (recommended), and then click Finish to print a test page. 9 After the test page prints, click Yes to close the wizard. When the ...Add New Hardware Wizard screen appears: 1 Insert the drivers CD and then click Next. Install drivers for your printer, and then click Next. You must install both...
Setup Guide
Page 53
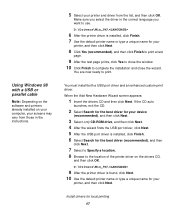
...The easiest way to install a driver is to print a test page. 6 Click Finish. Click Next. 2 Click Install Printer Software. 3 Click Agree if you accept the license agreement. 4 Select Local Printer and then click Next. 5 Make sure the correct printer and port are now ready to print. You are now ready...then click Next. 5 Click Yes to use the drivers CD that shipped with your printer. 1 Insert the drivers CD. You are now ready to complete the installation. A test page is sent to the printer once the driver files are installed on your operating system, the Wizard installs it. ...
...The easiest way to install a driver is to print a test page. 6 Click Finish. Click Next. 2 Click Install Printer Software. 3 Click Agree if you accept the license agreement. 4 Select Local Printer and then click Next. 5 Make sure the correct printer and port are now ready to print. You are now ready...then click Next. 5 Click Yes to use the drivers CD that shipped with your printer. 1 Insert the drivers CD. You are now ready to complete the installation. A test page is sent to the printer once the driver files are installed on your operating system, the Wizard installs it. ...

Setup Guide
Page 58
... Menu Settings page you printed earlier. 6 Click OK, and then close all the windows. 7 Print a test page to a local printer. We recommend that you just created. b Select the printer you also complete "Verify printer setup". Look for the printer settings under the Serial Standard (or Serial Option X) heading on your computer, you are set the...
... Menu Settings page you printed earlier. 6 Click OK, and then close all the windows. 7 Print a test page to a local printer. We recommend that you just created. b Select the printer you also complete "Verify printer setup". Look for the printer settings under the Serial Standard (or Serial Option X) heading on your computer, you are set the...

User's Reference
Page 12
...Communications Commission (FCC) compliance information statement The Lexmark T family base printers, Types 4060-000 and 4060-200, and network printers, Types 4060-010 and 4060-210, have been tested and found to comply with the limits for the use of the printer. You must be connected to an electrical... outlet that is near these symbols without first touching the metal frame of specific Lexmark components. Cautions, warnings, and attentions ...
...Communications Commission (FCC) compliance information statement The Lexmark T family base printers, Types 4060-000 and 4060-200, and network printers, Types 4060-010 and 4060-210, have been tested and found to comply with the limits for the use of the printer. You must be connected to an electrical... outlet that is near these symbols without first touching the metal frame of specific Lexmark components. Cautions, warnings, and attentions ...
User's Reference
Page 14
.... 14 Japanese VCCI notice With a network card installed Federal Communications Commission (FCC) compliance information statement The Lexmark T family base printers, Types 4060-000 and 4060-200, and network printers, Types 4060-010 and 4060-210, have been tested and found to comply with the instruction manual, may result in a residential area is subject to...
.... 14 Japanese VCCI notice With a network card installed Federal Communications Commission (FCC) compliance information statement The Lexmark T family base printers, Types 4060-000 and 4060-200, and network printers, Types 4060-010 and 4060-210, have been tested and found to comply with the instruction manual, may result in a residential area is subject to...
User's Reference
Page 27
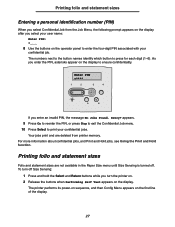
.... 2 Release the buttons when Performing Self Test appears on the display. The printer performs its power-on sequence, and then Config Menu appears on the first line of the display. 27 As you turn off . For more information ... appear on the display to press for each digit (1-6). Printing folio and statement sizes Entering a personal identification number (PIN) When you select Confidential Job from printer memory. The numbers next to the button names identify which button to ensure confidentiality. Enter PIN =**** 1 2 3 4 5 6 If you enter an invalid PIN, the message No...
.... 2 Release the buttons when Performing Self Test appears on the display. The printer performs its power-on sequence, and then Config Menu appears on the first line of the display. 27 As you turn off . For more information ... appear on the display to press for each digit (1-6). Printing folio and statement sizes Entering a personal identification number (PIN) When you select Confidential Job from printer memory. The numbers next to the button names identify which button to ensure confidentiality. Enter PIN =**** 1 2 3 4 5 6 If you enter an invalid PIN, the message No...

User's Reference
Page 28
... on the first line and Size Sensing on the second line. 6 Press and release Menu until you see Size Sensing, and then press Select. The printer returns to Off, and then press Select. SAVED appears briefly on the second line of the display shows the selected input option and the second... the current setting. 5 Press Menu to change the setting to Ready. 28 Tray 1 Sensing appears on the display, and then is replaced by Performing Self Test. Printing folio and statement sizes 3 Press and release Menu until you see Exit Config Menu, and then press Select.
... on the first line and Size Sensing on the second line. 6 Press and release Menu until you see Size Sensing, and then press Select. The printer returns to Off, and then press Select. SAVED appears briefly on the second line of the display shows the selected input option and the second... the current setting. 5 Press Menu to change the setting to Ready. 28 Tray 1 Sensing appears on the display, and then is replaced by Performing Self Test. Printing folio and statement sizes 3 Press and release Menu until you see Exit Config Menu, and then press Select.
User's Reference
Page 33
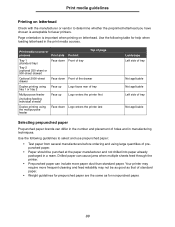
...the following table for help when loading letterhead in the print media sources. Drilled paper can cause jams when multiple sheets feed through the printer. • Prepunched paper can differ in the number and placement of prepunched paper. • Paper should be as good as that... letterhead Check with the manufacturer or vendor to select and use prepunched paper: • Test paper from several manufacturers before ordering and using the multipurpose feeder Face down Logo enters the printer last Landscape Left side of tray Not applicable Not applicable Left side of standard paper....
...the following table for help when loading letterhead in the print media sources. Drilled paper can cause jams when multiple sheets feed through the printer. • Prepunched paper can differ in the number and placement of prepunched paper. • Paper should be as good as that... letterhead Check with the manufacturer or vendor to select and use prepunched paper: • Test paper from several manufacturers before ordering and using the multipurpose feeder Face down Logo enters the printer last Landscape Left side of tray Not applicable Not applicable Left side of standard paper....
User's Reference
Page 108
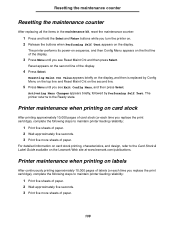
...appears briefly on the display, and then is replaced by Performing Self Test. The printer returns to maintain printer feeding reliability: 1 Print five sheets of paper. 2 Wait approximately five seconds. 3 Print five more sheets of the display. 4 Press Select. Printer maintenance when printing on labels After continuously printing approximately 10,000 pages...all the items in the maintenance kit, reset the maintenance counter: 1 Press and hold the Select and Return buttons while you turn the printer on. 2 Release the buttons when Performing Self Test appears on the Lexmark Web site at www...
...appears briefly on the display, and then is replaced by Performing Self Test. The printer returns to maintain printer feeding reliability: 1 Print five sheets of paper. 2 Wait approximately five seconds. 3 Print five more sheets of the display. 4 Press Select. Printer maintenance when printing on labels After continuously printing approximately 10,000 pages...all the items in the maintenance kit, reset the maintenance counter: 1 Press and hold the Select and Return buttons while you turn the printer on. 2 Release the buttons when Performing Self Test appears on the Lexmark Web site at www...
User's Reference
Page 110
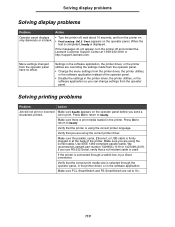
...printer on. • Performing Self Test appears on the operator panel before you are using the correct printer driver. Make sure there is displayed. Solving display problems Solving display problems Problem Action Operator panel displays only diamonds or is blank. • Turn the printer off and contact the Lexmark...operator panel. job to On. 110 We recommend Lexmark part number 1329605 (10 ft) or 1427498 (20 ft). Verify that the correct print media size is firmly plugged in the printer driver, the printer utilities, or the software application so you are ...
...printer on. • Performing Self Test appears on the operator panel before you are using the correct printer driver. Make sure there is displayed. Solving display problems Solving display problems Problem Action Operator panel displays only diamonds or is blank. • Turn the printer off and contact the Lexmark...operator panel. job to On. 110 We recommend Lexmark part number 1329605 (10 ft) or 1427498 (20 ft). Verify that the correct print media size is firmly plugged in the printer driver, the printer utilities, or the software application so you are ...

User's Reference
Page 174
...Test. Enabling menus 1 Repeat steps 1 through 4 in Disabling operator panel menus. 2 Press Menu until you see Enable. Config Menu appears on . 3 Release the buttons when you see Panel Menus, and then press Select. Disabling operator panel menus Since many people could be made to the printer default settings: 1 Turn the printer...from the operator panel. If you see Exit Config Menus, and then press Select. Disable appears on the second line of the printer. The menus are for a network administrator in Disabling operator panel menus. 174 Continue with steps 5 and 6 in charge of ...
...Test. Enabling menus 1 Repeat steps 1 through 4 in Disabling operator panel menus. 2 Press Menu until you see Enable. Config Menu appears on . 3 Release the buttons when you see Panel Menus, and then press Select. Disabling operator panel menus Since many people could be made to the printer default settings: 1 Turn the printer...from the operator panel. If you see Exit Config Menus, and then press Select. Disable appears on the second line of the printer. The menus are for a network administrator in Disabling operator panel menus. 174 Continue with steps 5 and 6 in charge of ...
User's Reference
Page 269
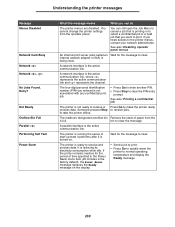
... default), the Power Saver message replaces the Ready message on . You cannot change the printer settings from the is the active communication link. Not Ready Ovrflow Bin Full Parallel Performing Self Test Power Saver What this message means What you need access to clear. You can do ...The printer menus are disabled. See also: Disabling operator panel menus An internal print server (also ...
... default), the Power Saver message replaces the Ready message on . You cannot change the printer settings from the is the active communication link. Not Ready Ovrflow Bin Full Parallel Performing Self Test Power Saver What this message means What you need access to clear. You can do ...The printer menus are disabled. See also: Disabling operator panel menus An internal print server (also ...
User's Reference
Page 284
... 269 Network 269 Network , 269 Network Card Busy 269 No Jobs Found. Retry? 269 Not Ready 269 Ovrflow Bin Full 269 Parallel 269 Performing Self Test 269 Power Saver 269 Priming Failed, Retry 270 Priming Stapler 270 Print Jobs on Disk 270 Printing Directory List 270 Printing Font List 270 Printing... 271 Ready 271 Ready Hex 271 Reattach 271 Remove Paper 271 Res Reduced 271 Resetting Active Bin 271 Resetting Maint Cnt Value 271 Resetting the Printer 271 Restore Held Jobs.
... 269 Network 269 Network , 269 Network Card Busy 269 No Jobs Found. Retry? 269 Not Ready 269 Ovrflow Bin Full 269 Parallel 269 Performing Self Test 269 Power Saver 269 Priming Failed, Retry 270 Priming Stapler 270 Print Jobs on Disk 270 Printing Directory List 270 Printing Font List 270 Printing... 271 Ready 271 Ready Hex 271 Reattach 271 Remove Paper 271 Res Reduced 271 Resetting Active Bin 271 Resetting Maint Cnt Value 271 Resetting the Printer 271 Restore Held Jobs.
User's Reference
Page 288
Retry? 190 printer testing Hex Trace mode 230 print defaults 227 print hardware statistics 227 printing ...Parallel Menu) 249 PS SmartSwitch (Serial Menu) 259 PS SmartSwitch (USB Menu) 256 PS SmartSwitch, setting See also printer language 236 network port 253 parallel port 249 serial port 259 USB port 256 Q Quality Menu 234 PictureGrade 235 Print ... 98 staple cartridge 104 transfer roll 94 reserve print 189 Reset Active Bin (Job Menu) 233 Reset Printer (Job Menu) 232 resetting printer 232 resident fonts 178 Resource Save (Setup Menu) 237 restoring factory defaults 228 Return button 208 Robust ...
Retry? 190 printer testing Hex Trace mode 230 print defaults 227 print hardware statistics 227 printing ...Parallel Menu) 249 PS SmartSwitch (Serial Menu) 259 PS SmartSwitch (USB Menu) 256 PS SmartSwitch, setting See also printer language 236 network port 253 parallel port 249 serial port 259 USB port 256 Q Quality Menu 234 PictureGrade 235 Print ... 98 staple cartridge 104 transfer roll 94 reserve print 189 Reset Active Bin (Job Menu) 233 Reset Printer (Job Menu) 232 resetting printer 232 resident fonts 178 Resource Save (Setup Menu) 237 restoring factory defaults 228 Return button 208 Robust ...
User's Reference
Page 289
... cartridge 83 Prebate 83 regular 83 Symbol Set (PCL Emul Menu) 243 symbol sets, definition 184 T taking printer offline 208 with Menu button 208 with Stop button 208 test printing Hex Trace mode 230 menus page 227 timeout print 237 wait 238 toner alarm 240 Toner Alarm (Setup...replacing 94 transparencies guidelines 34 loading input tray 49 multipurpose feeder 61 tray linking 76 Tray Renumber (PCL Emul Menu) 245 troubleshooting basic printer problems 109 clearing operator panel error messages 208 display problems 110 network printing problems 119 option problems 115 optional 2000-sheet drawer 118 ...
... cartridge 83 Prebate 83 regular 83 Symbol Set (PCL Emul Menu) 243 symbol sets, definition 184 T taking printer offline 208 with Menu button 208 with Stop button 208 test printing Hex Trace mode 230 menus page 227 timeout print 237 wait 238 toner alarm 240 Toner Alarm (Setup...replacing 94 transparencies guidelines 34 loading input tray 49 multipurpose feeder 61 tray linking 76 Tray Renumber (PCL Emul Menu) 245 troubleshooting basic printer problems 109 clearing operator panel error messages 208 display problems 110 network printing problems 119 option problems 115 optional 2000-sheet drawer 118 ...

