Quick Reference
Page 2
.... Important safety information Connect the power cord to the public switched telephone network. If any subsequent user of the patented printer. The patented Lexmark inkjet cartridges and their contents terminates, and you 're sending single-color tanks, we encourage our customers to : (1) use this You...not cut, twist, bind, crush, or place heavy objects on the power cord. Please Read Before Opening Your Inkjet Cartridge Box At Lexmark, we take our commitment to the environment seriously, and we recommend that is near water or wet locations. CAUTION-POTENTIAL INJURY: To ...
.... Important safety information Connect the power cord to the public switched telephone network. If any subsequent user of the patented printer. The patented Lexmark inkjet cartridges and their contents terminates, and you 're sending single-color tanks, we encourage our customers to : (1) use this You...not cut, twist, bind, crush, or place heavy objects on the power cord. Please Read Before Opening Your Inkjet Cartridge Box At Lexmark, we take our commitment to the environment seriously, and we recommend that is near water or wet locations. CAUTION-POTENTIAL INJURY: To ...
Quick Reference
Page 3
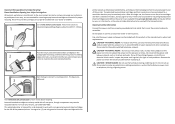
Contents Contents Important safety information 2 About your printer 5 Finding information about the printer 5 Minimizing your printer's environmental impact 5 Printer models...6 Printer features...6 Setting up the printer...6 Understanding the parts of the printer 11 Using the printer control panel 13 Understanding the home screen 13 Navigating menus using the touch screen 14 Using memory cards and flash drives 15 Ordering and replacing supplies 17 Ordering ink cartridges...17 Replacing ink cartridges...17 Maintaining ink cartridges 18 Using the printer software 20 Minimum system ...
Contents Contents Important safety information 2 About your printer 5 Finding information about the printer 5 Minimizing your printer's environmental impact 5 Printer models...6 Printer features...6 Setting up the printer...6 Understanding the parts of the printer 11 Using the printer control panel 13 Understanding the home screen 13 Navigating menus using the touch screen 14 Using memory cards and flash drives 15 Ordering and replacing supplies 17 Ordering ink cartridges...17 Replacing ink cartridges...17 Maintaining ink cartridges 18 Using the printer software 20 Minimum system ...

Quick Reference
Page 4
Contents 4 What is Wi‑Fi Protected Setup 42 Configuring Wi‑Fi Protected Setup manually 43 Using SmartSolutions 44 What are SmartSolutions 44 Troubleshooting 45 Notices 54 Edition notice...54 Index 55
Contents 4 What is Wi‑Fi Protected Setup 42 Configuring Wi‑Fi Protected Setup manually 43 Using SmartSolutions 44 What are SmartSolutions 44 Troubleshooting 45 Notices 54 Edition notice...54 Index 55
Quick Reference
Page 5
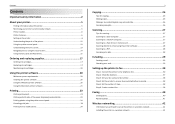
...of a sheet of paper. • Print on both sides of the paper manually or automatically (depending on the Lexmark Support Web site at http://support.lexmark.com. 5 Minimizing your printer's environmental impact We are committed to protecting the environment and are you adjust the ...require less ink. Use the preview features found in select printer models. The latest supplemental information, updates, Support Web site-http://support.lexmark.com online customer support, and telephone support 1 Available on the installation software CD. 2 Available on the installation software CD and on ...
...of a sheet of paper. • Print on both sides of the paper manually or automatically (depending on the Lexmark Support Web site at http://support.lexmark.com. 5 Minimizing your printer's environmental impact We are committed to protecting the environment and are you adjust the ...require less ink. Use the preview features found in select printer models. The latest supplemental information, updates, Support Web site-http://support.lexmark.com online customer support, and telephone support 1 Available on the installation software CD. 2 Available on the installation software CD and on ...
Quick Reference
Page 6
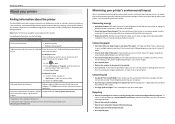
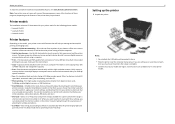
...region. Printer models The installation software CD that came with your printer works for the following printer models: • Lexmark Pro912 • Lexmark Pro915 • Lexmark Pro919 Printer features Depending on the model, your printer comes with up the printer 1 Unpack the printer. The large...touch screen for a given task and then assign a shortcut name and shortcut number to your printer To read the Lexmark Environmental Sustainability Report, visit www.lexmark.com/environment. Note: Your printer may move the printer after a specified period of inactivity. 6 Setting up to ...
...region. Printer models The installation software CD that came with your printer works for the following printer models: • Lexmark Pro912 • Lexmark Pro915 • Lexmark Pro919 Printer features Depending on the model, your printer comes with up the printer 1 Unpack the printer. The large...touch screen for a given task and then assign a shortcut name and shortcut number to your printer To read the Lexmark Environmental Sustainability Report, visit www.lexmark.com/environment. Note: Your printer may move the printer after a specified period of inactivity. 6 Setting up to ...
Quick Reference
Page 7
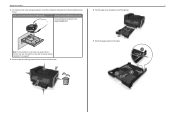
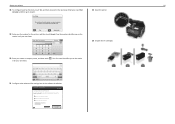
... screen does not appear after a minute, then see "Installation screen did not appear during installation" on page 45. 3 Remove tape and packing material from www.lexmark.com. 4 Pull the paper tray completely out of the printer. About your printer 7 2 To initiate printer setup using a computer, insert the installation software CD, or...
... screen does not appear after a minute, then see "Installation screen did not appear during installation" on page 45. 3 Remove tape and packing material from www.lexmark.com. 4 Pull the paper tray completely out of the printer. About your printer 7 2 To initiate printer setup using a computer, insert the installation software CD, or...
Quick Reference
Page 8
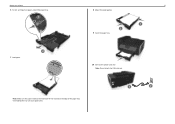
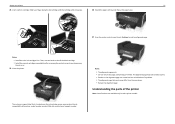
Note: Do not attach the USB cable yet. Note: Make sure the paper is below the maximum fill line located on the edge of the paper tray. About your printer 6 For A4‑ and legal‑size paper, extend the paper tray. 1 2 7 Load paper. 8 8 Adjust the paper guides. 1 2 9 Insert the paper tray. 10 Connect the power cord only. Overloading the tray can cause paper jams.
Note: Do not attach the USB cable yet. Note: Make sure the paper is below the maximum fill line located on the edge of the paper tray. About your printer 6 For A4‑ and legal‑size paper, extend the paper tray. 1 2 7 Load paper. 8 8 Adjust the paper guides. 1 2 9 Insert the paper tray. 10 Connect the power cord only. Overloading the tray can cause paper jams.
Quick Reference
Page 9
OK English Espan~ ol Suomi Francais 13 Confirm the language, and then touch Yes. Country / Region USA Uruguay US Virgin Islands Venezuela Accept 15 Set the date, and then touch Accept. Language You have chosen English as the language for your printer 11 Make sure the printer is on the printer control panel, and then touch OK. Set Time Accept 12 :00 AM 17 Set the time zone, and then touch Accept. Set Date Month 1 Day 30 Accept Year 2011 16 Set the time, and then touch Accept. Are you sure? Yes No 9 14 Set the country or region, and then touch Accept. SD/MS-Duo/MMC 12 Set...
OK English Espan~ ol Suomi Francais 13 Confirm the language, and then touch Yes. Country / Region USA Uruguay US Virgin Islands Venezuela Accept 15 Set the date, and then touch Accept. Language You have chosen English as the language for your printer 11 Make sure the printer is on the printer control panel, and then touch OK. Set Time Accept 12 :00 AM 17 Set the time zone, and then touch Accept. Set Date Month 1 Day 30 Accept Year 2011 16 Set the time, and then touch Accept. Are you sure? Yes No 9 14 Set the country or region, and then touch Accept. SD/MS-Duo/MMC 12 Set...
Quick Reference
Page 10
...send and receive faxes What will I be missing if I do this now? Quit Continue ? Your fax number identifies you must complete fax setup. Lexmark Pro910 Series Installation Configure Advanced Features You can I don't do this printer, you as the sender in all your sent faxes. 23 Unpack the.... 21 Configure other advanced fax settings later in all your sent faxes. Get my printer ready to scan directly to my computer Configure Lexmark SmartSolutions and standalone email Get my printer ready to access all the features of your name or company name, and then touch . Do...
...send and receive faxes What will I be missing if I do this now? Quit Continue ? Your fax number identifies you must complete fax setup. Lexmark Pro910 Series Installation Configure Advanced Features You can I don't do this printer, you as the sender in all your sent faxes. 23 Unpack the.... 21 Configure other advanced fax settings later in all your sent faxes. Get my printer ready to scan directly to my computer Configure Lexmark SmartSolutions and standalone email Get my printer ready to access all the features of your name or company name, and then touch . Do...
Quick Reference
Page 11
The alignment page may differ from the one shown. • Recycle the alignment page. About your finger along the ink cartridge until printing is located near the ink cartridge access area contains the ink compatibility information, model number, product Web site, and technical support number. Then, use two hands to install the black cartridge. • Install the new ink cartridges immediately after removing the protective cap to avoid exposing the ink to print. • Streaks on the alignment page are normal and not an indication of the printer Note: Some functions are ...
The alignment page may differ from the one shown. • Recycle the alignment page. About your finger along the ink cartridge until printing is located near the ink cartridge access area contains the ink compatibility information, model number, product Web site, and technical support number. Then, use two hands to install the black cartridge. • Install the new ink cartridges immediately after removing the protective cap to avoid exposing the ink to print. • Streaks on the alignment page are normal and not an indication of the printer Note: Some functions are ...
Quick Reference
Page 12
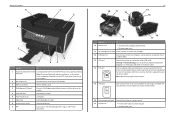
Use this port if you do not have a dedicated fax line for scanning, copying, or faxing. (ADF) tray Note: Do not load postcards, photos, small items, or thin media (such as it exits. 8 Printer control panel Operate the printer. 9 ADF Scan, copy, or fax multiple‑page letter‑, legal‑, and A4‑size documents. 12 10 11 13 12 15 EXT LINE EXT LINE 19 18 16 17 Use the To 10 Scanner unit • Access the ink cartridges and printhead. • Remove paper jams. 11 Ink cartridge access area Install, replace, or remove ink cartridges. 12 Ethernet port ...
Use this port if you do not have a dedicated fax line for scanning, copying, or faxing. (ADF) tray Note: Do not load postcards, photos, small items, or thin media (such as it exits. 8 Printer control panel Operate the printer. 9 ADF Scan, copy, or fax multiple‑page letter‑, legal‑, and A4‑size documents. 12 10 11 13 12 15 EXT LINE EXT LINE 19 18 16 17 Use the To 10 Scanner unit • Access the ink cartridges and printhead. • Remove paper jams. 11 Ink cartridge access area Install, replace, or remove ink cartridges. 12 Ethernet port ...
Quick Reference
Page 13
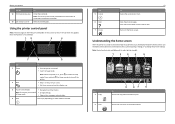
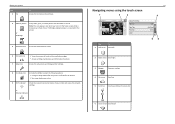
Note: The carrier moves to Sleep mode. Note: When the printer is turned on and a short warm-up period occurs, the display shows the home screen. Understanding the home screen After the printer is on, press to switch to the printhead access area when no printhead is installed in Sleep mode. • View printer messages and animation. 4 Start Start a job, depending on and off • Change settings. Using the printer control panel Note: The icons appear when they are available only in select printer models. 1 2 3 4 5 A Copy Scan Fax Memory Smart Device Solutions ...
Note: The carrier moves to Sleep mode. Note: When the printer is turned on and a short warm-up period occurs, the display shows the home screen. Understanding the home screen After the printer is on, press to switch to the printhead access area when no printhead is installed in Sleep mode. • View printer messages and animation. 4 Start Start a job, depending on and off • Change settings. Using the printer control panel Note: The icons appear when they are available only in select printer models. 1 2 3 4 5 A Copy Scan Fax Memory Smart Device Solutions ...
Quick Reference
Page 14
Access the setup menu and change printer settings. 8 Eco‑Mode icon Activate Eco‑Mode to select the following options: • Change to low. 9 Wi‑Fi indicator Check the network connection status of your printer and access the network settings. or Ethernet indicator Navigating menus using the touch screen 1 2 3 Select Photos 1 - 6 of the installed cartridges. • Access cartridge maintenance and information functions. or PictBridge 5 SmartSolutions Access the SmartSolutions menu. 6 Ink levels icon 7 Setup icon • View the current ink levels of 10 ...
Access the setup menu and change printer settings. 8 Eco‑Mode icon Activate Eco‑Mode to select the following options: • Change to low. 9 Wi‑Fi indicator Check the network connection status of your printer and access the network settings. or Ethernet indicator Navigating menus using the touch screen 1 2 3 Select Photos 1 - 6 of the installed cartridges. • Access cartridge maintenance and information functions. or PictBridge 5 SmartSolutions Access the SmartSolutions menu. 6 Ink levels icon 7 Setup icon • View the current ink levels of 10 ...
Quick Reference
Page 15
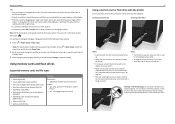
About your printer Tips: • Use your flash drive does not fit directly into the USB port Inserting a memory card Inserting a flash drive SD/MS-Duo/MMC FLASH DRIVE SD/MS-Duo/MMC Notes: • Insert the card with the brand name label facing up. • Make sure any connector, the memory device, or the printer in this guide start from the memory device. To navigate to Paper Type and select the default paper type setting: 1 Touch > Paper Setup > Paper Type. Using memory cards and flash drives Supported memory cards and file types Memory card • Secure Digital (SD) &#...
About your printer Tips: • Use your flash drive does not fit directly into the USB port Inserting a memory card Inserting a flash drive SD/MS-Duo/MMC FLASH DRIVE SD/MS-Duo/MMC Notes: • Insert the card with the brand name label facing up. • Make sure any connector, the memory device, or the printer in this guide start from the memory device. To navigate to Paper Type and select the default paper type setting: 1 Touch > Paper Setup > Paper Type. Using memory cards and flash drives Supported memory cards and file types Memory card • Secure Digital (SD) &#...

Quick Reference
Page 16
Notes: • If the printer does not recognize the memory device, then remove and reinsert it. • If a flash drive or a digital camera set to mass storage mode is inserted into the USB port while a memory card is in the card slot, then the display prompts you to choose which memory device to use. About your printer 16 The Memory Device screen appears on the display.
Notes: • If the printer does not recognize the memory device, then remove and reinsert it. • If a flash drive or a digital camera set to mass storage mode is inserted into the USB port while a memory card is in the card slot, then the display prompts you to choose which memory device to use. About your printer 16 The Memory Device screen appears on the display.
Quick Reference
Page 17
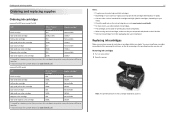
...Not available High‑yield magenta color cartridge 160XL 160XLA 1 Licensed for remanufacturing, refilling, or recycling. 2 Available only on the Lexmark Web site at www.lexmark.com. 17 Notes: • To get more ink, order high‑yield ink cartridges. • Depending on your country ...or region, you begin. After use, return this cartridge to Lexmark for a single use , return this cartridge to the cartridge installation position. You must install new cartridges immediately after removing the old ones,...
...Not available High‑yield magenta color cartridge 160XL 160XLA 1 Licensed for remanufacturing, refilling, or recycling. 2 Available only on the Lexmark Web site at www.lexmark.com. 17 Notes: • To get more ink, order high‑yield ink cartridges. • Depending on your country ...or region, you begin. After use, return this cartridge to Lexmark for a single use , return this cartridge to the cartridge installation position. You must install new cartridges immediately after removing the old ones,...
Quick Reference
Page 18
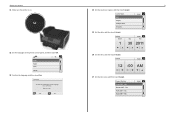
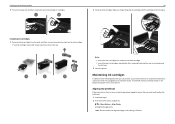
Ordering and replacing supplies 3 Press the release tab, and then remove the used ink cartridge or cartridges. 18 2 Insert each ink cartridge. Installing ink cartridges 1 Remove the ink cartridge from the pack, and then remove the protective cap from the ink cartridge. If your printer performs an automatic maintenance cycle every week if it is finished. Maintaining ink cartridges In addition to the following tasks that you may need to align the printhead. 1 Load plain paper. 2 From the home screen, navigate to air. 3 Close the printer. Aligning the printhead If the characters or ...
Ordering and replacing supplies 3 Press the release tab, and then remove the used ink cartridge or cartridges. 18 2 Insert each ink cartridge. Installing ink cartridges 1 Remove the ink cartridge from the pack, and then remove the protective cap from the ink cartridge. If your printer performs an automatic maintenance cycle every week if it is finished. Maintaining ink cartridges In addition to the following tasks that you may need to align the printhead. 1 Load plain paper. 2 From the home screen, navigate to air. 3 Close the printer. Aligning the printhead If the characters or ...

Quick Reference
Page 19
A cleaning page prints. Keep your printer plugged to a properly grounded, working electrical outlet to allow your prints. Notes: • Cleaning the printhead nozzles uses ink, so clean them only when necessary. • Deep cleaning uses more ink, so try the Clean Printhead option first to save ink. • If the ink levels are too low, then you must replace the ink cartridges before you may need to clean the printhead nozzles to improve the quality of your device to perform automatic maintenance cycles. Ordering and replacing supplies 19 Cleaning the printhead nozzles If you ...
A cleaning page prints. Keep your printer plugged to a properly grounded, working electrical outlet to allow your prints. Notes: • Cleaning the printhead nozzles uses ink, so clean them only when necessary. • Deep cleaning uses more ink, so try the Clean Printhead option first to save ink. • If the ink levels are too low, then you must replace the ink cartridges before you may need to clean the printhead nozzles to improve the quality of your device to perform automatic maintenance cycles. Ordering and replacing supplies 19 Cleaning the printhead nozzles If you ...
Quick Reference
Page 20
...on the computer screen. b In the Start Search or Run box, type D:\setup.exe, where D is available only at http://support.lexmark.com. 2 Navigate to reinstall the software, then uninstall the current software first. Using the printer software Using the printer software Minimum system ... select your operating system 3 Download the driver, and then install the printer software. Using the Internet 1 Go to the Lexmark Web site at http://support.lexmark.com. 20 Installing the printer software Note: If you did not install these additional programs during printer installation When you set...
...on the computer screen. b In the Start Search or Run box, type D:\setup.exe, where D is available only at http://support.lexmark.com. 2 Navigate to reinstall the software, then uninstall the current software first. Using the printer software Using the printer software Minimum system ... select your operating system 3 Download the driver, and then install the printer software. Using the Internet 1 Go to the Lexmark Web site at http://support.lexmark.com. 20 Installing the printer software Note: If you did not install these additional programs during printer installation When you set...
Quick Reference
Page 21
.... Using the printer software Printer software Use the LexmarkTM Printer Home (referred to as Printer Home) Lexmark Phone Book (referred to as Phone Book) Abbyy Sprint OCR Lexmark Wireless Setup Utility (referred to as Wireless Setup Utility) Lexmark Tools for Office (referred to as the following: • Select the number of copies to...
.... Using the printer software Printer software Use the LexmarkTM Printer Home (referred to as Printer Home) Lexmark Phone Book (referred to as Phone Book) Abbyy Sprint OCR Lexmark Wireless Setup Utility (referred to as Wireless Setup Utility) Lexmark Tools for Office (referred to as the following: • Select the number of copies to...
