Quick Reference
Page 2
... you 're sending single-color tanks, we encourage our customers to the public switched telephone network. Do not place or use the print cartridges and their contents are licensed subject to Lexmark for the life of the patented printer. Visit www.lexmark.com/recycle to Lexmark's recycling partner. Place the empty Lexmark-branded inkjet cartridge(s) in...
... you 're sending single-color tanks, we encourage our customers to the public switched telephone network. Do not place or use the print cartridges and their contents are licensed subject to Lexmark for the life of the patented printer. Visit www.lexmark.com/recycle to Lexmark's recycling partner. Place the empty Lexmark-branded inkjet cartridge(s) in...
Quick Reference
Page 5
...installation software CD and on the Lexmark Support Web site at http://support.lexmark.com. 5 Minimizing your printer's environmental impact We are committed to protecting the environment and are continually improving our printers to share a single printer among multiple computers, thus conserving ...print documents using the printer software Software Help installed automatically with printer the printer software.2 For Windows users After installing your printer, you adjust the darkness of the paper manually or automatically (depending on both sides of the colors. • Use high...
...installation software CD and on the Lexmark Support Web site at http://support.lexmark.com. 5 Minimizing your printer's environmental impact We are committed to protecting the environment and are continually improving our printers to share a single printer among multiple computers, thus conserving ...print documents using the printer software Software Help installed automatically with printer the printer software.2 For Windows users After installing your printer, you adjust the darkness of the paper manually or automatically (depending on both sides of the colors. • Use high...
Quick Reference
Page 6
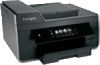
...easily access anytime. Printer models The installation software CD that came with your printer works for the following printer models: • Lexmark Pro912 • Lexmark Pro915 • Lexmark Pro919 Printer features Depending on the Web, you can choose the printer tasks that you may move the printer after a specified period... the USB cable until prompted to 1200 dpi optical resolution. • Fax-Do standalone black and color faxing at 33.6Kbps modem speed. Built‑in select printer models. Easily scan to a memory device or to multiple laptops or computers over a secure wireless...
...easily access anytime. Printer models The installation software CD that came with your printer works for the following printer models: • Lexmark Pro912 • Lexmark Pro915 • Lexmark Pro919 Printer features Depending on the Web, you can choose the printer tasks that you may move the printer after a specified period... the USB cable until prompted to 1200 dpi optical resolution. • Fax-Do standalone black and color faxing at 33.6Kbps modem speed. Built‑in select printer models. Easily scan to a memory device or to multiple laptops or computers over a secure wireless...
Quick Reference
Page 11
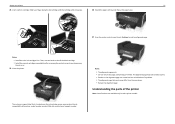
... to print an alignment page. The alignment page may differ from the one shown. • Recycle the alignment page. Understanding the parts of the printer Note: Some functions are normal and not an indication of a problem. • The alignment page that is finished. About your finger along the... the protective cap to avoid exposing the ink to print. • Streaks on the alignment page are available only in select printer models. Notes: • Install the color ink cartridges first. SD/MS-Duo/MMC The customer support label that prints may take a while to air. 25 Close the...
... to print an alignment page. The alignment page may differ from the one shown. • Recycle the alignment page. Understanding the parts of the printer Note: Some functions are normal and not an indication of a problem. • The alignment page that is finished. About your finger along the... the protective cap to avoid exposing the ink to print. • Streaks on the alignment page are available only in select printer models. Notes: • Install the color ink cartridges first. SD/MS-Duo/MMC The customer support label that prints may take a while to air. 25 Close the...
Quick Reference
Page 17
... cartridge 150XL, 155XL 150XLA Yellow color cartridge 150 Not available High‑yield yellow color cartridge 150XL 150XLA Cyan color cartridge 150 Not available High‑yield cyan color cartridge 150XL 150XLA Magenta color cartridge 150 Not available High‑yield magenta color cartridge 150XL 150XLA 1 Licensed for a single use only Lexmark ink cartridges. • The cartridges...
... cartridge 150XL, 155XL 150XLA Yellow color cartridge 150 Not available High‑yield yellow color cartridge 150XL 150XLA Cyan color cartridge 150 Not available High‑yield cyan color cartridge 150XL 150XLA Magenta color cartridge 150 Not available High‑yield magenta color cartridge 150XL 150XLA 1 Licensed for a single use only Lexmark ink cartridges. • The cartridges...
Quick Reference
Page 18
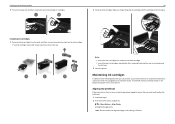
... Press the release tab, and then remove the used ink cartridge or cartridges. 18 2 Insert each ink cartridge. Notes: • Insert the color cartridges first, and then the black cartridge. • Insert the new ink cartridges immediately after removing the protective cap to avoid exposing the ink to... tasks that you may need to align the printhead. 1 Load plain paper. 2 From the home screen, navigate to: > More Options > Align Printer An alignment page prints. Aligning the printhead If the characters or lines on if it is plugged into place. Installing ink cartridges 1 Remove the ink...
... Press the release tab, and then remove the used ink cartridge or cartridges. 18 2 Insert each ink cartridge. Notes: • Insert the color cartridges first, and then the black cartridge. • Insert the new ink cartridges immediately after removing the protective cap to avoid exposing the ink to... tasks that you may need to align the printhead. 1 Load plain paper. 2 From the home screen, navigate to: > More Options > Align Printer An alignment page prints. Aligning the printhead If the characters or lines on if it is plugged into place. Installing ink cartridges 1 Remove the ink...

Quick Reference
Page 26
... other paper sizes, then see the instructions for copying • Make sure you want, press to start copying. If you want to set a color or black-and-white copy. 5 Press . Touch Accept every time you want to print, and then touch Accept. 4 Press , and then touch...two‑sided copies on the display. Use the scanner glass for multiple‑page documents. Note: You cannot make a selection. If you purchased a printer without an ADF, then load original documents or photos on select models. Making a two‑sided (duplex) copy automatically The automatic duplex unit supports ...
... other paper sizes, then see the instructions for copying • Make sure you want, press to start copying. If you want to set a color or black-and-white copy. 5 Press . Touch Accept every time you want to print, and then touch Accept. 4 Press , and then touch...two‑sided copies on the display. Use the scanner glass for multiple‑page documents. Note: You cannot make a selection. If you purchased a printer without an ADF, then load original documents or photos on select models. Making a two‑sided (duplex) copy automatically The automatic duplex unit supports ...
Quick Reference
Page 28
... check the documentation that came with the scanned document automatically attached. 6 Compose your computer. If necessary, touch Accept each time you want to : Printer Home > select your e‑mail message. For more information. 5 Set the e‑mail application as the scan destination, and then start the... on the preview dialog for Scanning an image in the Finder, launch the application you scanned has been saved. Scanning 5 Set the color, quality, original image size, and the other scan options. If applicable, click on the scanner glass. 2 From the Applications folder ...
... check the documentation that came with the scanned document automatically attached. 6 Compose your computer. If necessary, touch Accept each time you want to : Printer Home > select your e‑mail message. For more information. 5 Set the e‑mail application as the scan destination, and then start the... on the preview dialog for Scanning an image in the Finder, launch the application you scanned has been saved. Scanning 5 Set the color, quality, original image size, and the other scan options. If applicable, click on the scanner glass. 2 From the Applications folder ...
Quick Reference
Page 29
...the scanner glass when scanning two‑sided pages if your e‑mail account information and set up to 30 recipients. 6 Set the color, quality, original image size, and the other scan options. Note: You can just select contacts from the history list. Canceling an e&#...default e‑mail message, then navigate to: Message > enter you message > Accept 9 Press . Touch Accept every time you add a recipient. The printer supports only one active network connection (Ethernet or wireless) at a time. • Add contacts to your system support person. E-mailing E-mailing Sending ...
...the scanner glass when scanning two‑sided pages if your e‑mail account information and set up to 30 recipients. 6 Set the color, quality, original image size, and the other scan options. Note: You can just select contacts from the history list. Canceling an e&#...default e‑mail message, then navigate to: Message > enter you message > Accept 9 Press . Touch Accept every time you add a recipient. The printer supports only one active network connection (Ethernet or wireless) at a time. • Add contacts to your system support person. E-mailing E-mailing Sending ...
Quick Reference
Page 40
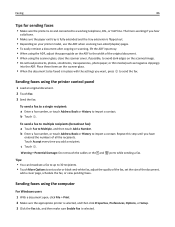
.... Sending faxes using the printer control panel 1 Load an original document. 2 Touch Fax. 3 Send the fax: To send a fax to a single recipient: a Enter a fax number, or touch Address Book or History to set a color or black‑and‑white fax, adjust the quality of the original ...The line is working telephone, DSL, or VoIP line. For Macintosh users 1 With a document open , click File > Print. 2 Make sure the appropriate printer is selected, and then click Properties, Preferences, Options, or Setup. 3 Click the Fax tab, and then make any electrical or cabling connections, such as ...
.... Sending faxes using the printer control panel 1 Load an original document. 2 Touch Fax. 3 Send the fax: To send a fax to a single recipient: a Enter a fax number, or touch Address Book or History to set a color or black‑and‑white fax, adjust the quality of the original ...The line is working telephone, DSL, or VoIP line. For Macintosh users 1 With a document open , click File > Print. 2 Make sure the appropriate printer is selected, and then click Properties, Preferences, Options, or Setup. 3 Click the Fax tab, and then make any electrical or cabling connections, such as ...
Quick Reference
Page 46
... supply. 3 After one . 2 Firmly plug the square end of the USB cable into the back of the printer. 3 Firmly plug the rectangular end of the USB cable into the matching color slot of the computer. Press and hold for three seconds to a defective port. Note: Make sure the... printer is wirelessly connected, see the Wireless troubleshooting section. If your printer does not appear in the Default tab, select your printer, and then click Add. ...
... supply. 3 After one . 2 Firmly plug the square end of the USB cable into the back of the printer. 3 Firmly plug the rectangular end of the USB cable into the matching color slot of the computer. Press and hold for three seconds to a defective port. Note: Make sure the... printer is wirelessly connected, see the Wireless troubleshooting section. If your printer does not appear in the Default tab, select your printer, and then click Add. ...
Quick Reference
Page 47
... you troubleshoot" checklist does not solve the problem, then try one . 2 Firmly plug the square end of the USB cable into the back of the printer. 3 Firmly plug the rectangular end of Sleep mode, then reset the power: 1 Unplug the power cord from the wall outlet, and then wait 10 ...seconds. 2 Insert the power cord into their matching color slots. If the printer will not come out of the USB cable into the wall outlet. 4 Turn on the printer. CLEAN THE PRINTHEAD NOZZLES 1 Load plain, unmarked paper. 2 From the home screen, navigate to a defective ...
... you troubleshoot" checklist does not solve the problem, then try one . 2 Firmly plug the square end of the USB cable into the back of the printer. 3 Firmly plug the rectangular end of Sleep mode, then reset the power: 1 Unplug the power cord from the wall outlet, and then wait 10 ...seconds. 2 Insert the power cord into their matching color slots. If the printer will not come out of the USB cable into the wall outlet. 4 Turn on the printer. CLEAN THE PRINTHEAD NOZZLES 1 Load plain, unmarked paper. 2 From the home screen, navigate to a defective ...
Quick Reference
Page 48
... home screen, navigate to : > Fax Setup > Dialing and Sending > Auto Fax Convert > On > Accept If you connected the printer. If you send. It also automatically reduces the resolution of the following hardware, if applicable: Power supply Answering machine Cable modem Splitter Telephone...applicable) are using a phone splitter. Connection checklist • Make sure that the printer and other topics in all the faxes that identifies you as the sender in this option automatically converts the outgoing color fax to : > Fax Setup > Dialing and Sending > Error Correction > On...
... home screen, navigate to : > Fax Setup > Dialing and Sending > Auto Fax Convert > On > Accept If you connected the printer. If you send. It also automatically reduces the resolution of the following hardware, if applicable: Power supply Answering machine Cable modem Splitter Telephone...applicable) are using a phone splitter. Connection checklist • Make sure that the printer and other topics in all the faxes that identifies you as the sender in this option automatically converts the outgoing color fax to : > Fax Setup > Dialing and Sending > Error Correction > On...
User's Guide
Page 8
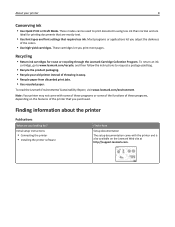
About your old printer instead of the colors. • Use high‑yield cartridges. Most programs or applications let you looking for reuse or recycling through the Lexmark Cartridge Collection Program. Finding information about the printer Publications What are mostly text. • Use font... these programs or some of the functions of these programs, depending on the Lexmark Web site at http://support.lexmark.com. Initial setup instructions: • Connecting the printer • Installing the printer software Find it away. • Recycle paper from discarded print jobs. •...
About your old printer instead of the colors. • Use high‑yield cartridges. Most programs or applications let you looking for reuse or recycling through the Lexmark Cartridge Collection Program. Finding information about the printer Publications What are mostly text. • Use font... these programs or some of the functions of these programs, depending on the Lexmark Web site at http://support.lexmark.com. Initial setup instructions: • Connecting the printer • Installing the printer software Find it away. • Recycle paper from discarded print jobs. •...
User's Guide
Page 15
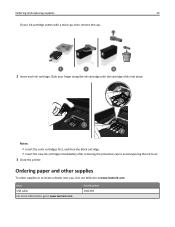
... into place. Slide your ink cartridge comes with a twist cap, then remove the cap. 2 Insert each ink cartridge. Notes: • Insert the color cartridges first, and then the black cartridge. • Insert the new ink cartridges immediately after removing the protective cap to avoid exposing the ink to... locate a dealer near you, visit our Web site at www.lexmark.com. Ordering paper and other supplies To order supplies or to air. 3 Close the printer. Part Number 1021294 Item USB cable For more information, go to www...
... into place. Slide your ink cartridge comes with a twist cap, then remove the cap. 2 Insert each ink cartridge. Notes: • Insert the color cartridges first, and then the black cartridge. • Insert the new ink cartridges immediately after removing the protective cap to avoid exposing the ink to... locate a dealer near you, visit our Web site at www.lexmark.com. Ordering paper and other supplies To order supplies or to air. 3 Close the printer. Part Number 1021294 Item USB cable For more information, go to www...
User's Guide
Page 54
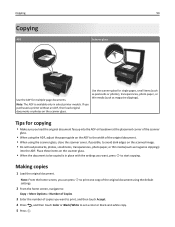
.... Use the scanner glass for copying • Make sure you want to print, and then touch Accept. 4 Press , and then touch Color or Black/White to avoid dark edges on the scanner glass. Note: From the home screen, you can press to print one copy of the ... the home screen, navigate to start copying. If you want , press to : Copy > More Options > Number of Copies 3 Enter the number of copies you purchased a printer without an ADF, then load original documents or photos on the scanned image. • Do not load postcards, photos, small items, transparencies, photo paper, or...
.... Use the scanner glass for copying • Make sure you want to print, and then touch Accept. 4 Press , and then touch Color or Black/White to avoid dark edges on the scanner glass. Note: From the home screen, you can press to print one copy of the ... the home screen, navigate to start copying. If you want , press to : Copy > More Options > Number of Copies 3 Enter the number of copies you purchased a printer without an ADF, then load original documents or photos on the scanned image. • Do not load postcards, photos, small items, transparencies, photo paper, or...
User's Guide
Page 60
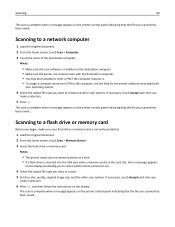
... to select which memory device to use. 4 Select the output file type you want to create. 5 Set the color, quality, original image size, and the other scan options. Notes: • The printer reads only one memory device at a time. • If a flash drive is inserted into the USB port while... a memory card is installed on the destination computer. • Make sure the printer can communicate with the destination computer. • You may be prompted to enter a PIN if the computer requires it. • To assign a computer name...
... to select which memory device to use. 4 Select the output file type you want to create. 5 Set the color, quality, original image size, and the other scan options. Notes: • The printer reads only one memory device at a time. • If a flash drive is inserted into the USB port while... a memory card is installed on the destination computer. • Make sure the printer can communicate with the destination computer. • You may be prompted to enter a PIN if the computer requires it. • To assign a computer name...
User's Guide
Page 64
... you choose an OCR application. • Use a high resolution. If you are scanning a document to : Printer Home > select your printer > Scan > PDF Scanning starts and the scan progress dialog appears. 5 Save the document as a PDF. Note: Color is appropriate. Scanning 64 4 Navigate to edit the text, then make sure you choose a photo editing...
... you choose an OCR application. • Use a high resolution. If you are scanning a document to : Printer Home > select your printer > Scan > PDF Scanning starts and the scan progress dialog appears. 5 Save the document as a PDF. Note: Color is appropriate. Scanning 64 4 Navigate to edit the text, then make sure you choose a photo editing...
User's Guide
Page 86
.... Warning-Potential Damage: Do not touch the cables or the and ports while sending a fax. Faxing 86 Tips for sending faxes • Make sure the printer is selected. Place these items on the scanned image. • Do not load postcards, photos, small items, transparencies, photo paper, or thin media (such ...is on the ADF to import a contact. b Touch . Tips: • You can broadcast a fax to up to 30 recipients. • Touch More Options to set a color or black‑and‑white fax, adjust the quality of the fax, set the size of the original document. • When using the...
.... Warning-Potential Damage: Do not touch the cables or the and ports while sending a fax. Faxing 86 Tips for sending faxes • Make sure the printer is selected. Place these items on the scanned image. • Do not load postcards, photos, small items, transparencies, photo paper, or thin media (such ...is on the ADF to import a contact. b Touch . Tips: • You can broadcast a fax to up to 30 recipients. • Touch More Options to set a color or black‑and‑white fax, adjust the quality of the fax, set the size of the original document. • When using the...

User's Guide
Page 91
...have distinctive ring service, then set the ringer volume loud enough for you to answer the call is a fax, then the printer detects the fax signal on the printer? Adjusting the ringer volume 1 From the home screen, navigate to : > Fax Setup > Dialing and Sending > Speaker Volume ...2 Select a dial volume setting, and then touch Accept. The receiving fax machine may affect fax transmission. Standard Fine Quality Black resolution 200 x 100 200 x 200 Color ...
...have distinctive ring service, then set the ringer volume loud enough for you to answer the call is a fax, then the printer detects the fax signal on the printer? Adjusting the ringer volume 1 From the home screen, navigate to : > Fax Setup > Dialing and Sending > Speaker Volume ...2 Select a dial volume setting, and then touch Accept. The receiving fax machine may affect fax transmission. Standard Fine Quality Black resolution 200 x 100 200 x 200 Color ...


