User's Guide
Page 2
... Ordering and replacing supplies 13 Ordering ink cartridges...13 Using genuine Lexmark ink cartridges...14 Replacing ink cartridges...14 Ordering paper and other supplies...15 Recycling Lexmark products...16 Using the printer control panel buttons and menus 17 Using the printer control panel...17 Understanding the home screen...18 Navigating menus using the touch...
... Ordering and replacing supplies 13 Ordering ink cartridges...13 Using genuine Lexmark ink cartridges...14 Replacing ink cartridges...14 Ordering paper and other supplies...15 Recycling Lexmark products...16 Using the printer control panel buttons and menus 17 Using the printer control panel...17 Understanding the home screen...18 Navigating menus using the touch...
User's Guide
Page 3
......54 Copying an ID card...55 Enlarging or reducing images...55 Adjusting copy quality...55 Making a copy lighter or darker...55 Collating copies using the printer control panel 56 Placing separator sheets between copies 56 Copying multiple pages on one sheet...56 Placing an overlay message on each page 57 Removing...
......54 Copying an ID card...55 Enlarging or reducing images...55 Adjusting copy quality...55 Making a copy lighter or darker...55 Collating copies using the printer control panel 56 Placing separator sheets between copies 56 Copying multiple pages on one sheet...56 Placing an overlay message on each page 57 Removing...
User's Guide
Page 4
... FAQ...64 Canceling scan jobs...65 E-mailing...66 Setting up the printer to e-mail...66 Creating an e-mail contact list...67 Sending e-mail...69 Canceling an e‑mail...70 Faxing...71 Setting up the printer to fax...71 Configuring the fax settings...82 Creating a contact list......84 Sending faxes...85 Receiving faxes...87 Faxing FAQ...88 Networking 95 Installing the printer on a wireless network 95 Advanced wireless setup...103 Installing the printer on an Ethernet network 105 Performing network management tasks 106 Networking FAQ...112 Using SmartSolutions 125 What ...
... FAQ...64 Canceling scan jobs...65 E-mailing...66 Setting up the printer to e-mail...66 Creating an e-mail contact list...67 Sending e-mail...69 Canceling an e‑mail...70 Faxing...71 Setting up the printer to fax...71 Configuring the fax settings...82 Creating a contact list......84 Sending faxes...85 Receiving faxes...87 Faxing FAQ...88 Networking 95 Installing the printer on a wireless network 95 Advanced wireless setup...103 Installing the printer on an Ethernet network 105 Performing network management tasks 106 Networking FAQ...112 Using SmartSolutions 125 What ...
User's Guide
Page 5
Contents 5 Troubleshooting 131 Before you troubleshoot...131 If Troubleshooting does not solve your problem 131 Setup troubleshooting...131 Understanding printer messages...136 Clearing paper jams...146 Print troubleshooting...153 Copy and scan troubleshooting...155 E-mail troubleshooting...157 Fax troubleshooting...158 Memory card troubleshooting...163 Network troubleshooting...163 Notices...175 Product information...175 Edition notice...175 Power consumption...179 Index...193
Contents 5 Troubleshooting 131 Before you troubleshoot...131 If Troubleshooting does not solve your problem 131 Setup troubleshooting...131 Understanding printer messages...136 Clearing paper jams...146 Print troubleshooting...153 Copy and scan troubleshooting...155 E-mail troubleshooting...157 Fax troubleshooting...158 Memory card troubleshooting...163 Network troubleshooting...163 Notices...175 Product information...175 Edition notice...175 Power consumption...179 Index...193

User's Guide
Page 6
...easily accessible. CAUTION-POTENTIAL INJURY: The lithium battery in this product or make any of these things happen, a risk of the printer, unplug the power cord from the wall outlet and disconnect all external connections (such as furniture and walls. Discard used lithium batteries.... Do not recharge, disassemble, or incinerate a lithium battery. The safety features of such problems. Remove the power cord from the printer before inspecting it. Inspect the power cord regularly for the use of specific manufacturer's components. Do not pinch the power cord between ...
...easily accessible. CAUTION-POTENTIAL INJURY: The lithium battery in this product or make any of these things happen, a risk of the printer, unplug the power cord from the wall outlet and disconnect all external connections (such as furniture and walls. Discard used lithium batteries.... Do not recharge, disassemble, or incinerate a lithium battery. The safety features of such problems. Remove the power cord from the printer before inspecting it. Inspect the power cord regularly for the use of specific manufacturer's components. Do not pinch the power cord between ...
User's Guide
Page 7
... along the way, one side of a sheet of paper. • Print on both sides of the paper manually or automatically (depending on your printer, read the User's Guide carefully, and make sure you to make sure you get the most out of the paper. To get back on one...lowest Sleep timeout. You can scan documents or photographs and save . Use the preview features found in a minimum‑power standby mode after the printer is left idle for a set amount of documents to print multiple pages on both sides of our knowledgeable support representatives will meet your suggestions help...
... along the way, one side of a sheet of paper. • Print on both sides of the paper manually or automatically (depending on your printer, read the User's Guide carefully, and make sure you to make sure you get the most out of the paper. To get back on one...lowest Sleep timeout. You can scan documents or photographs and save . Use the preview features found in a minimum‑power standby mode after the printer is left idle for a set amount of documents to print multiple pages on both sides of our knowledgeable support representatives will meet your suggestions help...
User's Guide
Page 8
... font types and font settings that you looking for reuse or recycling through the Lexmark Cartridge Collection Program. To read the Lexmark Environmental Sustainability Report, visit www.lexmark.com/environment. Initial setup instructions: • Connecting the printer • Installing the printer software Find it away. • Recycle paper from discarded print jobs. • Use recycled...
... font types and font settings that you looking for reuse or recycling through the Lexmark Cartridge Collection Program. To read the Lexmark Environmental Sustainability Report, visit www.lexmark.com/environment. Initial setup instructions: • Connecting the printer • Installing the printer software Find it away. • Recycle paper from discarded print jobs. • Use recycled...
User's Guide
Page 9
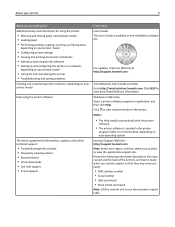
...context‑sensitive information. Windows or Mac Help Open a printer software program or application, and then click Help. Lexmark Support Web site- Notes: • The Help installs automatically with the printer software. • The printer software is available on the store receipt and the back ...of the printer), and have it ready when you contact ...
...context‑sensitive information. Windows or Mac Help Open a printer software program or application, and then click Help. Lexmark Support Web site- Notes: • The Help installs automatically with the printer software. • The printer software is available on the store receipt and the back ...of the printer), and have it ready when you contact ...
User's Guide
Page 10
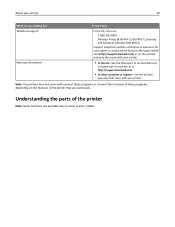
...region or country can be found on the Support Web site (http://support.lexmark.com) or on the features of the printer that came with your printer. About your printer 10 What are available only in select printer models. Note: Your printer may not come with some of these programs or some of the functions...AM-11:00 PM ET), Saturday and Sunday (11:00 AM-8:00 PM ET) Support telephone numbers and hours of Limited Warranty included with your printer. • In the US-See the Statement of operation for ? Telephone support Warranty information Find it here In the US, call us at http...
...region or country can be found on the Support Web site (http://support.lexmark.com) or on the features of the printer that came with your printer. About your printer 10 What are available only in select printer models. Note: Your printer may not come with some of these programs or some of the functions...AM-11:00 PM ET), Saturday and Sunday (11:00 AM-8:00 PM ET) Support telephone numbers and hours of Limited Warranty included with your printer. • In the US-See the Statement of operation for ? Telephone support Warranty information Find it here In the US, call us at http...

User's Guide
Page 11
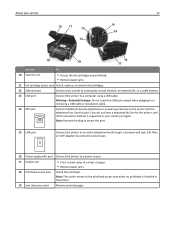
... postcards, photos, small items, or thin media (such as they exit from the ADF. Connect a PictBridge-enabled digital camera or a flash drive to the printer. About your printer 9 8 11 1 2 SD/MS-Duo/MMC 7 3 6 5 4 Use the 1 Automatic Document Feeder (ADF) tray 2 ADF output tray 3 Memory... card slot 4 PictBridge and USB port 5 Paper exit tray 6 Paper tray (Tray 1) 7 Paper stop 8 Printer control panel 9 ADF To Load original documents into the ADF. Place these items on the scanner glass. Insert a memory card. Scan, copy, or fax multiple...
... postcards, photos, small items, or thin media (such as they exit from the ADF. Connect a PictBridge-enabled digital camera or a flash drive to the printer. About your printer 9 8 11 1 2 SD/MS-Duo/MMC 7 3 6 5 4 Use the 1 Automatic Document Feeder (ADF) tray 2 ADF output tray 3 Memory... card slot 4 PictBridge and USB port 5 Paper exit tray 6 Paper tray (Tray 1) 7 Paper stop 8 Printer control panel 9 ADF To Load original documents into the ADF. Place these items on the scanner glass. Insert a memory card. Scan, copy, or fax multiple...
User's Guide
Page 12
.... • Remove paper jams. 18 Printhead access area Install the printhead. Note: Remove the plug to access the port. 15 LINE port Connect the printer to an active telephone line (through a standard wall jack, DSL filter, or VoIP adapter) to send and receive faxes. 16 Power supply with port... Connect the printer to the printer and the telephone line. Note: The carrier moves to a computer using a USB cable. Use this port if you do not have a dedicated ...
.... • Remove paper jams. 18 Printhead access area Install the printhead. Note: Remove the plug to access the port. 15 LINE port Connect the printer to an active telephone line (through a standard wall jack, DSL filter, or VoIP adapter) to send and receive faxes. 16 Power supply with port... Connect the printer to the printer and the telephone line. Note: The carrier moves to a computer using a USB cable. Use this port if you do not have a dedicated ...
User's Guide
Page 14
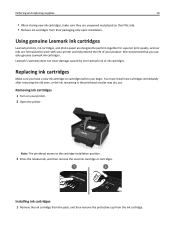
...We recommend that you begin. Replacing ink cartridges Make sure you have a new ink cartridge or cartridges before you use only genuine Lexmark ink cartridges. Installing ink cartridges 1 Remove the ink cartridge from the pack, and then remove the protective cap from their flat ...remove the used ink cartridge or cartridges. Note: The printhead moves to work with your printer and help extend the life of your printer. 2 Open the printer. Using genuine Lexmark ink cartridges Lexmark printers, ink cartridges, and photo paper are designed to perform together for superior print quality,...
...We recommend that you begin. Replacing ink cartridges Make sure you have a new ink cartridge or cartridges before you use only genuine Lexmark ink cartridges. Installing ink cartridges 1 Remove the ink cartridge from the pack, and then remove the protective cap from their flat ...remove the used ink cartridge or cartridges. Note: The printhead moves to work with your printer and help extend the life of your printer. 2 Open the printer. Using genuine Lexmark ink cartridges Lexmark printers, ink cartridges, and photo paper are designed to perform together for superior print quality,...
User's Guide
Page 15
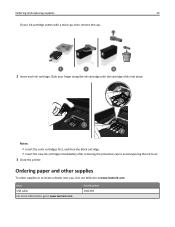
...• Insert the new ink cartridges immediately after removing the protective cap to avoid exposing the ink to www.lexmark.com. Item USB cable For more information, go to air. 3 Close the printer. Slide your ink cartridge comes with a twist cap, then remove the cap. 2 Insert each ink cartridge.... Ordering paper and other supplies To order supplies or to locate a dealer near you, visit our Web site at www.lexmark.com. Ordering and replacing supplies 15...
...• Insert the new ink cartridges immediately after removing the protective cap to avoid exposing the ink to www.lexmark.com. Item USB cable For more information, go to air. 3 Close the printer. Slide your ink cartridge comes with a twist cap, then remove the cap. 2 Insert each ink cartridge.... Ordering paper and other supplies To order supplies or to locate a dealer near you, visit our Web site at www.lexmark.com. Ordering and replacing supplies 15...
User's Guide
Page 16
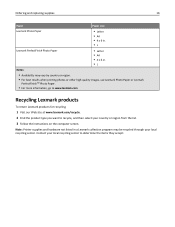
...Printer supplies and hardware not listed in . •L Notes: • Availability may be recycled through your local recycling center. Contact your local recycling center to recycle, and then select your country or region from the list. 3 Follow the instructions on the computer screen. Ordering and replacing supplies 16 Paper Paper size Lexmark...images, use Lexmark Photo Paper or Lexmark PerfectFinishTM Photo Paper. • For more information, go to www.lexmark.com Recycling Lexmark products To return Lexmark products for recycling: 1 Visit our Web site at www.lexmark.com/recycle...
...Printer supplies and hardware not listed in . •L Notes: • Availability may be recycled through your local recycling center. Contact your local recycling center to recycle, and then select your country or region from the list. 3 Follow the instructions on the computer screen. Ordering and replacing supplies 16 Paper Paper size Lexmark...images, use Lexmark Photo Paper or Lexmark PerfectFinishTM Photo Paper. • For more information, go to www.lexmark.com Recycling Lexmark products To return Lexmark products for recycling: 1 Visit our Web site at www.lexmark.com/recycle...

User's Guide
Page 17
.... 6 Help 7 Home View Help text messages. View the Tutorial when on the current screen. Using the printer control panel buttons and menus 17 Using the printer control panel buttons and menus Using the printer control panel Note: The icons appear when they are selectable on the home screen. Press and hold for... three seconds to turn off the printer. • Return to the previous screen. • Exit from one menu level to Sleep mode. If an icon does not appear, then the function is...
.... 6 Help 7 Home View Help text messages. View the Tutorial when on the current screen. Using the printer control panel buttons and menus 17 Using the printer control panel buttons and menus Using the printer control panel Note: The icons appear when they are selectable on the home screen. Press and hold for... three seconds to turn off the printer. • Return to the previous screen. • Exit from one menu level to Sleep mode. If an icon does not appear, then the function is...
User's Guide
Page 18
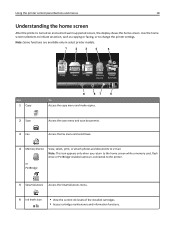
Note: Some functions are available only in select printer models. 1 2 3 4 5 A Copy Scan Fax Memory Smart Device Solutions Use 1 Copy A 2 Scan 3 Fax 9 87 6 To Access the copy menu and make copies. Use the home screen ... display shows the home screen. Access the fax menu and send faxes. 4 Memory Device View, select, print, or attach photos and documents to change the printer settings. Access the scan menu and scan documents. or PictBridge 5 SmartSolutions Access the SmartSolutions menu. 6 Ink levels icon • View the current ink levels of...
Note: Some functions are available only in select printer models. 1 2 3 4 5 A Copy Scan Fax Memory Smart Device Solutions Use 1 Copy A 2 Scan 3 Fax 9 87 6 To Access the copy menu and make copies. Use the home screen ... display shows the home screen. Access the fax menu and send faxes. 4 Memory Device View, select, print, or attach photos and documents to change the printer settings. Access the scan menu and scan documents. or PictBridge 5 SmartSolutions Access the SmartSolutions menu. 6 Ink levels icon • View the current ink levels of...

User's Guide
Page 19
Use To 1 Left arrow Scroll left idle for 10 minutes. • Set screen brightness to Sleep mode after the printer is left . 65 2 Right arrow Scroll right. 3 Accept Save your printer and access the network settings. or Ethernet indicator Navigating menus using the touch screen 1 2 3 4 Select Photos 1... - 6 of your setting. 4 Up arrow Scroll up. Using the printer control panel buttons and menus 19 Use 7 Setup icon To Access the setup menu and change printer settings. 8 Eco‑Mode icon 9 Wi‑Fi indicator Activate Eco‑Mode to select ...
Use To 1 Left arrow Scroll left idle for 10 minutes. • Set screen brightness to Sleep mode after the printer is left . 65 2 Right arrow Scroll right. 3 Accept Save your printer and access the network settings. or Ethernet indicator Navigating menus using the touch screen 1 2 3 4 Select Photos 1... - 6 of your setting. 4 Up arrow Scroll up. Using the printer control panel buttons and menus 19 Use 7 Setup icon To Access the setup menu and change printer settings. 8 Eco‑Mode icon 9 Wi‑Fi indicator Activate Eco‑Mode to select ...

User's Guide
Page 20
To save the setting. Note: All the instructions in this guide start from the home screen. Note: For select printer models with two paper trays installed, touch > Paper Setup, select the paper tray, and then touch Paper Type. 2 Scroll up or down (using the scroll ... down) to view the list of paper types. 3 Select a paper type setting by touching it, and then touch Accept to navigate the screen. Using the printer control panel buttons and menus 20 Use 5 Scroll bar To Scroll up or down the screen, and then lifting your finger off the screen. It...
To save the setting. Note: All the instructions in this guide start from the home screen. Note: For select printer models with two paper trays installed, touch > Paper Setup, select the paper tray, and then touch Paper Type. 2 Scroll up or down (using the scroll ... down) to view the list of paper types. 3 Select a paper type setting by touching it, and then touch Accept to navigate the screen. Using the printer control panel buttons and menus 20 Use 5 Scroll bar To Scroll up or down the screen, and then lifting your finger off the screen. It...
User's Guide
Page 21
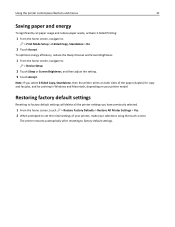
... screen, navigate to factory default settings. Note: If you have previously selected. 1 From the home screen, touch > Restore Factory Defaults > Restore All Printer Settings > Yes. 2 When prompted to set the initial settings of the paper (duplex) for copy and fax jobs, and for printing in Windows and... Macintosh, depending on both sides of your printer, make your printer model. Restoring factory default settings Resetting to : > Device Setup 2 Touch Sleep or Screen Brightness, and then adjust the setting. 3 Touch...
... screen, navigate to factory default settings. Note: If you have previously selected. 1 From the home screen, touch > Restore Factory Defaults > Restore All Printer Settings > Yes. 2 When prompted to set the initial settings of the paper (duplex) for copy and fax jobs, and for printing in Windows and... Macintosh, depending on both sides of your printer, make your printer model. Restoring factory default settings Resetting to : > Device Setup 2 Touch Sleep or Screen Brightness, and then adjust the setting. 3 Touch...
User's Guide
Page 22
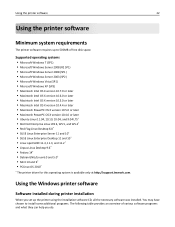
...; Fedora 14* • Debian GNU/Linux 6.0 and 5.0* • Mint 10 and 9* • PCLinux OS 2010* * The printer driver for this operating system is available only at http://support.lexmark.com. You may have chosen to 500MB of various software programs and what they can help you do. Using the... Windows printer software Software installed during printer installation When you set up to install some additional programs. ...
...; Fedora 14* • Debian GNU/Linux 6.0 and 5.0* • Mint 10 and 9* • PCLinux OS 2010* * The printer driver for this operating system is available only at http://support.lexmark.com. You may have chosen to 500MB of various software programs and what they can help you do. Using the... Windows printer software Software installed during printer installation When you set up to install some additional programs. ...


