
User's Guide for Windows
Page 9
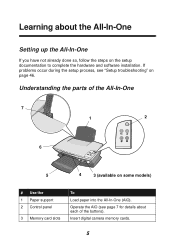
Insert digital camera memory cards. 5 Operate the AIO (see "Setup troubleshooting" on the setup documentation to complete the hardware and software installation. Learning about each of the All-In-One 7 1 2 6 5 4 3 (available on some models) # Use the 1 Paper support 2 Control panel 3 Memory card slots To Load paper into the All-In-One (AIO). If problems occur during the setup process, see page 7 for details about the All-In-One Setting up the All-In-One If you have not already done so, follow the steps on page 46. Understanding the parts of the buttons).
Insert digital camera memory cards. 5 Operate the AIO (see "Setup troubleshooting" on the setup documentation to complete the hardware and software installation. Learning about each of the All-In-One 7 1 2 6 5 4 3 (available on some models) # Use the 1 Paper support 2 Control panel 3 Memory card slots To Load paper into the All-In-One (AIO). If problems occur during the setup process, see page 7 for details about the All-In-One Setting up the All-In-One If you have not already done so, follow the steps on page 46. Understanding the parts of the buttons).
User's Guide for Windows
Page 20
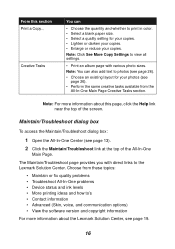
...this page, click the Help link near the top of the All-In-One Main Page. Creative Tasks You can also add text to photos (see page 13). 2 Click the Maintain/Troubleshoot link at the top of the screen. Maintain/Troubleshoot dialog box To access the Maintain/... this section Print a Copy... Note: For more information about the Lexmark Solution Center, see page 26). • Perform the same creative tasks available from these topics: • Maintain or fix quality problems • Troubleshoot All-In-One problems • Device status and ink levels • More printing ideas...
...this page, click the Help link near the top of the All-In-One Main Page. Creative Tasks You can also add text to photos (see page 13). 2 Click the Maintain/Troubleshoot link at the top of the screen. Maintain/Troubleshoot dialog box To access the Maintain/... this section Print a Copy... Note: For more information about the Lexmark Solution Center, see page 26). • Perform the same creative tasks available from these topics: • Maintain or fix quality problems • Troubleshoot All-In-One problems • Device status and ink levels • More printing ideas...
User's Guide for Windows
Page 23
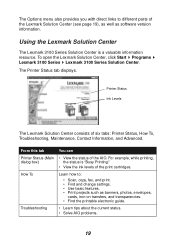
... current status. • Solve AIO problems. 19 To open the Lexmark Solution Center, click Start Programs Lexmark 3100 Series Lexmark 3100 Series Solution Center. From this tab You can Printer Status (Main • View the status of six tabs: Printer Status, How To, Troubleshooting, Maintenance,...as banners, photos, envelopes, cards, iron-on transfers, and transparencies. • Find the printable electronic guide. Using the Lexmark Solution Center The Lexmark 3100 Series Solution Center is "Busy Printing." • View the ink levels of the print cartridges. The Printer Status tab...
... current status. • Solve AIO problems. 19 To open the Lexmark Solution Center, click Start Programs Lexmark 3100 Series Lexmark 3100 Series Solution Center. From this tab You can Printer Status (Main • View the status of six tabs: Printer Status, How To, Troubleshooting, Maintenance,...as banners, photos, envelopes, cards, iron-on transfers, and transparencies. • Find the printable electronic guide. Using the Lexmark Solution Center The Lexmark 3100 Series Solution Center is "Busy Printing." • View the ink levels of the print cartridges. The Printer Status tab...
User's Guide for Windows
Page 24
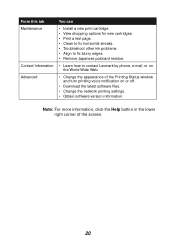
... for new cartridges. • Print a test page. • Clean to fix horizontal streaks. • Troubleshoot other ink problems. • Align to fix blurry edges. • Remove Japanese postcard residue. • Learn how to contact Lexmark by phone, e-mail, or on or off. • Download the latest software files. • Change the network...
... for new cartridges. • Print a test page. • Clean to fix horizontal streaks. • Troubleshoot other ink problems. • Align to fix blurry edges. • Remove Japanese postcard residue. • Learn how to contact Lexmark by phone, e-mail, or on or off. • Download the latest software files. • Change the network...
User's Guide for Windows
Page 48
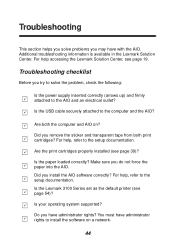
Troubleshooting This section helps you solve problems you try to solve the problem, check the following: Is the power supply inserted correctly (arrows up) and firmly attached to the AIO and an electrical outlet? Is the paper loaded correctly? Is the Lexmark 3100 Series set as the default printer (see page 19. For help accessing...
Troubleshooting This section helps you solve problems you try to solve the problem, check the following: Is the power supply inserted correctly (arrows up) and firmly attached to the AIO and an electrical outlet? Is the paper loaded correctly? Is the Lexmark 3100 Series set as the default printer (see page 19. For help accessing...
User's Guide for Windows
Page 49
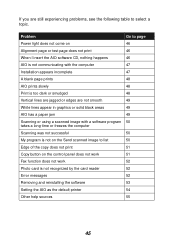
... not recognized by the card reader 52 Error messages 52 Removing and reinstalling the software 53 Setting the AIO as the default printer 54 Other help sources 55 45 Problem Go to page Power light does not come on 46 Alignment page or test page does not print 46 When I insert the... 50 Edge of the copy does not print 51 Copy button on the control panel does not work 51 Fax function does not work 52 Photo card is too dark or smudged 48 Vertical lines are jagged or edges are still experiencing problems, see the following table to select a topic.
... not recognized by the card reader 52 Error messages 52 Removing and reinstalling the software 53 Setting the AIO as the default printer 54 Other help sources 55 45 Problem Go to page Power light does not come on 46 Alignment page or test page does not print 46 When I insert the... 50 Edge of the copy does not print 51 Copy button on the control panel does not work 51 Fax function does not work 52 Photo card is too dark or smudged 48 Vertical lines are jagged or edges are still experiencing problems, see the following table to select a topic.

User's Guide for Windows
Page 50
... page 6). 2 Check the power supply connections. 3 Press Power on 1 Make sure the power supply is correctly inserted into the AIO (see page 8). 4 Make sure the Lexmark 3100 Series is turned off, double-click setup.exe. 46 Power light does not come on the control panel. Note: If auto launch is set... as the default printer (see page 54). Alignment page or test page does not print 1 Make sure you may have during setup. Setup troubleshooting Use this section to solve...
... page 6). 2 Check the power supply connections. 3 Press Power on 1 Make sure the power supply is correctly inserted into the AIO (see page 8). 4 Make sure the Lexmark 3100 Series is turned off, double-click setup.exe. 46 Power light does not come on the control panel. Note: If auto launch is set... as the default printer (see page 54). Alignment page or test page does not print 1 Make sure you may have during setup. Setup troubleshooting Use this section to solve...
User's Guide for Windows
Page 51
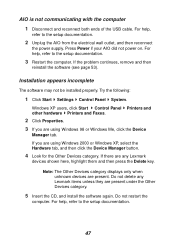
... Panel System. If you are present. Do not delete any Lexmark items unless they are any Lexmark devices shown here, highlight them and then press the Delete key. For help, refer to the setup documentation. 47 Printers and 3 If you are using Windows 98 or Windows Me,...and then reconnect the power supply. Do not restart the computer. Windows XP users, click Start Control Panel other hardware Printers and Faxes. 2 Click Properties. If the problem continues, remove and then reinstall the software (see page 53). AIO is not communicating with the computer 1 Disconnect and...
... Panel System. If you are present. Do not delete any Lexmark items unless they are any Lexmark devices shown here, highlight them and then press the Delete key. For help, refer to the setup documentation. 47 Printers and 3 If you are using Windows 98 or Windows Me,...and then reconnect the power supply. Do not restart the computer. Windows XP users, click Start Control Panel other hardware Printers and Faxes. 2 Click Properties. If the problem continues, remove and then reinstall the software (see page 53). AIO is not communicating with the computer 1 Disconnect and...

User's Guide for Windows
Page 59
Other help sources If the preceding solutions do not solve the problem with your All-In-One: • Refer to the Lexmark Solution Center software for more troubleshooting information: 1 Click Start Programs Lexmark 3100 Series Lexmark 3100 Series Solution Center. 2 Click the Troubleshooting tab on the left side of the screen. • Visit our Web site at http://support.lexmark.com/ for help. 55
Other help sources If the preceding solutions do not solve the problem with your All-In-One: • Refer to the Lexmark Solution Center software for more troubleshooting information: 1 Click Start Programs Lexmark 3100 Series Lexmark 3100 Series Solution Center. 2 Click the Troubleshooting tab on the left side of the screen. • Visit our Web site at http://support.lexmark.com/ for help. 55
User's Guide for Windows
Page 64
... 31 album page 26 borderless 27 digital photos 26 envelopes 9, 17 photos 17 posters 15, 17 without margins 27 printing problems 48 blank page prints 48 Printing Status window changing appearance of 20 Q Quality/Copies tab 18 R recycling Lexmark products 43 reinstalling software 53 removing print... remove red eye 21 text 21 transparencies loading 10 troubleshooting blank page prints 48 checklist 44 copying problems 50 faxing problems 50 printing problems 48 scanning problems 50 setup problems 46 Troubleshooting tab 19 U understanding software 13 V voice notification turning on or off 20 W Web ...
... 31 album page 26 borderless 27 digital photos 26 envelopes 9, 17 photos 17 posters 15, 17 without margins 27 printing problems 48 blank page prints 48 Printing Status window changing appearance of 20 Q Quality/Copies tab 18 R recycling Lexmark products 43 reinstalling software 53 removing print... remove red eye 21 text 21 transparencies loading 10 troubleshooting blank page prints 48 checklist 44 copying problems 50 faxing problems 50 printing problems 48 scanning problems 50 setup problems 46 Troubleshooting tab 19 U understanding software 13 V voice notification turning on or off 20 W Web ...