Card Stock & Label Guide
Page 11
...results in poor print quality and poor fuse grade. You may nest, causing multiple sheets to have installed a maintenance kit as toner cartridges and/or inkjet cartridges) • use of printing media outside the pick roller area on both sides of the adhesive in .) on the leading ... auto compensator has two rollers that variations in .) at the top of a product. Ties cannot, however, be used by any unauthorized (non‑Lexmark) servicer • operation of a product beyond the limit of its duty cycle • failure to feed. Basic form design When designing forms, include...
...results in poor print quality and poor fuse grade. You may nest, causing multiple sheets to have installed a maintenance kit as toner cartridges and/or inkjet cartridges) • use of printing media outside the pick roller area on both sides of the adhesive in .) on the leading ... auto compensator has two rollers that variations in .) at the top of a product. Ties cannot, however, be used by any unauthorized (non‑Lexmark) servicer • operation of a product beyond the limit of its duty cycle • failure to feed. Basic form design When designing forms, include...
Card Stock & Label Guide
Page 14
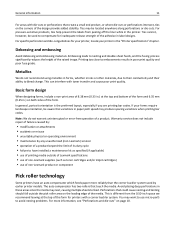
To maintain printer feeding reliability, repeat this cleaning process every time you replace the toner cartridge. Direction of the media: MS710, MS711, MS810, MS811, MS812, MX710, MX711, MX810, MX811, and MX812. 0.12 in . Pick Roller Location 0.91 in. 0.56 in. 1.08 ...
To maintain printer feeding reliability, repeat this cleaning process every time you replace the toner cartridge. Direction of the media: MS710, MS711, MS810, MS811, MS812, MX710, MX711, MX810, MX811, and MX812. 0.12 in . Pick Roller Location 0.91 in. 0.56 in. 1.08 ...
Card Stock & Label Guide
Page 65
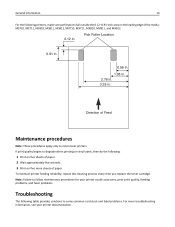
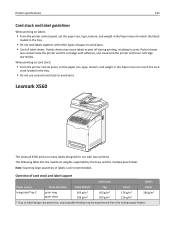
...tray. • Do not use of the label or the perforations, or between the die‑cuts. • Use full label sheets. The Lexmark CS310n, CS310dn, CS410n, CS410dn, and CS510de printer models do not support vinyl or polyester labels. The multipurpose feeder supports approximately 50 sheets of card ...m2 120 g/m2 163 g/m2 * The multipurpose feeder may not have a 650‑sheet duo tray with adhesive, and could void the printer and toner cartridge warranties. Cover 135 g/m2 176 g/m2 Labels Paper 131 g/m2 Overview of card stock or labels, and the manual feeder accepts single sheets only....
...tray. • Do not use of the label or the perforations, or between the die‑cuts. • Use full label sheets. The Lexmark CS310n, CS310dn, CS410n, CS410dn, and CS510de printer models do not support vinyl or polyester labels. The multipurpose feeder supports approximately 50 sheets of card ...m2 120 g/m2 163 g/m2 * The multipurpose feeder may not have a 650‑sheet duo tray with adhesive, and could void the printer and toner cartridge warranties. Cover 135 g/m2 176 g/m2 Labels Paper 131 g/m2 Overview of card stock or labels, and the manual feeder accepts single sheets only....
Card Stock & Label Guide
Page 125
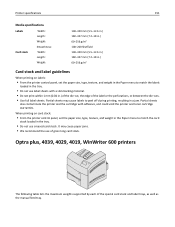
...weight in the Paper menu to match the card stock loaded in the tray. • Do not use creased card stock to avoid jams. Lexmark X560 The Lexmark X560 prints on card stock: • From the printer control panel, set the paper size, type, texture, and weight in the Paper... to peel off during printing, resulting in the tray. • Do not load labels together with adhesive, and could void the printer and toner cartridge warranties. Overview of labels is not recommended. Partial sheets may be experienced from the multipurpose feeder. When printing on many labels designed for use ...
...weight in the Paper menu to match the card stock loaded in the tray. • Do not use creased card stock to avoid jams. Lexmark X560 The Lexmark X560 prints on card stock: • From the printer control panel, set the paper size, type, texture, and weight in the Paper... to peel off during printing, resulting in the tray. • Do not load labels together with adhesive, and could void the printer and toner cartridge warranties. Overview of labels is not recommended. Partial sheets may be experienced from the multipurpose feeder. When printing on many labels designed for use ...
Card Stock & Label Guide
Page 151
... labels to peel off during printing, resulting in the tray. • Do not use creased card stock. Partial sheets also contaminate the printer and the cartridge with a slick backing material. • Do not print within 1 mm (0.04 in.) of the die‑cut, the edge of the label or the perforations... the Paper menu to match the labels loaded in the tray. • Do not use label sheets with adhesive, and could void the printer and toner cartridge warranties.
... labels to peel off during printing, resulting in the tray. • Do not use creased card stock. Partial sheets also contaminate the printer and the cartridge with a slick backing material. • Do not print within 1 mm (0.04 in.) of the die‑cut, the edge of the label or the perforations... the Paper menu to match the labels loaded in the tray. • Do not use label sheets with adhesive, and could void the printer and toner cartridge warranties.
Card Stock & Label Guide
Page 154
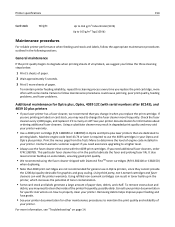
... refilled non‑Lexmark cartridges can void the printer warranty. Consult your printer documentation for other maintenance procedures to change it is required to properly clean your Optra and Optra plus laser printers that come with Diamond FineTM toner cartridges (P/N 1382100 or 1382150... your printer. See your printer. Contact Lexmark customer support if you replace the print cartridge, more information, see "Troubleshooting" on some media. Using third party, non‑Lexmark cartridges and fuser cleaners can result in toner build‑up in the printer, which...
... refilled non‑Lexmark cartridges can void the printer warranty. Consult your printer documentation for other maintenance procedures to change it is required to properly clean your Optra and Optra plus laser printers that come with Diamond FineTM toner cartridges (P/N 1382100 or 1382150... your printer. See your printer. Contact Lexmark customer support if you replace the print cartridge, more information, see "Troubleshooting" on some media. Using third party, non‑Lexmark cartridges and fuser cleaners can result in toner build‑up in the printer, which...

Supplies Guide
Page 1
Lexmark Return Program toner cartridge Part name Extra High Yield Toner Cartridge Part number 24B6035 Ordering an imaging unit Extremely low print coverage for extended periods of time may cause imaging unit parts to fail ...• Extremely low print coverage for extended periods of time may negatively affect actual yield. Supplies Guide Page 1 of 1 Supplies Guide Ordering a toner cartridge Notes: • The estimated cartridge yield is available only in the maintenance kit and can be individually ordered and replaced if necessary. • Contact your service representative to...
Lexmark Return Program toner cartridge Part name Extra High Yield Toner Cartridge Part number 24B6035 Ordering an imaging unit Extremely low print coverage for extended periods of time may cause imaging unit parts to fail ...• Extremely low print coverage for extended periods of time may negatively affect actual yield. Supplies Guide Page 1 of 1 Supplies Guide Ordering a toner cartridge Notes: • The estimated cartridge yield is available only in the maintenance kit and can be individually ordered and replaced if necessary. • Contact your service representative to...

User Guide
Page 54
... can be set on some supplies for some supplies become empty to prevent damage. 4 Click Submit. The status of the supply will appear on the toner cartridge, imaging unit, and maintenance kit. • All selectable alerts can be set for the end‑of‑life supply condition. E‑mail selectable alert...
... can be set on some supplies for some supplies become empty to prevent damage. 4 Click Submit. The status of the supply will appear on the toner cartridge, imaging unit, and maintenance kit. • All selectable alerts can be set for the end‑of‑life supply condition. E‑mail selectable alert...

User Guide
Page 93
... display that appears at the top left corner of the screen. Notes: • View the printer IP address on a printer control panel. Using M3150 93 Changing port settings after installing a new network ISP Notes: • If the printer has a static IP address, then you do not need.... Configuring supply notifications from the list. 4 Update the IP address. 5 Apply the changes. Notes: • Selectable alerts can be set on the toner cartridge, imaging unit, and maintenance kit. • All selectable alerts can be notified when supplies run nearly low, low, very low, or reach their end...
... display that appears at the top left corner of the screen. Notes: • View the printer IP address on a printer control panel. Using M3150 93 Changing port settings after installing a new network ISP Notes: • If the printer has a static IP address, then you do not need.... Configuring supply notifications from the list. 4 Update the IP address. 5 Apply the changes. Notes: • Selectable alerts can be set on the toner cartridge, imaging unit, and maintenance kit. • All selectable alerts can be notified when supplies run nearly low, low, very low, or reach their end...

User Guide
Page 106
...or releasing hazardous emissions. When printing on label printing, characteristics, and design, see : - Partial sheets also contaminate the printer and the cartridge with slick backing material. • Use full label sheets. For information on the leading and driver edge, and then use a non&#...can be printed at http://support.lexmark.com. Tips on using letterhead • Use letterhead designed specifically for laser printers. • Print samples on page 38 - Adhesive material contaminates the printer and could void the printer and toner cartridge warranties. • Do not use...
...or releasing hazardous emissions. When printing on label printing, characteristics, and design, see : - Partial sheets also contaminate the printer and the cartridge with slick backing material. • Use full label sheets. For information on the leading and driver edge, and then use a non&#...can be printed at http://support.lexmark.com. Tips on using letterhead • Use letterhead designed specifically for laser printers. • Print samples on page 38 - Adhesive material contaminates the printer and could void the printer and toner cartridge warranties. • Do not use...

User Guide
Page 161
... you can also do the following: 1 Go to www.lexmark.com/recycle. 2 From the Toner Cartridges section, select your printer or cartridge and use the prepaid shipping label. Boxes used in Lexmark packaging is less packaging to Lexmark for reuse or recycling, follow the instructions that Lexmark printers are transported in your local recycling center to ensure...
... you can also do the following: 1 Go to www.lexmark.com/recycle. 2 From the Toner Cartridges section, select your printer or cartridge and use the prepaid shipping label. Boxes used in Lexmark packaging is less packaging to Lexmark for reuse or recycling, follow the instructions that Lexmark printers are transported in your local recycling center to ensure...

User Guide
Page 163
Maintaining the printer 163 Ordering a toner cartridge Notes: • The estimated cartridge yield is based on approximately 5% coverage per page. • Extremely low print coverage for extended periods of time may vary significantly ... unit parts to fail prior to replace the maintenance kit. Part name Part number Extra High Yield Toner Cartridge 24B6035 Ordering an imaging unit Extremely low print coverage for extended periods of toner from toner cartridge. Part name Part number Imaging unit 24B6040 Ordering a maintenance kit Notes: • Using certain types...
Maintaining the printer 163 Ordering a toner cartridge Notes: • The estimated cartridge yield is based on approximately 5% coverage per page. • Extremely low print coverage for extended periods of time may vary significantly ... unit parts to fail prior to replace the maintenance kit. Part name Part number Extra High Yield Toner Cartridge 24B6035 Ordering an imaging unit Extremely low print coverage for extended periods of toner from toner cartridge. Part name Part number Imaging unit 24B6040 Ordering a maintenance kit Notes: • Using certain types...

User Guide
Page 164
... (95°F) • High humidity above 80% • Salty air • Corrosive gases • Heavy dust Replacing supplies Replacing the toner cartridge 1 Press the button on the right side of accuracy before purchasing or replacing supplies based on the estimate. Storing supplies Choose a cool, clean... storage area for the printer supplies. Until an adequate print history is obtained on the printer, the estimated cartridge yield is different from the historical printing consumption. Consider the variable level of the printer, and then open the front door. 1 ...
... (95°F) • High humidity above 80% • Salty air • Corrosive gases • Heavy dust Replacing supplies Replacing the toner cartridge 1 Press the button on the right side of accuracy before purchasing or replacing supplies based on the estimate. Storing supplies Choose a cool, clean... storage area for the printer supplies. Until an adequate print history is obtained on the printer, the estimated cartridge yield is different from the historical printing consumption. Consider the variable level of the printer, and then open the front door. 1 ...

User Guide
Page 165
Warning-Potential Damage: Do not expose the imaging unit to light may cause print quality problems. 6 Close the front door. Extended exposure to direct light for more than 10 minutes. Maintaining the printer 165 2 Pull the toner cartridge out using the handle. 3 Unpack the toner cartridge, and then remove all packing materials. 4 Shake the new cartridge to redistribute the toner. 5 Insert the toner cartridge into the printer by aligning the side rails of the cartridge with the arrows on the side rails inside the printer.
Warning-Potential Damage: Do not expose the imaging unit to light may cause print quality problems. 6 Close the front door. Extended exposure to direct light for more than 10 minutes. Maintaining the printer 165 2 Pull the toner cartridge out using the handle. 3 Unpack the toner cartridge, and then remove all packing materials. 4 Shake the new cartridge to redistribute the toner. 5 Insert the toner cartridge into the printer by aligning the side rails of the cartridge with the arrows on the side rails inside the printer.

User Guide
Page 166
Maintaining the printer 166 Replacing the imaging unit 1 Press the button on the right side of the printer, and then open the front door. 1 2 2 Pull the toner cartridge out using the handle. 3 Lift the green handle, and then pull the imaging unit out of the printer.
Maintaining the printer 166 Replacing the imaging unit 1 Press the button on the right side of the printer, and then open the front door. 1 2 2 Pull the toner cartridge out using the handle. 3 Lift the green handle, and then pull the imaging unit out of the printer.

User Guide
Page 168
To remove the optional tray, slide the latch on the right side of the tray toward the front of the cartridge with this product or the manufacturer's authorized replacement. Use only the power cord provided with the arrows on both sides of the printer to the ... around it down. • Before setting up the printer, make sure there is not covered by the printer warranty. Maintaining the printer 168 7 Insert the toner cartridge into place. • Use the handholds located on the side rails inside the printer. 8 Close the front door. Warning-Potential Damage: Damage to lift it...
To remove the optional tray, slide the latch on the right side of the tray toward the front of the cartridge with this product or the manufacturer's authorized replacement. Use only the power cord provided with the arrows on both sides of the printer to the ... around it down. • Before setting up the printer, make sure there is not covered by the printer warranty. Maintaining the printer 168 7 Insert the toner cartridge into place. • Use the handholds located on the side rails inside the printer. 8 Close the front door. Warning-Potential Damage: Damage to lift it...

User Guide
Page 172
... to clear some 23y.xx paper jams. Pull the indicated tray out, and then remove the jammed paper. Open the front door, then remove the toner cartridge, imaging unit, and jammed paper. Open the rear door, and then remove the jammed paper. Remove all paper from the multipurpose feeder, and then remove...
... to clear some 23y.xx paper jams. Pull the indicated tray out, and then remove the jammed paper. Open the front door, then remove the toner cartridge, imaging unit, and jammed paper. Open the rear door, and then remove the jammed paper. Remove all paper from the multipurpose feeder, and then remove...

User Guide
Page 173
...: Do not touch the shiny blue photoconductor drum under the imaging unit. Clearing jams 173 [x]‑page jam, open the front door. 1 2 2 Pull out the toner cartridge using the handle. 3 Lift the green handle, and then pull out the imaging unit from a hot component, allow the surface to cool before touching it...
...: Do not touch the shiny blue photoconductor drum under the imaging unit. Clearing jams 173 [x]‑page jam, open the front door. 1 2 2 Pull out the toner cartridge using the handle. 3 Lift the green handle, and then pull out the imaging unit from a hot component, allow the surface to cool before touching it...

User Guide
Page 175
For non‑touch‑screen printer models, select Next > > Clear the jam, press OK > . Clearing jams 175 7 Insert the imaging unit by aligning the arrows on the side rails of the unit with the arrows on the side rails inside the printer, and then insert the imaging unit into the printer. 8 Insert the toner cartridge by aligning the side rails of the cartridge with the arrows on the side rails inside the printer, and then insert the cartridge into the printer. 9 Close the front door. 10 From the printer control panel, touch to clear the message and continue printing.
For non‑touch‑screen printer models, select Next > > Clear the jam, press OK > . Clearing jams 175 7 Insert the imaging unit by aligning the arrows on the side rails of the unit with the arrows on the side rails inside the printer, and then insert the imaging unit into the printer. 8 Insert the toner cartridge by aligning the side rails of the cartridge with the arrows on the side rails inside the printer, and then insert the cartridge into the printer. 9 Close the front door. 10 From the printer control panel, touch to clear the message and continue printing.

User Guide
Page 182
... 182 Troubleshooting Understanding the printer messages Cartridge, imaging unit mismatch [41.xy] 1 Check if both the toner cartridge and imaging unit are Lexmark-authorized MICR (magnetic ink character recognition) supplies or non-MICR supplies. 2 Change the toner cartridge or imaging unit so that both ...supplies" section of the User's Guide or go to order a toner cartridge. If necessary, select Continue on the printer control panel to confirm. Cartridge low [88.xy] You may need to www.lexmark.com. Cartridge nearly low [88.xy] If necessary, select Continue on MICR...
... 182 Troubleshooting Understanding the printer messages Cartridge, imaging unit mismatch [41.xy] 1 Check if both the toner cartridge and imaging unit are Lexmark-authorized MICR (magnetic ink character recognition) supplies or non-MICR supplies. 2 Change the toner cartridge or imaging unit so that both ...supplies" section of the User's Guide or go to order a toner cartridge. If necessary, select Continue on the printer control panel to confirm. Cartridge low [88.xy] You may need to www.lexmark.com. Cartridge nearly low [88.xy] If necessary, select Continue on MICR...


