
Setup Guide
Page 5
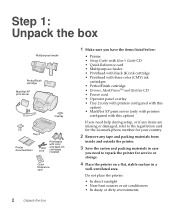
...listed below: • Printer • Setup Guide with User's Guide CD • Quick Reference card • Multipurpose feeder • Printhead with black (K) ink cartridge • Printhead with three color (CMY) ink cartridges • PerfectFinish cartridge • Drivers, MarkVisionTM and Utilities CD • Power cord • Operator...option) If you need help during setup, or if any items are missing or damaged, refer to the registration card for the Lexmark phone number for your country. 2 Remove any tape and packing materials from inside and outside the printer. 3 Save the carton and...
...listed below: • Printer • Setup Guide with User's Guide CD • Quick Reference card • Multipurpose feeder • Printhead with black (K) ink cartridge • Printhead with three color (CMY) ink cartridges • PerfectFinish cartridge • Drivers, MarkVisionTM and Utilities CD • Power cord • Operator...option) If you need help during setup, or if any items are missing or damaged, refer to the registration card for the Lexmark phone number for your country. 2 Remove any tape and packing materials from inside and outside the printer. 3 Save the carton and...
Setup Guide
Page 22
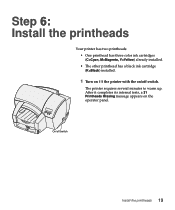
On/off switch. After it completes its internal tests, a 31 Printheads Missing message appears on /off switch Install the printheads 19 Step 6: Install the printheads Your printer has two printheads: • One printhead has three color ink cartridges (C=Cyan, M=Magenta, Y=Yellow) already installed. • The other printhead has a black ink cartridge (K=Black) installed. 1 Turn on (|) the printer with the on the operator panel. The printer requires several minutes to warm up.
On/off switch. After it completes its internal tests, a 31 Printheads Missing message appears on /off switch Install the printheads 19 Step 6: Install the printheads Your printer has two printheads: • One printhead has three color ink cartridges (C=Cyan, M=Magenta, Y=Yellow) already installed. • The other printhead has a black ink cartridge (K=Black) installed. 1 Turn on (|) the printer with the on the operator panel. The printer requires several minutes to warm up.
Setup Guide
Page 23
2 Open the printer front cover. After a few seconds, the carrier moves to the load position at the center of the printer. 3 Lift the carrier handle. 20 Install the printheads
2 Open the printer front cover. After a few seconds, the carrier moves to the load position at the center of the printer. 3 Lift the carrier handle. 20 Install the printheads
Setup Guide
Page 24
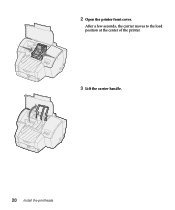
Printhead with Printhead with color (CMY) ink black (K) ink cartridges cartridge 4 Remove the printheads from the black ink printhead. Do not remove the ink cartridges from the printheads. 5 Remove the plastic cushioning from their packaging. Install the printheads 21
Printhead with Printhead with color (CMY) ink black (K) ink cartridges cartridge 4 Remove the printheads from the black ink printhead. Do not remove the ink cartridges from the printheads. 5 Remove the plastic cushioning from their packaging. Install the printheads 21
Setup Guide
Page 25
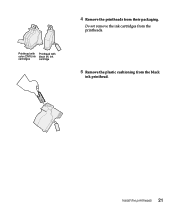
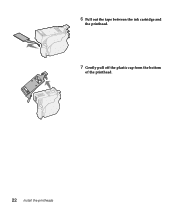
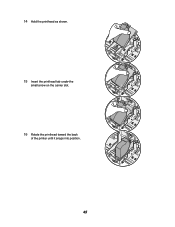
6 Pull out the tape between the ink cartridge and the printhead. 7 Gently pull off the plastic cap from the bottom of the printhead. 22 Install the printheads
6 Pull out the tape between the ink cartridge and the printhead. 7 Gently pull off the plastic cap from the bottom of the printhead. 22 Install the printheads
Setup Guide
Page 26
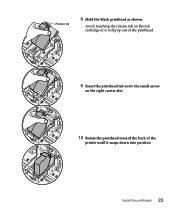
Avoid touching the release tab on the ink cartridge or it will pop out of the printhead. 9 Insert the printhead tab under the small arrow on the right carrier slot. 10 Rotate the printhead toward the back of the printer until it snaps down into position Install the printheads 23 Release tab 8 Hold the black printhead as shown.
Avoid touching the release tab on the ink cartridge or it will pop out of the printhead. 9 Insert the printhead tab under the small arrow on the right carrier slot. 10 Rotate the printhead toward the back of the printer until it snaps down into position Install the printheads 23 Release tab 8 Hold the black printhead as shown.
Setup Guide
Page 27
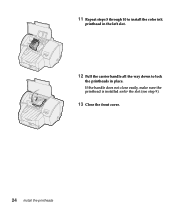
If the handle does not close easily, make sure the printhead is installed under the slot (see step 9). 13 Close the front cover. 24 Install the printheads 11 Repeat steps 5 through 10 to install the color ink printhead in the left slot. 12 Pull the carrier handle all the way down to lock the printheads in place.
If the handle does not close easily, make sure the printhead is installed under the slot (see step 9). 13 Close the front cover. 24 Install the printheads 11 Repeat steps 5 through 10 to install the color ink printhead in the left slot. 12 Pull the carrier handle all the way down to lock the printheads in place.

Setup Guide
Page 36
Congratulations! You are finished setting up your printer and are ready to print. Use the User's Guide CD in the back of this book for: • Printing tips • Changing menu settings from the Windows driver, Macintosh driver, and the operator panel • Replacing ink cartridges, printheads and the PerfectFinish cartridge • Clearing paper jams • Troubleshooting Warning: If you move the printer, keep it level. Congratulations! 33
Congratulations! You are finished setting up your printer and are ready to print. Use the User's Guide CD in the back of this book for: • Printing tips • Changing menu settings from the Windows driver, Macintosh driver, and the operator panel • Replacing ink cartridges, printheads and the PerfectFinish cartridge • Clearing paper jams • Troubleshooting Warning: If you move the printer, keep it level. Congratulations! 33
Setup Guide
Page 38
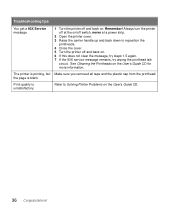
...message Attaching cables The paper jammed from tray 2. • Remove tray 2. • Gently pull the paper toward you. • If you see Change Printhead. • Press Select. • Open the cover. Congratulations! 35 Press Go to return the printer to the center of the printer. The paper ...Make sure the parallel cable or USB cable is not installed correctly. Troubleshooting tips You get a Check Tray 2 paper jam message You get a Missing Printhead message You need to Ready status. • Make sure there is released. • Reinstall the tray and press Go. Press Go to return ...
...message Attaching cables The paper jammed from tray 2. • Remove tray 2. • Gently pull the paper toward you. • If you see Change Printhead. • Press Select. • Open the cover. Congratulations! 35 Press Go to return the printer to the center of the printer. The paper ...Make sure the parallel cable or USB cable is not installed correctly. Troubleshooting tips You get a Check Tray 2 paper jam message You get a Missing Printhead message You need to Ready status. • Make sure there is released. • Reinstall the tray and press Go. Press Go to return ...
Setup Guide
Page 39
The printer is unsatisfactory. Refer to reposition the printheads. 4 Close the cover. 5 Turn the printer off and back on the User's Guide CD for more information. Always turn the printer off at the on/... down to Solving Printer Problems on . 6 If this does not clear the message, try steps 1-5 again. 7 If the 93X service message remains, try wiping the printhead tab circuit. Troubleshooting tips You get a 93X Service message 1 Turn the printer off and back on the User's Guide CD. 36 Congratulations! Remember! the page...
The printer is unsatisfactory. Refer to reposition the printheads. 4 Close the cover. 5 Turn the printer off and back on the User's Guide CD for more information. Always turn the printer off at the on/... down to Solving Printer Problems on . 6 If this does not clear the message, try steps 1-5 again. 7 If the 93X service message remains, try wiping the printhead tab circuit. Troubleshooting tips You get a 93X Service message 1 Turn the printer off and back on the User's Guide CD. 36 Congratulations! Remember! the page...
Setup Guide
Page 42
... installed a maintenance kit as specified (if applicable) • Use of print media outside of Lexmark specifications • Use of other than Lexmark supplies (such as inkjet cartridges, ink, pre-coating fluid and printheads) • Use of other than Lexmark product or component Statement of limited warranty 39 Free remote technical support is provided for...
... installed a maintenance kit as specified (if applicable) • Use of print media outside of Lexmark specifications • Use of other than Lexmark supplies (such as inkjet cartridges, ink, pre-coating fluid and printheads) • Use of other than Lexmark product or component Statement of limited warranty 39 Free remote technical support is provided for...
User's Guide
Page 6
... window 33 MarkVision status window 34 Web page 34 Chapter 15: Replacing an ink cartridge 35 Chapter 16: Replacing PerfectFinish 38 Chapter 17: Replacing the printheads 42 Chapter 18: Aligning the printheads 47 Chapter 19: Cleaning the printheads 48 Chapter 20: Adding hardware options 51 From Windows 51 From a Macintosh computer 51 iv
... window 33 MarkVision status window 34 Web page 34 Chapter 15: Replacing an ink cartridge 35 Chapter 16: Replacing PerfectFinish 38 Chapter 17: Replacing the printheads 42 Chapter 18: Aligning the printheads 47 Chapter 19: Cleaning the printheads 48 Chapter 20: Adding hardware options 51 From Windows 51 From a Macintosh computer 51 iv
User's Guide
Page 42
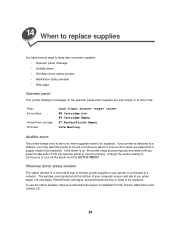
...low or need to Continuous or turn off the alarm from the Drivers, MarkVision and Utilities CD. 33 Paper Ink cartridge PerfectFinish cartridge Printhead Load 88 Cartridge Low 89 Cartridge Empty 87 PerfectFinish Empty Life Warning Audible alarm The printer beeps once to alert you when paper,... ink cartridges, PerfectFinish cartridges, and printheads are low, empty, or at the bottom of life. Change the printer setting to be replaced. If the alarm is connected to be...
...low or need to Continuous or turn off the alarm from the Drivers, MarkVision and Utilities CD. 33 Paper Ink cartridge PerfectFinish cartridge Printhead Load 88 Cartridge Low 89 Cartridge Empty 87 PerfectFinish Empty Life Warning Audible alarm The printer beeps once to alert you when paper,... ink cartridges, PerfectFinish cartridges, and printheads are low, empty, or at the bottom of life. Change the printer setting to be replaced. If the alarm is connected to be...
User's Guide
Page 45
Avoid touching the release tab on the cartridge until it will pop out of the printhead. 5 Close the front cover. 36 3 Remove the new ink cartridge from its packaging and pull off the tape. 4 Insert the ink cartridge into the corresponding printhead slot and push down on the cartridge or it is securely in place.
Avoid touching the release tab on the cartridge until it will pop out of the printhead. 5 Close the front cover. 36 3 Remove the new ink cartridge from its packaging and pull off the tape. 4 Insert the ink cartridge into the corresponding printhead slot and push down on the cartridge or it is securely in place.
User's Guide
Page 51
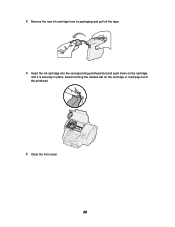
... replacing. 1 Make sure the printer is turned on the operator panel display when the indicated printhead needs to the load position at the center of the printer. 42 17 Replacing the printheads Your printer alerts you with a Cartridge Life Warning message on . 2 Press Menu> until you see the ...Utilities Menu. 3 Press Select. 4 Press Menu> until you see Change Printhead. 5 Press Select. 6 Open the printer front cover. If...
... replacing. 1 Make sure the printer is turned on the operator panel display when the indicated printhead needs to the load position at the center of the printer. 42 17 Replacing the printheads Your printer alerts you with a Cartridge Life Warning message on . 2 Press Menu> until you see the ...Utilities Menu. 3 Press Select. 4 Press Menu> until you see Change Printhead. 5 Press Select. 6 Open the printer front cover. If...
User's Guide
Page 52
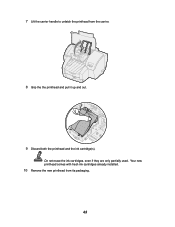
Do not reuse the ink cartridges, even if they are only partially used. 7 Lift the carrier handle to unlatch the printhead from its packaging. 43 Your new printhead comes with fresh ink cartridges already installed. 10 Remove the new printhead from the carrier. 8 Grip the the printhead and pull it up and out. 9 Discard both the printhead and the ink cartridge(s).
Do not reuse the ink cartridges, even if they are only partially used. 7 Lift the carrier handle to unlatch the printhead from its packaging. 43 Your new printhead comes with fresh ink cartridges already installed. 10 Remove the new printhead from the carrier. 8 Grip the the printhead and pull it up and out. 9 Discard both the printhead and the ink cartridge(s).
User's Guide
Page 53
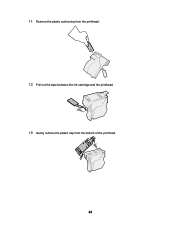
11 Remove the plastic cushioning from the printhead. 12 Pull out the tape between the ink cartridge and the printhead. 13 Gently remove the plastic cap from the bottom of the printhead. 44
11 Remove the plastic cushioning from the printhead. 12 Pull out the tape between the ink cartridge and the printhead. 13 Gently remove the plastic cap from the bottom of the printhead. 44
User's Guide
Page 54
14 Hold the printhead as shown. 15 Insert the printhead tab under the small arrow on the carrier slot. 16 Rotate the printhead toward the back of the printer until it snaps into position. 45
14 Hold the printhead as shown. 15 Insert the printhead tab under the small arrow on the carrier slot. 16 Rotate the printhead toward the back of the printer until it snaps into position. 45
User's Guide
Page 55
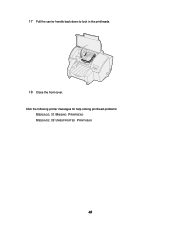
Click the following printer messages for help solving printhead problems: MESSAGE: 31 MISSING PRINTHEAD MESSAGE: 32 UNSUPPORTED PRINTHEAD 46 17 Pull the carrier handle back down to lock in the printheads. 18 Close the front cover.
Click the following printer messages for help solving printhead problems: MESSAGE: 31 MISSING PRINTHEAD MESSAGE: 32 UNSUPPORTED PRINTHEAD 46 17 Pull the carrier handle back down to lock in the printheads. 18 Close the front cover.
User's Guide
Page 56
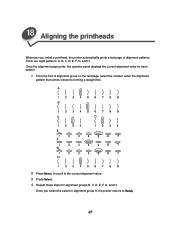
... Menu> to scroll to the correct alignment value. 3 Press Select. 4 Repeat these steps for alignment group H, the printer returns to Ready. 47 Once you install a printhead, the printer automatically prints a test page of alignment patterns. There are eight patterns: A, B, C, D, E, F, G, and H. 18 Aligning the...
... Menu> to scroll to the correct alignment value. 3 Press Select. 4 Repeat these steps for alignment group H, the printer returns to Ready. 47 Once you install a printhead, the printer automatically prints a test page of alignment patterns. There are eight patterns: A, B, C, D, E, F, G, and H. 18 Aligning the...


