
Setup Guide
Page 30
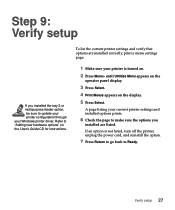
... not listed, turn off the printer, unplug the power cord, and reinstall the option. 7 Press Return to go back to "Adding new hardware options" on the display. 5 Press Select. If an ... installed correctly, print a menu settings page. 1 Make sure your current printer settings and installed options prints. 6 Check the page to make sure the options you installed the tray 2 or multipurpose feeder option, be sure to update your printer configuration through your Windows printer driver. Verify setup 27 Step 9: Verify setup If you installed are...
... not listed, turn off the printer, unplug the power cord, and reinstall the option. 7 Press Return to go back to "Adding new hardware options" on the display. 5 Press Select. If an ... installed correctly, print a menu settings page. 1 Make sure your current printer settings and installed options prints. 6 Check the page to make sure the options you installed the tray 2 or multipurpose feeder option, be sure to update your printer configuration through your Windows printer driver. Verify setup 27 Step 9: Verify setup If you installed are...
Setup Guide
Page 31
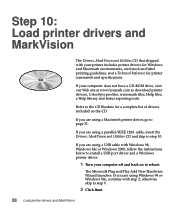
...The Microsoft Plug and Play Add New Hardware Wizard launches. Step 10: Load printer drivers and MarkVision The Drivers, MarkVision and Utilities CD that shipped with your computer does not have a CD-ROM drive, visit our Web site at www.lexmark.com to reboot. If you are using a USB cable with Windows 98,... Windows Me or Windows 2000, follow the instructions below to install a USB port driver and a Windows printer driver: 1 Turn your computer off and back on the CD. If...
...The Microsoft Plug and Play Add New Hardware Wizard launches. Step 10: Load printer drivers and MarkVision The Drivers, MarkVision and Utilities CD that shipped with your computer does not have a CD-ROM drive, visit our Web site at www.lexmark.com to reboot. If you are using a USB cable with Windows 98,... Windows Me or Windows 2000, follow the instructions below to install a USB port driver and a Windows printer driver: 1 Turn your computer off and back on the CD. If...
Setup Guide
Page 32
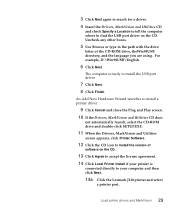
... drive letter of software on the CD. 13 Click Agree to accept the license agreement. 14 Click Local Printer Install if your computer and then click Next. 14a Click the Lexmark J110 printer and select a printer port. Load printer drivers and MarkVision 29 For example, D:\Win98USB\English. 6 Click Next. An Add New Hardware Wizard launches to install...
... drive letter of software on the CD. 13 Click Agree to accept the license agreement. 14 Click Local Printer Install if your computer and then click Next. 14a Click the Lexmark J110 printer and select a printer port. Load printer drivers and MarkVision 29 For example, D:\Win98USB\English. 6 Click Next. An Add New Hardware Wizard launches to install...
Setup Guide
Page 33
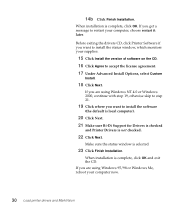
...(the default is local computer). 20 Click Next. 21 Make sure Bi-Di Support for Drivers is checked and Printer Drivers is complete, click OK and exit the CD. Before exiting the drivers CD, click Printer Software if you want to install the status window, which monitors your supplies. 15 Click ...Install the version of software on the CD. 16 Click Agree to restart your computer now. 30 Load printer drivers and MarkVision If you get a message to accept the license agreement. 17 Under Advanced Install Options, select Custom Install. 18 Click Next. When...
...(the default is local computer). 20 Click Next. 21 Make sure Bi-Di Support for Drivers is checked and Printer Drivers is complete, click OK and exit the CD. Before exiting the drivers CD, click Printer Software if you want to install the status window, which monitors your supplies. 15 Click ...Install the version of software on the CD. 16 Click Agree to restart your computer now. 30 Load printer drivers and MarkVision If you get a message to accept the license agreement. 17 Under Advanced Install Options, select Custom Install. 18 Click Next. When...
Setup Guide
Page 34
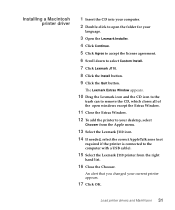
Load printer drivers and MarkVision 31 Installing a Macintosh printer driver 1 Insert the CD into your computer. 2 Double-click to open windows except the Extras Window. 11 Close the Extras Window. 12 To add the printer to your desktop, select Chooser from the Apple menu. 13 Select the Lexmark J110 icon. 14 If needed, select the correct AppleTalk zone...
Load printer drivers and MarkVision 31 Installing a Macintosh printer driver 1 Insert the CD into your computer. 2 Double-click to open windows except the Extras Window. 11 Close the Extras Window. 12 To add the printer to your desktop, select Chooser from the Apple menu. 13 Select the Lexmark J110 icon. 14 If needed, select the correct AppleTalk zone...
Setup Guide
Page 35
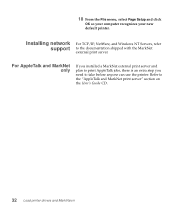
18 From the File menu, select Page Setup and click OK so your computer recognizes your new default printer. Installing network support For TCP/IP, NetWare, and Windows NT Servers, refer to the "AppleTalk and MarkNet print server" section on the User's Guide CD. 32 Load printer drivers and MarkVision Refer to the documentation shipped with the MarkNet external print server. For AppleTalk and MarkNet only If you installed a MarkNet external print server and plan to print AppleTalk jobs, there is an extra step you need to take before anyone can use the printer.
18 From the File menu, select Page Setup and click OK so your computer recognizes your new default printer. Installing network support For TCP/IP, NetWare, and Windows NT Servers, refer to the "AppleTalk and MarkNet print server" section on the User's Guide CD. 32 Load printer drivers and MarkVision Refer to the documentation shipped with the MarkNet external print server. For AppleTalk and MarkNet only If you installed a MarkNet external print server and plan to print AppleTalk jobs, there is an extra step you need to take before anyone can use the printer.
Setup Guide
Page 37
...Type setting in the Paper Menu on the printer wrong paper source or on operator panel and in the printer driver. Gently rock the printer back and forth until both sides of the printer are lined up with the drawer. Gently rock the tray 2 printer back and forth until paper jam you ...can reach it and pull it out. You get a Printer Calibrating message The PerfectFinish ...
...Type setting in the Paper Menu on the printer wrong paper source or on operator panel and in the printer driver. Gently rock the printer back and forth until both sides of the printer are lined up with the drawer. Gently rock the tray 2 printer back and forth until paper jam you ...can reach it and pull it out. You get a Printer Calibrating message The PerfectFinish ...

User's Guide
Page 11
... (or Printer) Setup to print your Lexmark driver is set up, your job. It's easy to change printer settings for any dialog box and then move your cursor to the setting you want . 4 Change Orientation to Landscape. 5 In the Print dialog box, click OK to open your printer driver. 4 ...In the Print Setup dialog box, click Properties, Options, or Setup (depending on a chart more vibrant? 2 Printing from Windows Your printer is installed - Want to print transparencies, add a Do Not Copy watermark, ...
... (or Printer) Setup to print your Lexmark driver is set up, your job. It's easy to change printer settings for any dialog box and then move your cursor to the setting you want . 4 Change Orientation to Landscape. 5 In the Print dialog box, click OK to open your printer driver. 4 ...In the Print Setup dialog box, click Properties, Options, or Setup (depending on a chart more vibrant? 2 Printing from Windows Your printer is installed - Want to print transparencies, add a Do Not Copy watermark, ...
User's Guide
Page 19
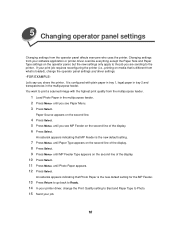
...13 Press Return to go back to Ready. 14 In your printer driver, change the operator panel settings and driver settings. -FOR EXAMPLELet's say you are sending to the printer. If your print job requires reconfiguring the printer (i.e., printing on media that Photo Paper is different from the...appears. 12 Press Select. Changing settings from the operator panel affects everyone who uses the printer. 5 Changing operator panel settings Changing settings from your software application or printer driver override everything except the Paper Size and Paper Type settings on the operator panel, but ...
...13 Press Return to go back to Ready. 14 In your printer driver, change the operator panel settings and driver settings. -FOR EXAMPLELet's say you are sending to the printer. If your print job requires reconfiguring the printer (i.e., printing on media that Photo Paper is different from the...appears. 12 Press Select. Changing settings from the operator panel affects everyone who uses the printer. 5 Changing operator panel settings Changing settings from your software application or printer driver override everything except the Paper Size and Paper Type settings on the operator panel, but ...
User's Guide
Page 22
... to open your job. The pages are pages you make your selections, click OK. 9 In the Print dialog box, click OK to print your Windows printer driver. 3 In the Print Setup dialog box, click Properties, Options, or Setup (depending on the application). 4 Select the Print Style tab. 5 Select poster and poster size...
... to open your job. The pages are pages you make your selections, click OK. 9 In the Print dialog box, click OK to print your Windows printer driver. 3 In the Print Setup dialog box, click Properties, Options, or Setup (depending on the application). 4 Select the Print Style tab. 5 Select poster and poster size...
User's Guide
Page 23
... side facing up into the manual feeder (or multipurpose feeder). 2 Open the File Menu from your software application. 3 Choose Print (or Printer) Setup to open your t-shirt design from Lexmark Shop Deluxe or other iron-on software package: 1 Load one iron-on transfer with the iron-on transfers to iron the image... or A4. 7 From Paper Source, select Manual Feeder (or Multipurpose Feeder). 8 Click OK. 9 Click Print. 8 Printing iron-on transfers From Windows Once you create your printer driver. 4 In the Print Setup dialog box, click Properties, Options, or Setup (depending on a t-shirt. 14
... side facing up into the manual feeder (or multipurpose feeder). 2 Open the File Menu from your software application. 3 Choose Print (or Printer) Setup to open your t-shirt design from Lexmark Shop Deluxe or other iron-on software package: 1 Load one iron-on transfer with the iron-on transfers to iron the image... or A4. 7 From Paper Source, select Manual Feeder (or Multipurpose Feeder). 8 Click OK. 9 Click Print. 8 Printing iron-on transfers From Windows Once you create your printer driver. 4 In the Print Setup dialog box, click Properties, Options, or Setup (depending on a t-shirt. 14
User's Guide
Page 25
Remove each photo card as it exits the printer and let it dry thoroughly before stacking. 16 From Windows Once you create the image you want to print: 1 Load one card into the manual ...feeder (or up to 50 if you are using the multipurpose feeder). 2 Open the File Menu from your software application. 3 Choose Print (or Printer) Setup to open your printer driver. 4 In the Print Setup dialog box, click Properties, Options, or Setup (depending on the application). 5 From Paper Type, select Card Stock. 6 Under Paper...
Remove each photo card as it exits the printer and let it dry thoroughly before stacking. 16 From Windows Once you create the image you want to print: 1 Load one card into the manual ...feeder (or up to 50 if you are using the multipurpose feeder). 2 Open the File Menu from your software application. 3 Choose Print (or Printer) Setup to open your printer driver. 4 In the Print Setup dialog box, click Properties, Options, or Setup (depending on the application). 5 From Paper Type, select Card Stock. 6 Under Paper...
User's Guide
Page 27
...8226; Try out a small amount of media before stacking. 18 To print envelopes, index cards, and iron-on transfers, always print from your printer driver. • If you are printing iron-on transfers, use media designed to reduce potential paper jams, we recommend you get the best print quality ...used in the tray or feeder. • Do not remove a paper tray while the printer is printing or Busy is properly loaded in inkjet printers. • Remove each transparency or photo as it exits the printer and let it dry thoroughly before buying large quantities. • Use new, undamaged paper...
...8226; Try out a small amount of media before stacking. 18 To print envelopes, index cards, and iron-on transfers, always print from your printer driver. • If you are printing iron-on transfers, use media designed to reduce potential paper jams, we recommend you get the best print quality ...used in the tray or feeder. • Do not remove a paper tray while the printer is printing or Busy is properly loaded in inkjet printers. • Remove each transparency or photo as it exits the printer and let it dry thoroughly before buying large quantities. • Use new, undamaged paper...
User's Guide
Page 31
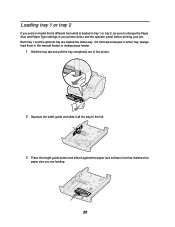
always load them in the manual feeder or multipurpose feeder. 1 Hold the tray tab and pull the tray completely out of the printer. 2 Squeeze the width guide and slide it all the way to the left. 3 Press the length guide button and slide it against the paper size ... matches the paper size you are loaded the same way. Both tray 1 and the optional tray are loading. 22 Do not load envelopes in your printer driver and the operator panel before printing your job.
always load them in the manual feeder or multipurpose feeder. 1 Hold the tray tab and pull the tray completely out of the printer. 2 Squeeze the width guide and slide it all the way to the left. 3 Press the length guide button and slide it against the paper size ... matches the paper size you are loaded the same way. Both tray 1 and the optional tray are loading. 22 Do not load envelopes in your printer driver and the operator panel before printing your job.

User's Guide
Page 35
..., with the print side facing you are printing an envelope, change the Orientation to select the Paper Size and Paper Type settings in your printer driver before printing your job. If you . 2 Squeeze the left paper guide lever and slide it until it is lightly touching the edge of... with the print side facing you are printing an envelope, change the Orientation to select the Paper Size and Paper Type settings in your printer driver before printing your job. 26 Loading the manual feeder Use the manual feeder for single or multiple page printing on paper, transparencies, labels,...
..., with the print side facing you are printing an envelope, change the Orientation to select the Paper Size and Paper Type settings in your printer driver before printing your job. If you . 2 Squeeze the left paper guide lever and slide it until it is lightly touching the edge of... with the print side facing you are printing an envelope, change the Orientation to select the Paper Size and Paper Type settings in your printer driver before printing your job. 26 Loading the manual feeder Use the manual feeder for single or multiple page printing on paper, transparencies, labels,...
User's Guide
Page 38
From Windows 1 Open the File Menu from your software application. 2 Choose Print (or Printer) Setup to open your printer driver. 3 In the Print Setup dialog box, click Properties, Options, or Setup (depending on the application). 4 From Paper Source, select Tray 1 or Tray 2. 5 From Paper Size, ...
From Windows 1 Open the File Menu from your software application. 2 Choose Print (or Printer) Setup to open your printer driver. 3 In the Print Setup dialog box, click Properties, Options, or Setup (depending on the application). 4 From Paper Source, select Tray 1 or Tray 2. 5 From Paper Size, ...
User's Guide
Page 40
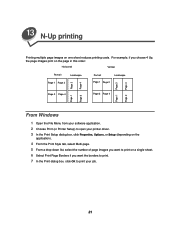
... images on a single sheet. 6 Select Print Page Borders if you want the borders to print. 7 In the Print dialog box, click OK to print your printer driver. 3 In the Print Setup dialog box, click Properties, Options, or Setup (depending on the application). 4 From the Print Style tab, select Multi-page. 5 From a drop...
... images on a single sheet. 6 Select Print Page Borders if you want the borders to print. 7 In the Print dialog box, click OK to print your printer driver. 3 In the Print Setup dialog box, click Properties, Options, or Setup (depending on the application). 4 From the Print Style tab, select Multi-page. 5 From a drop...
User's Guide
Page 60
...are updated automatically. The option appears under Available Options. 6 If you installed. 3 Click the check box again to update the printer's configuration through your printer driver. To remove an option, highlight it from the list of Available Options, highlight the option you need to remove an option. 51...Options and Installed Options are using Windows NT or Windows 2000, go to Start, Settings, Printers, J110, and right-click your mouse to select the Properties Menu, then click the Printer Configuration tab.) 5 From the list of Installed Options and click the Remove button. The ...
...are updated automatically. The option appears under Available Options. 6 If you installed. 3 Click the check box again to update the printer's configuration through your printer driver. To remove an option, highlight it from the list of Available Options, highlight the option you need to remove an option. 51...Options and Installed Options are using Windows NT or Windows 2000, go to Start, Settings, Printers, J110, and right-click your mouse to select the Properties Menu, then click the Printer Configuration tab.) 5 From the list of Installed Options and click the Remove button. The ...
User's Guide
Page 72
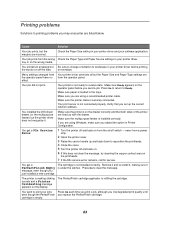
...installed the 250-sheet drawer (or the multipurpose feeder) but Be sure to change orientation to landscape in your printer driver and your printer driver. If you are using a recommended printer cable. The cartridge is empty. 63 cartridge is not installed correctly. Check the Paper Size setting in your jobs... recognize it is on the printheads. 7 If the 93x service errror remains, call for service. You want to print your printer driver before you may encounter are lined up with the drawer. Printing problems Solutions to printing problems you send a job. effect. ...
...installed the 250-sheet drawer (or the multipurpose feeder) but Be sure to change orientation to landscape in your printer driver and your printer driver. If you are using a recommended printer cable. The cartridge is empty. 63 cartridge is not installed correctly. Check the Paper Size setting in your jobs... recognize it is on the printheads. 7 If the 93x service errror remains, call for service. You want to print your printer driver before you may encounter are lined up with the drawer. Printing problems Solutions to printing problems you send a job. effect. ...
User's Guide
Page 73
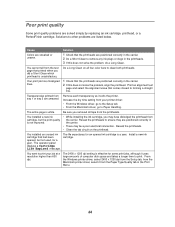
... although it uses large amounts of computer disk space and takes a longer time to print your printer driver: • From the Windows driver, go to the Setup tab. • From the Macintosh driver, go to clean both printheads. Poor print quality Some print quality problems are positioned correctly in the...page is a year. You installed an unused ink The life expectancy for a year. You want to print. from the Macintosh printer driver, select it exits the printer. You cannot tell from the Paper Type/Quality tab in the Print Menu. 64 Print an alignment test page and select the ...
... although it uses large amounts of computer disk space and takes a longer time to print your printer driver: • From the Windows driver, go to the Setup tab. • From the Macintosh driver, go to clean both printheads. Poor print quality Some print quality problems are positioned correctly in the...page is a year. You installed an unused ink The life expectancy for a year. You want to print. from the Macintosh printer driver, select it exits the printer. You cannot tell from the Paper Type/Quality tab in the Print Menu. 64 Print an alignment test page and select the ...

