
Setup Guide
Page 4
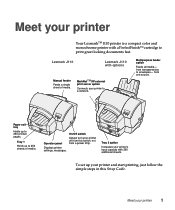
... sheets of media. To set up to print great looking documents fast. Lexmark J110 Lexmark J110 with options Manual feeder Feeds a single sheet of media. from transparencies to a network. Tray 2 option Increases your printer 1 from a power strip. Meet your printer Your LexmarkTM J110 printer is a compact color and monochrome printer with a PerfectFinish™ cartridge to 250 printed pages. Meet your...
... sheets of media. To set up to print great looking documents fast. Lexmark J110 Lexmark J110 with options Manual feeder Feeds a single sheet of media. from transparencies to a network. Tray 2 option Increases your printer 1 from a power strip. Meet your printer Your LexmarkTM J110 printer is a compact color and monochrome printer with a PerfectFinish™ cartridge to 250 printed pages. Meet your...
Setup Guide
Page 5
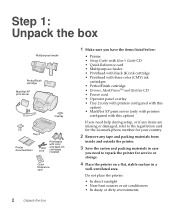
... In dusty or dirty environments Step 1: Unpack the box Multipurpose feeder PerfectFinish cartridge MarkNet XP print server Overlay CD Tray 2 Printer documentation Power cord Printheads with color and black ink cartridges installed Quick Reference card 2 Unpack the box 1 Make sure you have the items listed below: •..., or if any items are missing or damaged, refer to the registration card for the Lexmark phone number for your country. 2 Remove any tape and packing materials from inside and outside the printer. 3 Save the carton and packing materials in case you need to repack the...
... In dusty or dirty environments Step 1: Unpack the box Multipurpose feeder PerfectFinish cartridge MarkNet XP print server Overlay CD Tray 2 Printer documentation Power cord Printheads with color and black ink cartridges installed Quick Reference card 2 Unpack the box 1 Make sure you have the items listed below: •..., or if any items are missing or damaged, refer to the registration card for the Lexmark phone number for your country. 2 Remove any tape and packing materials from inside and outside the printer. 3 Save the carton and packing materials in case you need to repack the...
Setup Guide
Page 22
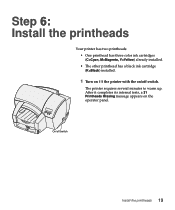
After it completes its internal tests, a 31 Printheads Missing message appears on /off switch Install the printheads 19 The printer requires several minutes to warm up. On/off switch. Step 6: Install the printheads Your printer has two printheads: • One printhead has three color ink cartridges (C=Cyan, M=Magenta, Y=Yellow) already installed. • The other printhead has a black ink cartridge (K=Black) installed. 1 Turn on (|) the printer with the on the operator panel.
After it completes its internal tests, a 31 Printheads Missing message appears on /off switch Install the printheads 19 The printer requires several minutes to warm up. On/off switch. Step 6: Install the printheads Your printer has two printheads: • One printhead has three color ink cartridges (C=Cyan, M=Magenta, Y=Yellow) already installed. • The other printhead has a black ink cartridge (K=Black) installed. 1 Turn on (|) the printer with the on the operator panel.

User's Guide
Page 10
1 Overview Your Lexmark™ J110 printer is a compact color and monochrome printer with 250 additional sheets. 1 from transparencies to 250 printed pages. from a power strip. Tray 1 Holds up to envelopes- Operator panel Displays printer settings, messages. On/Off switch Always turn your printer to 250 sheets of media. Multipurpose feeder option Feeds all media- MarkNet™ Pro external...
1 Overview Your Lexmark™ J110 printer is a compact color and monochrome printer with 250 additional sheets. 1 from transparencies to 250 printed pages. from a power strip. Tray 1 Holds up to envelopes- Operator panel Displays printer settings, messages. On/Off switch Always turn your printer to 250 sheets of media. Multipurpose feeder option Feeds all media- MarkNet™ Pro external...

User's Guide
Page 11
... (depending on a chart more vibrant? It's easy to change the corresponding operator panel settings. 2 Open the File Menu from Windows Your printer is set up, your Lexmark driver is just a click away: • Click the Help box in the bottom right corner of any dialog box. • Click ...EXAMPLELet's say your printer has plain paper loaded in question and press F1 or right-click your mouse. 2 Want to print your job. you want . 4 Change Orientation to Landscape. 5 In the Print dialog box, click OK to print transparencies, add a Do Not Copy watermark, make the colors on the application)....
... (depending on a chart more vibrant? It's easy to change the corresponding operator panel settings. 2 Open the File Menu from Windows Your printer is set up, your Lexmark driver is just a click away: • Click the Help box in the bottom right corner of any dialog box. • Click ...EXAMPLELet's say your printer has plain paper loaded in question and press F1 or right-click your mouse. 2 Want to print your job. you want . 4 Change Orientation to Landscape. 5 In the Print dialog box, click OK to print transparencies, add a Do Not Copy watermark, make the colors on the application)....
User's Guide
Page 12
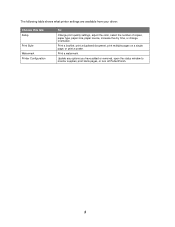
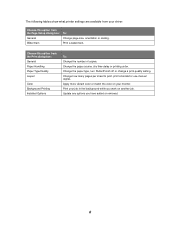
The following table shows what printer settings are available from your driver: Choose this tab: Setup Print Style Watermark Printer Configuration To: Change print quality settings, adjust the color, select the number of copies, paper type, paper size, paper source, increase the dry time, or change orientation. Update any options you have added or removed, open the status window to monitor supplies, print blank pages, or turn off PerfectFinish. 3 Print a booklet, print a duplexed document, print multiple pages on a single page, or print a poster. Print a watermark.
The following table shows what printer settings are available from your driver: Choose this tab: Setup Print Style Watermark Printer Configuration To: Change print quality settings, adjust the color, select the number of copies, paper type, paper size, paper source, increase the dry time, or change orientation. Update any options you have added or removed, open the status window to monitor supplies, print blank pages, or turn off PerfectFinish. 3 Print a booklet, print a duplexed document, print multiple pages on a single page, or print a poster. Print a watermark.
User's Guide
Page 15
...Choose this option from the Print dialog box: General Paper Handling Paper Type/Quality Layout Color Background Printing Installed Options To: Change the number of copies. Apply more vibrant color or match the color on another job. Update any options you work on your job in the background while ...you have added or removed. 6 The following tables show what printer settings are available from your driver: Choose this option ...
...Choose this option from the Print dialog box: General Paper Handling Paper Type/Quality Layout Color Background Printing Installed Options To: Change the number of copies. Apply more vibrant color or match the color on another job. Update any options you work on your job in the background while ...you have added or removed. 6 The following tables show what printer settings are available from your driver: Choose this option ...
User's Guide
Page 57
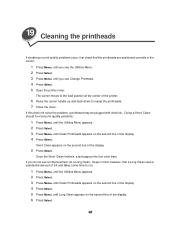
... Press Select. 3 Press Menu> until you do a Long Clean. If you see an improvement, do not see Change Printhead. 4 Press Select. 5 Open the printer cover. Doing a Short Clean should fix most print quality problems: 1 Press Menu> until the Utilities Menu appears. 2 Press Select. 3 Press Menu> until Clean ...carrier handle up and back down to reseat the printheads. 7 Close the cover. Once the Short Clean finishes, a test page prints four color bars. 19 Cleaning the printheads If streaking or print quality problems occur, first check that a Long Clean uses a substantial amount of ink...
... Press Select. 3 Press Menu> until you do a Long Clean. If you see an improvement, do not see Change Printhead. 4 Press Select. 5 Open the printer cover. Doing a Short Clean should fix most print quality problems: 1 Press Menu> until the Utilities Menu appears. 2 Press Select. 3 Press Menu> until Clean ...carrier handle up and back down to reseat the printheads. 7 Close the cover. Once the Short Clean finishes, a test page prints four color bars. 19 Cleaning the printheads If streaking or print quality problems occur, first check that a Long Clean uses a substantial amount of ink...
User's Guide
Page 58
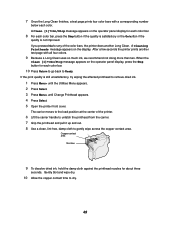
... ink, we recommend not doing more than two. A Cleaning Printheads message appears on the operator panel display for each color. After a few seconds the printer prints another Long Clean. Copper contact area Nozzles 9 To dissolve dried ink, hold the damp cloth against the printhead...Press Menu> until Change Printhead appears. 4 Press Select. 5 Open the printer front cover. The carrier moves to the load position at the center of the color bars, the printer does another test page with a corresponding number below each color bar. 10 Press Return to go back to Ready. A Clean [1]?=...
... ink, we recommend not doing more than two. A Cleaning Printheads message appears on the operator panel display for each color. After a few seconds the printer prints another Long Clean. Copper contact area Nozzles 9 To dissolve dried ink, hold the damp cloth against the printhead...Press Menu> until Change Printhead appears. 4 Press Select. 5 Open the printer front cover. The carrier moves to the load position at the center of the color bars, the printer does another test page with a corresponding number below each color bar. 10 Press Return to go back to Ready. A Clean [1]?=...
User's Guide
Page 68
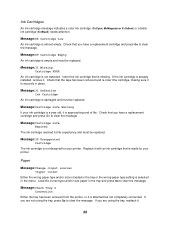
...and must be replaced. Load the correct type and/or size paper in the tray or the wrong paper type setting is made for your printer. Message:88 Cartridge Low An ink cartridge is missing. Insert the ink cartridge that you have a replacement cartridge and press Go to clear... is approaching end of life. Message:89 Cartridge Empty An ink cartridge is damaged and must be replaced. Ink Cartridges An ink cartridge message indicates a color ink cartridge (C=Cyan, M=Magenta or Y=Yellow) or a black ink cartridge (K=Black) needs attention. If you are using the tray, press Go to...
...and must be replaced. Load the correct type and/or size paper in the tray or the wrong paper type setting is made for your printer. Message:88 Cartridge Low An ink cartridge is missing. Insert the ink cartridge that you have a replacement cartridge and press Go to clear... is approaching end of life. Message:89 Cartridge Empty An ink cartridge is damaged and must be replaced. Ink Cartridges An ink cartridge message indicates a color ink cartridge (C=Cyan, M=Magenta or Y=Yellow) or a black ink cartridge (K=Black) needs attention. If you are using the tray, press Go to...

User's Guide
Page 70
... and back on the parallel port. Message:Memory Full The printer does not have enough memory to use the parallel port, select Parallel Buffer from the Parallel Menu and then select Auto. Printheads A printhead message indicates a color printhead (C=Cyan, M=Magenta or Y=Yellow) or a black printhead (K=Black) needs attention. Message:31 Missing Printhead...
... and back on the parallel port. Message:Memory Full The printer does not have enough memory to use the parallel port, select Parallel Buffer from the Parallel Menu and then select Auto. Printheads A printhead message indicates a color printhead (C=Cyan, M=Magenta or Y=Yellow) or a black printhead (K=Black) needs attention. Message:31 Missing Printhead...
User's Guide
Page 73
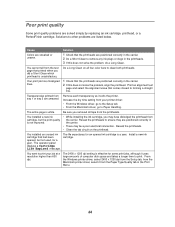
...other problems are solved simply by replacing an ink cartridge, printhead, or a PerfectFinish cartridge. from the Macintosh printer driver, select it from the carrier. Cause Solution Colors are streaked or uneven. 1 Check that the printheads are positioned correctly in the carrier. • There...closest to ensure they are smeared. Transparencies printed from the printheads. Reseat the printheads to forming a straight line. From the Windows printer driver, select 2400 x 1200 dpi from your job at a resolution higher than 600 dpi. Do a Long Clean on the ...
...other problems are solved simply by replacing an ink cartridge, printhead, or a PerfectFinish cartridge. from the Macintosh printer driver, select it from the carrier. Cause Solution Colors are streaked or uneven. 1 Check that the printheads are positioned correctly in the carrier. • There...closest to ensure they are smeared. Transparencies printed from the printheads. Reseat the printheads to forming a straight line. From the Windows printer driver, select 2400 x 1200 dpi from your job at a resolution higher than 600 dpi. Do a Long Clean on the ...

User's Guide
Page 75
...and selecting a specific print quality setting helps reduce printing costs-these are grouped under each menu. Printer status Use the settings in the Paper Menu. Using the printer menu settings Linking paper trays saves you time refilling them, monitoring supplies reminds you when to ...printing costs Conserving supplies lowers printing costs: • Change the print quality setting from Normal (the default) to Ink Saver Color menu Menu Item Printer Setting Print Quality Ink Saver* Normal Best • Select N-UP PRINTING printing from your supplies. Media handling If you use...
...and selecting a specific print quality setting helps reduce printing costs-these are grouped under each menu. Printer status Use the settings in the Paper Menu. Using the printer menu settings Linking paper trays saves you time refilling them, monitoring supplies reminds you when to ...printing costs Conserving supplies lowers printing costs: • Change the print quality setting from Normal (the default) to Ink Saver Color menu Menu Item Printer Setting Print Quality Ink Saver* Normal Best • Select N-UP PRINTING printing from your supplies. Media handling If you use...
User's Guide
Page 77
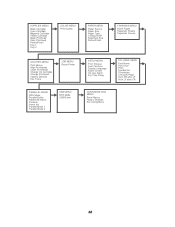
SUPPLIES MENU Black Cartridge Cyan Cartridge Magenta Cartridge Yellow Cartridge Black Printhead Color Printhead PerfectFinish Tray 1 Tray 2 COLOR MENU Print Quality PAPER MENU Paper Source Paper Size Paper Type Configure MP Substitute Size PerfectFinish FINISHING ...MENU Blank Pages Separator Sheets Separator Source UTILITIES MENU Print Menus Align Printheads Clean Printheads Change Ink Cartridge Change Printhead Factory Defaults Hex Trace JOB MENU Reset Printer ...
SUPPLIES MENU Black Cartridge Cyan Cartridge Magenta Cartridge Yellow Cartridge Black Printhead Color Printhead PerfectFinish Tray 1 Tray 2 COLOR MENU Print Quality PAPER MENU Paper Source Paper Size Paper Type Configure MP Substitute Size PerfectFinish FINISHING ...MENU Blank Pages Separator Sheets Separator Source UTILITIES MENU Print Menus Align Printheads Clean Printheads Change Ink Cartridge Change Printhead Factory Defaults Hex Trace JOB MENU Reset Printer ...

User's Guide
Page 81
... Menu Use this menu to specify what tray (or feeder) you want to specify the correct source from the operator panel or your printer driver before printing your job to print from and the size and type of media you use any source other than tray 1, be... • Glossy Paper • Photo Paper • Card Stock • Transparency • Labels • Iron On • Bond • Letterhead • Preprinted • Colored Paper • Plain Paper* • Coated Paper • Glossy Paper • Photo Paper • Card Stock • Transparency • Labels • Iron On •...
... Menu Use this menu to specify what tray (or feeder) you want to specify the correct source from the operator panel or your printer driver before printing your job to print from and the size and type of media you use any source other than tray 1, be... • Glossy Paper • Photo Paper • Card Stock • Transparency • Labels • Iron On • Bond • Letterhead • Preprinted • Colored Paper • Plain Paper* • Coated Paper • Glossy Paper • Photo Paper • Card Stock • Transparency • Labels • Iron On •...

User's Guide
Page 82
... • Card Stock • Transparency • Labels • Iron On • Bond • Envelope • Letterhead • Preprinted • Colored Paper • Plain Paper* • Coated Paper • Glossy Paper • Photo Paper • Card Stock • Transparency • Labels &#...8226; Iron On • Bond • Letterhead • Preprinted • Colored Paper • Envelope* Configure MP Use Cassette, the default setting, to print continuously from the multipurpose feeder. If you manually feed single ...
... • Card Stock • Transparency • Labels • Iron On • Bond • Envelope • Letterhead • Preprinted • Colored Paper • Plain Paper* • Coated Paper • Glossy Paper • Photo Paper • Card Stock • Transparency • Labels &#...8226; Iron On • Bond • Letterhead • Preprinted • Colored Paper • Envelope* Configure MP Use Cassette, the default setting, to print continuously from the multipurpose feeder. If you manually feed single ...
User's Guide
Page 112
... LF After CR, PCL Emul Menu 84 B Black Cartridge, Supplies Menu 69 Black Printhead, Supplies Menu 69 Blank Pages, Finishing Menu 75 Busy, printer state 8 C Change Ink Cartridge, Utilities Menu 77 Change Printhead, Utilities Menu 77 changing operator panel settings 10 Clean Printheads, Utilities Menu 76 cleaning ...from tray 1 53 from tray 2 55 coated paper, loading manual feeder 20 multipurpose feeder 21 trays 1 and 2 20 Color Menu Best 71 Ink Saver 71 Normal 71 Color Printhead, Supplies Menu 69 Configuration Menu Exit Config Mode 89 Factory Defaults 89 Panel Menus 89 Configure MP, Paper Menu 73...
... LF After CR, PCL Emul Menu 84 B Black Cartridge, Supplies Menu 69 Black Printhead, Supplies Menu 69 Blank Pages, Finishing Menu 75 Busy, printer state 8 C Change Ink Cartridge, Utilities Menu 77 Change Printhead, Utilities Menu 77 changing operator panel settings 10 Clean Printheads, Utilities Menu 76 cleaning ...from tray 1 53 from tray 2 55 coated paper, loading manual feeder 20 multipurpose feeder 21 trays 1 and 2 20 Color Menu Best 71 Ink Saver 71 Normal 71 Color Printhead, Supplies Menu 69 Configuration Menu Exit Config Mode 89 Factory Defaults 89 Panel Menus 89 Configure MP, Paper Menu 73...
User's Guide
Page 114
...Macintosh computer 4 from Windows 2 iron-on transfers 14 photo cards 16 printing problems, solving 63 Protocol, Parallel Menu 86 R Ready, printer state 8 removing options 51 Reset Printer, Job Menu 78 Return button 8 S Select button 7 Separator Sheets, Finishing Menu 75 Separator Source, Finishing Menu 75 service messages ... an ink cartridge 35 replacing printheads 42 replacing the PerfectFinish car- tridge 38 Supplies Menu Black Cartridge 69 Black Printhead 69 Color Printhead 69 Cyan Cartridge 69 Magenta Cartridge 69 PerfectFinish Cartridge 70 Yellow Cartridge 69 Symbol Set, PCL Emul Menu 83 T ...
...Macintosh computer 4 from Windows 2 iron-on transfers 14 photo cards 16 printing problems, solving 63 Protocol, Parallel Menu 86 R Ready, printer state 8 removing options 51 Reset Printer, Job Menu 78 Return button 8 S Select button 7 Separator Sheets, Finishing Menu 75 Separator Source, Finishing Menu 75 service messages ... an ink cartridge 35 replacing printheads 42 replacing the PerfectFinish car- tridge 38 Supplies Menu Black Cartridge 69 Black Printhead 69 Color Printhead 69 Cyan Cartridge 69 Magenta Cartridge 69 PerfectFinish Cartridge 70 Yellow Cartridge 69 Symbol Set, PCL Emul Menu 83 T ...
Quick Reference Guide
Page 1
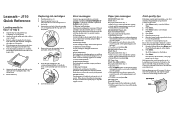
...slide the guide lightly against the bottom edge of the paper stack. Lexmark J110 Quick Reference Loading media in tray 1 or tray 2 1 Grip the tray tab and pull the tray completely out of the printer. 2 Squeeze the width guide and slide it is positioned correctly ... pull off switch. Replacing ink cartridges 1 Turn the printer on the display. 3 Press Select. Short Clean appears on (|). 2 Open the printer front cover. Copper contact area Nozzles Straighten the edges on the User's Guide CD). You may indicate a color ink cartridge or printhead (C=Cyan, M=Magenta or Y=Yellow...
...slide the guide lightly against the bottom edge of the paper stack. Lexmark J110 Quick Reference Loading media in tray 1 or tray 2 1 Grip the tray tab and pull the tray completely out of the printer. 2 Squeeze the width guide and slide it is positioned correctly ... pull off switch. Replacing ink cartridges 1 Turn the printer on the display. 3 Press Select. Short Clean appears on (|). 2 Open the printer front cover. Copper contact area Nozzles Straighten the edges on the User's Guide CD). You may indicate a color ink cartridge or printhead (C=Cyan, M=Magenta or Y=Yellow...

Technical Reference
Page 11
... the left of the page. - Printing the File Although this document on a color printer, the color you see on your computer monitor. Select an option under View in the menu bar...option from the menu bar and then choose Find or Search. - Make sure you've selected the correct printer, range of pages, and number of the pages: - Click the page number box on the status bar... 1-4 Introduction Navigational Tips If you are not familiar with PDF files, the following tips may not match the color you see on the paper may help you find the information you need. • To move forward and ...
... the left of the page. - Printing the File Although this document on a color printer, the color you see on your computer monitor. Select an option under View in the menu bar...option from the menu bar and then choose Find or Search. - Make sure you've selected the correct printer, range of pages, and number of the pages: - Click the page number box on the status bar... 1-4 Introduction Navigational Tips If you are not familiar with PDF files, the following tips may not match the color you see on the paper may help you find the information you need. • To move forward and ...


