User's Guide
Page 3
...cut form or envelope manually ...37 Aligning the left margin ...39 Setting Top-of-Form...40 Setting Top-Of-Form for continuous forms in push mode 40 Setting Top-Of-Form for continuous forms in pull mode 41 Setting Top-Of-Form for a cut form or an envelope ...41 Setting Top-Of-Form ...menu...50 Main menu options...50 Forms Macro options...51 Data options ...52 Control options...54 Emulation options ...55 Interface options...56 Maintaining the printer 57 Ordering supplies...57 Removing the ribbon cartridge...57 Cleaning the printer...57 Recycling Lexmark products...58 Administrative support 59 ...
...cut form or envelope manually ...37 Aligning the left margin ...39 Setting Top-of-Form...40 Setting Top-Of-Form for continuous forms in push mode 40 Setting Top-Of-Form for continuous forms in pull mode 41 Setting Top-Of-Form for a cut form or an envelope ...41 Setting Top-Of-Form ...menu...50 Main menu options...50 Forms Macro options...51 Data options ...52 Control options...54 Emulation options ...55 Interface options...56 Maintaining the printer 57 Ordering supplies...57 Removing the ribbon cartridge...57 Cleaning the printer...57 Recycling Lexmark products...58 Administrative support 59 ...
User's Guide
Page 8
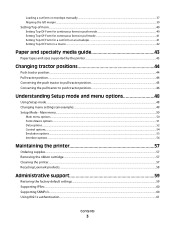
and wide-carriage models. Learning about the printer 8 Printer front view Part name 1 Forms thickness lever 2 Ribbon access cover 3 Power switch 4 Paper select lever 5 Paper guides 6 Manual feeder 7 Front cover 8 Control panel Learning about the printer Printer overview The LexmarkTM Forms Printer 2500 Series printers are available in 9- Depending on the model you have chosen, your printer may look slightly different from the printer illustrated. and 24-wire narrow-
and wide-carriage models. Learning about the printer 8 Printer front view Part name 1 Forms thickness lever 2 Ribbon access cover 3 Power switch 4 Paper select lever 5 Paper guides 6 Manual feeder 7 Front cover 8 Control panel Learning about the printer Printer overview The LexmarkTM Forms Printer 2500 Series printers are available in 9- Depending on the model you have chosen, your printer may look slightly different from the printer illustrated. and 24-wire narrow-
User's Guide
Page 11
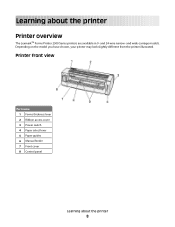
... a variety of symbols used , thus reducing costs Lets you turn the printer off unless it is set in the printer default settings. Loads and unloads continuous form paper (tractor fed) The printer has the capability of storing four unique document formats to various country languages ...function Control panel Font lock Pitch lock Load/Unload Macro function Manual front loading for cut sheets or envelopes • Assists in removing printed continuous forms at the perforation • Assists in tearing non-perforated forms • Reduces the amount of paper used in mathematical equations...
... a variety of symbols used , thus reducing costs Lets you turn the printer off unless it is set in the printer default settings. Loads and unloads continuous form paper (tractor fed) The printer has the capability of storing four unique document formats to various country languages ...function Control panel Font lock Pitch lock Load/Unload Macro function Manual front loading for cut sheets or envelopes • Assists in removing printed continuous forms at the perforation • Assists in tearing non-perforated forms • Reduces the amount of paper used in mathematical equations...
User's Guide
Page 13
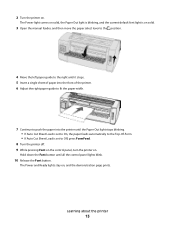
... Out light stops blinking. • If Auto Cut Sheet Load is set to Off, press FormFeed. 8 Turn the printer off. 9 While pressing Font on the control panel, turn the printer on solid. 3 Open the manual feeder, and then move the paper select lever to the position. 4 Move the left paper guide to the... right until it stops. 5 Insert a single sheet of paper into the front of the printer. 6 Adjust the right paper guide to fit the paper width. 7 Continue to the Top-Of-Form. •...
... Out light stops blinking. • If Auto Cut Sheet Load is set to Off, press FormFeed. 8 Turn the printer off. 9 While pressing Font on the control panel, turn the printer on solid. 3 Open the manual feeder, and then move the paper select lever to the position. 4 Move the left paper guide to the... right until it stops. 5 Insert a single sheet of paper into the front of the printer. 6 Adjust the right paper guide to fit the paper width. 7 Continue to the Top-Of-Form. •...

User's Guide
Page 25
... paper 25 You can set in Setup mode: • On-Sets the Tear Off function to move a continuous form automatically to the Tear Off position • Off-Lets you move a continuous form manually to the tear off position. Front loading paper Bottom loading paper Using the Tear Off function Pressing the Tear...paths for the pull tractor In these examples, the tractor pushes the paper from the front or the bottom of the printer. Front loading paper Rear loading paper Paper paths for the push tractor In these examples, the tractor pulls the paper from the front or the rear of the printer.
... paper 25 You can set in Setup mode: • On-Sets the Tear Off function to move a continuous form automatically to the Tear Off position • Off-Lets you move a continuous form manually to the tear off position. Front loading paper Bottom loading paper Using the Tear Off function Pressing the Tear...paths for the pull tractor In these examples, the tractor pushes the paper from the front or the bottom of the printer. Front loading paper Rear loading paper Paper paths for the push tractor In these examples, the tractor pulls the paper from the front or the rear of the printer.
User's Guide
Page 37
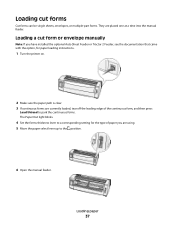
... the position. 6 Open the manual feeder. Loading paper 37 Loading cut form or envelope manually Note: If you have installed the optional Auto Sheet Feeder or Tractor 2 Feeder, see the documentation that came with the option, for paper loading instructions. 1 Turn the printer on. 2 Make sure the ...paper path is clear. 3 If continuous forms are currently ...
... the position. 6 Open the manual feeder. Loading paper 37 Loading cut form or envelope manually Note: If you have installed the optional Auto Sheet Feeder or Tractor 2 Feeder, see the documentation that came with the option, for paper loading instructions. 1 Turn the printer on. 2 Make sure the ...paper path is clear. 3 If continuous forms are currently ...

User's Guide
Page 39
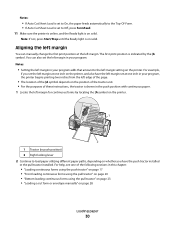
...the pull tractor" on page 29 • "Bottom loading continuous forms using the pull tractor" on page 32 • "Loading a cut form or envelope manually" on page 37 Loading paper 39 Notes: • Setting the left margin setting on the printer. Note: If not, press Start/Stop until the Ready light ...is on solid. You can manually change the first print position at one inch on...
...the pull tractor" on page 29 • "Bottom loading continuous forms using the pull tractor" on page 32 • "Loading a cut form or envelope manually" on page 37 Loading paper 39 Notes: • Setting the left margin setting on the printer. Note: If not, press Start/Stop until the Ready light ...is on solid. You can manually change the first print position at one inch on...
User's Guide
Page 41
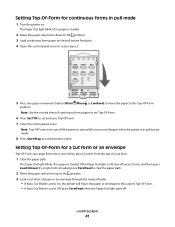
... to set Top-Of-Form. 6 Press Set TOF to set to On, the printer will move the paper to the Top-Of-Form position. If a single form is loaded. Loading paper 41 Note: Use the second sheet of paper or an envelope through the manual feeder. • If Auto Cut Sheet is off, tear off... excess forms, and then press Load/Unload.
... to set Top-Of-Form. 6 Press Set TOF to set to On, the printer will move the paper to the Top-Of-Form position. If a single form is loaded. Loading paper 41 Note: Use the second sheet of paper or an envelope through the manual feeder. • If Auto Cut Sheet is off, tear off... excess forms, and then press Load/Unload.
User's Guide
Page 43
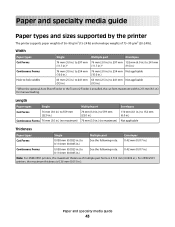
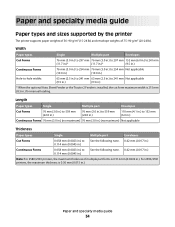
For 2590/2591 printers, the maximum thickness is 215 mm (8.5 in.) for manual loading. Width Paper types Single Multiple part Envelopes Cut Forms 76 mm (3.0 in.) to 297 mm 76 mm (3.0 in.) to 297 mm 152 mm (6.0 in.) to 241 mm (11.7 in.)* (11.7 in.)* (9.5 in.) Continuous Forms 76 mm (3.0 in.) ... and specialty media guide Paper types and sizes supported by the printer The printer supports paper weights of 56-90 g/m2 (15-24 lb) and envelope weights of multiple part forms is 0.512 mm (0.0202 in.). Length Paper types Single Cut Forms 76 mm (3.0 in.) to 559 mm (22.0 in.) Continuous...
For 2590/2591 printers, the maximum thickness is 215 mm (8.5 in.) for manual loading. Width Paper types Single Multiple part Envelopes Cut Forms 76 mm (3.0 in.) to 297 mm 76 mm (3.0 in.) to 297 mm 152 mm (6.0 in.) to 241 mm (11.7 in.)* (11.7 in.)* (9.5 in.) Continuous Forms 76 mm (3.0 in.) ... and specialty media guide Paper types and sizes supported by the printer The printer supports paper weights of 56-90 g/m2 (15-24 lb) and envelope weights of multiple part forms is 0.512 mm (0.0202 in.). Length Paper types Single Cut Forms 76 mm (3.0 in.) to 559 mm (22.0 in.) Continuous...
User's Guide
Page 52
... language code page configurations can be selected by holding down specific key combinations when the printer is turned on the Lexmark Web site at www.lexmark.com. - 437 is the factory default setting. • Form Length This option lets you set the left margin to any inch increment from 0" ...to 3". • Right Margin This option lets you can manually advance the perforation of a continuous form to a maximum...
... language code page configurations can be selected by holding down specific key combinations when the printer is turned on the Lexmark Web site at www.lexmark.com. - 437 is the factory default setting. • Form Length This option lets you set the left margin to any inch increment from 0" ...to 3". • Right Margin This option lets you can manually advance the perforation of a continuous form to a maximum...
Quick Reference
Page 3
... tractor 23 Loading cut forms...28 Loading a cut form or envelope manually ...28 Aligning the left margin ...30 Setting Top-of-Form...31 Setting Top-Of-Form for continuous forms in push mode 31 Setting Top-Of-Form for continuous forms in pull mode 32 Setting Top-Of-Form for a cut form or an envelope ...32... Setting Top-Of-Form in a macro ...33 Paper and specialty media guide 34 Paper types and sizes supported by the printer...34 ...
... tractor 23 Loading cut forms...28 Loading a cut form or envelope manually ...28 Aligning the left margin ...30 Setting Top-of-Form...31 Setting Top-Of-Form for continuous forms in push mode 31 Setting Top-Of-Form for continuous forms in pull mode 32 Setting Top-Of-Form for a cut form or an envelope ...32... Setting Top-Of-Form in a macro ...33 Paper and specialty media guide 34 Paper types and sizes supported by the printer...34 ...
Quick Reference
Page 5
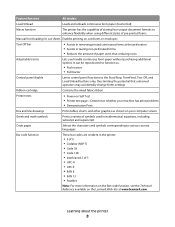
Printer front view 1 2 A 3 8 7 6 5 4 Part name 1 Forms thickness lever 2 Ribbon access cover 3 Power switch 4 Paper select lever 5 Paper guides 6 Manual feeder 7 Front cover 8 Control panel Learning about the printer Printer overview The LexmarkTM Forms Printer 2500 Series printers are available in 9- and 24-wire narrow- Learning about the printer 5 and wide-carriage models. Depending on the model you have chosen, your printer may look slightly different from the printer illustrated.
Printer front view 1 2 A 3 8 7 6 5 4 Part name 1 Forms thickness lever 2 Ribbon access cover 3 Power switch 4 Paper select lever 5 Paper guides 6 Manual feeder 7 Front cover 8 Control panel Learning about the printer Printer overview The LexmarkTM Forms Printer 2500 Series printers are available in 9- and 24-wire narrow- Learning about the printer 5 and wide-carriage models. Depending on the model you have chosen, your printer may look slightly different from the printer illustrated.
Quick Reference
Page 8
...function, see the Technical Reference available on cut sheets or envelopes Tear Off bar • Assists in removing printed continuous forms at www.lexmark.com. It can be repositioned to function as: • Push tractor • Pull tractor Control panel disable Limits ...Selects the characters and symbols corresponding to enhance flexibility when using different styles of pre-printed forms. Manual front loading for cut sheets Enables printing on the Lexmark Web site at the perforation • Assists in the printer: • 3 of 9 • Codabar (NW-7) • Code 39 •...
...function, see the Technical Reference available on cut sheets or envelopes Tear Off bar • Assists in removing printed continuous forms at www.lexmark.com. It can be repositioned to function as: • Push tractor • Pull tractor Control panel disable Limits ...Selects the characters and symbols corresponding to enhance flexibility when using different styles of pre-printed forms. Manual front loading for cut sheets Enables printing on the Lexmark Web site at the perforation • Assists in the printer: • 3 of 9 • Codabar (NW-7) • Code 39 •...

Quick Reference
Page 16
... the Auto Tear Off Setting in Setup mode: • On-Sets the Tear Off function to move a continuous form automatically to the Tear Off position • Off-Lets you move a continuous form manually to the tear off position. Note: The Tear Off function works only when the tractor unit is in the... 16 Paper paths Paper paths for the pull tractor In these examples, the tractor pushes the paper from the front or the bottom of the printer. For more information, see "Using Setup mode" on page 39. Front loading paper Bottom loading paper Using the Tear Off function Pressing the Tear...
... the Auto Tear Off Setting in Setup mode: • On-Sets the Tear Off function to move a continuous form automatically to the Tear Off position • Off-Lets you move a continuous form manually to the tear off position. Note: The Tear Off function works only when the tractor unit is in the... 16 Paper paths Paper paths for the pull tractor In these examples, the tractor pushes the paper from the front or the bottom of the printer. For more information, see "Using Setup mode" on page 39. Front loading paper Bottom loading paper Using the Tear Off function Pressing the Tear...

Quick Reference
Page 28
...the position. 6 Open the manual feeder. A Loading paper 28 Loading cut form or envelope manually Note: If you have installed the optional Auto Sheet Feeder or Tractor 2 Feeder, see the documentation that came with the option, for paper loading instructions. 1 Turn the printer on. 2 Make sure the... paper path is clear. 3 If continuous forms are currently ...
...the position. 6 Open the manual feeder. A Loading paper 28 Loading cut form or envelope manually Note: If you have installed the optional Auto Sheet Feeder or Tractor 2 Feeder, see the documentation that came with the option, for paper loading instructions. 1 Turn the printer on. 2 Make sure the... paper path is clear. 3 If continuous forms are currently ...
Quick Reference
Page 30
...: • If Auto Cut Sheet Load is set to On, the paper feeds automatically to the Top-Of-Form. • If Auto Cut Sheet Load is set to the left margin setting on the printer. Note: If not, press Start/Stop until the Ready light is on solid. Notes: • Setting the... the pull tractor" on page 23 • "Loading a cut form or envelope manually" on solid. For example, if you have the left margin set at the left margin in your program adds that amount to Off, press FormFeed. 11 Make sure the printer is online, and the Ready light is on page 28...
...: • If Auto Cut Sheet Load is set to On, the paper feeds automatically to the Top-Of-Form. • If Auto Cut Sheet Load is set to the left margin setting on the printer. Note: If not, press Start/Stop until the Ready light is on solid. Notes: • Setting the... the pull tractor" on page 23 • "Loading a cut form or envelope manually" on solid. For example, if you have the left margin set at the left margin in your program adds that amount to Off, press FormFeed. 11 Make sure the printer is online, and the Ready light is on page 28...

Quick Reference
Page 32
... move the paper or envelope to the current Top-Of-Form. • If Auto Cut Sheet is off, tear off . Note: Top-Of-Form is not saved if the printer is turned off or runs out of paper or an envelope through the manual feeder. • If Auto Cut Sheet is loaded, press FormFeed... to clear the paper path. 2 Move the paper select lever up to the position. 3 Load a cut form. 1 Clear the paper...
... move the paper or envelope to the current Top-Of-Form. • If Auto Cut Sheet is off, tear off . Note: Top-Of-Form is not saved if the printer is turned off or runs out of paper or an envelope through the manual feeder. • If Auto Cut Sheet is loaded, press FormFeed... to clear the paper path. 2 Move the paper select lever up to the position. 3 Load a cut form. 1 Clear the paper...
Quick Reference
Page 34
... specialty media guide Paper types and sizes supported by the printer The printer supports paper weights of 56-90 g/m2 (15-24 lb) and envelope weights of multiple part forms is 0.512 mm (0.0202 in.). Width Paper types Single Multiple part Envelopes Cut Forms 76 mm (3.0 in.) to 297 mm 76 mm (3.0 ...63 mm (2.5 in.) to See the following note. 0.42 mm (0.017 in.) 0.114 mm (0.0045 in .) for manual loading. Paper and specialty media guide 34 Length Paper types Single Multiple part Envelopes Cut Forms 76 mm (3.0 in.) to 559 mm (22.0 in.) 76 mm (3.0 in.) to 559 mm (22.0 in.) 110...
... specialty media guide Paper types and sizes supported by the printer The printer supports paper weights of 56-90 g/m2 (15-24 lb) and envelope weights of multiple part forms is 0.512 mm (0.0202 in.). Width Paper types Single Multiple part Envelopes Cut Forms 76 mm (3.0 in.) to 297 mm 76 mm (3.0 ...63 mm (2.5 in.) to See the following note. 0.42 mm (0.017 in.) 0.114 mm (0.0045 in .) for manual loading. Paper and specialty media guide 34 Length Paper types Single Multiple part Envelopes Cut Forms 76 mm (3.0 in.) to 559 mm (22.0 in.) 76 mm (3.0 in.) to 559 mm (22.0 in.) 110...

Quick Reference
Page 43
...from 4" to 3". • Right Margin This option lets you can use with the printer: Understanding Setup mode and menu options 43 Eastern European, Baltic, and Middle Eastern language code page configurations can manually advance the perforation of all default settings, press LineFeed from 3 to 6. Off-You... model, the maximum right margin is turned on the Lexmark Web site at www.lexmark.com. - 437 is installed. Paper Handling Options Use the following list items outline and explain the Data options and settings you set the form length (in an inch from the Main menu. To...
...from 4" to 3". • Right Margin This option lets you can use with the printer: Understanding Setup mode and menu options 43 Eastern European, Baltic, and Middle Eastern language code page configurations can manually advance the perforation of all default settings, press LineFeed from 3 to 6. Off-You... model, the maximum right margin is turned on the Lexmark Web site at www.lexmark.com. - 437 is installed. Paper Handling Options Use the following list items outline and explain the Data options and settings you set the form length (in an inch from the Main menu. To...


