Quick Reference
Page 1
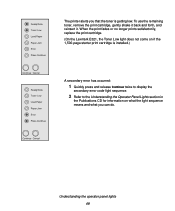
... may be warm) and cover it exits the optional 250-sheet tray into the printer: 1 Open the printer cover. 2 Remove the print cartridge (the print cartridge may damage the print cartridge. If the jam occurs just after the paper feeds from your software application. 8 Start your print job. Exposing...If the jam occurs as it . 1 If loading: • letterhead paper, insert letterhead face down , facing you . 4 Reinstall the print cartridge. 5 Close the printer cover to resume printing. 6 Press Continue to light may be hot! 4 If the media is inserted, the metal plate springs back up so ...
... may be warm) and cover it exits the optional 250-sheet tray into the printer: 1 Open the printer cover. 2 Remove the print cartridge (the print cartridge may damage the print cartridge. If the jam occurs just after the paper feeds from your software application. 8 Start your print job. Exposing...If the jam occurs as it . 1 If loading: • letterhead paper, insert letterhead face down , facing you . 4 Reinstall the print cartridge. 5 Close the printer cover to resume printing. 6 Press Continue to light may be hot! 4 If the media is inserted, the metal plate springs back up so ...
Quick Reference
Page 2
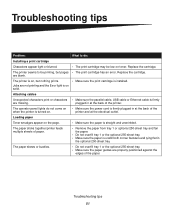
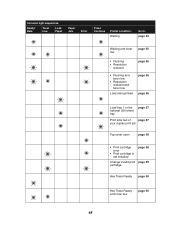
...reserved. When the Paper Jam light and the Press Continue lights are on solid, the printer detects a jam. Press Continue to resolve the problem. To use the remaining toner, remove the print cartridge, gently shake it back and forth, and reinsert it. When the Ready/Data light ...the Error light and Press Continue lights are on solid, a secondary error has occurred. Lexmark International, Inc. When the Load Paper light is blinking and the Press Continue light is on solid, the printer is data. waiting for more information about operator panel light sequences. © Copyright ...
...reserved. When the Paper Jam light and the Press Continue lights are on solid, the printer detects a jam. Press Continue to resolve the problem. To use the remaining toner, remove the print cartridge, gently shake it back and forth, and reinsert it. When the Ready/Data light ...the Error light and Press Continue lights are on solid, a secondary error has occurred. Lexmark International, Inc. When the Load Paper light is blinking and the Press Continue light is on solid, the printer is data. waiting for more information about operator panel light sequences. © Copyright ...
Setup Guide
Page 3
... overlay 2 Step 2: Install the optional 250-sheet drawer 3 Step 3: Install printer supplies 5 Installing the print cartridge 5 Step 4: Install memory cards 8 Removing the printer side cover 8 Removing the system board shield 10 Installing a memory card 10 Reinstalling the system board shield 12 Reattaching the printer side cover 13 Step 5: Load paper 14 Loading tray 1 15...
... overlay 2 Step 2: Install the optional 250-sheet drawer 3 Step 3: Install printer supplies 5 Installing the print cartridge 5 Step 4: Install memory cards 8 Removing the printer side cover 8 Removing the system board shield 10 Installing a memory card 10 Reinstalling the system board shield 12 Reattaching the printer side cover 13 Step 5: Load paper 14 Loading tray 1 15...

Setup Guide
Page 5
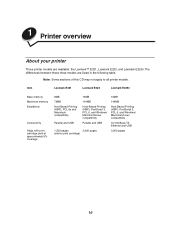
Feature Lexmark E321 Lexmark E323 Lexmark E323n Base memory Maximum memory Emulations Connectivity Ships with print cartridge yield at approximately 5% coverage 8MB 16MB 16MB 72MB 144MB 144MB PCL 5e, and Macintosh compatibility PostScript 3, PCL 6, and ...-TX Ethernet and USB 1,500 pages (starter 3,000 pages print cartridge) 3,000 pages Introduction vi The differences between these three models are listed in three models: the Lexmark™ E321, the Lexmark E323, and the Lexmark E323n. Introduction About the printer Your printer is available in the following table.
Feature Lexmark E321 Lexmark E323 Lexmark E323n Base memory Maximum memory Emulations Connectivity Ships with print cartridge yield at approximately 5% coverage 8MB 16MB 16MB 72MB 144MB 144MB PCL 5e, and Macintosh compatibility PostScript 3, PCL 6, and ...-TX Ethernet and USB 1,500 pages (starter 3,000 pages print cartridge) 3,000 pages Introduction vi The differences between these three models are listed in three models: the Lexmark™ E321, the Lexmark E323, and the Lexmark E323n. Introduction About the printer Your printer is available in the following table.
Setup Guide
Page 9
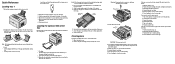
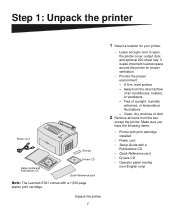
... CD Setup Guide and Publications CD Quick Reference card Note: The Lexmark E321 comes with a Publications CD • Quick Reference card • Drivers CD • Operator panel overlay (non-English only) Make sure you have the following items: • Printer with print cartridge installed • Power cord • Setup Guide with a 1,500-page starter...
... CD Setup Guide and Publications CD Quick Reference card Note: The Lexmark E321 comes with a Publications CD • Quick Reference card • Drivers CD • Operator panel overlay (non-English only) Make sure you have the following items: • Printer with print cartridge installed • Power cord • Setup Guide with a 1,500-page starter...
Setup Guide
Page 13
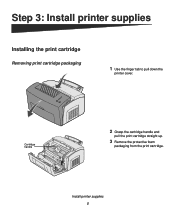
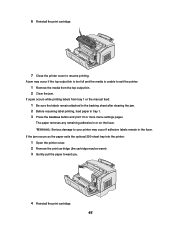
Cartridge handle 2 Grasp the cartridge handle and pull the print cartridge straight up. 3 Remove the protective foam packaging from the print cartridge. Install printer supplies 5 Step 3: Install printer supplies Installing the print cartridge Removing print cartridge packaging 1 Use the finger tab to pull down the printer cover.
Cartridge handle 2 Grasp the cartridge handle and pull the print cartridge straight up. 3 Remove the protective foam packaging from the print cartridge. Install printer supplies 5 Step 3: Install printer supplies Installing the print cartridge Removing print cartridge packaging 1 Use the finger tab to pull down the printer cover.
Setup Guide
Page 14
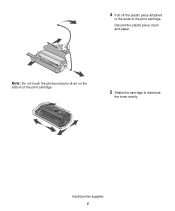
4 Pull off the plastic piece attached to the ends of the print cartridge. 5 Shake the cartridge to distribute the toner evenly. Install printer supplies 6 Discard the plastic piece, foam and paper. Note: Do not touch the photoconductor drum on the bottom of the print cartridge.
4 Pull off the plastic piece attached to the ends of the print cartridge. 5 Shake the cartridge to distribute the toner evenly. Install printer supplies 6 Discard the plastic piece, foam and paper. Note: Do not touch the photoconductor drum on the bottom of the print cartridge.
Setup Guide
Page 15
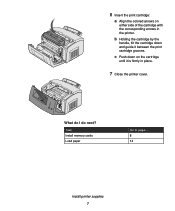
What do I do next? Task Install memory cards Load paper Go to page... 8 14 Install printer supplies 7 c Push down and guide it is firmly in the printer. 6 Insert the print cartridge: a Align the colored arrows on the cartridge until it between the print cartridge grooves. b Holding the cartridge by the handle, tilt the cartridge down on either side of the cartridge with the corresponding arrows in place. 7 Close the printer cover.
What do I do next? Task Install memory cards Load paper Go to page... 8 14 Install printer supplies 7 c Push down and guide it is firmly in the printer. 6 Insert the print cartridge: a Align the colored arrows on the cartridge until it between the print cartridge grooves. b Holding the cartridge by the handle, tilt the cartridge down on either side of the cartridge with the corresponding arrows in place. 7 Close the printer cover.
Setup Guide
Page 57
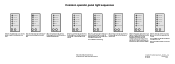
... and forth, and reinsert it. When the print fades or no longer prints satisfactorily, replace the print cartridge. (On the Lexmark E321, the Toner Low light does not come on if the 1,500-page starter print cartridge is installed.) A secondary error has occurred: 1 Quickly press and release Continue twice to display the secondary error... Toner Low Load Paper Paper Jam Error Press Continue Continue Cancel Ready/Data Toner Low Load Paper Paper Jam Error Press Continue Continue Cancel The printer alerts you can do.
... and forth, and reinsert it. When the print fades or no longer prints satisfactorily, replace the print cartridge. (On the Lexmark E321, the Toner Low light does not come on if the 1,500-page starter print cartridge is installed.) A secondary error has occurred: 1 Quickly press and release Continue twice to display the secondary error... Toner Low Load Paper Paper Jam Error Press Continue Continue Cancel Ready/Data Toner Low Load Paper Paper Jam Error Press Continue Continue Cancel The printer alerts you can do.
Setup Guide
Page 59
... be low on toner. The operator panel lights do : Installing a print cartridge Characters appear light or blurred. • The print cartridge may be printing, but nothing prints. • Make sure the print cartridge is straight and unwrinkled. Replace the cartridge. Jobs are missing. printer and at the back of paper. • Remove the paper from...
... be low on toner. The operator panel lights do : Installing a print cartridge Characters appear light or blurred. • The print cartridge may be printing, but nothing prints. • Make sure the print cartridge is straight and unwrinkled. Replace the cartridge. Jobs are missing. printer and at the back of paper. • Remove the paper from...

User's Reference
Page 4
...Manual feed 40 Clearing jams ...42 Chapter 4: Understanding the operator panel lights 47 Chapter 5: Understanding the printer configuration menus ....... 69 Printing the Printer Settings Configuration sheet 69 Configuration menus overview 69 Utilities menu 70 Setup menu 70 Parallel menu 71 USB ...menu 72 Using the Local Printer Setup Utility 74 Chapter 6: Maintenance 75 Conserving supplies 75 Ordering supplies 75 Recycling the print cartridge 76 Replacing the print cartridge 76 Removing the old print cartridge 76 Installing the new print cartridge 78 Chapter 7: Troubleshooting 80...
...Manual feed 40 Clearing jams ...42 Chapter 4: Understanding the operator panel lights 47 Chapter 5: Understanding the printer configuration menus ....... 69 Printing the Printer Settings Configuration sheet 69 Configuration menus overview 69 Utilities menu 70 Setup menu 70 Parallel menu 71 USB ...menu 72 Using the Local Printer Setup Utility 74 Chapter 6: Maintenance 75 Conserving supplies 75 Ordering supplies 75 Recycling the print cartridge 76 Replacing the print cartridge 76 Removing the old print cartridge 76 Installing the new print cartridge 78 Chapter 7: Troubleshooting 80...
User's Reference
Page 10
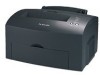
1 Printer overview About your printer Three printer models are available: the Lexmark™ E321, Lexmark E323, and Lexmark E323n.The differences between these three models are listed in the following table. Item Lexmark E321 Lexmark E323 Lexmark E323n Base memory Maximum memory Emulations Connectivity Ships with print cartridge yield at approximately 5% coverage 8MB 72MB Host-Based Printing (HBP), PCL 5e and Macintosh compatibility...
1 Printer overview About your printer Three printer models are available: the Lexmark™ E321, Lexmark E323, and Lexmark E323n.The differences between these three models are listed in the following table. Item Lexmark E321 Lexmark E323 Lexmark E323n Base memory Maximum memory Emulations Connectivity Ships with print cartridge yield at approximately 5% coverage 8MB 72MB Host-Based Printing (HBP), PCL 5e and Macintosh compatibility...

User's Reference
Page 13
... resume printing. prompts you to press the Continue button to receive and process data. detects a jam. is not installed. cover is open or the print cartridge is busy receiving or processing data. Ready/Data Toner Low Load Paper Paper Jam Error Press Continue Continue Cancel When the: Ready/Data light is... on Paper Jam light is on Error light is on Press Continue light is on Error light and Press Continue light are both on The printer: is getting low.
... resume printing. prompts you to press the Continue button to receive and process data. detects a jam. is not installed. cover is open or the print cartridge is busy receiving or processing data. Ready/Data Toner Low Load Paper Paper Jam Error Press Continue Continue Cancel When the: Ready/Data light is... on Paper Jam light is on Error light is on Press Continue light is on Error light and Press Continue light are both on The printer: is getting low.

User's Reference
Page 43
... sure there is no more media in a clean, dark place if you cannot get a grip on the bottom of time. Cover the cartridge or store it in the printer. 43 it may be damaged if it is exposed to light. Photoconductor drum 3 Gently pull out the media. Fuser Roller CAUTION: Avoid ...touching the fuser; 2 Remove the print cartridge (it may be hot! 4 If the media is jammed tightly behind the roller, or if you take it out of the printer for an extended period of the print...
... sure there is no more media in a clean, dark place if you cannot get a grip on the bottom of time. Cover the cartridge or store it in the printer. 43 it may be damaged if it is exposed to light. Photoconductor drum 3 Gently pull out the media. Fuser Roller CAUTION: Avoid ...touching the fuser; 2 Remove the print cartridge (it may be hot! 4 If the media is jammed tightly behind the roller, or if you take it out of the printer for an extended period of the print...
User's Reference
Page 44
...Be sure the labels remain attached to resume printing. If the jam occurs as the paper exits the optional 250-sheet tray into the printer: 1 Open the printer cover. 2 Remove the print cartridge (the cartridge may occur if the top output bin is too full and the media is unable to your... occur if adhesive labels remain in tray 1. 3 Press the Continue button and print 10 or more menu settings pages. 6 Reinstall the print cartridge. 7 Close the printer cover to the backing sheet after clearing the jam. 2 Before resuming label printing, load paper in the fuser. If a jam occurs while printing...
...Be sure the labels remain attached to resume printing. If the jam occurs as the paper exits the optional 250-sheet tray into the printer: 1 Open the printer cover. 2 Remove the print cartridge (the cartridge may occur if the top output bin is too full and the media is unable to your... occur if adhesive labels remain in tray 1. 3 Press the Continue button and print 10 or more menu settings pages. 6 Reinstall the print cartridge. 7 Close the printer cover to the backing sheet after clearing the jam. 2 Before resuming label printing, load paper in the fuser. If a jam occurs while printing...
User's Reference
Page 48
Common light sequences: Ready/ Data Toner Low Load Paper Paper Jam Error Press Continue Printer condition: Waiting Go to: page 54 Waiting and toner page 55 low • Flushing • Resolution reduced page 55 • Flushing and toner low • ... optional 250-sheet tray page 57 Print side two of page 57 your duplex print job Top cover open page 58 • Print cartridge error • Print cartridge is not installed page 58 Change invalid print page 59 cartridge Hex Trace Ready page 59 Hex Trace Ready and toner low page 60 48
Common light sequences: Ready/ Data Toner Low Load Paper Paper Jam Error Press Continue Printer condition: Waiting Go to: page 54 Waiting and toner page 55 low • Flushing • Resolution reduced page 55 • Flushing and toner low • ... optional 250-sheet tray page 57 Print side two of page 57 your duplex print job Top cover open page 58 • Print cartridge error • Print cartridge is not installed page 58 Change invalid print page 59 cartridge Hex Trace Ready page 59 Hex Trace Ready and toner low page 60 48
User's Reference
Page 51
...can do : • Send a print job. • Press and release Continue to print the menu settings pages for a list of current printer settings. • Remove the print cartridge and shake it can do : • Send a print job. • Press and release Continue to print the menu settings page for a... light sequence means: The printer is ready to receive and process data. What you want to change the Power Saver setting, it to extend the life of current printer settings. • Press and hold Cancel to reset the printer. In addition, the toner in the Lexmark E321. What you can only ...
...can do : • Send a print job. • Press and release Continue to print the menu settings pages for a list of current printer settings. • Remove the print cartridge and shake it can do : • Send a print job. • Press and release Continue to print the menu settings page for a... light sequence means: The printer is ready to receive and process data. What you want to change the Power Saver setting, it to extend the life of current printer settings. • Press and hold Cancel to reset the printer. In addition, the toner in the Lexmark E321. What you can only ...
User's Reference
Page 52
...ready to receive or process data, or the printer ports are offline. Ready/Data Toner Low Load Paper Paper Jam Error Press Continue Continue Cancel What this light sequence means: The printer is getting low. In addition, the toner in the print cartridge is not ready to receive or process data..., or the printer ports are offline. Ready/Data Toner Low Load Paper Paper Jam Error Press ...
...ready to receive or process data, or the printer ports are offline. Ready/Data Toner Low Load Paper Paper Jam Error Press Continue Continue Cancel What this light sequence means: The printer is getting low. In addition, the toner in the print cartridge is not ready to receive or process data..., or the printer ports are offline. Ready/Data Toner Low Load Paper Paper Jam Error Press ...
User's Reference
Page 54
... Jam Error Press Continue Continue Cancel What this light sequence means: The printer is getting low. In addition, the toner in the Lexmark E321. What this light sequence means: The printer is installed in the print cartridge is busy receiving or processing data, or printing a test page. What... you can do : • Remove the print cartridge and shake it receives additional data. What ...
... Jam Error Press Continue Continue Cancel What this light sequence means: The printer is getting low. In addition, the toner in the Lexmark E321. What this light sequence means: The printer is installed in the print cartridge is busy receiving or processing data, or printing a test page. What... you can do : • Remove the print cartridge and shake it receives additional data. What ...

User's Reference
Page 77
Note: We do not recommend refilling used . For best results, use genuine Lexmark supplies. 77 Photoconductor drum 3 Set the print cartridge aside. Print quality and printer reliability cannot be warm). 2 Grasp the cartridge handle and pull the print cartridge straight up (it may be guaranteed if third-party supplies are used printer cartridges or purchasing refilled cartridges from a third party. Note: Do not touch the photoconductor drum on the bottom of the print cartridge.
Note: We do not recommend refilling used . For best results, use genuine Lexmark supplies. 77 Photoconductor drum 3 Set the print cartridge aside. Print quality and printer reliability cannot be warm). 2 Grasp the cartridge handle and pull the print cartridge straight up (it may be guaranteed if third-party supplies are used printer cartridges or purchasing refilled cartridges from a third party. Note: Do not touch the photoconductor drum on the bottom of the print cartridge.


