
Setup Guide
Page 52
... or back • Make sure the paper is installed. plugged in at the wall outlet. Step 10: Troubleshooting tips Problem: What to be low on toner. The printer seems to do not come on • Make sure the power cord is firmly plugged in the optional tray... optional tray 2. • Make sure the paper is firmly are blank. of the paper. 42 Troubleshooting tips Replace the cartridge. The paper sticks together/printer feeds multiple sheets of the when the printer is on . Replace the cartridge. The operator panel lights do : Installing a print cartridge Characters appear...
... or back • Make sure the paper is installed. plugged in at the wall outlet. Step 10: Troubleshooting tips Problem: What to be low on toner. The printer seems to do not come on • Make sure the power cord is firmly plugged in the optional tray... optional tray 2. • Make sure the paper is firmly are blank. of the paper. 42 Troubleshooting tips Replace the cartridge. The paper sticks together/printer feeds multiple sheets of the when the printer is on . Replace the cartridge. The operator panel lights do : Installing a print cartridge Characters appear...

Setup Guide
Page 53
Troubleshooting tips 43 The paper fails to feed from tray 1. • Make sure tray 1 is under both corner bucklers. • Make sure the paper does not ... 1 and fan the paper. Problem: What to do: The paper fails to feed from the optional tray 2. • Make sure tray 2 is selected from the printer driver. • Make sure the tray is pushed all the way in. • Make sure the metal plate is pressed down. • Make sure the...
Troubleshooting tips 43 The paper fails to feed from tray 1. • Make sure tray 1 is under both corner bucklers. • Make sure the paper does not ... 1 and fan the paper. Problem: What to do: The paper fails to feed from the optional tray 2. • Make sure tray 2 is selected from the printer driver. • Make sure the tray is pushed all the way in. • Make sure the metal plate is pressed down. • Make sure the...

Setup Guide
Page 59
see the Publications CD T toner cartridge see print cartridge transparencies, loading 23, 25 tray 1, loading 21 tray 2, loading 27 troubleshooting attaching cables 42 installing a print cartridge 42 loading paper 42 paper jams see Publications CD or Quick Reference printing from the correct tray 43 restoring factory defaults see the Publications CD U unpacking the printer 1 USB cable 18 W warnings iii warranty 44 Web site, Lexmark x Windows printer drivers 39 Index 49
see the Publications CD T toner cartridge see print cartridge transparencies, loading 23, 25 tray 1, loading 21 tray 2, loading 27 troubleshooting attaching cables 42 installing a print cartridge 42 loading paper 42 paper jams see Publications CD or Quick Reference printing from the correct tray 43 restoring factory defaults see the Publications CD U unpacking the printer 1 USB cable 18 W warnings iii warranty 44 Web site, Lexmark x Windows printer drivers 39 Index 49

Online Information
Page 1
Print as book Printer overview Notices Other resources Navigation All rights reserved. Printing Paper handling Maintenance Troubleshooting Administration Index Lexmark E320/E322 Change your language www.lexmark.com Copyright © 2001 Lexmark International, Inc.
Print as book Printer overview Notices Other resources Navigation All rights reserved. Printing Paper handling Maintenance Troubleshooting Administration Index Lexmark E320/E322 Change your language www.lexmark.com Copyright © 2001 Lexmark International, Inc.

User's Guide
Page 4
... user defaults 77 Using the special function menu 77 Restoring factory defaults 78 Using Hex Trace mode 79 Using print quality test pages 80 Advanced troubleshooting mode 80 Chapter 20: Advanced troubleshooting 81 Chapter 21: Calling for service 89 ii
... user defaults 77 Using the special function menu 77 Restoring factory defaults 78 Using Hex Trace mode 79 Using print quality test pages 80 Advanced troubleshooting mode 80 Chapter 20: Advanced troubleshooting 81 Chapter 21: Calling for service 89 ii

User's Guide
Page 5
... (NDS 103 NPRINTER in IntraNetWare NDS 103 PSERVER in NetWare 3.x 105 Troubleshooting 105 Queue-based printing 105 AppleTalk ...106 Finding the default AppleTalk name 106 Creating a desktop printer icon 106 Changing the zone 107 Changing the printer name 107 Updating printer hardware 107 Troubleshooting 108 Print server light patterns 109 Normal conditions 109 Error conditions...
... (NDS 103 NPRINTER in IntraNetWare NDS 103 PSERVER in NetWare 3.x 105 Troubleshooting 105 Queue-based printing 105 AppleTalk ...106 Finding the default AppleTalk name 106 Creating a desktop printer icon 106 Changing the zone 107 Changing the printer name 107 Updating printer hardware 107 Troubleshooting 108 Print server light patterns 109 Normal conditions 109 Error conditions...

User's Guide
Page 56
...can do. Special function menu light sequences Ready/ Data Toner Low Load Paper Paper Jam Error Press Button Printer condition: Go to page: page 69 Insufficient printer memory page 69 Insufficient flash memory page 70 Error communicating page 70 with the host computer The following ... light sequences in the special function menu. Secondary error code light sequences Ready/ Data Toner Low Load Paper Paper Jam Error Press Button Printer condition: Font error Go to page: Restore factory defaults page 78, "Solving print quality problems" Hex Trace mode page 79, "Solving...
...can do. Special function menu light sequences Ready/ Data Toner Low Load Paper Paper Jam Error Press Button Printer condition: Go to page: page 69 Insufficient printer memory page 69 Insufficient flash memory page 70 Error communicating page 70 with the host computer The following ... light sequences in the special function menu. Secondary error code light sequences Ready/ Data Toner Low Load Paper Paper Jam Error Press Button Printer condition: Font error Go to page: Restore factory defaults page 78, "Solving print quality problems" Hex Trace mode page 79, "Solving...
User's Guide
Page 72
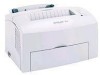
... button with a double-button press from the special function menu: The printer has insufficient memory to free up unused space in advanced troubleshooting mode. -Continued- 70 What you first turn the printer on. • The computer attempts to communicate with the printer through the parallel port, but the port setting has been disabled in...
... button with a double-button press from the special function menu: The printer has insufficient memory to free up unused space in advanced troubleshooting mode. -Continued- 70 What you first turn the printer on. • The computer attempts to communicate with the printer through the parallel port, but the port setting has been disabled in...
User's Guide
Page 73
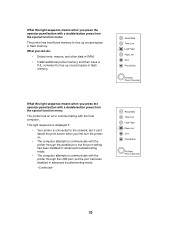
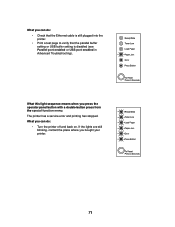
... with a double-button press from the special function menu: The printer has a service error and printing has stopped. What you can do : • Turn the printer off and back on. What this light sequence means when you bought your printer. 71 What you can do : • Check that the ...Ethernet cable is still plugged into the printer. • Print a test page to verify that the parallel buffer setting or USB buffer setting is disabled (see Parallel port enabled or USB port enabled in Advanced Troubleshooting).
... with a double-button press from the special function menu: The printer has a service error and printing has stopped. What you can do : • Turn the printer off and back on. What this light sequence means when you bought your printer. 71 What you can do : • Check that the ...Ethernet cable is still plugged into the printer. • Print a test page to verify that the parallel buffer setting or USB buffer setting is disabled (see Parallel port enabled or USB port enabled in Advanced Troubleshooting).

User's Guide
Page 79
...on. 4 When the Error light comes on . Resetting user defaults When formatting problems occur or unexpected characters print, try resetting the printer default settings to your user defaults. Press and hold the operator panel button until all of the lights come on , indicating the top... cover is open, press and release the operator panel button twice quickly (double-button press). 77 Using the special function menu Printer settings for solving print quality problems are found in the special function menu: restore factory defaults, Hex Trace, print quality test pages, and advanced...
...on. 4 When the Error light comes on . Resetting user defaults When formatting problems occur or unexpected characters print, try resetting the printer default settings to your user defaults. Press and hold the operator panel button until all of the lights come on , indicating the top... cover is open, press and release the operator panel button twice quickly (double-button press). 77 Using the special function menu Printer settings for solving print quality problems are found in the special function menu: restore factory defaults, Hex Trace, print quality test pages, and advanced...

User's Guide
Page 82
Once the paper exits into the output bin, the printer returns to the Ready state. 4 Use the test pages to "Advanced troubleshooting" for solutions to these problems. 5 To exit print quality test pages, press the operator panel button with a long button press (hold until all the lights... operator panel button with a long button press (hold until all the lights come on . Three pages print to initiate Print Quality Test Pages. Advanced troubleshooting mode Go to isolate problems such as print is black. The first page has registration marks, the second page is gray, and the third page...
Once the paper exits into the output bin, the printer returns to the Ready state. 4 Use the test pages to "Advanced troubleshooting" for solutions to these problems. 5 To exit print quality test pages, press the operator panel button with a long button press (hold until all the lights... operator panel button with a long button press (hold until all the lights come on . Three pages print to initiate Print Quality Test Pages. Advanced troubleshooting mode Go to isolate problems such as print is black. The first page has registration marks, the second page is gray, and the third page...
User's Guide
Page 83
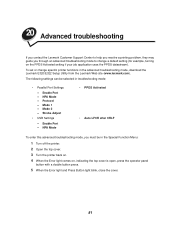
... Center to help you resolve a printing problem, they may guide you must be selected in the advanced troubleshooting mode, download the Lexmark E320/E322 Setup Utility from the Lexmark Web site (www.lexmark.com). Mode 1 - To set or change a default setting (for example, turning on , indicating ...; USB Settings - Mode 2 - NPA Mode • PPDS Activated • Auto LFCR after CRLF To enter this advanced troubleshooting mode, you through an advanced troubleshooting mode to change specific printer functions in troubleshooting mode: • Parallel Port Settings - Enable Port -
... Center to help you resolve a printing problem, they may guide you must be selected in the advanced troubleshooting mode, download the Lexmark E320/E322 Setup Utility from the Lexmark Web site (www.lexmark.com). Mode 1 - To set or change a default setting (for example, turning on , indicating ...; USB Settings - Mode 2 - NPA Mode • PPDS Activated • Auto LFCR after CRLF To enter this advanced troubleshooting mode, you through an advanced troubleshooting mode to change specific printer functions in troubleshooting mode: • Parallel Port Settings - Enable Port -

User's Guide
Page 84
This illustration represents the operator panel settings in the advanced troubleshooting mode, the operator panel lights take on new meanings based on . 82 When the printer is in the advanced troubleshooting mode when an operator panel light is on their function. 6 Press and release the operator panel button twice quickly (double-button press) until the Load Paper light comes on and the two bottom lights blink. 7 Press the operator panel until all the lights come on to initiate the advanced troubleshooting mode.
This illustration represents the operator panel settings in the advanced troubleshooting mode, the operator panel lights take on new meanings based on . 82 When the printer is in the advanced troubleshooting mode when an operator panel light is on their function. 6 Press and release the operator panel button twice quickly (double-button press) until the Load Paper light comes on and the two bottom lights blink. 7 Press the operator panel until all the lights come on to initiate the advanced troubleshooting mode.

User's Guide
Page 85
... free up memory: • Press the operator panel button with a brief button press to exit the advanced troubleshooting mode. 83 This light sequence in advanced troubleshooting mode: Corresponds to this setting: For E320 and E322 printers, Parallel Port Enabled is set to select and save the Off setting. As the setting is blinking. The...
... free up memory: • Press the operator panel button with a brief button press to exit the advanced troubleshooting mode. 83 This light sequence in advanced troubleshooting mode: Corresponds to this setting: For E320 and E322 printers, Parallel Port Enabled is set to select and save the Off setting. As the setting is blinking. The...

User's Guide
Page 86
...with a long button press to scroll through the settings (Off, On, Auto). For E320 and E322 printers, Parallel Protocol is set to exit the advanced troubleshooting mode. 84 Turn off the printer to Auto, the factory default. To change the setting to Standard, press the operator ... a double button press. Turn off the printer to Fastbytes, the factory default. This light sequence in advanced troubleshooting mode: Corresponds to this setting: For E320 and E322 printers, Parallel NPA Mode is set to exit the advanced troubleshooting mode. When the protocol is set to the...
...with a long button press to scroll through the settings (Off, On, Auto). For E320 and E322 printers, Parallel Protocol is set to exit the advanced troubleshooting mode. 84 Turn off the printer to Auto, the factory default. To change the setting to Standard, press the operator ... a double button press. Turn off the printer to Fastbytes, the factory default. This light sequence in advanced troubleshooting mode: Corresponds to this setting: For E320 and E322 printers, Parallel NPA Mode is set to exit the advanced troubleshooting mode. When the protocol is set to the...

User's Guide
Page 87
... button with a double button press to scroll to the next menu item, Parallel Strobe Adjust. To turn off the printer to exit the advanced troubleshooting mode. It is saved, all operator panel lights remain on for computers that have open collector outputs on the leading edge... Mode 2. • Turn off this setting: For E320 and E322 printers, Parallel Mode 1 is set to On, the factory default. For E320 and E322 printers, Parallel Mode 2 is set to On, the factory default. This light sequence in advanced troubleshooting mode: Corresponds to this setting, press the operator panel...
... button with a double button press to scroll to the next menu item, Parallel Strobe Adjust. To turn off the printer to exit the advanced troubleshooting mode. It is saved, all operator panel lights remain on for computers that have open collector outputs on the leading edge... Mode 2. • Turn off this setting: For E320 and E322 printers, Parallel Mode 1 is set to On, the factory default. For E320 and E322 printers, Parallel Mode 2 is set to On, the factory default. This light sequence in advanced troubleshooting mode: Corresponds to this setting, press the operator panel...

User's Guide
Page 88
...• Press the operator panel button with a double button press to scroll to the next menu item, USB NPA Mode. Turn off the printer to exit the advanced troubleshooting mode. As the setting is set to Off (0), the factory default. Press the operator panel button with a double button press to scroll to... the next menu item, USB Port Enabled. This light sequence in advanced troubleshooting mode: Corresponds to this setting: For E320 and E322 printers, Parallel Strobe Adjust is set to Auto, the factory default.
...• Press the operator panel button with a double button press to scroll to the next menu item, USB NPA Mode. Turn off the printer to exit the advanced troubleshooting mode. As the setting is set to Off (0), the factory default. Press the operator panel button with a double button press to scroll to... the next menu item, USB Port Enabled. This light sequence in advanced troubleshooting mode: Corresponds to this setting: For E320 and E322 printers, Parallel Strobe Adjust is set to Auto, the factory default.

User's Guide
Page 89
As the setting is set to exit the advanced troubleshooting mode. Press the operator panel button with a double button press to scroll back to scroll through the settings (Off, On, Auto). For E322 and E322n printers, PPDS Activated is saved, all operator panel lights remain on for approximately 2 seconds • Press the operator...
As the setting is set to exit the advanced troubleshooting mode. Press the operator panel button with a double button press to scroll back to scroll through the settings (Off, On, Auto). For E322 and E322n printers, PPDS Activated is saved, all operator panel lights remain on for approximately 2 seconds • Press the operator...

User's Guide
Page 90
Use this setting: Auto CRLF/LFCR is set to Off, the factory default. How the printer formats the end of a line depends on , Auto CR after LF is On and Auto LF after CR is Off. • If the Press Button ... panel button with a double button press to scroll to the next menu item, Parallel Mode 1. This light sequence in advanced troubleshooting mode: Corresponds to this setting to select whether or not the printer automatically performs a carriage return (CR) after a line feed (LF) or a line feed after a carriage return. • If the Press...
Use this setting: Auto CRLF/LFCR is set to Off, the factory default. How the printer formats the end of a line depends on , Auto CR after LF is On and Auto LF after CR is Off. • If the Press Button ... panel button with a double button press to scroll to the next menu item, Parallel Mode 1. This light sequence in advanced troubleshooting mode: Corresponds to this setting to select whether or not the printer automatically performs a carriage return (CR) after a line feed (LF) or a line feed after a carriage return. • If the Press...

User's Guide
Page 94
... computer that the TCP/IP protocol is turned on (activated). ping 157.184.8.231 92 Installation 1 Launch the drivers CD. 2 Click Install Software, Printer Software. 3 Click Custom Install when you see if there is an IP address listed for the print server and that is 9000. 4 Follow the ...operator panel button with a print server on the screen to access the print server. Troubleshooting If you use the IPX protocol to see this method, you add a static entry to print a network settings page. Select the printer and then select the TCP/IP task. If TCP/IP is not supported.) Then...
... computer that the TCP/IP protocol is turned on (activated). ping 157.184.8.231 92 Installation 1 Launch the drivers CD. 2 Click Install Software, Printer Software. 3 Click Custom Install when you see if there is an IP address listed for the print server and that is 9000. 4 Follow the ...operator panel button with a print server on the screen to access the print server. Troubleshooting If you use the IPX protocol to see this method, you add a static entry to print a network settings page. Select the printer and then select the TCP/IP task. If TCP/IP is not supported.) Then...
