User's Guide
Page 45
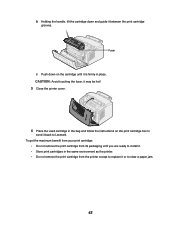
... print cartridge grooves. b Holding the handle, tilt the cartridge down on the print cartridge box to send it or to Lexmark. CAUTION: Avoid touching the fuser, it may be hot! 5 Close the printer cover. 6 Place the used cartridge in place. To get the maximum benefit from your print cartridge: • Do not remove... bag and follow the instructions on the cartridge until you are ready to install it. • Store print cartridges in the same environment as the printer. • Do not remove the print cartridge from the printer except to replace it back to clear a paper jam. 43
... print cartridge grooves. b Holding the handle, tilt the cartridge down on the print cartridge box to send it or to Lexmark. CAUTION: Avoid touching the fuser, it may be hot! 5 Close the printer cover. 6 Place the used cartridge in place. To get the maximum benefit from your print cartridge: • Do not remove... bag and follow the instructions on the cartridge until you are ready to install it. • Store print cartridges in the same environment as the printer. • Do not remove the print cartridge from the printer except to replace it back to clear a paper jam. 43

User's Guide
Page 49
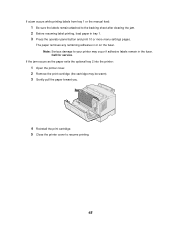
... occurs in the fuser: 1 Open the printer cover. 2 Remove the print cartridge (it may occur if the output bin is too full and the media is unable to exit the printer: 1 Empty the media from the printer, cover it or store it may damage the print cartridge. Fuser Roller CAUTION: Avoid... touching the fuser, it in the printer. 6 Reinstall the print cartridge. 7 Close the printer cover to light may be warm). A jam may...
... occurs in the fuser: 1 Open the printer cover. 2 Remove the print cartridge (it may occur if the output bin is too full and the media is unable to exit the printer: 1 Empty the media from the printer, cover it or store it may damage the print cartridge. Fuser Roller CAUTION: Avoid... touching the fuser, it in the printer. 6 Reinstall the print cartridge. 7 Close the printer cover to light may be warm). A jam may...
User's Guide
Page 50
... be warm). 3 Gently pull the paper toward you. 4 Reinstall the print cartridge. 5 Close the printer cover to the backing sheet after clearing the jam. 2 Before resuming label printing, load paper in tray 1. 3 Press the operator panel button and print 10 ... the jam occurs as the paper exits the optional tray 2 into the printer: 1 Open the printer cover. 2 Remove the print cartridge (the cartridge may occur if adhesive labels remain in or on the fuser. The paper removes any remaining adhesive in the fuser. If a jam occurs while printing labels from tray 1 or the manual...
... be warm). 3 Gently pull the paper toward you. 4 Reinstall the print cartridge. 5 Close the printer cover to the backing sheet after clearing the jam. 2 Before resuming label printing, load paper in tray 1. 3 Press the operator panel button and print 10 ... the jam occurs as the paper exits the optional tray 2 into the printer: 1 Open the printer cover. 2 Remove the print cartridge (the cartridge may occur if adhesive labels remain in or on the fuser. The paper removes any remaining adhesive in the fuser. If a jam occurs while printing labels from tray 1 or the manual...

Quick Reference Guide
Page 1
...cartridge. Note: Exposing the photoconductor to resume printing. Loading the optional tray 2 Grasp the tabs on the printer. 6 Resend your print job. Fuser Roller Caution! The fuser may cause paper feed problems and jams. 3 Load: • letterhead paper with the top of the ...page pointing down , with the top of the printer. 1 If loading: • letterhead paper, insert letterhead face down before inserting it . Lexmark™ E320/E322...
...cartridge. Note: Exposing the photoconductor to resume printing. Loading the optional tray 2 Grasp the tabs on the printer. 6 Resend your print job. Fuser Roller Caution! The fuser may cause paper feed problems and jams. 3 Load: • letterhead paper with the top of the ...page pointing down , with the top of the printer. 1 If loading: • letterhead paper, insert letterhead face down before inserting it . Lexmark™ E320/E322...
Technical Reference
Page 160
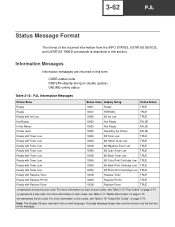
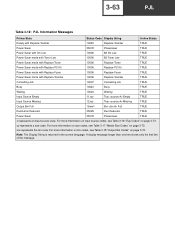
... represents the bin code. Note: The Display String is described in double quotes) ONLINE=online status Table 3-12: PJL Information Messages Printer State Status Code Display String Online Status Ready 10001 Ready TRUE Ready 10001 RDYMSG TRUE Ready with Ink Low 10006 88 Ink Low TRUE...Cartridge Low TRUE Ready with Replace Toner 10006 Replace Toner TRUE Ready with Replace PC Kit 10006 Replace PC Kit TRUE Ready with Replace Fuser 10006 Replace Fuser TRUE x represents an input source code. For more information on input source codes, see Table 3-18 "Output Bin Codes" on...
... represents the bin code. Note: The Display String is described in double quotes) ONLINE=online status Table 3-12: PJL Information Messages Printer State Status Code Display String Online Status Ready 10001 Ready TRUE Ready 10001 RDYMSG TRUE Ready with Ink Low 10006 88 Ink Low TRUE...Cartridge Low TRUE Ready with Replace Toner 10006 Replace Toner TRUE Ready with Replace PC Kit 10006 Replace PC Kit TRUE Ready with Replace Fuser 10006 Replace Fuser TRUE x represents an input source code. For more information on input source codes, see Table 3-18 "Output Bin Codes" on...
Technical Reference
Page 161
...on input source codes, see Table 3-18 "Output Bin Codes" on page 3-74. 3-63 PJL Table 3-12: PJL Information Messages Printer State Status Code Display String Online Status Ready with Replace Transfer 10006 Replace Transfer TRUE Power Saver 35078 Powersaver TRUE Power Saver with Ink Low...10006 Replace Toner TRUE Power Saver mode with Replace PC Kit 10006 Replace PC Kit TRUE Power Saver mode with Replace Fuser 10006 Replace Fuser TRUE Power Saver mode with Replace Transfer 10006 Replace Transfer TRUE Cancelling Job 10007 Cancelling Job TRUE Busy 10023 Busy TRUE...
...on input source codes, see Table 3-18 "Output Bin Codes" on page 3-74. 3-63 PJL Table 3-12: PJL Information Messages Printer State Status Code Display String Online Status Ready with Replace Transfer 10006 Replace Transfer TRUE Power Saver 35078 Powersaver TRUE Power Saver with Ink Low...10006 Replace Toner TRUE Power Saver mode with Replace PC Kit 10006 Replace PC Kit TRUE Power Saver mode with Replace Fuser 10006 Replace Fuser TRUE Power Saver mode with Replace Transfer 10006 Replace Transfer TRUE Cancelling Job 10007 Cancelling Job TRUE Busy 10023 Busy TRUE...

Technical Reference
Page 165
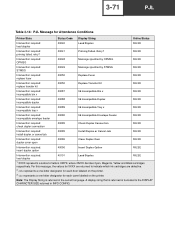
...80 Scheduled Maintenance FALSE Intervention required: scheduled maintenance 35075 81 Scheduled Maintenance FALSE Intervention required: fuser maintenance 40038 80 Fuser Maintanance FALSE Intervention required: ITU maintenance 40038 83 ITU Maintanance FALSE Note: The Display ...String is returned in double quotes) ONLINE=online status To determine which messages your printer supports, see Table B-11: "PJL Messages for Auto-Continuable Conditions (Continued) Printer...
...80 Scheduled Maintenance FALSE Intervention required: scheduled maintenance 35075 81 Scheduled Maintenance FALSE Intervention required: fuser maintenance 40038 80 Fuser Maintanance FALSE Intervention required: ITU maintenance 40038 83 ITU Maintanance FALSE Note: The Display ...String is returned in double quotes) ONLINE=online status To determine which messages your printer supports, see Table B-11: "PJL Messages for Auto-Continuable Conditions (Continued) Printer...
Technical Reference
Page 169
... Message specified by OPMSG FALSE Intervention required: STMSG 40049 Message specified by STMSG FALSE Intervention required: replace fuser 40050 Replace Fuser FALSE Intervention required: replace transfer kit 40050 Replace Transfer Kit FALSE Intervention required: incompatible bin x 40087 ... cartridges are defective. 2 represents a one-letter designator for each door labeled on the printer. 3 represents a one-letter designator for Attendance Conditions Printer State Status Code Display String Online Status Intervention required: load staples 40040 Load Staples FALSE...
... Message specified by OPMSG FALSE Intervention required: STMSG 40049 Message specified by STMSG FALSE Intervention required: replace fuser 40050 Replace Fuser FALSE Intervention required: replace transfer kit 40050 Replace Transfer Kit FALSE Intervention required: incompatible bin x 40087 ... cartridges are defective. 2 represents a one-letter designator for each door labeled on the printer. 3 represents a one-letter designator for Attendance Conditions Printer State Status Code Display String Online Status Intervention required: load staples 40040 Load Staples FALSE...
Technical Reference
Page 331
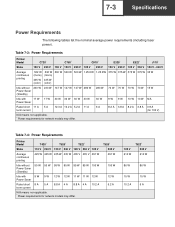
Table 7-4: Power Requirements Printer Model T420* T520* T522* State 110 V 230 V 120 V 230 V 120 V 230 V 120 V Average continuous printing 425 W 425 W 435 W 435 W 435 V 435 V 491 W Idle ... W T622* 230 V 614 W 86 W 86 W 15 W 10.2 A 15 W 5 A 7-3 Specifications Power Requirements The following tables list the nominal average power requirements (including fuser power). Table 7-3: Power Requirements Printer Model C720* C750* C910* E320* E322* J110* State 120 V 230 V 100 V 120 V 230 V 120 V 230 V 120 V 230 V 120 V 230 V 100 V - 240 V Average continuous printing ...
Table 7-4: Power Requirements Printer Model T420* T520* T522* State 110 V 230 V 120 V 230 V 120 V 230 V 120 V Average continuous printing 425 W 425 W 435 W 435 W 435 V 435 V 491 W Idle ... W T622* 230 V 614 W 86 W 86 W 15 W 10.2 A 15 W 5 A 7-3 Specifications Power Requirements The following tables list the nominal average power requirements (including fuser power). Table 7-3: Power Requirements Printer Model C720* C750* C910* E320* E322* J110* State 120 V 230 V 100 V 120 V 230 V 120 V 230 V 120 V 230 V 120 V 230 V 100 V - 240 V Average continuous printing ...
Technical Reference
Page 421
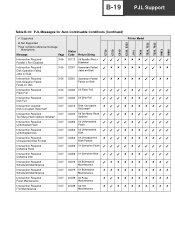
... 35075 80 Scheduled Maintenance Intervention Required Scheduled Maintenance 3-67 35075 81 Scheduled Maintenance Intervention Required Fuser Maintenance 3-67 40038 80 Fuser Maintenance Intervention Required ITU Maintenance 3-67 40038 83 ITU Maintenance B-19 PJL Support C720 C750 C910 E320, E322 J110 T420 T520, T522 T620, T622 W812 W820 Table B-10: PJL Messages for Auto...
... 35075 80 Scheduled Maintenance Intervention Required Scheduled Maintenance 3-67 35075 81 Scheduled Maintenance Intervention Required Fuser Maintenance 3-67 40038 80 Fuser Maintenance Intervention Required ITU Maintenance 3-67 40038 83 ITU Maintenance B-19 PJL Support C720 C750 C910 E320, E322 J110 T420 T520, T522 T620, T622 W812 W820 Table B-10: PJL Messages for Auto...

Technical Reference
Page 425
...Staples Intervention Required - 3-71 Priming Failed. Retry? Intervention Required - 3-71 OPMSG Intervention Required - 3-71 STMSG Intervention Required - 3-71 Replace Fuser Intervention Required - 3-71 Replace Transfer Kit Intervention Required - 3-71 Incompatible Bin x Intervention Required - 3-71 Incompatible Duplex Intervention Required - 3-... Check Duplex Connection Install Duplex or Cancel Job Close Duplex Door Insert Duplex Option Load Staples Printer Model B-23 PJL Support C720 C750 C910 E320, E322 J110 T420 T520, T522 T620, T622 W812 W820 Table B-11: PJL Messages for...
...Staples Intervention Required - 3-71 Priming Failed. Retry? Intervention Required - 3-71 OPMSG Intervention Required - 3-71 STMSG Intervention Required - 3-71 Replace Fuser Intervention Required - 3-71 Replace Transfer Kit Intervention Required - 3-71 Incompatible Bin x Intervention Required - 3-71 Incompatible Duplex Intervention Required - 3-... Check Duplex Connection Install Duplex or Cancel Job Close Duplex Door Insert Duplex Option Load Staples Printer Model B-23 PJL Support C720 C750 C910 E320, E322 J110 T420 T520, T522 T620, T622 W812 W820 Table B-11: PJL Messages for...
Technical Reference
Page 466
... 3-79 295 Paper Jam 3-79 Priming Failed. Retry? 3-71 Reattach Bins 3-69 Reattach Envelope Feeder 3-69 Reattach MP Feeder 3-69 Reattach Output Bin 3-69 Replace Fuser 3-71 Replace PC Kit 3-70 Replace PC Kit To Continue 3-70 Replace Toner Cartridge 3-70 Replace Toner Cartridge To Continue
... 3-79 295 Paper Jam 3-79 Priming Failed. Retry? 3-71 Reattach Bins 3-69 Reattach Envelope Feeder 3-69 Reattach MP Feeder 3-69 Reattach Output Bin 3-69 Replace Fuser 3-71 Replace PC Kit 3-70 Replace PC Kit To Continue 3-70 Replace Toner Cartridge 3-70 Replace Toner Cartridge To Continue

Technical Reference
Page 468
...3-63 RDYMSG 3-62 Ready 3-62 Ready with 88 Ink Low 3-62 Replace Fuser 3-62, 3-63 Replace PC Kit 3-62, 3-63 Replace Toner 3-62, 3-63 Replace Transfer 3-63 Res Reduced 3-63 Resetting the Printer 3-62 Tray Empty 3-63 Tray Missing 3-63 Waiting 3-63 status messages and... codes 3-62 variable categories 3-7 common variables all printer languages 3-12 PCL emulation 3-48 PostScript emulation 3-51 printer unique all printer languages 3-19 LRESOURCE 3-52 PCL emulation 3-49 PostScript emulation 3-52 variables AUTOCONT 3-12 BINDING 3-12 BITSPERPIXEL ...
...3-63 RDYMSG 3-62 Ready 3-62 Ready with 88 Ink Low 3-62 Replace Fuser 3-62, 3-63 Replace PC Kit 3-62, 3-63 Replace Toner 3-62, 3-63 Replace Transfer 3-63 Res Reduced 3-63 Resetting the Printer 3-62 Tray Empty 3-63 Tray Missing 3-63 Waiting 3-63 status messages and... codes 3-62 variable categories 3-7 common variables all printer languages 3-12 PCL emulation 3-48 PostScript emulation 3-51 printer unique all printer languages 3-19 LRESOURCE 3-52 PCL emulation 3-49 PostScript emulation 3-52 variables AUTOCONT 3-12 BINDING 3-12 BITSPERPIXEL ...
Service Manual
Page 4
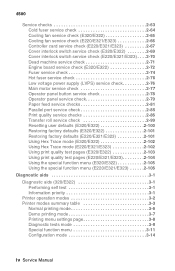
... service check (E220/E321/E323) . . . .2-70 Dead machine service check 2-71 Engine board service check (E320/E322 2-72 Fuser service check 2-74 Hot fuser service check 2-76 Low voltage power supply (LVPS) service check 2-76 Main motor service check 2-77 Operator panel .../E321/E323 2-104 Using the special function menu (E320/E322 2-105 Using the special function menu (E220/E321/E323 2-106 Diagnostic aids 3-1 Diagnostic aids (320/E322 3-1 Performing self test 3-1 Information priority 3-1 Printer operation modes 3-2 Printer modes summary table 3-3 Normal printing mode 3-6 Demo ...
... service check (E220/E321/E323) . . . .2-70 Dead machine service check 2-71 Engine board service check (E320/E322 2-72 Fuser service check 2-74 Hot fuser service check 2-76 Low voltage power supply (LVPS) service check 2-76 Main motor service check 2-77 Operator panel .../E321/E323 2-104 Using the special function menu (E320/E322 2-105 Using the special function menu (E220/E321/E323 2-106 Diagnostic aids 3-1 Diagnostic aids (320/E322 3-1 Performing self test 3-1 Information priority 3-1 Printer operation modes 3-2 Printer modes summary table 3-3 Normal printing mode 3-6 Demo ...
Service Manual
Page 5
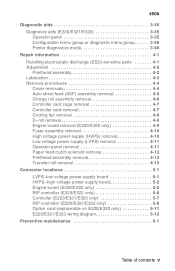
...aids 3-35 Diagnostic aids (E220/E321/E323 3-35 Operator panel 3-35 Configuration menu group or diagnostic menu group 3-36 Printer diagnostics mode 3-40 Repair information 4-1 Handling electrostatic discharge (ESD)-sensitive parts 4-1 Adjustment 4-2 Printhead assembly 4-2 Lubrication 4-3 ... removal 4-6 Controller card cage removal 4-7 Controller card removal 4-7 Cooling fan removal 4-8 D-roll removal 4-9 Engine board removal (E320/E322 only 4-9 Fuser assembly removal 4-10 High voltage power supply (HVPS) removal 4-10 Low voltage power supply (LVPS) removal 4-11 Operator panel...
...aids 3-35 Diagnostic aids (E220/E321/E323 3-35 Operator panel 3-35 Configuration menu group or diagnostic menu group 3-36 Printer diagnostics mode 3-40 Repair information 4-1 Handling electrostatic discharge (ESD)-sensitive parts 4-1 Adjustment 4-2 Printhead assembly 4-2 Lubrication 4-3 ... removal 4-6 Controller card cage removal 4-7 Controller card removal 4-7 Cooling fan removal 4-8 D-roll removal 4-9 Engine board removal (E320/E322 only 4-9 Fuser assembly removal 4-10 High voltage power supply (HVPS) removal 4-10 Low voltage power supply (LVPS) removal 4-11 Operator panel...

Service Manual
Page 6
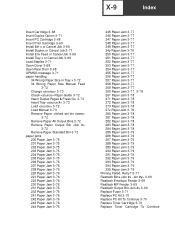
4500 Parts catalog 7-1 How to use this parts catalog 7-1 Assembly 1: Covers (E320/E322 7-2 Assembly 2: Frame 7-8 Assembly 3: Fuser 7-10 Assembly 4: Main drive 7-12 Assembly 5: Paper feed 7-14 Assembly 6: Printhead 7-16 Assembly 7: Electronics 7-18 Assembly 8: Options 7-22 Assembly 9: Cables 7-26 Assembly 10: Miscellaneous 7-27 Index I-7 Part number index I-1 vi Service Manual
4500 Parts catalog 7-1 How to use this parts catalog 7-1 Assembly 1: Covers (E320/E322 7-2 Assembly 2: Frame 7-8 Assembly 3: Fuser 7-10 Assembly 4: Main drive 7-12 Assembly 5: Paper feed 7-14 Assembly 6: Printhead 7-16 Assembly 7: Electronics 7-18 Assembly 8: Options 7-22 Assembly 9: Cables 7-26 Assembly 10: Miscellaneous 7-27 Index I-7 Part number index I-1 vi Service Manual
Service Manual
Page 26
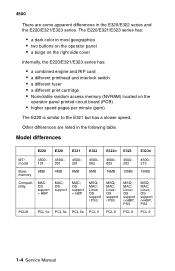
... series and the E220/E321/E323 series. Model differences E220 E320 E321 E322 E322n E323 E323n MT/ model 4500- 101 4500- 001 4500- 201 4500- 002 4500- 003 4500- 202 4500- 213 Base 8MB memory 4MB ... the right side cover Internally, the E220/E321/E323 series has: • a combined engine and RIP card • a different printhead and interlock switch • a different fuser • a different print cartridge • Nonvolatile random access memory (NVRAM) located on the operator panel printed circuit board (PCB) • higher speed pages per minute...
... series and the E220/E321/E323 series. Model differences E220 E320 E321 E322 E322n E323 E323n MT/ model 4500- 101 4500- 001 4500- 201 4500- 002 4500- 003 4500- 202 4500- 213 Base 8MB memory 4MB ... the right side cover Internally, the E220/E321/E323 series has: • a combined engine and RIP card • a different printhead and interlock switch • a different fuser • a different print cartridge • Nonvolatile random access memory (NVRAM) located on the operator panel printed circuit board (PCB) • higher speed pages per minute...
Service Manual
Page 27
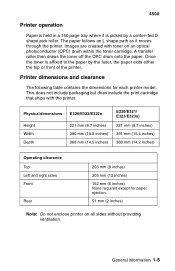
Once the toner is picked by the fuser, the paper exits either the top or front of the printer. 4500 Printer operation Paper is held in a 150 page tray where it moves through the printer. A transfer roller then draws the toner off the OPC drum onto the paper. General ...information 1-5 This does not include packaging but does include the print cartridge that ships with toner on all sides without providing ventilation. Physical dimensions Height Width Depth E320/E322/...
Once the toner is picked by the fuser, the paper exits either the top or front of the printer. 4500 Printer operation Paper is held in a 150 page tray where it moves through the printer. A transfer roller then draws the toner off the OPC drum onto the paper. General ...information 1-5 This does not include packaging but does include the print cartridge that ships with toner on all sides without providing ventilation. Physical dimensions Height Width Depth E320/E322/...
Service Manual
Page 39
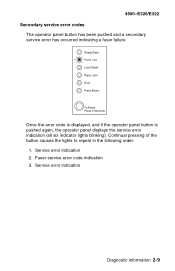
Once the error code is displayed, and if the operator panel button is pushed again, the operator panel displays the service error indication (all six indicator lights blinking). Service error indication 2. Fuser service error code indication 3. Service error indication Diagnostic information 2-9 Continual pressing of the button causes the lights to repeat in the following order: 1. 4500-E320/E322 Secondary service error codes The operator panel button has been pushed and a secondary service error has occurred indicating a fuser failure.
Once the error code is displayed, and if the operator panel button is pushed again, the operator panel displays the service error indication (all six indicator lights blinking). Service error indication 2. Fuser service error code indication 3. Service error indication Diagnostic information 2-9 Continual pressing of the button causes the lights to repeat in the following order: 1. 4500-E320/E322 Secondary service error codes The operator panel button has been pushed and a secondary service error has occurred indicating a fuser failure.
Service Manual
Page 40
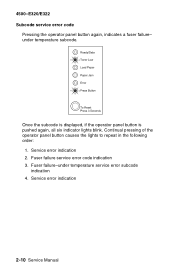
Service error indication 2-10 Service Manual under temperature service error subcode indication 4. Fuser failure service error code indication 3. 4500-E320/E322 Subcode service error code Pressing the operator panel button again, indicates a fuser failure- Service error indication 2. Fuser failure-under temperature subcode. Once the subcode is displayed, if the operator panel button is pushed again, all six indicator lights blink. Continual pressing of the operator panel button causes the lights to repeat in the following order: 1.
Service error indication 2-10 Service Manual under temperature service error subcode indication 4. Fuser failure service error code indication 3. 4500-E320/E322 Subcode service error code Pressing the operator panel button again, indicates a fuser failure- Service error indication 2. Fuser failure-under temperature subcode. Once the subcode is displayed, if the operator panel button is pushed again, all six indicator lights blink. Continual pressing of the operator panel button causes the lights to repeat in the following order: 1.


