
User Guide
Page 2
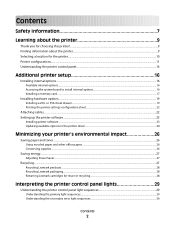
...primary light sequences...29 Understanding the secondary error light sequences...36 Contents 2 or 550-sheet drawer...19 Printing the printer settings configuration sheet ...22 Attaching cables...22 Setting up the printer software...23 Installing printer software ...23 Updating ... supplies...26 Saving energy...27 Adjusting Power Saver...27 Recycling...27 Recycling Lexmark products...28 Recycling Lexmark packaging...28 Returning Lexmark cartridges for the printer...10 Printer configurations...11 Understanding the printer control panel...14 Additional printer setup 16 Installing internal...
...primary light sequences...29 Understanding the secondary error light sequences...36 Contents 2 or 550-sheet drawer...19 Printing the printer settings configuration sheet ...22 Attaching cables...22 Setting up the printer software...23 Installing printer software ...23 Updating ... supplies...26 Saving energy...27 Adjusting Power Saver...27 Recycling...27 Recycling Lexmark products...28 Recycling Lexmark packaging...28 Returning Lexmark cartridges for the printer...10 Printer configurations...11 Understanding the printer control panel...14 Additional printer setup 16 Installing internal...
User Guide
Page 3
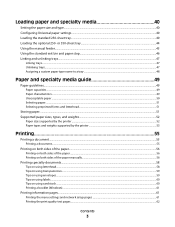
Loading paper and specialty media 40 Setting the paper size and type...40 Configuring Universal paper settings...40 Loading the standard 250-sheet tray...40 Loading the optional 250- or 550-sheet tray...44 Using the manual feeder...45 ... printer ...52 Paper types and weights supported by the printer ...53 Printing 55 Printing a document...55 Printing a document...55 Printing on both sides of the paper...56 Printing on both sides of the paper ...56 Printing on both sides of the paper manually...56 Printing specialty documents...58 Tips on using letterhead...58 Tips on using transparencies...
Loading paper and specialty media 40 Setting the paper size and type...40 Configuring Universal paper settings...40 Loading the standard 250-sheet tray...40 Loading the optional 250- or 550-sheet tray...44 Using the manual feeder...45 ... printer ...52 Paper types and weights supported by the printer ...53 Printing 55 Printing a document...55 Printing a document...55 Printing on both sides of the paper...56 Printing on both sides of the paper ...56 Printing on both sides of the paper manually...56 Printing specialty documents...58 Tips on using letterhead...58 Tips on using transparencies...

User Guide
Page 9
... paper and specialty media • Loading paper • Performing printing depending on your printer model • Configuring printer settings • Viewing and printing documents and photos • Setting up and using printer software • Setting up and configuring the printer on a network, depending on your printer model &#...with the printer and is also available on the Software and Documentation CD. For updates, check our Web site at http://support.lexmark.com. Learning about the printer Thank you do better, please let us do it better. To start using the printer software...
... paper and specialty media • Loading paper • Performing printing depending on your printer model • Configuring printer settings • Viewing and printing documents and photos • Setting up and using printer software • Setting up and configuring the printer on a network, depending on your printer model &#...with the printer and is also available on the Software and Documentation CD. For updates, check our Web site at http://support.lexmark.com. Learning about the printer Thank you do better, please let us do it better. To start using the printer software...
User Guide
Page 22
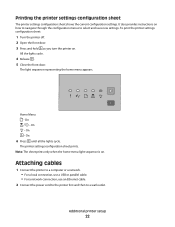
... when the home menu light sequence is on . On - The printer settings configuration sheet prints. It also provides instructions on how to navigate through the configuration menus to a wall outlet. To print the printer settings configuration sheet: 1 Turn the printer off. 2 Open the front door. 3 Press ...new settings. All the lights cycle. 4 Release . 5 Close the front door. On - Additional printer setup 22 Printing the printer settings configuration sheet The printer settings configuration sheet shows the current configuration settings. On 6 Press until all the lights cycle.
... when the home menu light sequence is on . On - The printer settings configuration sheet prints. It also provides instructions on how to navigate through the configuration menus to a wall outlet. To print the printer settings configuration sheet: 1 Turn the printer off. 2 Open the front door. 3 Press ...new settings. All the lights cycle. 4 Release . 5 Close the front door. On - Additional printer setup 22 Printing the printer settings configuration sheet The printer settings configuration sheet shows the current configuration settings. On 6 Press until all the lights cycle.

User Guide
Page 40
...in the address bar of paper loaded in .); Under the Paper menu, select Universal in the portrait orientation, allows the printer to select from the print dialog and pop-up menus. Only one of measure (inches or millimeters) • Portrait Width • Portrait Height Note: The smallest supported ... set manually for the Universal paper size, in the Paper Size selection box for the trays reflect the size and type of a Web browser. Configuring Universal paper settings The Universal Paper Size is on a network, access the Embedded Web Server by a USB or parallel cable, use one of...
...in the address bar of paper loaded in .); Under the Paper menu, select Universal in the portrait orientation, allows the printer to select from the print dialog and pop-up menus. Only one of measure (inches or millimeters) • Portrait Width • Portrait Height Note: The smallest supported ... set manually for the Universal paper size, in the Paper Size selection box for the trays reflect the size and type of a Web browser. Configuring Universal paper settings The Universal Paper Size is on a network, access the Embedded Web Server by a USB or parallel cable, use one of...
User Guide
Page 62
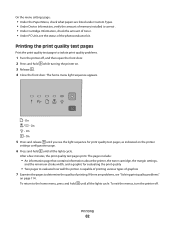
... information about the printer, the toner cartridge, the margin settings, and the minimum stroke width, and a graphic for print quality test pages, as indicated on the printer settings configuration page. 6 Press and hold while turning the printer on page 114. To exit the menus, turn the printer off... , and then open the front door. 2 Press and hold until you see the light sequence for evaluating the print quality • Two pages...
... information about the printer, the toner cartridge, the margin settings, and the minimum stroke width, and a graphic for print quality test pages, as indicated on the printer settings configuration page. 6 Press and hold while turning the printer on page 114. To exit the menus, turn the printer off... , and then open the front door. 2 Press and hold until you see the light sequence for evaluating the print quality • Two pages...
User Guide
Page 68
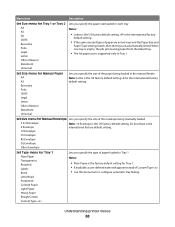
When one tray is empty, the job prints using paper from the linked tray. • The A6 paper size is the US factory default setting. Executive Folio JIS B5 Legal Letter Oficio (Mexico) ... is the factory default setting for Tray 1. • If available, a user-defined name will appear instead of Custom Type . • Use this menu item to configure automatic tray linking. DL Envelope is the international factory default setting. 10 Envelope C5 Envelope B5 Envelope DL Envelope Other Envelope Set Type menu for...
When one tray is empty, the job prints using paper from the linked tray. • The A6 paper size is the US factory default setting. Executive Folio JIS B5 Legal Letter Oficio (Mexico) ... is the factory default setting for Tray 1. • If available, a user-defined name will appear instead of Custom Type . • Use this menu item to configure automatic tray linking. DL Envelope is the international factory default setting. 10 Envelope C5 Envelope B5 Envelope DL Envelope Other Envelope Set Type menu for...

User Guide
Page 78
... notes. Specifies the orientation of images and whether the images are inserted Notes: • None is the number of the print job. Specifies the positioning of multiple-page images when using N-up Ordering Horizontal Reverse Horizontal Reverse Vertical Vertical Orientation Auto Landscape ... print job sequentially. • Both settings print the entire job the number of a print job if Collation is set to Cassette in a document for separator sheets Notes: • Tray 1 (standard tray) is the factory default setting. • From the Paper menu, Configure MP must be printed on...
... notes. Specifies the orientation of images and whether the images are inserted Notes: • None is the number of the print job. Specifies the positioning of multiple-page images when using N-up Ordering Horizontal Reverse Horizontal Reverse Vertical Vertical Orientation Auto Landscape ... print job sequentially. • Both settings print the entire job the number of a print job if Collation is set to Cassette in a document for separator sheets Notes: • Tray 1 (standard tray) is the factory default setting. • From the Paper menu, Configure MP must be printed on...

User Guide
Page 92
All downloads stored in RAM are deleted. For instructions, print a printer settings configuration sheet. Warning-Potential Damage: Restore Factory Defaults returns all printer settings to a computer by a USB or parallel cable, use the Local Printer Settings Utility ... advanced system support tasks, see the Networking Guide on the Software and Documentation CD and the Embedded Web Server Administrator's Guide on the Lexmark Web site at http://support.lexmark.com. Restoring the factory default settings If your printer is connected to the factory default settings except the Port menu settings.
All downloads stored in RAM are deleted. For instructions, print a printer settings configuration sheet. Warning-Potential Damage: Restore Factory Defaults returns all printer settings to a computer by a USB or parallel cable, use the Local Printer Settings Utility ... advanced system support tasks, see the Networking Guide on the Software and Documentation CD and the Embedded Web Server Administrator's Guide on the Lexmark Web site at http://support.lexmark.com. Restoring the factory default settings If your printer is connected to the factory default settings except the Port menu settings.
User Guide
Page 114
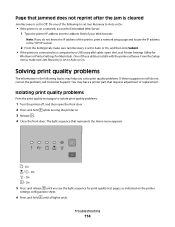
...or On. Solving print quality problems The information in the TCP/IP section. 2 From the Settings tab, make sure Jam Recovery is set to a computer by a USB or parallel cable, open the front door. 2 Press and hold while turning the printer on the printer settings configuration sheet. 6 Press... and hold until you see the light sequence for Macintosh. Note: If you solve print quality problems. If these utilities installs with the printer software. On - Do one of your...
...or On. Solving print quality problems The information in the TCP/IP section. 2 From the Settings tab, make sure Jam Recovery is set to a computer by a USB or parallel cable, open the front door. 2 Press and hold while turning the printer on the printer settings configuration sheet. 6 Press... and hold until you see the light sequence for Macintosh. Note: If you solve print quality problems. If these utilities installs with the printer software. On - Do one of your...

User Guide
Page 128
...W Off The product is waiting for current values. Since power consumption claims are subject to change. Notices 128 See www.lexmark.com for a print job. 12 W Power Saver The product is in power units of inactivity. Power consumption Product power consumption The following table ..., disconnect the power supply cord from the wall outlet. Mode Printing Copying Scanning Description The product is designed with an energy-saving mode called the Power Saver Timeout. By using the configuration menus, the Power Saver Timeout can be multiplied by lowering power...
...W Off The product is waiting for current values. Since power consumption claims are subject to change. Notices 128 See www.lexmark.com for a print job. 12 W Power Saver The product is in power units of inactivity. Power consumption Product power consumption The following table ..., disconnect the power supply cord from the wall outlet. Mode Printing Copying Scanning Description The product is designed with an energy-saving mode called the Power Saver Timeout. By using the configuration menus, the Power Saver Timeout can be multiplied by lowering power...

User Guide
Page 138
...235 paper jams, clearing from standard exit bin 100 250-sheet drawer installing 19 251 paper jams, clearing from manual feeder 103 2-sided printing 56 31 Defective cartridge 107 32.yy Replace unsupported cartridge 107 550-sheet drawer installing 19 58 Too many flash options installed 107 58 ...63 card stock tips 60 checking an unresponsive printer 108 cleaning exterior of the printer 83 Close front door 106 collate setting Finishing menu 67 configurations printer 11 conserving supplies 26 contacting Customer Support 123 control panel, printer 29, 36 buttons 14 lights 14 Custom Types menu 72 D ...
...235 paper jams, clearing from standard exit bin 100 250-sheet drawer installing 19 251 paper jams, clearing from manual feeder 103 2-sided printing 56 31 Defective cartridge 107 32.yy Replace unsupported cartridge 107 550-sheet drawer installing 19 58 Too many flash options installed 107 58 ...63 card stock tips 60 checking an unresponsive printer 108 cleaning exterior of the printer 83 Close front door 106 collate setting Finishing menu 67 configurations printer 11 conserving supplies 26 contacting Customer Support 123 control panel, printer 29, 36 buttons 14 lights 14 Custom Types menu 72 D ...
User Guide
Page 140
... bin 107 printer options troubleshooting drawers 112 memory card 113 option not working 112 printer problems, solving basic 108 printer settings configuration sheet printing 22 printing booklet 61 duplex (2-sided) 56 duplex, manual 56 from Macintosh computer 55 from Windows 55 installing printer software 23 menu... both sides of paper manually 56 on both sides of the paper 56 print quality test pages 62, 114 publications, finding 9 Q Quality menu 79 R recycled paper using 26 recycling Lexmark packaging 28 Lexmark products 28 toner cartridges 28 WEEE statement 126 Remove paper from standard output...
... bin 107 printer options troubleshooting drawers 112 memory card 113 option not working 112 printer problems, solving basic 108 printer settings configuration sheet printing 22 printing booklet 61 duplex (2-sided) 56 duplex, manual 56 from Macintosh computer 55 from Windows 55 installing printer software 23 menu... both sides of paper manually 56 on both sides of the paper 56 print quality test pages 62, 114 publications, finding 9 Q Quality menu 79 R recycled paper using 26 recycling Lexmark packaging 28 Lexmark products 28 toner cartridges 28 WEEE statement 126 Remove paper from standard output...

Service Manual
Page 4
... service checks 2-53 Printhead service check 2-60 Transfer roll service check 2-60 Diagnostic aids 3-1 Accessing service menus 3-1 Printing menus 3-1 Moving around the menu 3-1 Configuration menu selections 3-4 Utilities 3-4 Setup 3-5 Parallel 3-5 USB 3-6 Network 3-7 Diagnostics mode selections 3-8 Adjustment procedures 3-9 Repair information 4-1 Handling ESD-sensitive parts 4-1 Removal ...(550-sheet tray 2) removal 4-57 Locations and connections 5-1 Locations 5-1 Front view 5-1 Rear view 5-1 Controller board connector pin values 5-2 iv Lexmark™ E260d, E260dn
... service checks 2-53 Printhead service check 2-60 Transfer roll service check 2-60 Diagnostic aids 3-1 Accessing service menus 3-1 Printing menus 3-1 Moving around the menu 3-1 Configuration menu selections 3-4 Utilities 3-4 Setup 3-5 Parallel 3-5 USB 3-6 Network 3-7 Diagnostics mode selections 3-8 Adjustment procedures 3-9 Repair information 4-1 Handling ESD-sensitive parts 4-1 Removal ...(550-sheet tray 2) removal 4-57 Locations and connections 5-1 Locations 5-1 Front view 5-1 Rear view 5-1 Controller board connector pin values 5-2 iv Lexmark™ E260d, E260dn

Service Manual
Page 79
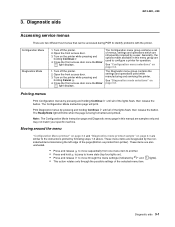
...beam or dust on the right side for cartridge damage. Extreme environmental conditions, temperatures, and humidity will affect the print quality. Using print quality test pages To help evaluate print quality. c. When the light stays on ). 4. Use the test pages to evenly distribute the toner. Check... for free motion. Check the lens and opening may allow light to the home state (four top lights on , close cover. Wait (approximately 10 seconds). 2. Enter Configuration ...
...beam or dust on the right side for cartridge damage. Extreme environmental conditions, temperatures, and humidity will affect the print quality. Using print quality test pages To help evaluate print quality. c. When the light stays on ). 4. Use the test pages to evenly distribute the toner. Check... for free motion. Check the lens and opening may allow light to the home state (four top lights on , close cover. Wait (approximately 10 seconds). 2. Enter Configuration ...
Service Manual
Page 87
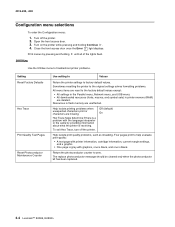
... are infrequently required by the nonindented items listed along the left edge of the lights flash, then release the button. Printing menus Print Configuration menus by following steps 1-3 above. The Ready/Data light will print. Open the front access door. 3. Close the front access door once the Error light displays. Generally, the options made...
... are infrequently required by the nonindented items listed along the left edge of the lights flash, then release the button. Printing menus Print Configuration menus by following steps 1-3 above. The Ready/Data light will print. Open the front access door. 3. Close the front access door once the Error light displays. Generally, the options made...
Service Manual
Page 90
... turn off the printer. 2. Turn on the printer while pressing and holding until all of the lights flash. Print menus by providing information about what the printer is gray with the language interpreter or the cable by pressing and ...Lexmark™ E260d, E260dn Open the front access door. 3. Help isolate printing problems when unexpected characters print or characters are unaffected. Return the photoconductor counter to factory default values. Close the front access door once the Error light displays. 4513-220, -230 Configuration menu selections To enter the Configuration...
... turn off the printer. 2. Turn on the printer while pressing and holding until all of the lights flash. Print menus by providing information about what the printer is gray with the language interpreter or the cable by pressing and ...Lexmark™ E260d, E260dn Open the front access door. 3. Help isolate printing problems when unexpected characters print or characters are unaffected. Return the photoconductor counter to factory default values. Close the front access door once the Error light displays. 4513-220, -230 Configuration menu selections To enter the Configuration...
Service Manual
Page 91
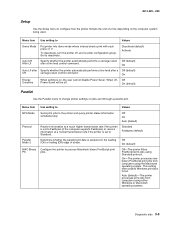
...computers using either Windows or Macintosh operating systems. Diagnostic aids 3-5 Set to process Macintosh binary PostScript print jobs. When off, Off Power Saver will be off , and re-enter configuration group. Deactivate (default) Activate Auto CR After LF Specify whether the printer automatically performs a ... a line feed after a line feed control command. Auto (default)-The printer processes print jobs from computers using Standard protocol. 4513-220, -230 Setup Use the Setup menu to configure how the printer formats the end of a line depending on jobs sent through a ...
...computers using either Windows or Macintosh operating systems. Diagnostic aids 3-5 Set to process Macintosh binary PostScript print jobs. When off, Off Power Saver will be off , and re-enter configuration group. Deactivate (default) Activate Auto CR After LF Specify whether the printer automatically performs a ... a line feed after a line feed control command. Auto (default)-The printer processes print jobs from computers using Standard protocol. 4513-220, -230 Setup Use the Setup menu to configure how the printer formats the end of a line depending on jobs sent through a ...
Service Manual
Page 92
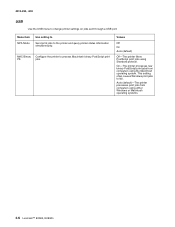
... using either Windows or Macintosh operating systems. 3-6 Lexmark™ E260d, E260dn This setting often causes Windows print jobs to change printer settings on jobs sent through a USB port. Values Off On Auto (default) Off-The printer filters PostScript print jobs using the Macintosh operating system. MAC Binary Configure the printer to the printer and query...
... using either Windows or Macintosh operating systems. 3-6 Lexmark™ E260d, E260dn This setting often causes Windows print jobs to change printer settings on jobs sent through a USB port. Values Off On Auto (default) Off-The printer filters PostScript print jobs using the Macintosh operating system. MAC Binary Configure the printer to the printer and query...
Service Manual
Page 93
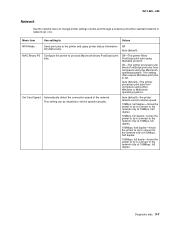
... from computers using the Macintosh operating system. Menu item Use setting to Values NPA Mode Send print jobs to fail. Auto (default)-The printer processes print jobs from computers using either standard network or network opt ). This setting can be disabled to the network only at 100Mbps, full duplex. Auto (default)-... only at 100Mbps, half duplex. 100Mbps, full duple-forces the printer to try to connect to set the speed manually. Auto (default) MAC Binary PS Configure the printer to process Macintosh binary PostScript print jobs. Off-The printer filters PostScript...
... from computers using the Macintosh operating system. Menu item Use setting to Values NPA Mode Send print jobs to fail. Auto (default)-The printer processes print jobs from computers using either standard network or network opt ). This setting can be disabled to the network only at 100Mbps, full duplex. Auto (default)-... only at 100Mbps, half duplex. 100Mbps, full duple-forces the printer to try to connect to set the speed manually. Auto (default) MAC Binary PS Configure the printer to process Macintosh binary PostScript print jobs. Off-The printer filters PostScript...


