User's Guide
Page 5
...removable storage media (unless directed otherwise by a third party of any product. This limited warranty applies to this statement as fuser units, transfer belts, and paper feed items)###, if any, and any other than the average. To obtain warranty service, ... The replacement item assumes the remaining warranty period of Limited Warranty Lexmark International, Inc. For further explanation of original purchase as warranted during the warranty period, contact a Remarketer or Lexmark for the Lexmark E238. Remote technical support is a feature or option, this product ...
...removable storage media (unless directed otherwise by a third party of any product. This limited warranty applies to this statement as fuser units, transfer belts, and paper feed items)###, if any, and any other than the average. To obtain warranty service, ... The replacement item assumes the remaining warranty period of Limited Warranty Lexmark International, Inc. For further explanation of original purchase as warranted during the warranty period, contact a Remarketer or Lexmark for the Lexmark E238. Remote technical support is a feature or option, this product ...

User's Guide
Page 29
Warning: Do not leave the print cartridge assembly exposed to clear paper jams 2 Open the front cover, and remove the print cartridge assembly. Warning: Fuser or area may be hot. 29 Extended light exposure can cause print quality problems. 3 Remove any jams in the area behind the print cartridge assembly. How to direct light for an extended period of time.
Warning: Do not leave the print cartridge assembly exposed to clear paper jams 2 Open the front cover, and remove the print cartridge assembly. Warning: Fuser or area may be hot. 29 Extended light exposure can cause print quality problems. 3 Remove any jams in the area behind the print cartridge assembly. How to direct light for an extended period of time.

User's Guide
Page 30
..., the memory that holds the image of the printer, and remove any jams beneath the flap. 5 Open the rear exit, and remove any jams. Warning: Fuser or area may be re-used after the page is printed but before it has successfully exited the printer if that memory is set to...
..., the memory that holds the image of the printer, and remove any jams beneath the flap. 5 Open the rear exit, and remove any jams. Warning: Fuser or area may be re-used after the page is printed but before it has successfully exited the printer if that memory is set to...
User's Guide
Page 87
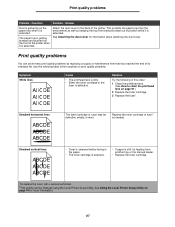
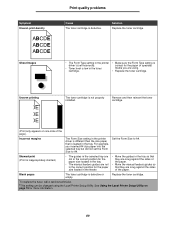
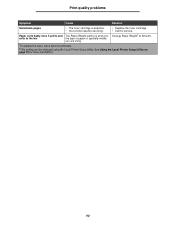
... ABCDE • Toner is smeared before fusing to clean the printhead lens on page 91.) 2 Replace the toner cartridge. 3 Replace the fuser*. Solution Try the following table to find solutions to the back of the printer when it is extended. Replace the toner cartridge or...extended. This protects the paper tray from being knocked out of its intended life. Streaked horizontal lines ABCDE ABCDE ABCDE The toner cartridge or fuser may be changed using the Local Printer Setup Utility. Print quality problems Problem / Question Solution / Answer Dust is gathering on the paper ...
... ABCDE • Toner is smeared before fusing to clean the printhead lens on page 91.) 2 Replace the toner cartridge. 3 Replace the fuser*. Solution Try the following table to find solutions to the back of the printer when it is extended. Replace the toner cartridge or...extended. This protects the paper tray from being knocked out of its intended life. Streaked horizontal lines ABCDE ABCDE ABCDE The toner cartridge or fuser may be changed using the Local Printer Setup Utility. Print quality problems Problem / Question Solution / Answer Dust is gathering on the paper ...
User's Guide
Page 88
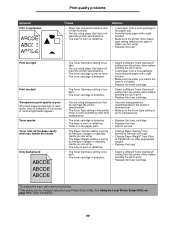
... irregularities ABCDE ABCDE ABCDE Cause • Paper has absorbed moisture due to print. • Replace the toner cartridge. *To replace the fuser, call a service technician. †This setting can be changed using paper that does not meet the printer specifications. • The toner cartridge...8224; from Normal to Smooth or Rough. • Change Paper Weight† from Plain to CardStock (or other appropriate weight). • Replace the fuser*. • Select a different Toner Darkness† setting from a new package. • Avoid textured paper with rough finishes. • Make sure ...
... irregularities ABCDE ABCDE ABCDE Cause • Paper has absorbed moisture due to print. • Replace the toner cartridge. *To replace the fuser, call a service technician. †This setting can be changed using paper that does not meet the printer specifications. • The toner cartridge...8224; from Normal to Smooth or Rough. • Change Paper Weight† from Plain to CardStock (or other appropriate weight). • Replace the fuser*. • Select a different Toner Darkness† setting from a new package. • Avoid textured paper with rough finishes. • Make sure ...
User's Guide
Page 89
Replace the toner cartridge. *To replace the fuser, call a service technician. †This setting can be changed using . • Replace the toner cartridge. Solution Replace the toner cartridge. • The Form Type setting ...
Replace the toner cartridge. *To replace the fuser, call a service technician. †This setting can be changed using . • Replace the toner cartridge. Solution Replace the toner cartridge. • The Form Type setting ...
User's Guide
Page 90
... toner cartridge is wrong for Change Paper Weight† to the bin the type of paper or specialty media you are using. *To replace the fuser, call a service technician. †This setting can be changed using the Local Printer Setup Utility.
... toner cartridge is wrong for Change Paper Weight† to the bin the type of paper or specialty media you are using. *To replace the fuser, call a service technician. †This setting can be changed using the Local Printer Setup Utility.
Service Manual
Page 4
... 2-82 Cover interlock switch service check 2-85 Dead machine service check 2-86 Fuser service check 2-87 Cold fuser service check 2-89 Hot fuser service check 2-89 LVPS/HVPS service check 2-90 Main motor service check 2-91 Operator panel service check (models E238, E240, and E240n) . . . 2-92 Operator panel service check (models E340 and E342n...
... 2-82 Cover interlock switch service check 2-85 Dead machine service check 2-86 Fuser service check 2-87 Cold fuser service check 2-89 Hot fuser service check 2-89 LVPS/HVPS service check 2-90 Main motor service check 2-91 Operator panel service check (models E238, E240, and E240n) . . . 2-92 Operator panel service check (models E340 and E342n...
Service Manual
Page 5
... drive coupling assembly removal 4-20 Door latch assembly removal 4-21 Exit sensor removal (on the fuser 4-22 Fan removal 4-26 Front access cover logo removal (E238, E240, and E240n 4-27 Fuser removal 4-28 Fuser idle gear links removal 4-30 Fuser power cable removal 4-32 Input roller clutch and lever removal (autocompensator clutch). . . . 4-34 Input sensor...
... drive coupling assembly removal 4-20 Door latch assembly removal 4-21 Exit sensor removal (on the fuser 4-22 Fan removal 4-26 Front access cover logo removal (E238, E240, and E240n 4-27 Fuser removal 4-28 Fuser idle gear links removal 4-30 Fuser power cable removal 4-32 Input roller clutch and lever removal (autocompensator clutch). . . . 4-34 Input sensor...
Service Manual
Page 34
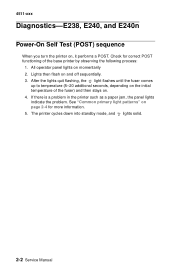
All operator panel lights on page 2-4 for correct POST functioning of the fuser) and then stays on and off sequentially. 3. If there is a problem in the printer such as a paper jam, the panel lights indicate the problem. See "... patterns" on momentarily 2. The printer cycles down into standby mode, and lights solid. 2-2 Service Manual After the lights quit flashing, the light flashes until the fuser comes up to temperature (5-20 additional seconds, depending on the initial temperature of the base printer by observing the following process: 1. Lights then flash on...
All operator panel lights on page 2-4 for correct POST functioning of the fuser) and then stays on and off sequentially. 3. If there is a problem in the printer such as a paper jam, the panel lights indicate the problem. See "... patterns" on momentarily 2. The printer cycles down into standby mode, and lights solid. 2-2 Service Manual After the lights quit flashing, the light flashes until the fuser comes up to temperature (5-20 additional seconds, depending on the initial temperature of the base printer by observing the following process: 1. Lights then flash on...
Service Manual
Page 57
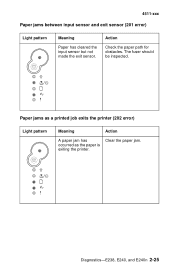
The fuser should be inspected. Diagnostics-E238, E240, and E240n 2-25 Action Check the paper path for obstacles. Paper jams as the paper is exiting the printer. occurred as a printed job exits the printer (202 error) Light pattern Meaning Action A paper jam has Clear the paper jam. 4511-xxx Paper jams between input sensor and exit sensor (201 error) Light pattern Meaning Paper has cleared the input sensor but not made the exit sensor.
The fuser should be inspected. Diagnostics-E238, E240, and E240n 2-25 Action Check the paper path for obstacles. Paper jams as the paper is exiting the printer. occurred as a printed job exits the printer (202 error) Light pattern Meaning Action A paper jam has Clear the paper jam. 4511-xxx Paper jams between input sensor and exit sensor (201 error) Light pattern Meaning Paper has cleared the input sensor but not made the exit sensor.

Service Manual
Page 68
... flash simultaneously, and double-clicking does not produce a secondary code, you may have a code problem. Doubleclick for more information. • The secondary light pattern indicates a fuser or toner sensor error. Tertiary codes (shown on the following example: • The primary light pattern indicates a service error (all lights flash, double-click to...
... flash simultaneously, and double-clicking does not produce a secondary code, you may have a code problem. Doubleclick for more information. • The secondary light pattern indicates a fuser or toner sensor error. Tertiary codes (shown on the following example: • The primary light pattern indicates a service error (all lights flash, double-click to...

Service Manual
Page 70
90x-Software 91x-DC motor or transfer roll 92x-Fuser or toner sensor 93x-Printhead, drive motor, RIP to engine 94x-RIP to engine communications, engine electronics 95x-Controller card (NVRAM, ROM, or NAND) 4511-xxx Service secondary error codes Service secondary error codes Service secondary error codes Lights ✷ ✷ ✷ ✷ ✷ ✷ Continue Ready Toner Low/ Replace PC Kit Load Paper Paper Jam Error ✷ ✷ ✷ ✷ ✷ ✷ ✷ 2-38 Service Manual
90x-Software 91x-DC motor or transfer roll 92x-Fuser or toner sensor 93x-Printhead, drive motor, RIP to engine 94x-RIP to engine communications, engine electronics 95x-Controller card (NVRAM, ROM, or NAND) 4511-xxx Service secondary error codes Service secondary error codes Service secondary error codes Lights ✷ ✷ ✷ ✷ ✷ ✷ Continue Ready Toner Low/ Replace PC Kit Load Paper Paper Jam Error ✷ ✷ ✷ ✷ ✷ ✷ ✷ 2-38 Service Manual

Service Manual
Page 74
...Service secondary codes- 92x Service teriary codes-fuser, fan, or toner sensor 920-Fuser below temperature when printing 921-Fuser below standby temperature at idle 922-Fuser failed to reach standby temperature 923-Fuser too hot during printing or idle 924-Open circuit in the fuser (see "Fuser service check" on page 2-87 for ...more information), a stalled fan motor, or a faulty toner sensor or toner cartridge. 4511-xxx Fuser, fan, or toner sensor error Codes 920 through 929 indicate a problem in thermistor path Lights ✷ Continue Ready Toner Low/ Replace PC ...
...Service secondary codes- 92x Service teriary codes-fuser, fan, or toner sensor 920-Fuser below temperature when printing 921-Fuser below standby temperature at idle 922-Fuser failed to reach standby temperature 923-Fuser too hot during printing or idle 924-Open circuit in the fuser (see "Fuser service check" on page 2-87 for ...more information), a stalled fan motor, or a faulty toner sensor or toner cartridge. 4511-xxx Fuser, fan, or toner sensor error Codes 920 through 929 indicate a problem in thermistor path Lights ✷ Continue Ready Toner Low/ Replace PC ...
Service Manual
Page 75
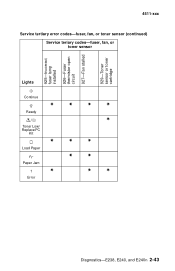
4511-xxx Service tertiary error codes-fuser, fan, or toner sensor (continued) Service teriary codes-fuser, fan, or toner sensor 925-Incorrect fuser lamp installed 926-Fuser thermistor open circuit 927-Fan stalled 929-Toner sensor or toner cartridge Lights Continue ✷ ✷ ✷ ✷ Ready ✷ Toner Low/ Replace PC Kit ✷ ✷ ✷ Load Paper ✷ ✷ Paper Jam ✷ ✷ ✷ Error Diagnostics-E238, E240, and E240n 2-43
4511-xxx Service tertiary error codes-fuser, fan, or toner sensor (continued) Service teriary codes-fuser, fan, or toner sensor 925-Incorrect fuser lamp installed 926-Fuser thermistor open circuit 927-Fan stalled 929-Toner sensor or toner cartridge Lights Continue ✷ ✷ ✷ ✷ Ready ✷ Toner Low/ Replace PC Kit ✷ ✷ ✷ Load Paper ✷ ✷ Paper Jam ✷ ✷ ✷ Error Diagnostics-E238, E240, and E240n 2-43

Service Manual
Page 97
... Go to "Transfer roll service check" on page 2-87 for fuser thermistor circuit. Go to Fuser failed to been detected in the "Fuser service check" on page 2-111. 920 Fuser error Go to the fuser. standby temperature. 923 Fuser is idle. 924 An open circuit has Check cabling and connectors....the controller card. 905 Interface violation by the Paperport device 917 Transfer roll The likely cause is below temperature when printing. 921 Fuser error Go to temporarily recover from the error condition. It may also indicate a problem in an intermittent condition when you can ...
... Go to "Transfer roll service check" on page 2-87 for fuser thermistor circuit. Go to Fuser failed to been detected in the "Fuser service check" on page 2-111. 920 Fuser error Go to the fuser. standby temperature. 923 Fuser is idle. 924 An open circuit has Check cabling and connectors....the controller card. 905 Interface violation by the Paperport device 917 Transfer roll The likely cause is below temperature when printing. 921 Fuser error Go to temporarily recover from the error condition. It may also indicate a problem in an intermittent condition when you can ...

Service Manual
Page 98
...cable. 950 Controller card There is stalling. Warning: Always replace only one of one at a time with correct one. See (Incorrect fuser lamp.) "Fuser removal" on page 4-26. 929 Toner sensor The toner sensor is not operating properly, the developer drive assembly is not operating properly,... to speed. Replace the controller card. 2-66 Service Manual 4511-xxx Service error codes (9xx) (continued) Error Description Action 925 Fuser Error Replace fuser with a POR between the variables in the EPROM on the operator panel card and those in the secure NVRAM on page 3-27....
...cable. 950 Controller card There is stalling. Warning: Always replace only one of one at a time with correct one. See (Incorrect fuser lamp.) "Fuser removal" on page 4-26. 929 Toner sensor The toner sensor is not operating properly, the developer drive assembly is not operating properly,... to speed. Replace the controller card. 2-66 Service Manual 4511-xxx Service error codes (9xx) (continued) Error Description Action 925 Fuser Error Replace fuser with a POR between the variables in the EPROM on the operator panel card and those in the secure NVRAM on page 3-27....

Service Manual
Page 102
... before EP leading edge state machine was ready. (x1=leading edge of media state, x2=trailing edge of the transfer roll and input to the fuser for anything that the input sensor 200 is still actuated from the first sheet, and the second sheet is ready to arrive at the sensor...
... before EP leading edge state machine was ready. (x1=leading edge of media state, x2=trailing edge of the transfer roll and input to the fuser for anything that the input sensor 200 is still actuated from the first sheet, and the second sheet is ready to arrive at the sensor...
Service Manual
Page 103
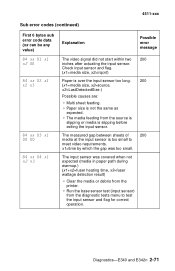
... input sensor was too small. x1=time by which the gap was covered when not expected (media in paper path during warmup.) (x1+x2=fuser heating time, x3=fuser wattage detection result) • Clear the media or debris from the printer. • Run the base sensor test (input sensor) from the source...
... input sensor was too small. x1=time by which the gap was covered when not expected (media in paper path during warmup.) (x1+x2=fuser heating time, x3=fuser wattage detection result) • Clear the media or debris from the printer. • Run the base sensor test (input sensor) from the source...

Service Manual
Page 107
See "Accessing service menus" on page 3-2 for models E340 or E342n. See "Base sensor test" on page 3-14 for models E238, E240, or E240n or "Accessing service menus" on page 3-28. Turn the printer off, enter the diagnostic tests menu, and select the base sensor test. ... message Input sensor never became uncovered 200 from page ahead while trying to feed media out of the input sensor. Paper originally detected at the fuser is activated by 202 a piece of media indicating there is present, check the exit sensor assembly. The exit sensor at option tray pass thru sensor...
See "Accessing service menus" on page 3-2 for models E340 or E342n. See "Base sensor test" on page 3-14 for models E238, E240, or E240n or "Accessing service menus" on page 3-28. Turn the printer off, enter the diagnostic tests menu, and select the base sensor test. ... message Input sensor never became uncovered 200 from page ahead while trying to feed media out of the input sensor. Paper originally detected at the fuser is activated by 202 a piece of media indicating there is present, check the exit sensor assembly. The exit sensor at option tray pass thru sensor...


