
Forms and Bar Code Card Technical Reference Guide
Page 30
...set • 4 = Kanji character set (shifted JIS) Bar code descriptor for MaxiCode data The data sent when using the Lexmark Transfer Bar Code Data command to print MaxiCode symbols, with the following change to rule 1: The input data must start with either ... 2 Optional Determines ECC level as follows: • 0 = Use default (Automatic: JIS/ShiftJIS) • 1 = Numeric (0-9) • 2 = Alphanumeric (0-9; Optional Specifies module height (and width) in length and are terminated with a label-number field, a number-of 15%) • 1 = Low ECC/High Density level (L), 7% damage allowed....
...set • 4 = Kanji character set (shifted JIS) Bar code descriptor for MaxiCode data The data sent when using the Lexmark Transfer Bar Code Data command to print MaxiCode symbols, with the following change to rule 1: The input data must start with either ... 2 Optional Determines ECC level as follows: • 0 = Use default (Automatic: JIS/ShiftJIS) • 1 = Numeric (0-9) • 2 = Alphanumeric (0-9; Optional Specifies module height (and width) in length and are terminated with a label-number field, a number-of 15%) • 1 = Low ECC/High Density level (L), 7% damage allowed....
Forms and Bar Code Card Technical Reference Guide
Page 94
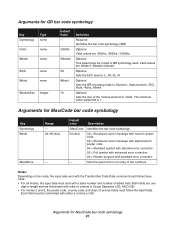
... either a comma or GS. Each field must be terminated with a label-number and number-of the module element in an array of two numbers Notes: Depending on the mode, the input data sent with the Transfer Bar Code Data command must follow the label fields. Optional Sets the ECC level to /L, /M, /Q, /H Optional...
... either a comma or GS. Each field must be terminated with a label-number and number-of the module element in an array of two numbers Notes: Depending on the mode, the input data sent with the Transfer Bar Code Data command must follow the label fields. Optional Sets the ECC level to /L, /M, /Q, /H Optional...

Maintenance Guide
Page 2
... supplies from the printer control panel 6 Checking the status of supplies from a network computer 7 Ordering supplies...7 Ordering toner cartridges...7 Ordering imaging units...8 Ordering a fuser or a transfer module...8 Ordering a waste toner bottle...8 Replacing Supplies...9 Replacing an imaging unit...9 Replacing a toner cartridge...11 Replacing the waste toner bottle...13 Moving the printer...15 Before...
... supplies from the printer control panel 6 Checking the status of supplies from a network computer 7 Ordering supplies...7 Ordering toner cartridges...7 Ordering imaging units...8 Ordering a fuser or a transfer module...8 Ordering a waste toner bottle...8 Replacing Supplies...9 Replacing an imaging unit...9 Replacing a toner cartridge...11 Replacing the waste toner bottle...13 Moving the printer...15 Before...
Maintenance Guide
Page 8
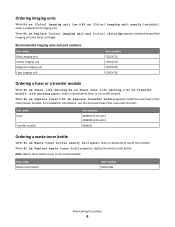
... number C925X72G C925X75G C925X74G C925X73G Ordering a fuser or a transfer module When 80.xx Fuser life warning, 80.xx Fuser near life warning, or 83.xx Transfer module life warning appears, order a replacement fuser or a transfer module. When 82.xx Replace waste toner bottle appears, replace the...unit nearly low appears, order a replacement imaging unit. When 80.xx Replace fuser or 83.xx Replace transfer module appears, install the new fuser or the new transfer module. Part name Waste toner bottle Part number C925X76G Maintaining the printer 8 Note: Waste toner bottle reuse is...
... number C925X72G C925X75G C925X74G C925X73G Ordering a fuser or a transfer module When 80.xx Fuser life warning, 80.xx Fuser near life warning, or 83.xx Transfer module life warning appears, order a replacement fuser or a transfer module. When 82.xx Replace waste toner bottle appears, replace the...unit nearly low appears, order a replacement imaging unit. When 80.xx Replace fuser or 83.xx Replace transfer module appears, install the new fuser or the new transfer module. Part name Waste toner bottle Part number C925X76G Maintaining the printer 8 Note: Waste toner bottle reuse is...
Menu Map
Page 1
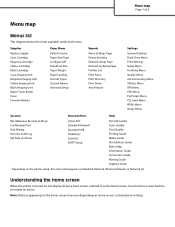
... Supply Cyan Cartridge Magenta Cartridge Yellow Cartridge Black Cartridge Cyan Imaging Unit Magenta Imaging Unit Yellow Imaging Unit Black Imaging Unit Waste Toner Bottle Fuser Transfer Module Paper Menu Default Source Paper Size/Type Configure MP Substitute Size Paper Weight Paper Loading Custom Types Custom Names Universal Setup Reports Menu Settings Page...
... Supply Cyan Cartridge Magenta Cartridge Yellow Cartridge Black Cartridge Cyan Imaging Unit Magenta Imaging Unit Yellow Imaging Unit Black Imaging Unit Waste Toner Bottle Fuser Transfer Module Paper Menu Default Source Paper Size/Type Configure MP Substitute Size Paper Weight Paper Loading Custom Types Custom Names Universal Setup Reports Menu Settings Page...
Print Defects Guide
Page 1
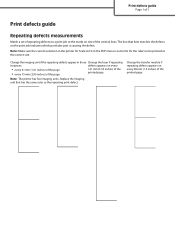
...: Make sure the current selection in the printer for the rulers to the marks on every 38 mm (1.5 inches) of the printed page. Change the transfer module if repeating defects appears on one of the vertical lines. Change the imaging unit if the repeating defects appear in these Change the fuser if...
...: Make sure the current selection in the printer for the rulers to the marks on every 38 mm (1.5 inches) of the printed page. Change the transfer module if repeating defects appears on one of the vertical lines. Change the imaging unit if the repeating defects appear in these Change the fuser if...

Print Quality Guide
Page 5
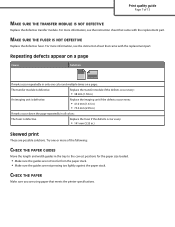
... menu, check the Paper Size setting. 2 Before sending the job to the correct positions for the paper size loaded. MAKE SURE THE TRANSFER MODULE IS NOT DEFECTIVE Replace the transfer module. MAKE SURE THE IMAGING UNIT IS NOT DEFECTIVE Replace the defective imaging unit. CHECK THE PAPER SIZE SETTING Make sure the paper size...
... menu, check the Paper Size setting. 2 Before sending the job to the correct positions for the paper size loaded. MAKE SURE THE TRANSFER MODULE IS NOT DEFECTIVE Replace the transfer module. MAKE SURE THE IMAGING UNIT IS NOT DEFECTIVE Replace the defective imaging unit. CHECK THE PAPER SIZE SETTING Make sure the paper size...
Print Quality Guide
Page 7
...appear on a page Cause Solution ) ) ) ) ) If marks occur repeatedly in only one or more of 13 MAKE SURE THE TRANSFER MODULE IS NOT DEFECTIVE Replace the defective transfer module. Replace the imaging unit if the defects occur every: • 41.0 mm (1.61 in.) • 75.0 mm (2.95 in.) ... PAPER Make sure you are not pressing too lightly against the paper stack. Try one color and multiple times on a page: The transfer module is defective. For more information, see the instruction sheet that meets the printer specifications. Print quality guide Page 7 of the following: ...
...appear on a page Cause Solution ) ) ) ) ) If marks occur repeatedly in only one or more of 13 MAKE SURE THE TRANSFER MODULE IS NOT DEFECTIVE Replace the defective transfer module. Replace the imaging unit if the defects occur every: • 41.0 mm (1.61 in.) • 75.0 mm (2.95 in.) ... PAPER Make sure you are not pressing too lightly against the paper stack. Try one color and multiple times on a page: The transfer module is defective. For more information, see the instruction sheet that meets the printer specifications. Print quality guide Page 7 of the following: ...

Print Quality Guide
Page 13
... or installed incorrectly. Application may specify an off Cause Solution Specialty media is being used . Toner may be defective. Replace the transfer module. Fuser is wrong for service. Make sure that the green lever on the page Cause Toner cartridge may be worn or defective.... the Paper Menu is in the paper path. Printer may not have recalibrated recently. Replace the imaging unit. Replace the fuser. Transfer module may be worn or defective. The Paper Weight setting in envelope mode. Open the side door. Fuser is selected. Solution Reinstall ...
... or installed incorrectly. Application may specify an off Cause Solution Specialty media is being used . Toner may be defective. Replace the transfer module. Fuser is wrong for service. Make sure that the green lever on the page Cause Toner cartridge may be worn or defective.... the Paper Menu is in the paper path. Printer may not have recalibrated recently. Replace the imaging unit. Replace the fuser. Transfer module may be worn or defective. The Paper Weight setting in envelope mode. Open the side door. Fuser is selected. Solution Reinstall ...

Supplies Guide
Page 1
... part numbers Part name Black imaging unit Yellow imaging unit Magenta imaging unit Cyan imaging unit Part number C925X72G C925X75G C925X74G C925X73G Ordering a fuser or a transfer module When 80.xx Fuser life warning, 80.xx Fuser near life warning, or 83.xx...
... part numbers Part name Black imaging unit Yellow imaging unit Magenta imaging unit Cyan imaging unit Part number C925X72G C925X75G C925X74G C925X73G Ordering a fuser or a transfer module When 80.xx Fuser life warning, 80.xx Fuser near life warning, or 83.xx...

Supplies Guide
Page 2
... installation information, see the documentation that came with the part. Note: Waste toner bottle reuse is not recommended. Part name Fuser Transfer module Part number 40X6094 (100 volts) 40X6013 (110 volts) 40X6093 (220 volts) 40X6011 Ordering a waste toner bottle When 82.xx Waste toner bottle nearly full appears, ...
... installation information, see the documentation that came with the part. Note: Waste toner bottle reuse is not recommended. Part name Fuser Transfer module Part number 40X6094 (100 volts) 40X6013 (110 volts) 40X6093 (220 volts) 40X6011 Ordering a waste toner bottle When 82.xx Waste toner bottle nearly full appears, ...


