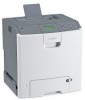
Quick Reference
Page 2
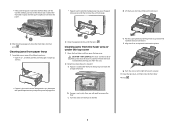
...the screws to the right to fasten it securely. 3 Close the top cover, and then close the front door, and then press . Wait for the fuser to cool before clearing jams from this area. 2 Determine where the jam is located: a If paper is visible under the top cover 1 Open the ... out to remove the paper. • If paper is jammed inthe multipurposetray, press the paper release lever, and then remove the jammed pages. 1 d Lift the fuser, and move it forward to remove it. 2 After clearing a paper jam, close the front door. 4 Press . 2 Clearing jams from paper trays 1 Complete one of ...
...the screws to the right to fasten it securely. 3 Close the top cover, and then close the front door, and then press . Wait for the fuser to cool before clearing jams from this area. 2 Determine where the jam is located: a If paper is visible under the top cover 1 Open the ... out to remove the paper. • If paper is jammed inthe multipurposetray, press the paper release lever, and then remove the jammed pages. 1 d Lift the fuser, and move it forward to remove it. 2 After clearing a paper jam, close the front door. 4 Press . 2 Clearing jams from paper trays 1 Complete one of ...
Menu Map
Page 1
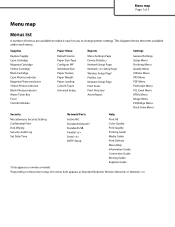
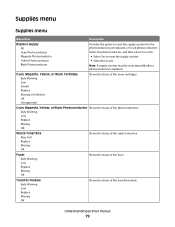
... change printer settings. Supplies Replace Supply Cyan Cartridge Magenta Cartridge Yellow Cartridge Black Cartridge Cyan Photoconductor Magenta Photoconductor Yellow Photoconductor Black Photoconductor Waste Toner Box Fuser Transfer Module Paper Menu Default Source Paper Size/Type Configure MP Substitute Size Paper Texture Paper Weight Paper Loading Custom Types Universal Setup Reports Menu...
... change printer settings. Supplies Replace Supply Cyan Cartridge Magenta Cartridge Yellow Cartridge Black Cartridge Cyan Photoconductor Magenta Photoconductor Yellow Photoconductor Black Photoconductor Waste Toner Box Fuser Transfer Module Paper Menu Default Source Paper Size/Type Configure MP Substitute Size Paper Texture Paper Weight Paper Loading Custom Types Universal Setup Reports Menu...
Print Defects
Page 1
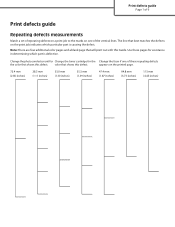
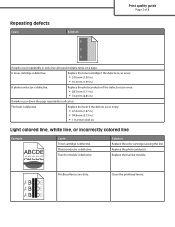
... the defects on the print job indicates which part is causing the defect. color that shows this defect. Use these pages for the Change the fuser if one of these repeating defects the color that shows this Guide. Print defects guide Page 1 of 6 Print defects guide Repeating defects measurements Match a set...
... the defects on the print job indicates which part is causing the defect. color that shows this defect. Use these pages for the Change the fuser if one of these repeating defects the color that shows this Guide. Print defects guide Page 1 of 6 Print defects guide Repeating defects measurements Match a set...

Print Quality
Page 1
..., and then press . ABC) D)E ABCDE ABCDE You are using paper that you are using. Replace the print cartridge, the transfer module, or the fuser. Check the printer control panel for Config Menu to high humidity. Load paper from a fresh package into the paper tray. The print quality test pages.... Make sure that the Paper Type and Paper Weight settings match the type of its intended life. A toner cartridge, the transfer module, or the fuser is loaded in Tray 1. 2 Turn the printer off. 3 From the printer control panel, press and hold and the right arrow button while turning ...
..., and then press . ABC) D)E ABCDE ABCDE You are using paper that you are using. Replace the print cartridge, the transfer module, or the fuser. Check the printer control panel for Config Menu to high humidity. Load paper from a fresh package into the paper tray. The print quality test pages.... Make sure that the Paper Type and Paper Weight settings match the type of its intended life. A toner cartridge, the transfer module, or the fuser is loaded in Tray 1. 2 Turn the printer off. 3 From the printer control panel, press and hold and the right arrow button while turning ...
Print Quality
Page 2
... .) Light colored line, white line, or incorrectly colored line Example ABCDE ABCDE Cause Toner cartridge is defective. Photoconductor is defective. Replace the photoconductor. Replace the fuser if the defects occur every: • 47.4 mm (1.87 in.) • 94.8 mm (3.73 in.) • 113.0 mm (4.45 in all colors: The...
... .) Light colored line, white line, or incorrectly colored line Example ABCDE ABCDE Cause Toner cartridge is defective. Photoconductor is defective. Replace the photoconductor. Replace the fuser if the defects occur every: • 47.4 mm (1.87 in.) • 94.8 mm (3.73 in.) • 113.0 mm (4.45 in all colors: The...
Print Quality
Page 4
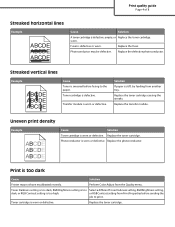
Replace the fuser. Photoconductor may not have recalibrated recently. Replace the toner cartridge causing the streaks. Photoconductor is too high. Toner Darkness setting is too dark, RGB Brightness ... or defective. Streaked vertical lines Example ABCDE ABCDE ABCDE Cause Toner is smeared before sending the job to the paper. worn. Toner cartridge is defective. Fuser is stiff, try feeding from the Quality menu. Replace the defective photoconductor. Solution If paper is defective or worn.
Replace the fuser. Photoconductor may not have recalibrated recently. Replace the toner cartridge causing the streaks. Photoconductor is too high. Toner Darkness setting is too dark, RGB Brightness ... or defective. Streaked vertical lines Example ABCDE ABCDE ABCDE Cause Toner is smeared before sending the job to the paper. worn. Toner cartridge is defective. Fuser is stiff, try feeding from the Quality menu. Replace the defective photoconductor. Solution If paper is defective or worn.
Print Quality
Page 6
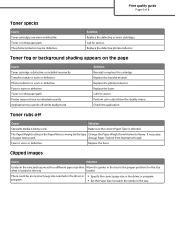
... or background shading appears on the page Cause Toner cartridge is worn or defective. Toner is in the driver or program. Replace the fuser. Check the application. Clipped images Cause Solution Guides in the selected tray are worn or defective. There could be defective. program. ...guides in the tray to the proper positions for the type Change the Paper Weight from Normal to Rough. Replace the fuser. Replace the transfer module. Fuser is worn or defective. Call for service. Replace the photoconductor. Toner rubs off -white background. Make sure the ...
... or background shading appears on the page Cause Toner cartridge is worn or defective. Toner is in the driver or program. Replace the fuser. Check the application. Clipped images Cause Solution Guides in the selected tray are worn or defective. There could be defective. program. ...guides in the tray to the proper positions for the type Change the Paper Weight from Normal to Rough. Replace the fuser. Replace the transfer module. Fuser is worn or defective. Call for service. Replace the photoconductor. Toner rubs off -white background. Make sure the ...
Supplies Guide
Page 1
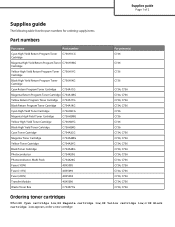
... C736H2KG Cyan Toner Cartridge C734A2CG Magenta Toner Cartridge C734A2MG Yellow Toner Cartridge C734A2YG Black Toner Cartridge C734A2KG Photoconductor C734X20G Photoconductor, Multi-Pack C734X24G Fuser (100V) 40X5095 Fuser (115V) 40X5093 Fuser (230V) 40X5094 Transfer Module 40X5096 Waste Toner Box C734X77G For printer(s) C736 C736 C736 C736 C734, C736 C734, C736 C734, C736 C734, C736...
... C736H2KG Cyan Toner Cartridge C734A2CG Magenta Toner Cartridge C734A2MG Yellow Toner Cartridge C734A2YG Black Toner Cartridge C734A2KG Photoconductor C734X20G Photoconductor, Multi-Pack C734X24G Fuser (100V) 40X5095 Fuser (115V) 40X5093 Fuser (230V) 40X5094 Transfer Module 40X5096 Waste Toner Box C734X77G For printer(s) C736 C736 C736 C736 C734, C736 C734, C736 C734, C736 C734, C736...

Supplies Guide
Page 2
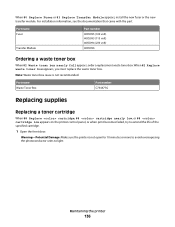
...low print coverage (less than 1.25% for a color) for that came with about 5% coverage per color). When 80 Replace Fuser or 83 Replace Transfer Module appears, install the new fuser or the new transfer module. Note: Waste toner box reuse is based on the ISO / IEC 19798 standard (with the part... extended periods of time may cause cartridge parts to fail prior to exhaustion of toner. Part name Waste Toner Box Part number C734X77G Part name Fuser Transfer Module Part number 40X5095 (100 volt) 40X5093 (115 volt) 40X5094 (230 volt) 40X5096 Ordering a waste toner box When 82 Waste toner box...
...low print coverage (less than 1.25% for a color) for that came with about 5% coverage per color). When 80 Replace Fuser or 83 Replace Transfer Module appears, install the new fuser or the new transfer module. Note: Waste toner box reuse is based on the ISO / IEC 19798 standard (with the part... extended periods of time may cause cartridge parts to fail prior to exhaustion of toner. Part name Waste Toner Box Part number C734X77G Part name Fuser Transfer Module Part number 40X5095 (100 volt) 40X5093 (115 volt) 40X5094 (230 volt) 40X5096 Ordering a waste toner box When 82 Waste toner box...

User's Guide
Page 60
they do not know the IP address of the fuser varies according to your custom name. 8 Select a Paper Type setting from the Paper Size/Type menu. Creating a custom name for a paper type If the printer ...
they do not know the IP address of the fuser varies according to your custom name. 8 Select a Paper Type setting from the Paper Size/Type menu. Creating a custom name for a paper type If the printer ...

User's Guide
Page 63
... in the same source; mixing results in jams. • Do not use coated papers unless they are not affected by the temperature in the printer fuser • Preprinted papers that require a registration (the precise print location on these requirements; Use papers printed with heat-resistant inks designed for electrophotographic printing. When...
... in the same source; mixing results in jams. • Do not use coated papers unless they are not affected by the temperature in the printer fuser • Preprinted papers that require a registration (the precise print location on these requirements; Use papers printed with heat-resistant inks designed for electrophotographic printing. When...

User's Guide
Page 67
... vinyl may show print quality defects in some environments, and prolonged vinyl label usage may reduce fuser life. For more information, see the Card Stock & Label Guide available on the Lexmark Web site at http://support.lexmark.com. 4 Use envelopes that lie flat when individually placed on a table facedown. Paper type Standard 550...
... vinyl may show print quality defects in some environments, and prolonged vinyl label usage may reduce fuser life. For more information, see the Card Stock & Label Guide available on the Lexmark Web site at http://support.lexmark.com. 4 Use envelopes that lie flat when individually placed on a table facedown. Paper type Standard 550...

User's Guide
Page 70
... adhesives, face sheet (printable stock), and topcoats can withstand up to fit the width of its variable characteristics, such as vinyl may reduce fuser life. Adhesive material contaminates the printer and could void the printer and cartridge warranties. • Do not use labels with exposed adhesive. &#... the printer and the cartridge with adhesive, and could void the warranty. • If zone coating of the adhesive at http://support.lexmark.com. Are stuck together or damaged in any exposed adhesive when the flap is heavy, single-ply specialty media. Many of the envelopes...
... adhesives, face sheet (printable stock), and topcoats can withstand up to fit the width of its variable characteristics, such as vinyl may reduce fuser life. Adhesive material contaminates the printer and could void the printer and cartridge warranties. • Do not use labels with exposed adhesive. &#... the printer and the cartridge with adhesive, and could void the warranty. • If zone coating of the adhesive at http://support.lexmark.com. Are stuck together or damaged in any exposed adhesive when the flap is heavy, single-ply specialty media. Many of the envelopes...

User's Guide
Page 78
... menus Menus list Supplies Replace Supply Cyan Cartridge Magenta Cartridge Yellow Cartridge Black Cartridge Cyan Photoconductor Magenta Photoconductor Yellow Photoconductor Black Photoconductor Waste Toner Box Fuser Transfer Module Paper Menu Default Source Paper Size/Type Configure MP Substitute Size Paper Texture Paper Weight Paper Loading Custom Types Universal Setup Reports Menu...
... menus Menus list Supplies Replace Supply Cyan Cartridge Magenta Cartridge Yellow Cartridge Black Cartridge Cyan Photoconductor Magenta Photoconductor Yellow Photoconductor Black Photoconductor Waste Toner Box Fuser Transfer Module Paper Menu Default Source Paper Size/Type Configure MP Substitute Size Paper Texture Paper Weight Paper Loading Custom Types Universal Setup Reports Menu...
User's Guide
Page 79
... Low Replace Missing OK Waste Toner Box Near Full Replace Missing OK Shows the status of the waste toner box Fuser Early Warning Low Replace Missing OK Shows the status of the fuser Transfer module Early Warning Low Replace Missing OK Shows the status of the transfer module Understanding printer menus 79
... Low Replace Missing OK Waste Toner Box Near Full Replace Missing OK Shows the status of the waste toner box Fuser Early Warning Low Replace Missing OK Shows the status of the fuser Transfer module Early Warning Low Replace Missing OK Shows the status of the transfer module Understanding printer menus 79

User's Guide
Page 135
... for printer supplies assume printing on the ISO / IEC 19798 standard (with about Lexmark authorized supplies dealers in the U.S., contact Lexmark at www.lexmark.com or contact the place where you must replace the specified cartridge. Part name Photoconductor... Photoconductor, Multi-Pack Part number C734X20G C734X24G Ordering a fuser or a transfer module When 80 Fuser Life Warning or 83 Transfer Module Life Warning appears, order a replacement fuser...
... for printer supplies assume printing on the ISO / IEC 19798 standard (with about Lexmark authorized supplies dealers in the U.S., contact Lexmark at www.lexmark.com or contact the place where you must replace the specified cartridge. Part name Photoconductor... Photoconductor, Multi-Pack Part number C734X20G C734X24G Ordering a fuser or a transfer module When 80 Fuser Life Warning or 83 Transfer Module Life Warning appears, order a replacement fuser...
User's Guide
Page 136
...minutes or more to avoid overexposing the photoconductor units to extend the life of the specified cartridge. 1 Open the front door. When 80 Replace Fuser or 83 Replace Transfer Module appears, install the new fuser or the new transfer module. Warning-Potential Damage: Make sure the printer is not recommended. Part name... Fuser Transfer Module Part number 40X5095 (100 volt) 40X5093 (115 volt) 40X5094 (230 volt) 40X5096 Ordering a waste toner box When 82 Waste toner box nearly ...
...minutes or more to avoid overexposing the photoconductor units to extend the life of the specified cartridge. 1 Open the front door. When 80 Replace Fuser or 83 Replace Transfer Module appears, install the new fuser or the new transfer module. Warning-Potential Damage: Make sure the printer is not recommended. Part name... Fuser Transfer Module Part number 40X5095 (100 volt) 40X5093 (115 volt) 40X5094 (230 volt) 40X5096 Ordering a waste toner box When 82 Waste toner box nearly ...

User's Guide
Page 154
... Turn the screws on each side and pull it towards you will damage the fuser. Clearing jams 154 Touching the fuser roller will need to cool before touching. 2 If the paper is jammed behind the fuser unit Warning-Potential Damage: To avoid overexposing the photoconductors, do not leave the .... Warning-Potential Damage: Do not touch the center of injury from a hot component, allow the surface to remove the fuser unit. Paper jam under the fuser unit Warning-Potential Damage: To avoid overexposing the photoconductors, do not leave the front door open longer than 10 minutes. ...
... Turn the screws on each side and pull it towards you will damage the fuser. Clearing jams 154 Touching the fuser roller will need to cool before touching. 2 If the paper is jammed behind the fuser unit Warning-Potential Damage: To avoid overexposing the photoconductors, do not leave the .... Warning-Potential Damage: Do not touch the center of injury from a hot component, allow the surface to remove the fuser unit. Paper jam under the fuser unit Warning-Potential Damage: To avoid overexposing the photoconductors, do not leave the front door open longer than 10 minutes. ...

User's Guide
Page 155
b Turn the screws to the right to remove it. 4 Reinstall the fuser unit. b Lift the handholds on each side, and place it back into the printer. c Place the fuser unit on each side of the printer or up toward the standard exit bin to fasten the fuser unit securely. 5 Close the top cover, and then close the front door. 6 Press . Clearing jams 155 a Align the fuser unit using the handholds on a flat surface. 3 Pull the paper gently out of the fuser unit, and then pull forward to remove it.
b Turn the screws to the right to remove it. 4 Reinstall the fuser unit. b Lift the handholds on each side, and place it back into the printer. c Place the fuser unit on each side of the printer or up toward the standard exit bin to fasten the fuser unit securely. 5 Close the top cover, and then close the front door. 6 Press . Clearing jams 155 a Align the fuser unit using the handholds on a flat surface. 3 Pull the paper gently out of the fuser unit, and then pull forward to remove it.

User's Guide
Page 156
... the top cover. Clearing jams 156 c Close the top cover, and then close the front door. 3 If the jam is under the rollers near the fuser: Warning-Potential Damage: To avoid overexposing the photoconductors, do not leave the front door open longer than 10 minutes. a Open the front door, and then...
... the top cover. Clearing jams 156 c Close the top cover, and then close the front door. 3 If the jam is under the rollers near the fuser: Warning-Potential Damage: To avoid overexposing the photoconductors, do not leave the front door open longer than 10 minutes. a Open the front door, and then...


