
User's Guide
Page 60
... on ordering a maintenance kit, see Replacing the maintenance kit or the installation instructions that supplies need to replace your maintenance kit. Maintenance kit Drum cleaner Transfer roller Paper discharger The maintenance kit consist of your print image to transfer your maintenance kit. the transfer roller, paper discharger and drum cleaner. These components work together to the...
... on ordering a maintenance kit, see Replacing the maintenance kit or the installation instructions that supplies need to replace your maintenance kit. Maintenance kit Drum cleaner Transfer roller Paper discharger The maintenance kit consist of your print image to transfer your maintenance kit. the transfer roller, paper discharger and drum cleaner. These components work together to the...

User's Guide
Page 102
... quality. For best print quality, make sure you to replace the maintenance kit. If a new maintenance kit has been installed, press Go. 102 When these components reach the end of a transfer roller, paper discharger, and drum cleaner. The maintenance kit consists of their life, the printer displays 80 Scheduled Maintenance. If... as shown. 5 Slide the filter cover assembly onto the printer until it locks into place. appears. If a new maintenance kit has not been installed, press Stop. Replacing the maintenance kit Your printer monitors the life of the display to clear the message.
... quality. For best print quality, make sure you to replace the maintenance kit. If a new maintenance kit has been installed, press Go. 102 When these components reach the end of a transfer roller, paper discharger, and drum cleaner. The maintenance kit consists of their life, the printer displays 80 Scheduled Maintenance. If... as shown. 5 Slide the filter cover assembly onto the printer until it locks into place. appears. If a new maintenance kit has not been installed, press Stop. Replacing the maintenance kit Your printer monitors the life of the display to clear the message.

User's Guide
Page 103
For more information, see reset the maintenance kit counter. Allow the printer to cool before the 80 Scheduled Maintenance message appeared, you must manually reset the fuser counter. To replace the maintenance kit components, use the following steps or the instruction sheet supplied with the maintenance kit: Replacing the transfer roller 1 Pull the rear door release latch toward the rear of the printer may be hot. Rear door release latch CAUTION: The inside of the printer. 2 Lower the rear door. If you install a new maintenance kit before touching any internal components. 103
For more information, see reset the maintenance kit counter. Allow the printer to cool before the 80 Scheduled Maintenance message appeared, you must manually reset the fuser counter. To replace the maintenance kit components, use the following steps or the instruction sheet supplied with the maintenance kit: Replacing the transfer roller 1 Pull the rear door release latch toward the rear of the printer may be hot. Rear door release latch CAUTION: The inside of the printer. 2 Lower the rear door. If you install a new maintenance kit before touching any internal components. 103

User's Guide
Page 145
...Port Disabled 56 Serial Port Disabled 56 Std Parallel Port Disabled 58 Too Many Disks Installed 58 Too Many Flash Options 6 61 Defective Disk 62 Disk Full 63 Unformatted Disk 7 70-79 8 80 Scheduled Maintenance 80 Transfer Roller Missing 81 Oil Bottle Empty or Missing 81 Oil Bottle Low 82 Photo Dev ...Cart Exhausted 82 Photo Dev Cart Missing 83 Waste Bottle Full Or Missing 83 Waste Toner Bottle Near Full 84 Transfer Drum Exhausted 85 Fuser Cleaner Exhausted 85 Fuser...
...Port Disabled 56 Serial Port Disabled 56 Std Parallel Port Disabled 58 Too Many Disks Installed 58 Too Many Flash Options 6 61 Defective Disk 62 Disk Full 63 Unformatted Disk 7 70-79 8 80 Scheduled Maintenance 80 Transfer Roller Missing 81 Oil Bottle Empty or Missing 81 Oil Bottle Low 82 Photo Dev ...Cart Exhausted 82 Photo Dev Cart Missing 83 Waste Bottle Full Or Missing 83 Waste Toner Bottle Near Full 84 Transfer Drum Exhausted 85 Fuser Cleaner Exhausted 85 Fuser...

User's Guide
Page 168
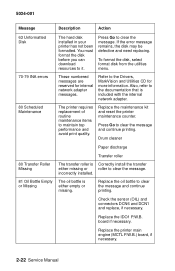
...either empty or missing. What you can do: Replace the oil bottle to clear the message and continue printing. What you can do : Correctly install the transfer roller to clear the message and continue printing. What you can do : • Replace the oil bottle. • Press Go to clear the ...message. See also: Replacing the transfer roller 81 Oil Bottle Empty or Missing What this message means: The oil bottle is either missing or incorrectly installed. See also: Oil bottle 168 See also: Oil bottle 81 Oil Bottle Low What this ...
...either empty or missing. What you can do: Replace the oil bottle to clear the message and continue printing. What you can do : Correctly install the transfer roller to clear the message and continue printing. What you can do : • Replace the oil bottle. • Press Go to clear the ...message. See also: Replacing the transfer roller 81 Oil Bottle Empty or Missing What this message means: The oil bottle is either missing or incorrectly installed. See also: Oil bottle 168 See also: Oil bottle 81 Oil Bottle Low What this ...

User's Guide
Page 269
....5 in.) 520 mm (20.5 in.) 605 mm (23.8 in.) Weight Printer configuration Printer (without supplies installed) Printer (with supplies installed1) Optional drawer unit Optional duplex unit 1 Excludes the weight of transfer roller, paper discharger, and drum cleaner). Transfers image to media (consists of paper. Printer supplies Supply Waste toner bottle Maintenance kit Description Collects...
....5 in.) 520 mm (20.5 in.) 605 mm (23.8 in.) Weight Printer configuration Printer (without supplies installed) Printer (with supplies installed1) Optional drawer unit Optional duplex unit 1 Excludes the weight of transfer roller, paper discharger, and drum cleaner). Transfers image to media (consists of paper. Printer supplies Supply Waste toner bottle Maintenance kit Description Collects...
User's Guide
Page 295
... 165 56 Std Parallel Port Disabled 165 58 Too Many Disks Installed 165 58 Too Many Flash Options 166 61 Defective Disk 166 62 Disk Full 166 63 Unformatted Disk 167 70-79 messages 167 80 Scheduled Maintenance 167 80 Transfer Roller Missing 168 81 Oil Bottle Empty or Missing 168 81 Oil... Bottle Low 168 82 Photo Dev Cart Exhausted 169 82 Photo Dev Cart Missing 169 83 Waste Bottle Full Or Missing 169 83 Waste Toner Bottle Near Full 170 84 Transfer Drum Exhausted 170 85...
... 165 56 Std Parallel Port Disabled 165 58 Too Many Disks Installed 165 58 Too Many Flash Options 166 61 Defective Disk 166 62 Disk Full 166 63 Unformatted Disk 167 70-79 messages 167 80 Scheduled Maintenance 167 80 Transfer Roller Missing 168 81 Oil Bottle Empty or Missing 168 81 Oil... Bottle Low 168 82 Photo Dev Cart Exhausted 169 82 Photo Dev Cart Missing 169 83 Waste Bottle Full Or Missing 169 83 Waste Toner Bottle Near Full 170 84 Transfer Drum Exhausted 170 85...
Service Manual
Page 102
... format disk from the utilities menu. 70-79 INA errors These numbered messages are reserved for more information. Drum cleaner Paper discharge Transfer roller 80 Transfer Roller Missing The transfer roller is Correctly install the transfer either empty or missing. If the error message remains, the disk may be defective and need replacing. Replace the maintenance kit and...
... format disk from the utilities menu. 70-79 INA errors These numbered messages are reserved for more information. Drum cleaner Paper discharge Transfer roller 80 Transfer Roller Missing The transfer roller is Correctly install the transfer either empty or missing. If the error message remains, the disk may be defective and need replacing. Replace the maintenance kit and...

Service Manual
Page 157
... roller and the separator pad for paper caught behind the cassette, in the pickup transport roll. Diagnostic Information 2-77 Replace any additional damage to the transfer unit replace it. Ensure paper does not contain humidity. 2 • Paper Stop • Paper Cassette Note: Disconnect the lower feed unit and the duplex unit, if installed...
... roller and the separator pad for paper caught behind the cassette, in the pickup transport roll. Diagnostic Information 2-77 Replace any additional damage to the transfer unit replace it. Ensure paper does not contain humidity. 2 • Paper Stop • Paper Cassette Note: Disconnect the lower feed unit and the duplex unit, if installed...

Service Manual
Page 173
... not correct. THV output to the DC high voltage unit is properly installed. Replace the toner cartridge. Paper in place. FRU 1 Transfer Unit 2 Transfer Roller 3 High Voltage Unit 4 Toner Cartridge 5 Check Paper Action Transfer unit is not in printer is deformed. Transfer roller assembly not correct. Replace the DC high voltage unit. Diagnostic Information 2-93 Ensure the...
... not correct. THV output to the DC high voltage unit is properly installed. Replace the toner cartridge. Paper in place. FRU 1 Transfer Unit 2 Transfer Roller 3 High Voltage Unit 4 Toner Cartridge 5 Check Paper Action Transfer unit is not in printer is deformed. Transfer roller assembly not correct. Replace the DC high voltage unit. Diagnostic Information 2-93 Ensure the...

Service Manual
Page 180
5024-001 White Band Service Check A white banding line appears, in the horizontal direction, causing a missing image. Ensure the transfer unit is properly installed and locked on the transfer roller bias pole. TR cam clutch failure. FRU 1 Check Transfer Unit 2 Transfer Roller 3 TR Cam Clutch (TRCM) 4 Transfer Unit Action Transfer unit installation failure and deformation of the transfer roller. Contact failure on both sides. Replace the transfer unit. 2-100 Service Manual Ensure the transfer unit is properly installed.
5024-001 White Band Service Check A white banding line appears, in the horizontal direction, causing a missing image. Ensure the transfer unit is properly installed and locked on the transfer roller bias pole. TR cam clutch failure. FRU 1 Check Transfer Unit 2 Transfer Roller 3 TR Cam Clutch (TRCM) 4 Transfer Unit Action Transfer unit installation failure and deformation of the transfer roller. Contact failure on both sides. Replace the transfer unit. 2-100 Service Manual Ensure the transfer unit is properly installed.

Service Manual
Page 185
... is not functioning. One side of paper. Paper discharger unit in the transfer unit is not locked properly. The fuser roller is installed properly and fixed with set screws. Diagnostic Information 2-105 5024-001 Wrinkle / Image Migration Service Check Banding shadows of different optical density appear due to ...
... is not functioning. One side of paper. Paper discharger unit in the transfer unit is not locked properly. The fuser roller is installed properly and fixed with set screws. Diagnostic Information 2-105 5024-001 Wrinkle / Image Migration Service Check Banding shadows of different optical density appear due to ...

Service Manual
Page 289
Lifting the left end and undo the shaft from the hole. Note: Install the transfer unit with the fixing metal stop on the transfer unit. 3. Slide the transfer unit to the left side, remove the shaft from the right side hole. Repair Information 4-79 b. Remove the set screw BT4X10 (1) from the retainer band on the transfer unit. 4. a. Remove the shaft from the fixing metal stop . Remove the set screw ST3X6 (1) from the frame installation hole. Open the transfer unit. 2. 5024-001 Transfer Unit (Rollers and Drum) Removal Transfer Unit Removal 1.
Lifting the left end and undo the shaft from the hole. Note: Install the transfer unit with the fixing metal stop on the transfer unit. 3. Slide the transfer unit to the left side, remove the shaft from the right side hole. Repair Information 4-79 b. Remove the set screw BT4X10 (1) from the retainer band on the transfer unit. 4. a. Remove the shaft from the fixing metal stop . Remove the set screw ST3X6 (1) from the frame installation hole. Open the transfer unit. 2. 5024-001 Transfer Unit (Rollers and Drum) Removal Transfer Unit Removal 1.

Replacing Supplies
Page 82
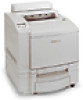
...the following steps or the instruction sheet supplied with the maintenance kit: www.lexmark.com Lexmark C720 The maintenance kit consists of their life, the printer displays 80 Scheduled Maintenance. If you install a new maintenance kit before the 80 Scheduled Maintenance message appeared, you replace... kit components when the 80 Scheduled Maintenance message appears. If a new maintenance kit has not been installed, press Stop. When these components reach the end of a transfer roller, paper discharger, and drum cleaner. It is opened and closed, the message Did you that affect...
...the following steps or the instruction sheet supplied with the maintenance kit: www.lexmark.com Lexmark C720 The maintenance kit consists of their life, the printer displays 80 Scheduled Maintenance. If you install a new maintenance kit before the 80 Scheduled Maintenance message appeared, you replace... kit components when the 80 Scheduled Maintenance message appears. If a new maintenance kit has not been installed, press Stop. When these components reach the end of a transfer roller, paper discharger, and drum cleaner. It is opened and closed, the message Did you that affect...

