
User's Guide
Page 5
.... Do not pinch the power cord between objects such as Ethernet and telephone system connections) are accessing the system board or installing optional hardware or memory devices sometime after setting up this product near the product and easily accessible. Do not place or use of the printer, unplug the power cord...
.... Do not pinch the power cord between objects such as Ethernet and telephone system connections) are accessing the system board or installing optional hardware or memory devices sometime after setting up this product near the product and easily accessible. Do not place or use of the printer, unplug the power cord...
User's Guide
Page 13
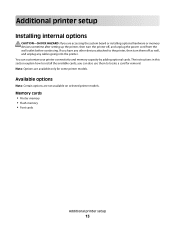
you can customize your printer connectivity and memory capacity by adding optional cards. Memory cards • Printer memory • Flash memory • Font cards Additional printer setup 13 The instructions in this section explain how to the printer, then turn the printer off...selected printer models. Additional printer setup Installing internal options CAUTION-SHOCK HAZARD: If you are accessing the system board or installing optional hardware or memory devices sometime after setting up the printer, then turn them to locate a card for some printer models. If you have any other ...
you can customize your printer connectivity and memory capacity by adding optional cards. Memory cards • Printer memory • Flash memory • Font cards Additional printer setup 13 The instructions in this section explain how to the printer, then turn the printer off...selected printer models. Additional printer setup Installing internal options CAUTION-SHOCK HAZARD: If you are accessing the system board or installing optional hardware or memory devices sometime after setting up the printer, then turn them to locate a card for some printer models. If you have any other ...
User's Guide
Page 14
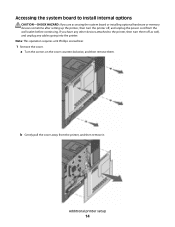
..., and unplug any other devices attached to install internal options CAUTION-SHOCK HAZARD: If you are accessing the system board or installing optional hardware or memory devices sometime after setting up the printer, then turn them .
..., and unplug any other devices attached to install internal options CAUTION-SHOCK HAZARD: If you are accessing the system board or installing optional hardware or memory devices sometime after setting up the printer, then turn them .

User's Guide
Page 15
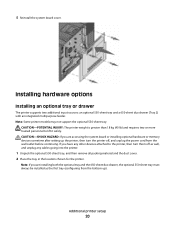
Touch something metal on the printer before touching any system board electronic components or connectors. 1 Flash memory card connector 2 Memory card connector Additional printer setup 15 Warning-Potential Damage: System board electrical components are easily damaged by static electricity. 2 Use the illustration below to locate the appropriate connector.
Touch something metal on the printer before touching any system board electronic components or connectors. 1 Flash memory card connector 2 Memory card connector Additional printer setup 15 Warning-Potential Damage: System board electrical components are easily damaged by static electricity. 2 Use the illustration below to locate the appropriate connector.

User's Guide
Page 16
Installing a memory card The system board has one connector for an optional memory card. Additional printer setup 16 If you are accessing the system board or installing optional hardware or memory devices sometime after setting up the printer, then turn them off , and unplug the power cord from the wall outlet before continuing. CAUTION-SHOCK HAZARD: If you have any other devices attached to the printer, then turn the printer off as well, and unplug any cables going into the printer. 1 Access the system board.
Installing a memory card The system board has one connector for an optional memory card. Additional printer setup 16 If you are accessing the system board or installing optional hardware or memory devices sometime after setting up the printer, then turn them off , and unplug the power cord from the wall outlet before continuing. CAUTION-SHOCK HAZARD: If you have any other devices attached to the printer, then turn the printer off as well, and unplug any cables going into the printer. 1 Access the system board.

User's Guide
Page 17
Note: Avoid touching the connection points along the edge of the memory card. 1 Notch 2 Latch Additional printer setup 17 2 Open both latches on the connector. 5 Push the memory card straight into the connector until it snaps into place. Make sure each latch fits over the notch located on either side of the card. 4 Align the notches on the memory card with the ridges on the connector completely. 3 Unpack the memory card.
Note: Avoid touching the connection points along the edge of the memory card. 1 Notch 2 Latch Additional printer setup 17 2 Open both latches on the connector. 5 Push the memory card straight into the connector until it snaps into place. Make sure each latch fits over the notch located on either side of the card. 4 Align the notches on the memory card with the ridges on the connector completely. 3 Unpack the memory card.

User's Guide
Page 18
Additional printer setup 18 6 Reinstall the system board access cover. If you are accessing the system board or installing optional hardware or memory devices sometime after setting up the printer, then turn them off , and unplug the power cord from the wall outlet before continuing. Installing a flash memory card CAUTION-SHOCK HAZARD: If you have any other devices attached to the printer, then turn the printer off as well, and unplug any cables going into the printer. 1 Access the system board.
Additional printer setup 18 6 Reinstall the system board access cover. If you are accessing the system board or installing optional hardware or memory devices sometime after setting up the printer, then turn them off , and unplug the power cord from the wall outlet before continuing. Installing a flash memory card CAUTION-SHOCK HAZARD: If you have any other devices attached to the printer, then turn the printer off as well, and unplug any cables going into the printer. 1 Access the system board.

User's Guide
Page 19
Additional printer setup 19 This ensures the metal pins line up correctly as well. 1 Plastic pins 2 Metal pins 4 Push the card firmly into place. Notes: • The entire length of the card. 3 Holding the card by its sides, align the plastic pins on the card with the holes on the card must touch and be flush against the system board. • Be careful not to damage the connectors. 2 Unpack the memory card. Note: Avoid touching the connection points along the edge of the connector on the system board.
Additional printer setup 19 This ensures the metal pins line up correctly as well. 1 Plastic pins 2 Metal pins 4 Push the card firmly into place. Notes: • The entire length of the card. 3 Holding the card by its sides, align the plastic pins on the card with the holes on the card must touch and be flush against the system board. • Be careful not to damage the connectors. 2 Unpack the memory card. Note: Avoid touching the connection points along the edge of the connector on the system board.
User's Guide
Page 20
... the dust cover. 2 Place the tray in the location chosen for the printer. If you are accessing the system board or installing optional hardware or memory devices sometime after setting up ). 5 Reinstall the system board cover.
... the dust cover. 2 Place the tray in the location chosen for the printer. If you are accessing the system board or installing optional hardware or memory devices sometime after setting up ). 5 Reinstall the system board cover.
User's Guide
Page 60
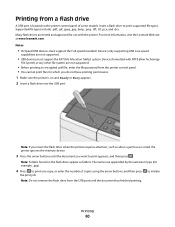
For more information, visit the Lexmark Web site at www.lexmark.com. Notes: • Hi-Speed USB devices must support the FAT (File Allocation Tables) system. Supported file types include: .pdf, .gif, .jpeg, .jpg, .bmp, .png, .... do not have printing permissions. 1 Make sure the printer is located on the flash drive appear as when a jam has occurred, the printer ignores the memory device. 3 Press the arrow buttons until the document has finished printing. Insert a flash drive to print appears, and then press . Many flash drives are not...
For more information, visit the Lexmark Web site at www.lexmark.com. Notes: • Hi-Speed USB devices must support the FAT (File Allocation Tables) system. Supported file types include: .pdf, .gif, .jpeg, .jpg, .bmp, .png, .... do not have printing permissions. 1 Make sure the printer is located on the flash drive appear as when a jam has occurred, the printer ignores the memory device. 3 Press the arrow buttons until the document has finished printing. Insert a flash drive to print appears, and then press . Many flash drives are not...
User's Guide
Page 62
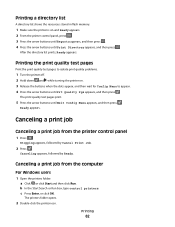
..., or click OK. Ready appears. Canceling a print job from the printer control panel 1 Press . Printing a directory list A directory list shows the resources stored in flash memory. 1 Make sure the printer is on . 3 Release the buttons when the dots appear, and then wait for Config Menu to isolate print quality problems. 1 Turn...
..., or click OK. Ready appears. Canceling a print job from the printer control panel 1 Press . Printing a directory list A directory list shows the resources stored in flash memory. 1 Make sure the printer is on . 3 Release the buttons when the dots appear, and then wait for Config Menu to isolate print quality problems. 1 Turn...
User's Guide
Page 73
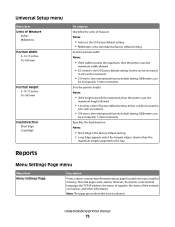
.... • 8.5 inches is selected. Reports Menu Settings Page menu Menu item Menu Settings Page Description Prints a report containing information about paper loaded into trays, installed memory, the total page count, alarms, timeouts, the printer control panel language, the TCP/IP address, the status of supplies, the status of measure Notes: •...
.... • 8.5 inches is selected. Reports Menu Settings Page menu Menu item Menu Settings Page Description Prints a report containing information about paper loaded into trays, installed memory, the total page count, alarms, timeouts, the printer control panel language, the TCP/IP address, the status of supplies, the status of measure Notes: •...

User's Guide
Page 83
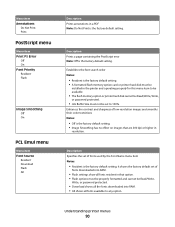
...Whole Page Description Specifies whether the printer reprints jammed pages Notes: • Auto is the factory default setting. Downloads stored in flash memory or on a printer hard disk are deleted. Description Sets the default printer language Notes: • PCL is the factory default printer... PostScript emulation uses a PS interpreter for processing print jobs. Understanding printer menus 83 The printer reprints jammed pages unless the memory required to never reprint jammed pages. Menu item Print Recovery Jam Recovery Auto On Off Print Recovery Page Protect Off On ...
...Whole Page Description Specifies whether the printer reprints jammed pages Notes: • Auto is the factory default setting. Downloads stored in flash memory or on a printer hard disk are deleted. Description Sets the default printer language Notes: • PCL is the factory default printer... PostScript emulation uses a PS interpreter for processing print jobs. Understanding printer menus 83 The printer reprints jammed pages unless the memory required to never reprint jammed pages. Menu item Print Recovery Jam Recovery Auto On Off Print Recovery Page Protect Off On ...

User's Guide
Page 84
...that binding be placed on the left edge of portrait pages and the top edge of landscape pages. • Short Edge specifies that requires more memory than is available Notes: • Off is the factory default setting. Downloads are bound and how the printing on the back of landscape pages.... as fonts and macros stored in RAM is temporary. • This menu appears only if a flash option is installed. Specifies a default number of memory, 38 Memory Full appears, and downloads are not deleted. If the printer runs out of copies for each print job Note: 1 is the factory default setting. ...
...that binding be placed on the left edge of portrait pages and the top edge of landscape pages. • Short Edge specifies that requires more memory than is available Notes: • Off is the factory default setting. Downloads are bound and how the printing on the back of landscape pages.... as fonts and macros stored in RAM is temporary. • This menu appears only if a flash option is installed. Specifies a default number of memory, 38 Memory Full appears, and downloads are not deleted. If the printer runs out of copies for each print job Note: 1 is the factory default setting. ...
User's Guide
Page 89
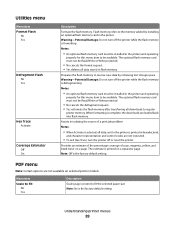
.../Write or Write protected. • No cancels the defragment request. • Yes reformats the flash memory after transferring all downloads to receive new data by installing an optional flash memory card in isolating the source of cyan, magenta, yellow, and black toner on a page. Utilities... Flash No Yes Defragment Flash No Yes Hex Trace Activate Coverage Estimator Off On Description Formats the flash memory. Prepares the flash memory to regular printer memory. Flash memory refers to fit the selected paper size Note: No is printed in the printer and operating properly for...
.../Write or Write protected. • No cancels the defragment request. • Yes reformats the flash memory after transferring all downloads to receive new data by installing an optional flash memory card in isolating the source of cyan, magenta, yellow, and black toner on a page. Utilities... Flash No Yes Defragment Flash No Yes Hex Trace Activate Coverage Estimator Off On Description Formats the flash memory. Prepares the flash memory to regular printer memory. Flash memory refers to fit the selected paper size Note: No is printed in the printer and operating properly for...
User's Guide
Page 90
... show all fonts available to any option. Establishes the font search order Notes: • Resident is the factory default setting. • A formatted flash memory option card or printer hard disk must be installed in that are 300 dpi or higher in a PDF Note: Do Not Print is the factory... fonts resident in the printer and operating properly for this menu item to 100%. Description Specifies the set to be available. • The flash memory option or printer hard disk cannot be Read/Write, Write, or password protected. • Job Buffer Size must be properly formatted and cannot be...
... show all fonts available to any option. Establishes the font search order Notes: • Resident is the factory default setting. • A formatted flash memory option card or printer hard disk must be installed in that are 300 dpi or higher in a PDF Note: Do Not Print is the factory... fonts resident in the printer and operating properly for this menu item to 100%. Description Specifies the set to be available. • The flash memory option or printer hard disk cannot be Read/Write, Write, or password protected. • Job Buffer Size must be properly formatted and cannot be...
User's Guide
Page 116
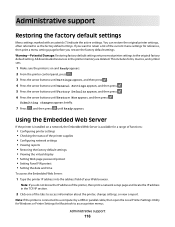
...: 1 Type the printer IP address into the address field of the printer, then print a network setup page and locate the IP address in the printer memory are deleted. Administrative support Restoring the factory default settings Menu settings marked with an asterisk (*) indicate the active settings.
...: 1 Type the printer IP address into the address field of the printer, then print a network setup page and locate the IP address in the printer memory are deleted. Administrative support Restoring the factory default settings Menu settings marked with an asterisk (*) indicate the active settings.
User's Guide
Page 128
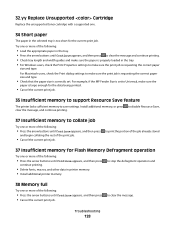
... set to Universal, make sure the print job is requesting the correct paper size and type. to stop the defragment operation and 38 Memory full Try one or more of the following: • Press the arrow buttons until Continue appears, and then press and begin collating ... save settings. For example, if the MP Feeder Size is properly loaded in printer memory. • Install additional printer memory. to print the portion of the job already stored 37 Insufficient memory for Flash Memory Defragment operation Try one or more of the following : • Press the arrow buttons until...
... set to Universal, make sure the print job is requesting the correct paper size and type. to stop the defragment operation and 38 Memory full Try one or more of the following: • Press the arrow buttons until Continue appears, and then press and begin collating ... save settings. For example, if the MP Feeder Size is properly loaded in printer memory. • Install additional printer memory. to print the portion of the job already stored 37 Insufficient memory for Flash Memory Defragment operation Try one or more of the following : • Press the arrow buttons until...
User's Guide
Page 129
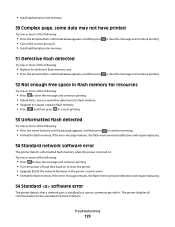
...8226; Press to clear the message and continue printing. • Turn the power off and then back on . If the error message remains, the flash memory may not have printed Try one or more of the following: • Press the arrow buttons until Continue appears, and then press to clear the... message and continue printing. 52 Not enough free space in flash memory for resources Try one or more of the following: • Press to clear the message and continue printing. • Delete fonts, macros, and ...
...8226; Press to clear the message and continue printing. • Turn the power off and then back on . If the error message remains, the flash memory may not have printed Try one or more of the following: • Press the arrow buttons until Continue appears, and then press to clear the... message and continue printing. 52 Not enough free space in flash memory for resources Try one or more of the following: • Press to clear the message and continue printing. • Delete fonts, macros, and ...

User's Guide
Page 130
... the printer off, and then remove extra flash options: 1 Turn the printer off. 2 Unplug the power cord from the wall outlet. 3 Remove the excess flash memory. 4 Connect the power cord to a properly grounded outlet. 5 Turn the printer back on. • Press to clear the message and continue printing. 58 Too many...
... the printer off, and then remove extra flash options: 1 Turn the printer off. 2 Unplug the power cord from the wall outlet. 3 Remove the excess flash memory. 4 Connect the power cord to a properly grounded outlet. 5 Turn the printer back on. • Press to clear the message and continue printing. 58 Too many...


