Troubleshooting Guide
Page 1
... Server 2003, or Windows Vista and using a recommended cable. • Make sure the connection is secure. Printer has received invalid data. Lexmark™ C53x Troubleshooting Guide Troubleshooting Checking an unresponsive printer If your printer. • If you are using the wrong USB or Ethernet cable,... checked each of these possibilities, turn the printer off and contact Customer Support. Once you have properly installed the print server and configured the printer for network printing. Turn the printer off, wait about 10 seconds, and then turn the printer off and then back...
... Server 2003, or Windows Vista and using a recommended cable. • Make sure the connection is secure. Printer has received invalid data. Lexmark™ C53x Troubleshooting Guide Troubleshooting Checking an unresponsive printer If your printer. • If you are using the wrong USB or Ethernet cable,... checked each of these possibilities, turn the printer off and contact Customer Support. Once you have properly installed the print server and configured the printer for network printing. Turn the printer off, wait about 10 seconds, and then turn the printer off and then back...

Troubleshooting Guide
Page 2
...Hex Trace mode before you to the appropriate recovery information in the the tray. Unexpected page breaks occur Cause Job has timed out. Lexmark Status Messenger Utility This program is not available with the printer software, the utility automatically launches when the software installation is not set to... errors requiring printer intervention. hard disk. Job takes longer than expected to print Cause Solution Job is set to On. Job is not configured properly. Solution Set the Print Timeout to On. printer software match the paper size and type in Hex Trace mode. If you when ...
...Hex Trace mode before you to the appropriate recovery information in the the tray. Unexpected page breaks occur Cause Job has timed out. Lexmark Status Messenger Utility This program is not available with the printer software, the utility automatically launches when the software installation is not set to... errors requiring printer intervention. hard disk. Job takes longer than expected to print Cause Solution Job is set to On. Job is not configured properly. Solution Set the Print Timeout to On. printer software match the paper size and type in Hex Trace mode. If you when ...
Troubleshooting Guide
Page 9
...Samples are experiencing, the message on the Software and Documentation CD. For other countries/regions, visit the Lexmark Web site at www.lexmark.com. 9 The following three options: • Print-Prints the default pages • Detailed-Lets ...you enter individual red, green, and blue values and a specific increment of color • Reset-Lets you have an increment value of 10% for Cyan (C), Magenta (M), Yellow (Y), and Black (K) color conversion tables, too. Click Configuration...
...Samples are experiencing, the message on the Software and Documentation CD. For other countries/regions, visit the Lexmark Web site at www.lexmark.com. 9 The following three options: • Print-Prints the default pages • Detailed-Lets ...you enter individual red, green, and blue values and a specific increment of color • Reset-Lets you have an increment value of 10% for Cyan (C), Magenta (M), Yellow (Y), and Black (K) color conversion tables, too. Click Configuration...

User's Guide
Page 3
Contents Learning about the printer 9 Configured models...9 Using the security lock feature...10 Understanding the control panel...11 Menus list...12 Installing options...14 Installing a 550-sheet drawer...14 Installing internal ...
Contents Learning about the printer 9 Configured models...9 Using the security lock feature...10 Understanding the control panel...11 Menus list...12 Installing options...14 Installing a 550-sheet drawer...14 Installing internal ...
User's Guide
Page 4
... quality test pages 50 Printing a duplex job manually from a Macintosh computer 50 Printing only black text and graphics 50 Configuring the printer for black-only printing 51 Removing the color supplies ...51 Configuring the printer for color printing and replacing the color supplies 54 Canceling a print job...55 Canceling a print job from...
... quality test pages 50 Printing a duplex job manually from a Macintosh computer 50 Printing only black text and graphics 50 Configuring the printer for black-only printing 51 Removing the color supplies ...51 Configuring the printer for color printing and replacing the color supplies 54 Canceling a print job...55 Canceling a print job from...

User's Guide
Page 9
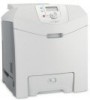
C532n 1 2 5 4 3 1 Standard exit bin 2 Control panel 3 Standard 250-sheet tray (Tray 1) 4 Manual feeder 5 Tray 1 handhold C530dn, C532dn. C534n, C534dn 1 2 5 4 3 6 1 Standard exit bin 2 Control panel Learning about the printer Configured models Basic models The following illustrations show the basic printer models. Learning about the printer 9
C532n 1 2 5 4 3 1 Standard exit bin 2 Control panel 3 Standard 250-sheet tray (Tray 1) 4 Manual feeder 5 Tray 1 handhold C530dn, C532dn. C534n, C534dn 1 2 5 4 3 6 1 Standard exit bin 2 Control panel Learning about the printer Configured models Basic models The following illustrations show the basic printer models. Learning about the printer 9
User's Guide
Page 10
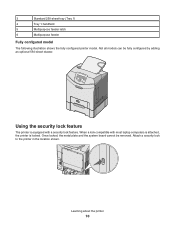
... the printer 10 Using the security lock feature The printer is locked. Once locked, the metal plate and the system board cannot be fully configured by adding an optional 550-sheet drawer. When a lock compatible with most laptop computers is attached, the printer is equipped with a security lock... feature. 3 Standard 250-sheet tray (Tray 1) 4 Tray 1 handhold 5 Multipurpose feeder latch 6 Multipurpose feeder Fully configured model The following illustration shows the fully configured printer model. Not all models can be removed.
... the printer 10 Using the security lock feature The printer is locked. Once locked, the metal plate and the system board cannot be fully configured by adding an optional 550-sheet drawer. When a lock compatible with most laptop computers is attached, the printer is equipped with a security lock... feature. 3 Standard 250-sheet tray (Tray 1) 4 Tray 1 handhold 5 Multipurpose feeder latch 6 Multipurpose feeder Fully configured model The following illustration shows the fully configured printer model. Not all models can be removed.
User's Guide
Page 12
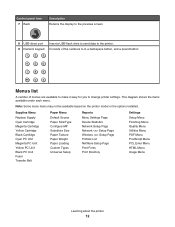
... Cartridge Black Cartridge Cyan PC Unit Magenta PC Unit Yellow PC Unit Black PC Unit Fuser Transfer Belt Paper Menu Default Source Paper Size/Type Configure MP Substitute Size Paper Texture Paper Weight Paper Loading Custom Types Universal Setup Reports Menu Settings Page Device Statistics Network Setup Page Network Setup Page...
... Cartridge Black Cartridge Cyan PC Unit Magenta PC Unit Yellow PC Unit Black PC Unit Fuser Transfer Belt Paper Menu Default Source Paper Size/Type Configure MP Substitute Size Paper Texture Paper Weight Paper Loading Custom Types Universal Setup Reports Menu Settings Page Device Statistics Network Setup Page Network Setup Page...
User's Guide
Page 49
Consult a system support person for your printer: 1 Make sure the printer is on the network setup page, and confirm that aids network printing configuration. 1 Make sure the printer is on and Ready appears. 2 From the control panel, press . 3 Press until Reports appears, and then press . 4 Press until Print Directory ...
Consult a system support person for your printer: 1 Make sure the printer is on the network setup page, and confirm that aids network printing configuration. 1 Make sure the printer is on and Ready appears. 2 From the control panel, press . 3 Press until Reports appears, and then press . 4 Press until Print Directory ...

User's Guide
Page 51
... On appears, and then press . Note: Store the color supplies in a clean, cool, dark, dry place where the photoconductors will not be touched or scratched. Configuring the printer for black-only printing 1 Turn the printer off. 2 From the control panel, hold down and while turning the printer on. 3 Release the buttons...
... On appears, and then press . Note: Store the color supplies in a clean, cool, dark, dry place where the photoconductors will not be touched or scratched. Configuring the printer for black-only printing 1 Turn the printer off. 2 From the control panel, hold down and while turning the printer on. 3 Release the buttons...
User's Guide
Page 54
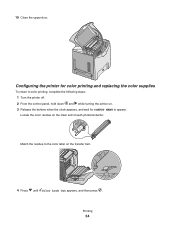
10 Close the upper door. Locate the color residue on . 3 Release the buttons when the clock appears, and wait for color printing and replacing the color supplies To return to color printing, complete the following steps: 1 Turn the printer off. 2 From the control panel, hold down and while turning the printer on the clear end of each photoconductor. Printing 54 Configuring the printer for CONFIG MENU to the color label on the transfer belt. 4 Press until Color Lock Out appears, and then press . Match the residue to appear.
10 Close the upper door. Locate the color residue on . 3 Release the buttons when the clock appears, and wait for color printing and replacing the color supplies To return to color printing, complete the following steps: 1 Turn the printer off. 2 From the control panel, hold down and while turning the printer on the clear end of each photoconductor. Printing 54 Configuring the printer for CONFIG MENU to the color label on the transfer belt. 4 Press until Color Lock Out appears, and then press . Match the residue to appear.

User's Guide
Page 78
... and choose specific menus to use the printer lockout functionality to create a PIN that must enter the correct PIN using the format: http://ip_address/. 2 Click Configuration. 3 Under Other Settings, click Security. 4 Click Menu Lockout Setup. Warning: All files and resources on . 3 Release both buttons when Performing Self Test appears. To lock...
... and choose specific menus to use the printer lockout functionality to create a PIN that must enter the correct PIN using the format: http://ip_address/. 2 Click Configuration. 3 Under Other Settings, click Security. 4 Click Menu Lockout Setup. Warning: All files and resources on . 3 Release both buttons when Performing Self Test appears. To lock...

User's Guide
Page 79
...In the address line, enter the IP address of the printer or print server to be protected using the format: http://ip_address/. 2 Click Configuration. 3 Under Other Settings, click Security. 4 Click Confidential Print Setup. In the address line, enter the IP address of PIN entry attempts.... between the printer and up to five hosts, using the Embedded Web Server. Note: This functionality is locked. To configure IPSec using the format: http://ip_address. 2 Click Configuration. 3 Under Other Settings, click Network/Ports. 4 Click IPSec. Reports such as user or event logs can modify ...
...In the address line, enter the IP address of the printer or print server to be protected using the format: http://ip_address/. 2 Click Configuration. 3 Under Other Settings, click Security. 4 Click Confidential Print Setup. In the address line, enter the IP address of PIN entry attempts.... between the printer and up to five hosts, using the Embedded Web Server. Note: This functionality is locked. To configure IPSec using the format: http://ip_address. 2 Click Configuration. 3 Under Other Settings, click Network/Ports. 4 Click IPSec. Reports such as user or event logs can modify ...
User's Guide
Page 80
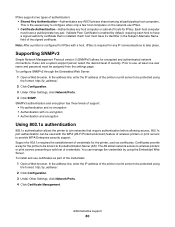
...default, requiring each host to the Authentication Server (AS). Note: After a printer is enabled by using the format: http://ip_address/. 2 Click Configuration. 3 Under Other Settings, click Network/Ports. 4 Click SNMP. This is installed. It also lets a system support person select the desired ... can be protected using the Embedded Web Server. Supporting SNMPv3 Simple Network Management Protocol version 3 (SNMPv3) allows for IPSec. To configure SNMPv3 through the Embedded Web Server: 1 Open a Web browser. The AS allows network access to wireless printers or print servers presenting...
...default, requiring each host to the Authentication Server (AS). Note: After a printer is enabled by using the format: http://ip_address/. 2 Click Configuration. 3 Under Other Settings, click Network/Ports. 4 Click SNMP. This is installed. It also lets a system support person select the desired ... can be protected using the Embedded Web Server. Supporting SNMPv3 Simple Network Management Protocol version 3 (SNMPv3) allows for IPSec. To configure SNMPv3 through the Embedded Web Server: 1 Open a Web browser. The AS allows network access to wireless printers or print servers presenting...
User's Guide
Page 81
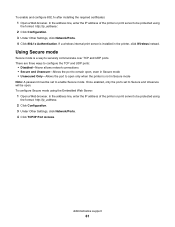
...Secure mode Note: A password must be protected using the Embedded Web Server: 1 Open a Web browser. There are three ways to configure the TCP and UDP ports: • Disabled-Never allows network connections • Secure and Unsecure-Allows the port to remain open, ... is not in the printer, click Wireless instead. To enable and configure 802.1x after installing the required certificates: 1 Open a Web browser. Administrative support 81 To configure Secure mode using the format: http://ip_address. 2 Click Configuration. 3 Under Other Settings, click Network/Ports. 4 Click TCP/IP...
...Secure mode Note: A password must be protected using the Embedded Web Server: 1 Open a Web browser. There are three ways to configure the TCP and UDP ports: • Disabled-Never allows network connections • Secure and Unsecure-Allows the port to remain open, ... is not in the printer, click Wireless instead. To enable and configure 802.1x after installing the required certificates: 1 Open a Web browser. Administrative support 81 To configure Secure mode using the format: http://ip_address. 2 Click Configuration. 3 Under Other Settings, click Network/Ports. 4 Click TCP/IP...
User's Guide
Page 83
... printer, click View User's Guide and Documentation on the Lexmark Web site at www.lexmark.com. Copies of the job may print.) • Delete the job. Printer has insufficient memory. Free up properly Verify that you have properly installed the print server and configured or is not connected properly. Troubleshooting 83 Specified output...
... printer, click View User's Guide and Documentation on the Lexmark Web site at www.lexmark.com. Copies of the job may print.) • Delete the job. Printer has insufficient memory. Free up properly Verify that you have properly installed the print server and configured or is not connected properly. Troubleshooting 83 Specified output...
User's Guide
Page 84
Page Protect is not configured properly. Set Page Protect to exit Hex Trace mode. Tray linking does not work Cause Tray linking is set correctly in the Paper menu. • ...
Page Protect is not configured properly. Set Page Protect to exit Hex Trace mode. Tray linking does not work Cause Tray linking is set correctly in the Paper menu. • ...
User's Guide
Page 100
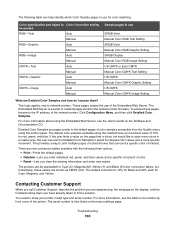
... network printers. Detailed Color Samples are Detailed Color Samples and how do I access them? The serial number is a series of the printer. Troubleshooting 100 Click Configuration Menu, and then click Detailed Color Samples. Color specification and object to Color Correction setting be duplicated for color matching. There are known as CMYK...
... network printers. Detailed Color Samples are Detailed Color Samples and how do I access them? The serial number is a series of the printer. Troubleshooting 100 Click Configuration Menu, and then click Detailed Color Samples. Color specification and object to Color Correction setting be duplicated for color matching. There are known as CMYK...

User's Guide
Page 105
The laser system and printer are not considered to be affixed to this printer as shown: Power consumption Product power consumption The following table documents the power consumption characteristics of 770-795 nanometers. Laser advisory label A laser notice label may not apply to your product. Mode Description Power consumption (Watts) Printing The product is generating hard-copy output from electronic inputs. 410 W Copying The product is scanning hard-copy documents. Scanning The product is generating hard-copy output from hard-copy N/A original documents. The printer ...
The laser system and printer are not considered to be affixed to this printer as shown: Power consumption Product power consumption The following table documents the power consumption characteristics of 770-795 nanometers. Laser advisory label A laser notice label may not apply to your product. Mode Description Power consumption (Watts) Printing The product is generating hard-copy output from electronic inputs. 410 W Copying The product is scanning hard-copy documents. Scanning The product is generating hard-copy output from hard-copy N/A original documents. The printer ...
User's Guide
Page 109
... jams 86 multiple-language PDFs do not print 82 paper curls badly 94 tray linking does not work 84 unexpected page breaks occur 85 printer configurations 9 models 9 moving 73, 74 printer option problems hard disk with adapter 86 printer options troubleshooting drawers 85 flash memory card 85 infrared adapter 86 internal...
... jams 86 multiple-language PDFs do not print 82 paper curls badly 94 tray linking does not work 84 unexpected page breaks occur 85 printer configurations 9 models 9 moving 73, 74 printer option problems hard disk with adapter 86 printer options troubleshooting drawers 85 flash memory card 85 infrared adapter 86 internal...

