
User's Guide
Page 47
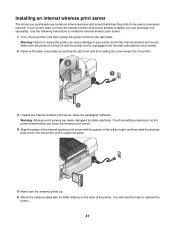
.... 6 Attach the adhesive label with the guides on a wireless network. Warning: Failure to unplug the printer can purchase one separately. You will need this later to the internal wireless print server. Touch something metal such as the printer frame before you proceed. 2 Remove the back cover plate by static electricity. Use the following instructions...
.... 6 Attach the adhesive label with the guides on a wireless network. Warning: Failure to unplug the printer can purchase one separately. You will need this later to the internal wireless print server. Touch something metal such as the printer frame before you proceed. 2 Remove the back cover plate by static electricity. Use the following instructions...

User's Guide
Page 82
.... Once you select default printer settings that came with your camera. To access the PictBridge Default Print Settings menu: 1 Connect a PictBridge-enabled digital camera to print a photo in black and white, sepia, antique brown, or antique gray. Crop a photo. From here Photo Size Layout Quality Paper Handling... Specify the size of the photo or photos to be printed. Use this photo have been saved. Select a frame for this Photo Size Layout Quality To Specify the size of the photo or photos to be printed. Choose the quality of the photo or photos to be printed. The message...
.... Once you select default printer settings that came with your camera. To access the PictBridge Default Print Settings menu: 1 Connect a PictBridge-enabled digital camera to print a photo in black and white, sepia, antique brown, or antique gray. Crop a photo. From here Photo Size Layout Quality Paper Handling... Specify the size of the photo or photos to be printed. Use this photo have been saved. Select a frame for this Photo Size Layout Quality To Specify the size of the photo or photos to be printed. Choose the quality of the photo or photos to be printed. The message...

User's Guide
Page 87
... adjust the print settings: a Press . Select whether to print a photo in 90-degree increments clockwise or counterclockwise. Select a frame for printing and editing by light reflection. Editing photos Editing photos using the control panel 1 Load photo paper with the paper.) 2 Insert a memory card or flash drive.... Auto Enhance Remove Red Eye Colorized Effect Frames You can select more photos for the photo. 9 Make your selections using the control panel buttons. 10 Press to save your selections using the control panel buttons. 87 Rotate a photo in black and white, sepia, antique ...
... adjust the print settings: a Press . Select whether to print a photo in 90-degree increments clockwise or counterclockwise. Select a frame for printing and editing by light reflection. Editing photos Editing photos using the control panel 1 Load photo paper with the paper.) 2 Insert a memory card or flash drive.... Auto Enhance Remove Red Eye Colorized Effect Frames You can select more photos for the photo. 9 Make your selections using the control panel buttons. 10 Press to save your selections using the control panel buttons. 87 Rotate a photo in black and white, sepia, antique ...