

Service Manual
Page 32
4060-xxx Tools required Flat-blade screwdrivers, various sizes Phillips screwdrivers, various sizes 7.0 mm nut driver 5.5 mm wrench Needlenose pliers Diagonal side cutters Spring hook Feeler gauges Analog or digital multimeter Parallel wrap plug 1319128 Twinax/serial debug cable 1381963 Flash light (optional) 1-14 Service Manual
4060-xxx Tools required Flat-blade screwdrivers, various sizes Phillips screwdrivers, various sizes 7.0 mm nut driver 5.5 mm wrench Needlenose pliers Diagonal side cutters Spring hook Feeler gauges Analog or digital multimeter Parallel wrap plug 1319128 Twinax/serial debug cable 1381963 Flash light (optional) 1-14 Service Manual
Service Manual
Page 36
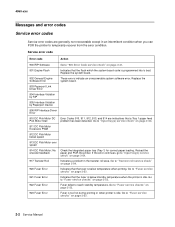
... Fuser failed to "Fuser service checks" on page 2-64. 917 Transfer Roll Indicates a problem in an intermittent condition when you can POR the printer to "Transfer roll service check" on page 2-41. 901 Engine Flash Indicates that a Tray 1 paper feed Pick Motor Stall problem has been detected...printing. Go to temporarily recover from the error condition. Replace the system board. 903 Paperport Link Driver Error 904 Interface Violation by RIP 905 Interface Violation by Paperport Device 906 RIP Interface Driver Error 910 DC Pick Motor DC Error Codes 910, 911, 912, 913, and 914 are...
... Fuser failed to "Fuser service checks" on page 2-64. 917 Transfer Roll Indicates a problem in an intermittent condition when you can POR the printer to "Transfer roll service check" on page 2-41. 901 Engine Flash Indicates that a Tray 1 paper feed Pick Motor Stall problem has been detected...printing. Go to temporarily recover from the error condition. Replace the system board. 903 Paperport Link Driver Error 904 Interface Violation by RIP 905 Interface Violation by Paperport Device 906 RIP Interface Driver Error 910 DC Pick Motor DC Error Codes 910, 911, 912, 913, and 914 are...

Service Manual
Page 112
...tip: Before troubleshooting any service replaceable parts or components. If correct, replace the FRUs in the printer. An incorrect printer driver for the installed software can return the printer to the original customer printer setup. • Print Resolution: Set to 300 dpi (print quality problems should be checked ...error codes indicate a problem with the service checks. • Use Tray 1 to test for the media being used. • Test the printer using plain paper (20 lb). If incorrect, replace the cable. If incorrect, replace the system board. Be sure and note the original settings...
...tip: Before troubleshooting any service replaceable parts or components. If correct, replace the FRUs in the printer. An incorrect printer driver for the installed software can return the printer to the original customer printer setup. • Print Resolution: Set to 300 dpi (print quality problems should be checked ...error codes indicate a problem with the service checks. • Use Tray 1 to test for the media being used. • Test the printer using plain paper (20 lb). If incorrect, replace the cable. If incorrect, replace the system board. Be sure and note the original settings...

Service Manual
Page 158
... When replacing the alignment assembly, it touches the back of each adjustment on the left side frame. 3. These settings should be removed from the printer. Install the new alignment assembly. The reference adjustment screw can be adjusted without loosening the nut. Continue adjusting the screw as you check the results...A. • If you want. 4-4 Service Manual Do the reference adjustment if you replace the alignment assembly. Turn the reference screw clockwise with a 7 mm nut driver until you obtain the results you are replacing the alignment assembly go to the left margin.
... When replacing the alignment assembly, it touches the back of each adjustment on the left side frame. 3. These settings should be removed from the printer. Install the new alignment assembly. The reference adjustment screw can be adjusted without loosening the nut. Continue adjusting the screw as you check the results...A. • If you want. 4-4 Service Manual Do the reference adjustment if you replace the alignment assembly. Turn the reference screw clockwise with a 7 mm nut driver until you obtain the results you are replacing the alignment assembly go to the left margin.

