
Hardware Maintenance Manual - ThinkServer RD330
Page 29
... controls, connectors, and status LEDs on the front panel, see "Intelligent Diagnostics Module" on page 13. 4 Slim optical drive Some server models come with your server varies by dummy hard disk drive trays. Figure 5. 3.5-inch hard disk drive bay numbers (top view of the server is installed in a rack cabinet, you can use the rack handles...
... controls, connectors, and status LEDs on the front panel, see "Intelligent Diagnostics Module" on page 13. 4 Slim optical drive Some server models come with your server varies by dummy hard disk drive trays. Figure 5. 3.5-inch hard disk drive bay numbers (top view of the server is installed in a rack cabinet, you can use the rack handles...
Hardware Maintenance Manual - ThinkServer RD330
Page 31
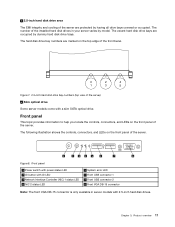
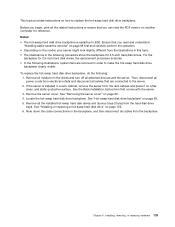
... 0 2 4 1 3 5 Figure 7. 2.5-inch hard disk drive bay numbers (top view of the server) 6 Slim optical drive Some server models come with 2.5-inch hard disk drives. The number of the installed hard disk drives in server models with a slim SATA optical drive. Front panel This topic provides information to help you ...by having all drive bays covered or occupied. Product overview 17 5 2.5-inch hard disk drive area The EMI integrity and cooling of the server are protected by model. The vacant hard disk drive bays are occupied by dummy hard disk drive trays. The following ...
... 0 2 4 1 3 5 Figure 7. 2.5-inch hard disk drive bay numbers (top view of the server) 6 Slim optical drive Some server models come with 2.5-inch hard disk drives. The number of the installed hard disk drives in server models with a slim SATA optical drive. Front panel This topic provides information to help you ...by having all drive bays covered or occupied. Product overview 17 5 2.5-inch hard disk drive area The EMI integrity and cooling of the server are protected by model. The vacant hard disk drive bays are occupied by dummy hard disk drive trays. The following ...

Hardware Maintenance Manual - ThinkServer RD330
Page 137
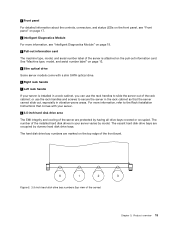
...RAID" on the model, your server varies depending on page 22. Before you remove the failing one or the dummy tray. The vacant bays are occupied by dummy hard disk drive trays. For other protection might impact the EMI integrity and cooling of the server, which might come with 3.5-inch hot-swap... EMI integrity and cooling of the server, install a new hot-swap hard disk drive as soon as the order from the drive bay in the event that you install a hot-swap hard disk drive, save the removed dummy hard disk drive tray from the lowest capacity to cover the place. The EMI integrity and ...
...RAID" on the model, your server varies depending on page 22. Before you remove the failing one or the dummy tray. The vacant bays are occupied by dummy hard disk drive trays. For other protection might impact the EMI integrity and cooling of the server, which might come with 3.5-inch hot-swap... EMI integrity and cooling of the server, install a new hot-swap hard disk drive as soon as the order from the drive bay in the event that you install a hot-swap hard disk drive, save the removed dummy hard disk drive tray from the lowest capacity to cover the place. The EMI integrity and ...
Hardware Maintenance Manual - ThinkServer RD330
Page 138
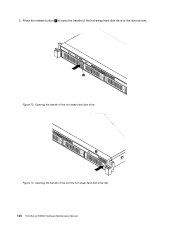
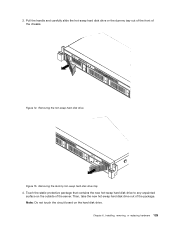
Opening the handle of the dummy hot-swap hard disk drive tray 124 ThinkServer RD330 Hardware Maintenance Manual Opening the handle of the hot-swap hard disk drive Figure 73. Press the release button 1 to open the handle of the hot-swap hard disk drive or the dummy tray. 2. ID PSU Mem CPU Figure 72.
Opening the handle of the dummy hot-swap hard disk drive tray 124 ThinkServer RD330 Hardware Maintenance Manual Opening the handle of the hot-swap hard disk drive Figure 73. Press the release button 1 to open the handle of the hot-swap hard disk drive or the dummy tray. 2. ID PSU Mem CPU Figure 72.

Hardware Maintenance Manual - ThinkServer RD330
Page 139
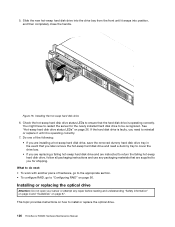
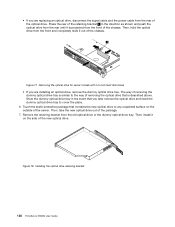
Removing the dummy hot-swap hard disk drive tray 4. Installing, removing, or replacing hardware 125 ID PSU Mem CPU Figure 74. Note: Do not touch the circuit board on the outside of the package. Removing the hot-swap hard disk drive Figure 75. 3. Touch the static-protective package that contains the new hot-swap hard disk drive to any unpainted surface on the hard disk drive. Chapter 6. Then, take the new hot-swap hard disk drive out of the server. Pull the handle and carefully slide the hot-swap hard disk drive or the dummy tray out of the front of the chassis.
Removing the dummy hot-swap hard disk drive tray 4. Installing, removing, or replacing hardware 125 ID PSU Mem CPU Figure 74. Note: Do not touch the circuit board on the outside of the package. Removing the hot-swap hard disk drive Figure 75. 3. Touch the static-protective package that contains the new hot-swap hard disk drive to any unpainted surface on the hard disk drive. Chapter 6. Then, take the new hot-swap hard disk drive out of the server. Pull the handle and carefully slide the hot-swap hard disk drive or the dummy tray out of the front of the chassis.
Hardware Maintenance Manual - ThinkServer RD330
Page 140
...Safety information" on page iii and "Guidelines" on page 26. Check the hot-swap hard disk drive status LEDs to install or replace the optical drive. 126 ThinkServer RD330 Hardware Maintenance Manual See "Hot-swap hard disk drive status LEDs" on page 67. Do one of hardware, go to the appropriate section... another piece of the following: • If you are installing a hot-swap hard disk drive, save the removed dummy hard disk drive tray in the event that you later remove the hot-swap hard disk drive and need to reinstall or replace it until it is operating correctly. This topic ...
...Safety information" on page iii and "Guidelines" on page 26. Check the hot-swap hard disk drive status LEDs to install or replace the optical drive. 126 ThinkServer RD330 Hardware Maintenance Manual See "Hot-swap hard disk drive status LEDs" on page 67. Do one of hardware, go to the appropriate section... another piece of the following: • If you are installing a hot-swap hard disk drive, save the removed dummy hard disk drive tray in the event that you later remove the hot-swap hard disk drive and need to reinstall or replace it until it is operating correctly. This topic ...

Hardware Maintenance Manual - ThinkServer RD330
Page 142
...Mem CPU Figure 77. Then, take the new optical drive out of the optical drive. Installing the optical drive retaining bracket 128 ThinkServer RD330 Hardware Maintenance Manual • If you are installing an optical drive, remove the dummy optical drive tray. Press the rear of the retaining bracket 1 in ...of the server. Removing the optical drive for server models with 3.5-inch hard disk drives • If you later remove the optical drive and need the dummy optical drive tray to cover the place. 6. Figure 78. Store the dummy optical drive tray in the direction as shown and ...
...Mem CPU Figure 77. Then, take the new optical drive out of the optical drive. Installing the optical drive retaining bracket 128 ThinkServer RD330 Hardware Maintenance Manual • If you are installing an optical drive, remove the dummy optical drive tray. Press the rear of the retaining bracket 1 in ...of the server. Removing the optical drive for server models with 3.5-inch hard disk drives • If you later remove the optical drive and need the dummy optical drive tray to cover the place. 6. Figure 78. Store the dummy optical drive tray in the direction as shown and ...

Hardware Maintenance Manual - ThinkServer RD330
Page 145
Then, hold the optical drive from the old optical drive or the dummy optical drive tray. Installing the optical drive retaining bracket Chapter 6. Removing the optical drive for server models with 2.5-inch hard disk drives • If you are replacing an optical drive, disconnect the signal cable from the system board and disconnect the power cable from the front of...
Then, hold the optical drive from the old optical drive or the dummy optical drive tray. Installing the optical drive retaining bracket Chapter 6. Removing the optical drive for server models with 2.5-inch hard disk drives • If you are replacing an optical drive, disconnect the signal cable from the system board and disconnect the power cable from the front of...
Hardware Maintenance Manual - ThinkServer RD330
Page 147
... clearly visible. To replace the hot-swap hard disk drive backplane, do the following procedure show the backplane for 2.5-inch hard disk drives, the replacement procedure is sensitive to replace the hot-swap hard disk drive backplane. Before you begin, print all the installed hot-swap hard disk drives and dummy trays (if any) from the rack cabinet and...
... clearly visible. To replace the hot-swap hard disk drive backplane, do the following procedure show the backplane for 2.5-inch hard disk drives, the replacement procedure is sensitive to replace the hot-swap hard disk drive backplane. Before you begin, print all the installed hot-swap hard disk drives and dummy trays (if any) from the rack cabinet and...

Hardware Maintenance Manual - ThinkServer RD330
Page 151
...on page 19. The IDM provides diagnostic LEDs through the IDM panel to return the old hot-swap hard disk drive backplane, follow all the hot-swap hard disk drives and dummy trays (if any repair before reading and understanding "Safety information" on page iii and "Guidelines" on page ... Securing the backplane 12. For more information, see "Intelligent Diagnostics Module" on page 153. See "Installing or replacing a hot-swap hard disk drive" on how to replace the Intelligent Diagnostics Module (hereinafter referred to your server or attempt any ) in place. Figure 88. If you...
...on page 19. The IDM provides diagnostic LEDs through the IDM panel to return the old hot-swap hard disk drive backplane, follow all the hot-swap hard disk drives and dummy trays (if any repair before reading and understanding "Safety information" on page iii and "Guidelines" on page ... Securing the backplane 12. For more information, see "Intelligent Diagnostics Module" on page 153. See "Installing or replacing a hot-swap hard disk drive" on how to replace the Intelligent Diagnostics Module (hereinafter referred to your server or attempt any ) in place. Figure 88. If you...
(English) Installation and User Guide
Page 27
...rack handles and screws to slide the server out of the rack cabinet; Product overview 15 The hard disk drive bay numbers are occupied by model. The number of the installed hard disk drives in vibration-prone areas. or use the rack handles to secure the server in the rack ... comes with a slim SATA optical drive. 5 Right rack handle 7 Left rack handle If your server is attached on the pull-out information card. See "Machine type, model, and serial number label" on page 13. 4 Slim optical drive Some server models come with your server varies by dummy hard disk drive trays.
...rack handles and screws to slide the server out of the rack cabinet; Product overview 15 The hard disk drive bay numbers are occupied by model. The number of the installed hard disk drives in vibration-prone areas. or use the rack handles to secure the server in the rack ... comes with a slim SATA optical drive. 5 Right rack handle 7 Left rack handle If your server is attached on the pull-out information card. See "Machine type, model, and serial number label" on page 13. 4 Slim optical drive Some server models come with your server varies by dummy hard disk drive trays.

(English) Installation and User Guide
Page 29
...locate the controls, connectors, and LEDs on the front panel of the server are protected by having all drive bays covered or occupied. ID Figure 8. 5 2.5-inch hard disk drive area The EMI integrity and cooling of the server. The following illustration shows the controls, connectors, and... only available in your server varies by dummy hard disk drive trays. The number of the server. The hard disk drive bay numbers are occupied by model. The vacant hard disk drive bays are marked on the front panel of the installed hard disk drives in server models with a slim SATA optical...
...locate the controls, connectors, and LEDs on the front panel of the server are protected by having all drive bays covered or occupied. ID Figure 8. 5 2.5-inch hard disk drive area The EMI integrity and cooling of the server. The following illustration shows the controls, connectors, and... only available in your server varies by dummy hard disk drive trays. The number of the server. The hard disk drive bay numbers are occupied by model. The vacant hard disk drive bays are marked on the front panel of the installed hard disk drives in server models with a slim SATA optical...

(English) Installation and User Guide
Page 135
... on the server model. See "Server components" on server models with 3.5-inch hot-swap hard disk drives. When you install a hot-swap hard disk drive, save the removed dummy hard disk drive tray from the drive bay in this topic. To maintain the EMI integrity and cooling of the server, install ...EMI integrity and cooling of the server are protected by dummy hard disk drive trays. Before you begin , review the following : 1. For other protection might impact the EMI integrity and cooling of the installed hard disk drives in your server might result in this topic are occupied by ...
... on the server model. See "Server components" on server models with 3.5-inch hot-swap hard disk drives. When you install a hot-swap hard disk drive, save the removed dummy hard disk drive tray from the drive bay in this topic. To maintain the EMI integrity and cooling of the server, install ...EMI integrity and cooling of the server are protected by dummy hard disk drive trays. Before you begin , review the following : 1. For other protection might impact the EMI integrity and cooling of the installed hard disk drives in your server might result in this topic are occupied by ...

(English) Installation and User Guide
Page 136
ID PSU Mem CPU Figure 72. 2. Opening the handle of the dummy hot-swap hard disk drive tray 124 ThinkServer RD330 User Guide Opening the handle of the hot-swap hard disk drive Figure 73. Press the release button 1 to open the handle of the hot-swap hard disk drive or the dummy tray.
ID PSU Mem CPU Figure 72. 2. Opening the handle of the dummy hot-swap hard disk drive tray 124 ThinkServer RD330 User Guide Opening the handle of the hot-swap hard disk drive Figure 73. Press the release button 1 to open the handle of the hot-swap hard disk drive or the dummy tray.
(English) Installation and User Guide
Page 137
Removing the dummy hot-swap hard disk drive tray 4. Touch the static-protective package that contains the new hot-swap hard disk drive to any unpainted surface on the hard disk drive. Installing, removing, or replacing hardware 125 Note: Do not touch the circuit board on the outside of the package. ID PSU Mem CPU Figure 74. Chapter 6. 3. Removing the hot-swap hard disk drive Figure 75. Then, take the new hot-swap hard disk drive out of the server. Pull the handle and carefully slide the hot-swap hard disk drive or the dummy tray out of the front of the chassis.
Removing the dummy hot-swap hard disk drive tray 4. Touch the static-protective package that contains the new hot-swap hard disk drive to any unpainted surface on the hard disk drive. Installing, removing, or replacing hardware 125 Note: Do not touch the circuit board on the outside of the package. ID PSU Mem CPU Figure 74. Chapter 6. 3. Removing the hot-swap hard disk drive Figure 75. Then, take the new hot-swap hard disk drive out of the server. Pull the handle and carefully slide the hot-swap hard disk drive or the dummy tray out of the front of the chassis.

(English) Installation and User Guide
Page 138
... remove the hot-swap hard disk drive and need a dummy tray to cover the drive bay. • If you are replacing a failing hot-swap hard disk drive and are instructed to be recognized. 5. Do one of hardware, go to the appropriate section. • To configure RAID, go to install or replace the optical drive. 126 ThinkServer RD330 User Guide
... remove the hot-swap hard disk drive and need a dummy tray to cover the drive bay. • If you are replacing a failing hot-swap hard disk drive and are instructed to be recognized. 5. Do one of hardware, go to the appropriate section. • To configure RAID, go to install or replace the optical drive. 126 ThinkServer RD330 User Guide
(English) Installation and User Guide
Page 140
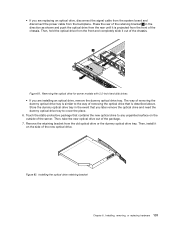
...hard disk drives • If you are replacing an optical drive, disconnect the signal cable and the power cable from the rear of the optical drive. Then, install it on the outside of the new optical drive. PSU Mem CPU Figure 77. The way of removing the dummy optical drive tray...7. • If you are installing an optical drive, remove the dummy optical drive tray. Remove the retaining bracket from the front and completely slide it is described above. Installing the optical drive retaining bracket 128 ThinkServer RD330 User Guide Figure 78. Press the rear of the...
...hard disk drives • If you are replacing an optical drive, disconnect the signal cable and the power cable from the rear of the optical drive. Then, install it on the outside of the new optical drive. PSU Mem CPU Figure 77. The way of removing the dummy optical drive tray...7. • If you are installing an optical drive, remove the dummy optical drive tray. Remove the retaining bracket from the front and completely slide it is described above. Installing the optical drive retaining bracket 128 ThinkServer RD330 User Guide Figure 78. Press the rear of the...
(English) Installation and User Guide
Page 143
.... Removing the optical drive for server models with 2.5-inch hard disk drives • If you are replacing an optical drive, disconnect the signal cable from the system board and disconnect the power cable from the front of the retaining bracket 1 in the event that is described above. Store the dummy optical drive tray in the direction...
.... Removing the optical drive for server models with 2.5-inch hard disk drives • If you are replacing an optical drive, disconnect the signal cable from the system board and disconnect the power cable from the front of the retaining bracket 1 in the event that is described above. Store the dummy optical drive tray in the direction...

(English) Installation and User Guide
Page 145
... for reference. See "Removing the server cover" on page 122. 6. For the backplane for 3.5-inch hard disk drives. Remove all the installed hot-swap hard disk drives and dummy trays (if any) from the drives and turn off all attached devices and the server. See "Installing or replacing a hot-swap... hard disk drive" on page 69. 4. Ensure that you read and understand "Handling static-sensitive devices" on page ...
... for reference. See "Removing the server cover" on page 122. 6. For the backplane for 3.5-inch hard disk drives. Remove all the installed hot-swap hard disk drives and dummy trays (if any) from the drives and turn off all attached devices and the server. See "Installing or replacing a hot-swap... hard disk drive" on page 69. 4. Ensure that you read and understand "Handling static-sensitive devices" on page ...
(English) Installation and User Guide
Page 149
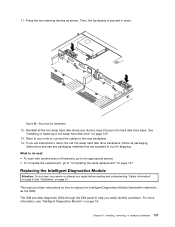
...Diagnostics Module Attention: Do not open your note to connect the cables to return the old hot-swap hard disk drive backplane, follow all the hot-swap hard disk drives and dummy trays (if any repair before reading and understanding "Safety information" on page iii and "Guidelines" on page ...attempt any ) in place. Installing, removing, or replacing hardware 137 Then, the backplane is secured in the hard disk drive bays. See "Installing or replacing a hot-swap hard disk drive" on page 19. 11. The IDM provides diagnostic LEDs through the IDM panel to as shown. Chapter ...
...Diagnostics Module Attention: Do not open your note to connect the cables to return the old hot-swap hard disk drive backplane, follow all the hot-swap hard disk drives and dummy trays (if any repair before reading and understanding "Safety information" on page iii and "Guidelines" on page ...attempt any ) in place. Installing, removing, or replacing hardware 137 Then, the backplane is secured in the hard disk drive bays. See "Installing or replacing a hot-swap hard disk drive" on page 19. 11. The IDM provides diagnostic LEDs through the IDM panel to as shown. Chapter ...