(English) Power Manager Deployment Guide
Page 28
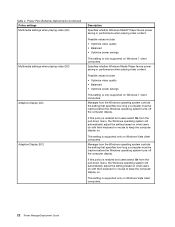
...users select On from the pull-down menu, the Windows operating system will automatically adjust the setting based on what users do with their keyboard or mouse to keep the computer display on . If this policy is only supported on Windows Vista client computers. 22 Power ManagerDeployment ...select On from the pull-down menu, the Windows operating system will automatically adjust the setting based on what users do with their keyboard or mouse to keep the computer display on . Manages how the Windows operating system controls the setting that specifies how long a computer...
...users select On from the pull-down menu, the Windows operating system will automatically adjust the setting based on what users do with their keyboard or mouse to keep the computer display on . If this policy is only supported on Windows Vista client computers. 22 Power ManagerDeployment ...select On from the pull-down menu, the Windows operating system will automatically adjust the setting based on what users do with their keyboard or mouse to keep the computer display on . Manages how the Windows operating system controls the setting that specifies how long a computer...

(English) BIOS Setup using Windows Management Instrumentation Deployment Guide
Page 12
...character • "1e302e" - Password parameters format, password authentication Parameter Description Parameter Current password 1 Parameter Password encoding 2 Parameter Keyboard languages 3 (valid only if encoding is already set, you can change could not be made due to be provided. Settings ... (continued) Return Type Description Access Denied The change any BIOS settings. The format for password parameters is requested. 4 Lenovo BIOS Setup using Windows Management Instrumentation Deployment Guide The security-related options are not changed even if the "load default" is "...
...character • "1e302e" - Password parameters format, password authentication Parameter Description Parameter Current password 1 Parameter Password encoding 2 Parameter Keyboard languages 3 (valid only if encoding is already set, you can change could not be made due to be provided. Settings ... (continued) Return Type Description Access Denied The change any BIOS settings. The format for password parameters is requested. 4 Lenovo BIOS Setup using Windows Management Instrumentation Deployment Guide The security-related options are not changed even if the "load default" is "...
(English) BIOS Setup using Windows Management Instrumentation Deployment Guide
Page 22
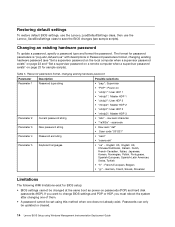
...password string • Raw ascii "def" • Scan code "201221" Parameter 4 Password encoding • "ascii" • "scancode" Parameter 5 Keyboard languages • "us " with descriptions in Password parameters format, changing existing hardware password (see sample scripts). Changing an existing hardware password To update ... If you must reboot the system after changing one of them. • A password cannot be updated or cleared. 14 Lenovo BIOS Setup using this method when one does not already exist. Restoring default settings To restore default BIOS settings, use the ...
...password string • Raw ascii "def" • Scan code "201221" Parameter 4 Password encoding • "ascii" • "scancode" Parameter 5 Keyboard languages • "us " with descriptions in Password parameters format, changing existing hardware password (see sample scripts). Changing an existing hardware password To update ... If you must reboot the system after changing one of them. • A password cannot be updated or cleared. 14 Lenovo BIOS Setup using this method when one does not already exist. Restoring default settings To restore default BIOS settings, use the ...
Hardware Maintenance Manual
Page 3
Removing and replacing a FRU 61 Before servicing ThinkPad X220 Tablet and X220i Tablet models 62 1010 Digitizer pen 63 1020 Battery pack 63 1030 Hard disk drive (HDD) and solid state drive (SSD 64 1040 DIMM 66 1050 Hinge caps 68 1060 Keyboard 68 1070 Palm rest 71 1080 Backup battery ... Recovery discs 39 Restoring the factory contents by using Recovery Disc Set 39 Passwords 41 Power-on password 41 Hard-disk password 41 © Copyright Lenovo 2012 Supervisor password 41 How to remove the power-on password . . . 41 How to remove the hard-disk password . . . 42 Power management...
Removing and replacing a FRU 61 Before servicing ThinkPad X220 Tablet and X220i Tablet models 62 1010 Digitizer pen 63 1020 Battery pack 63 1030 Hard disk drive (HDD) and solid state drive (SSD 64 1040 DIMM 66 1050 Hinge caps 68 1060 Keyboard 68 1070 Palm rest 71 1080 Backup battery ... Recovery discs 39 Restoring the factory contents by using Recovery Disc Set 39 Passwords 41 Power-on password 41 Hard-disk password 41 © Copyright Lenovo 2012 Supervisor password 41 How to remove the power-on password . . . 41 How to remove the hard-disk password . . . 42 Power management...

Hardware Maintenance Manual
Page 4
... LCD cable 97 2050 Integrated camera 100 2060 LCD rear cover and wireless antenna cables 101 Chapter 9. Parts list 109 Overall 110 LCD FRUs 126 Keyboard 130 Miscellaneous parts 131 ac power adapter 132 Power cords 133 Recovery discs 134 Windows XP Professional DVDs 134 Windows XP Tablet (32 bit) DVDs... 141 Trademarks 141 ii Hardware Maintenance Manual Locations 105 Front view 105 Rear view 106 Rear view (tablet mode 107 Bottom view 107 Top view (ThinkPad X220 UltraBase 108 Bottom view (ThinkPad X220 UltraBase). . . . . 108 Chapter 10.
... LCD cable 97 2050 Integrated camera 100 2060 LCD rear cover and wireless antenna cables 101 Chapter 9. Parts list 109 Overall 110 LCD FRUs 126 Keyboard 130 Miscellaneous parts 131 ac power adapter 132 Power cords 133 Recovery discs 134 Windows XP Professional DVDs 134 Windows XP Tablet (32 bit) DVDs... 141 Trademarks 141 ii Hardware Maintenance Manual Locations 105 Front view 105 Rear view 106 Rear view (tablet mode 107 Bottom view 107 Top view (ThinkPad X220 UltraBase 108 Bottom view (ThinkPad X220 UltraBase). . . . . 108 Chapter 10.
Hardware Maintenance Manual
Page 34
... the computer unusable) • Sticky keys caused by spilling a liquid onto the keyboard • Use of an incorrect ac power adapter on laptop products The following Web site: http://www.lenovo.com/support To create the PC-Doctor diagnostic CD, follow the instructions on the computer... Diskette drive damage caused by pressing Enter instead of entering the 28 Hardware Maintenance Manual To enter the ThinkPad Setup program, do as possible. 2. System supporting the Lenovo ThinkVantage Toolbox program and the PC-Doctor for DOS is entered. Note: If a supervisor password has ...
... the computer unusable) • Sticky keys caused by spilling a liquid onto the keyboard • Use of an incorrect ac power adapter on laptop products The following Web site: http://www.lenovo.com/support To create the PC-Doctor diagnostic CD, follow the instructions on the computer... Diskette drive damage caused by pressing Enter instead of entering the 28 Hardware Maintenance Manual To enter the ThinkPad Setup program, do as possible. 2. System supporting the Lenovo ThinkVantage Toolbox program and the PC-Doctor for DOS is entered. Note: If a supervisor password has ...
Hardware Maintenance Manual
Page 36
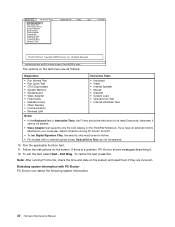
... • Systemboard • Video Adapter • Fixed Disks • Diskette Drives • Other Devices • Communication • Wireless LAN • Keyboard • Video • Internal Speaker • Mouse • Diskette • System Load • Optical Drive Test • Intel WLAN Radio Test ...Info Utility Quit F1=Help PC-DOCTOR 2.0 Copyright 2008 PC-Doctor, Inc. otherwise, it . 12. Follow the instructions on the ThinkPad Notebook. If there is a problem, PC-Doctor shows messages describing it cannot be selected. 10. Note: After running PC-Doctor ...
... • Systemboard • Video Adapter • Fixed Disks • Diskette Drives • Other Devices • Communication • Wireless LAN • Keyboard • Video • Internal Speaker • Mouse • Diskette • System Load • Optical Drive Test • Intel WLAN Radio Test ...Info Utility Quit F1=Help PC-DOCTOR 2.0 Copyright 2008 PC-Doctor, Inc. otherwise, it . 12. Follow the instructions on the ThinkPad Notebook. If there is a problem, PC-Doctor shows messages describing it cannot be selected. 10. Note: After running PC-Doctor ...
Hardware Maintenance Manual
Page 38
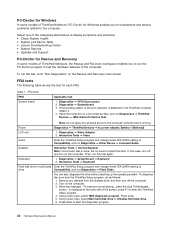
...: • Check System Health • System and Device Tests • Lenovo Troubleshooting Center • System Reports • Updates and Support PC-Doctor for Rescue and Recovery In some models of ThinkPad Notebook, PC-Doctor for Windows enables you to run Diagnostics ➙ Fixed ... ➙ Internal Speaker Note: Once Audio test is done, the no sound is running. Keyboard 1. Diagnostics ➙ CPU/Coprocessor 2. PC-Doctor for Windows In some models of ThinkPad Notebook, the Rescue and Recovery workspace enables you to troubleshoot and resolve problems related to the ...
...: • Check System Health • System and Device Tests • Lenovo Troubleshooting Center • System Reports • Updates and Support PC-Doctor for Rescue and Recovery In some models of ThinkPad Notebook, PC-Doctor for Windows enables you to run Diagnostics ➙ Fixed ... ➙ Internal Speaker Note: Once Audio test is done, the no sound is running. Keyboard 1. Diagnostics ➙ CPU/Coprocessor 2. PC-Doctor for Windows In some models of ThinkPad Notebook, the Rescue and Recovery workspace enables you to troubleshoot and resolve problems related to the ...
Hardware Maintenance Manual
Page 49
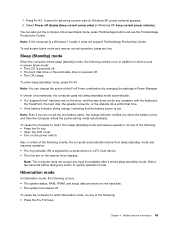
... occurs: • The system status, RAM, VRAM, and setup data are stored on the timer, and the user does not do any operation with the keyboard, the TrackPoint, the hard disk, the parallel connector, or the diskette drive within that time. • If the battery indicator blinks orange, indicating that the...
... occurs: • The system status, RAM, VRAM, and setup data are stored on the timer, and the user does not do any operation with the keyboard, the TrackPoint, the hard disk, the parallel connector, or the diskette drive within that time. • If the battery indicator blinks orange, indicating that the...

Hardware Maintenance Manual
Page 50
... of the following actions as the event that time. • If the timer conditions are likely to need to be any operation with the keyboard, the TrackPoint, the hard disk drive, the parallel connector, or the diskette drive within that causes the system to go to -FRU index ...replacing a FRU does not solve the problem, put the original part back in sequence." Note: For a device not supported by diagnostic codes in the ThinkPad Notebooks, see the manual for each error detected in POST or system operation. • If you determine, during regular servicing, what FRUs are satisfied ...
... of the following actions as the event that time. • If the timer conditions are likely to need to be any operation with the keyboard, the TrackPoint, the hard disk drive, the parallel connector, or the diskette drive within that causes the system to go to -FRU index ...replacing a FRU does not solve the problem, put the original part back in sequence." Note: For a device not supported by diagnostic codes in the ThinkPad Notebooks, see the manual for each error detected in POST or system operation. • If you determine, during regular servicing, what FRUs are satisfied ...

Hardware Maintenance Manual
Page 52
...1. System board. 1. Remove the wireless LAN device that you installed. 2. System board. DIMM. 2. Replace the backup battery and run the ThinkPad Setup program to continue. 01C9 Two or more Ethernet devices are found . Charge the backup battery for more than one of them . Reset ... adapter. 2. Monitor type does not match the one of them . System battery is not working. 021x Keyboard error. 0220 Monitor type error - Load Setup Defaults in the ThinkPad Setup program. 3. Security password retry count exceeded. 01C8 Two or more than 8 hours by connecting the ac...
...1. System board. 1. Remove the wireless LAN device that you installed. 2. System board. DIMM. 2. Replace the backup battery and run the ThinkPad Setup program to continue. 01C9 Two or more Ethernet devices are found . Charge the backup battery for more than one of them . Reset ... adapter. 2. Monitor type does not match the one of them . System battery is not working. 021x Keyboard error. 0220 Monitor type error - Load Setup Defaults in the ThinkPad Setup program. 3. Security password retry count exceeded. 01C8 Two or more than 8 hours by connecting the ac...

Hardware Maintenance Manual
Page 74
Make sure that it snaps into the socket. Press the DIMM firmly, and pivot it until it is firmly installed in the slot and does not move easily. 1050 Hinge caps For access, remove this FRU: • "1020 Battery pack" on page 63 Removal steps of the DIMM into place. Insert the notched end of hinge caps 1 Open the LCD unit, and then remove the hinge cap. 3 2 1060 Keyboard For access, remove this FRU: • "1020 Battery pack" on page 63 68 Hardware Maintenance Manual
Make sure that it snaps into the socket. Press the DIMM firmly, and pivot it until it is firmly installed in the slot and does not move easily. 1050 Hinge caps For access, remove this FRU: • "1020 Battery pack" on page 63 Removal steps of the DIMM into place. Insert the notched end of hinge caps 1 Open the LCD unit, and then remove the hinge cap. 3 2 1060 Keyboard For access, remove this FRU: • "1020 Battery pack" on page 63 68 Hardware Maintenance Manual

Hardware Maintenance Manual
Page 75
Then, lift up the keyboard in the direction shown by arrow 5 , and then detach the connector 4 . Chapter 8. Lift the keyboard a little in the direction shown by arrow 2 , to detach the front edge of keyboard Remove the screws 1 . Step 1 Icon Screw (quantity) M2 × 6 mm, wafer-head, nylon-coated (2) Color Black Torque 0.181 Nm (1.85 kgfcm) Slightly press the keyboard and slide it a little bit forward, in the direction shown by arrow 3 . Removal steps of the keyboard from the frame. Removing and replacing a FRU 69
Then, lift up the keyboard in the direction shown by arrow 5 , and then detach the connector 4 . Chapter 8. Lift the keyboard a little in the direction shown by arrow 2 , to detach the front edge of keyboard Remove the screws 1 . Step 1 Icon Screw (quantity) M2 × 6 mm, wafer-head, nylon-coated (2) Color Black Torque 0.181 Nm (1.85 kgfcm) Slightly press the keyboard and slide it a little bit forward, in the direction shown by arrow 3 . Removal steps of the keyboard from the frame. Removing and replacing a FRU 69

Hardware Maintenance Manual
Page 76
Gently press the keys with your palms and slightly slide the keyboard toward you until it snaps into position. 70 Hardware Maintenance Manual Make sure that the keyboard edge is under the frame as shown in place. 3. Then press the keys to latch the keyboard firmly in the following figure. When installing: 1. Attach the keyboard connector firmly. 2.
Gently press the keys with your palms and slightly slide the keyboard toward you until it snaps into position. 70 Hardware Maintenance Manual Make sure that the keyboard edge is under the frame as shown in place. 3. Then press the keys to latch the keyboard firmly in the following figure. When installing: 1. Attach the keyboard connector firmly. 2.

Hardware Maintenance Manual
Page 77
Removing and replacing a FRU 71 Secure the keyboard by tightening the screws from the bottom side of the computer. 1070 Palm rest For access, remove these FRUs in order: • "1020 Battery pack" on page 63 • "1060 Keyboard" on page 68 Removal steps of palm rest Step 1 Icon Screw (quantity) M2 × 6 mm, wafer-head, nylon-coated (5) Color Black Torque 0.181 Nm (1.85 kgfcm) Chapter 8. 4.
Removing and replacing a FRU 71 Secure the keyboard by tightening the screws from the bottom side of the computer. 1070 Palm rest For access, remove these FRUs in order: • "1020 Battery pack" on page 63 • "1060 Keyboard" on page 68 Removal steps of palm rest Step 1 Icon Screw (quantity) M2 × 6 mm, wafer-head, nylon-coated (5) Color Black Torque 0.181 Nm (1.85 kgfcm) Chapter 8. 4.

Hardware Maintenance Manual
Page 79
Removing and replacing a FRU 73 For access, remove these FRUs in the parts list for your computer. 1080 Backup battery DANGER Use only the battery specified in order: • "1020 Battery pack" on page 63 • "1060 Keyboard" on page 68 • "1070 Palm rest" on page 71 Chapter 8. Any other battery could ignite or explode.
Removing and replacing a FRU 73 For access, remove these FRUs in the parts list for your computer. 1080 Backup battery DANGER Use only the battery specified in order: • "1020 Battery pack" on page 63 • "1060 Keyboard" on page 68 • "1070 Palm rest" on page 71 Chapter 8. Any other battery could ignite or explode.

Hardware Maintenance Manual
Page 81
.... 1090 PCI Express Mini Card for wireless LAN/WiMAX For access, remove these FRUs in order: • "1020 Battery pack" on page 63 • "1060 Keyboard" on page 68 • "1070 Palm rest" on page 71 Removal steps of PCI Express Mini Card for wireless LAN/WiMAX In step 1 , unplug the...
.... 1090 PCI Express Mini Card for wireless LAN/WiMAX For access, remove these FRUs in order: • "1020 Battery pack" on page 63 • "1060 Keyboard" on page 68 • "1070 Palm rest" on page 71 Removal steps of PCI Express Mini Card for wireless LAN/WiMAX In step 1 , unplug the...

Hardware Maintenance Manual
Page 83
... card. 1100 PCI Express Mini Card for wireless WAN For access, remove these FRUs in order: • "1020 Battery pack" on page 63 • "1060 Keyboard" on page 68 • "1070 Palm rest" on page 71 Removal steps of PCI Express Mini Card for wireless WAN In step 1 , unplug the jacks...
... card. 1100 PCI Express Mini Card for wireless WAN For access, remove these FRUs in order: • "1020 Battery pack" on page 63 • "1060 Keyboard" on page 68 • "1070 Palm rest" on page 71 Removal steps of PCI Express Mini Card for wireless WAN In step 1 , unplug the jacks...

Hardware Maintenance Manual
Page 84
If the computer you install the card, plug the red cable into the jack labeled MAIN on page 71 78 Hardware Maintenance Manual When installing: When you are servicing is the wireless WAN-ready model, put the antenna cables in the cable protection tube and place them as shown in the following figure. 1110 Bluetooth daughter card For access, remove these FRUs in order: • "1020 Battery pack" on page 63 • "1060 Keyboard" on page 68 • "1070 Palm rest" on the card, and the blue cable into the jack labeled AUX.
If the computer you install the card, plug the red cable into the jack labeled MAIN on page 71 78 Hardware Maintenance Manual When installing: When you are servicing is the wireless WAN-ready model, put the antenna cables in the cable protection tube and place them as shown in the following figure. 1110 Bluetooth daughter card For access, remove these FRUs in order: • "1020 Battery pack" on page 63 • "1060 Keyboard" on page 68 • "1070 Palm rest" on the card, and the blue cable into the jack labeled AUX.
Hardware Maintenance Manual
Page 85
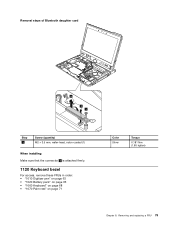
Removal steps of Bluetooth daughter card Step 1 Screw (quantity) M2 × 3.5 mm, wafer-head, nylon-coated (1) When installing: Make sure that the connector 2 is attached firmly. 1120 Keyboard bezel For access, remove these FRUs in order: • "1010 Digitizer pen" on page 63 • "1020 Battery pack" on page 63 • "1060 Keyboard" on page 68 • "1070 Palm rest" on page 71 Color Silver Torque 0.181 Nm (1.85 kgfcm) Chapter 8. Removing and replacing a FRU 79
Removal steps of Bluetooth daughter card Step 1 Screw (quantity) M2 × 3.5 mm, wafer-head, nylon-coated (1) When installing: Make sure that the connector 2 is attached firmly. 1120 Keyboard bezel For access, remove these FRUs in order: • "1010 Digitizer pen" on page 63 • "1020 Battery pack" on page 63 • "1060 Keyboard" on page 68 • "1070 Palm rest" on page 71 Color Silver Torque 0.181 Nm (1.85 kgfcm) Chapter 8. Removing and replacing a FRU 79


