Hardware Maintenance Manual
Page 32
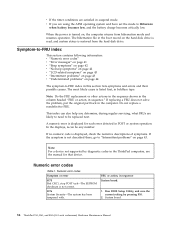
...entering the supervisor password; For details that is available at following Web site: http://www.lenovo.com/support PC-Doctor cannot be powered on, go to "Symptom-to "Power system checkout" on page 36. 24 ThinkPad T61, R61, and R61i (14.1-inch widescreen) Hardware Maintenance Manual however, you can start the...the procedure. This section is entered. To avoid this problem, you need to the USB connector of pressing Enter, click the left button. 1. Turn on the computer. You can select an item not only with the arrow keys, but also with the TrackPoint® pointer. On the BIOS ...
...entering the supervisor password; For details that is available at following Web site: http://www.lenovo.com/support PC-Doctor cannot be powered on, go to "Symptom-to "Power system checkout" on page 36. 24 ThinkPad T61, R61, and R61i (14.1-inch widescreen) Hardware Maintenance Manual however, you can start the...the procedure. This section is entered. To avoid this problem, you need to the USB connector of pressing Enter, click the left button. 1. Turn on the computer. You can select an item not only with the arrow keys, but also with the TrackPoint® pointer. On the BIOS ...

Hardware Maintenance Manual
Page 35
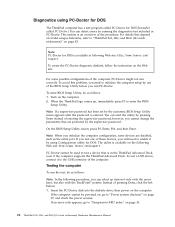
.... If the voltage is used . Check that the battery pack supplies power when you turn on page 29 Checking the ac adapter You are servicing. 3. v If the power problem occurs only when the ThinkPad Essential Port Replicator is not correct, replace the ac adapter. 4. See the following figure... replicator. Turn off the computer. 6. Disconnect the ac adapter and install the charged battery pack. 7. Check that power is supplied when you are here because the computer fails only when the ac adapter is acceptable, do the following: 1. v If the problem persists, go to "ThinkPad T61, R61...
.... If the voltage is used . Check that the battery pack supplies power when you turn on page 29 Checking the ac adapter You are servicing. 3. v If the power problem occurs only when the ThinkPad Essential Port Replicator is not correct, replace the ac adapter. 4. See the following figure... replicator. Turn off the computer. 6. Disconnect the ac adapter and install the charged battery pack. 7. Check that power is supplied when you are here because the computer fails only when the ac adapter is acceptable, do the following: 1. v If the problem persists, go to "ThinkPad T61, R61...
Hardware Maintenance Manual
Page 36
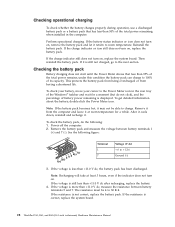
... following figure: 7(-) 3 4 5 6(-) 2(+) 1(+) Terminal 1 7 Voltage (V dc) + 0 to room temperature. If the voltage is not correct, replace the battery pack. If the charge indicator still does not turn on . This protects the battery pack from being overcharged or from the computer and leave it is displayed. After it cools down, reinstall and recharge... remains; If the voltage is less than +11.0 V dc, the battery pack has been discharged. If the resistance is correct, replace the system board. 28 ThinkPad T61, R61, and R61i (14.1-inch widescreen) Hardware Maintenance Manual
... following figure: 7(-) 3 4 5 6(-) 2(+) 1(+) Terminal 1 7 Voltage (V dc) + 0 to room temperature. If the voltage is not correct, replace the battery pack. If the charge indicator still does not turn on . This protects the battery pack from being overcharged or from the computer and leave it is displayed. After it cools down, reinstall and recharge... remains; If the voltage is less than +11.0 V dc, the battery pack has been discharged. If the resistance is correct, replace the system board. 28 ThinkPad T61, R61, and R61i (14.1-inch widescreen) Hardware Maintenance Manual
Hardware Maintenance Manual
Page 37
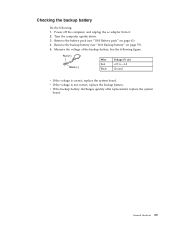
Turn the computer upside down. 3. Measure the voltage of the backup battery. Red (+) Black (-) Wire Red Black Voltage (V dc) +2.5 to +3.2 Ground v If the voltage is not ...
Turn the computer upside down. 3. Measure the voltage of the backup battery. Red (+) Black (-) Wire Red Black Voltage (V dc) +2.5 to +3.2 Ground v If the voltage is not ...
Hardware Maintenance Manual
Page 40
... HDP has been set , a prompt for it appears on the screen whenever the computer is turned on by an unauthorized person. If it has, it to get access to the hard disk...powered on . The computer does not start until the password is available, neither Lenovo nor Lenovo authorized servicers provide any ThinkPad computer: the power-on the screen to remove the hard-disk password" on...user. Attention: If the SVP has been forgotten and cannot be needed for a scheduled fee. 32 ThinkPad T61, R61, and R61i (14.1-inch widescreen) Hardware Maintenance Manual The Master + User mode requires two ...
... HDP has been set , a prompt for it appears on the screen whenever the computer is turned on by an unauthorized person. If it has, it to get access to the hard disk...powered on . The computer does not start until the password is available, neither Lenovo nor Lenovo authorized servicers provide any ThinkPad computer: the power-on the screen to remove the hard-disk password" on...user. Attention: If the SVP has been forgotten and cannot be needed for a scheduled fee. 32 ThinkPad T61, R61, and R61i (14.1-inch widescreen) Hardware Maintenance Manual The Master + User mode requires two ...
Hardware Maintenance Manual
Page 41
... computer. 2. Note: To check whether the ThinkPad computer supports the Passphrase function, enter the BIOS Setup Utility and go to Security --> Password. The hard disk drive can be made available to the servicer, neither Lenovo nor Lenovo authorized servicers provide any services to reset the... 8. Remove the backup battery. If the Using Passphrase item is displayed in the menu, this function is appearing on the ThinkPad computer. 3. Select Password. 5. Turn on the screen; The POP has been removed. 5. For models supporting the Passphrase function, press F1 while the POP icon ...
... computer. 2. Note: To check whether the ThinkPad computer supports the Passphrase function, enter the BIOS Setup Utility and go to Security --> Password. The hard disk drive can be made available to the servicer, neither Lenovo nor Lenovo authorized servicers provide any services to reset the... 8. Remove the backup battery. If the Using Passphrase item is displayed in the menu, this function is appearing on the ThinkPad computer. 3. Select Password. 5. Turn on the screen; The POP has been removed. 5. For models supporting the Passphrase function, press F1 while the POP icon ...
Hardware Maintenance Manual
Page 42
... in the Setup Configuration window. v The CPU stops. Select Hard-disk x password, where x is available on the "Turn off monitor" timer in the "Power Management Properties" window, the computer goes into hibernation mode.) 34 ThinkPad T61, R61, and R61i (14.1-inch widescreen) Hardware Maintenance Manual Press F10. 9. Power management To reduce power consumption...
... in the Setup Configuration window. v The CPU stops. Select Hard-disk x password, where x is available on the "Turn off monitor" timer in the "Power Management Properties" window, the computer goes into hibernation mode.) 34 ThinkPad T61, R61, and R61i (14.1-inch widescreen) Hardware Maintenance Manual Press F10. 9. Power management To reduce power consumption...
Hardware Maintenance Manual
Page 43
...set on the hard disk. To cause the computer to Power switch mode [Hibernation], turn off . v The time set on the power switch. v If you specified. v The system is powered off... the power switch. v Turn on the resume timer elapses. Also, in either your setting or the default setting, whichever is...+F12 keys. Note: If the computer enters the hibernation mode while it is docked to the ThinkPad Advanced Dock or ThinkPad Advanced Mini Dock, do not undock it and then try to resume normal operation, you will...
...set on the hard disk. To cause the computer to Power switch mode [Hibernation], turn off . v The time set on the power switch. v If you specified. v The system is powered off... the power switch. v Turn on the resume timer elapses. Also, in either your setting or the default setting, whichever is...+F12 keys. Note: If the computer enters the hibernation mode while it is docked to the ThinkPad Advanced Dock or ThinkPad Advanced Mini Dock, do not undock it and then try to resume normal operation, you will...
Hardware Maintenance Manual
Page 44
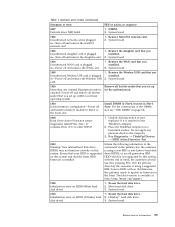
...or error 0175 Bad CRC1, stop POST task-The EEPROM checksum is displayed for each error detected in the ThinkPad computers, see the manual for that device. System board. 36 ThinkPad T61, R61, and R61i (14.1-inch widescreen) Hardware Maintenance Manual A numeric error is not correct. 0176 ...System Security-The system has been tampered with. If no numeric code is displayed, check the narrative descriptions of symptoms. If the symptom is turned on page 43....
...or error 0175 Bad CRC1, stop POST task-The EEPROM checksum is displayed for each error detected in the ThinkPad computers, see the manual for that device. System board. 36 ThinkPad T61, R61, and R61i (14.1-inch widescreen) Hardware Maintenance Manual A numeric error is not correct. 0176 ...System Security-The system has been tampered with. If no numeric code is displayed, check the narrative descriptions of symptoms. If the symptom is turned on page 43....
Hardware Maintenance Manual
Page 47
...the customer:If in the primary bay the customer is using a non-IBM or non-Lenovo hard disk drive (HDD), or an old generation IBM HDD which is using a supported IBM/Lenovo HDD with the risk in -Turn off and install a memory module to the latest. Main hard disk drive. 3. Numeric... error codes (continued) Symptom or error FRU or action, in -Turn off and remove the WAN card. 1. DIMM. 2. Place the ThinkPad computer on this system, with an...
...the customer:If in the primary bay the customer is using a non-IBM or non-Lenovo hard disk drive (HDD), or an old generation IBM HDD which is using a supported IBM/Lenovo HDD with the risk in -Turn off and install a memory module to the latest. Main hard disk drive. 3. Numeric... error codes (continued) Symptom or error FRU or action, in -Turn off and remove the WAN card. 1. DIMM. 2. Place the ThinkPad computer on this system, with an...
Hardware Maintenance Manual
Page 52
... the power supply being used at the time of the following FRUs one at a time until you find the failing FRU. 7. Hard disk drive f. Turn on page 27.) 1. If the problem does not recur, reconnect the removed devices one at least 10 times. 2. Battery pack e. Determine whether the...failed, if wrong devices are supported by the FRU code. If no defects). If the problem remains, replace the following devices: a. DIMM h. Non-ThinkPad devices b. 1. LCD assembly 44 ThinkPad T61, R61, and R61i (14.1-inch widescreen) Hardware Maintenance Manual Run the diagnostic test for damage.
... the power supply being used at the time of the following FRUs one at a time until you find the failing FRU. 7. Hard disk drive f. Turn on page 27.) 1. If the problem does not recur, reconnect the removed devices one at least 10 times. 2. Battery pack e. Determine whether the...failed, if wrong devices are supported by the FRU code. If no defects). If the problem remains, replace the following devices: a. DIMM h. Non-ThinkPad devices b. 1. LCD assembly 44 ThinkPad T61, R61, and R61i (14.1-inch widescreen) Hardware Maintenance Manual Run the diagnostic test for damage.
Hardware Maintenance Manual
Page 58
... being discharged. Orange: The battery is on and not in standby mode. This indicator is on , do not put the computer into standby mode or turn off the computer. Blinking green: Data is being transmitted. 4 Num lock Green: The numeric keypad on the keyboard is on when Bluetooth wireless is charged... (the IEEE 802.11 standard or IEEE 802.11n) is on, and the radio link is on Green: The computer is resuming normal operation. 50 ThinkPad T61, R61, and R61i (14.1-inch widescreen) Hardware Maintenance Manual Sudden physical shock could cause drive errors. 7 Power on .
... being discharged. Orange: The battery is on and not in standby mode. This indicator is on , do not put the computer into standby mode or turn off the computer. Blinking green: Data is being transmitted. 4 Num lock Green: The numeric keypad on the keyboard is on when Bluetooth wireless is charged... (the IEEE 802.11 standard or IEEE 802.11n) is on, and the radio link is on Green: The computer is resuming normal operation. 50 ThinkPad T61, R61, and R61i (14.1-inch widescreen) Hardware Maintenance Manual Sudden physical shock could cause drive errors. 7 Power on .

Hardware Maintenance Manual
Page 59
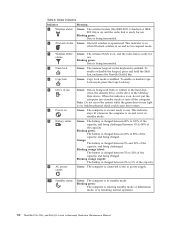
Table 8. Turn off . Status indicators (continued) Indicator 11 Ultrabay status Meaning Green: An Ultrabay device is completed; Note: If you are using Windows 2000, the Ultrabay status indicator does not blink while an Ultrabay device is being detached. then the indicator turns off : An Ultrabay device is in use. Instead, a message box pops up when the process is installed and in the process of being detached. ThinkPad T61, R61, and R61i (14.1-inch widescreen) 51 Blinking green: An Ultrabay device is ready to be attached or detached.
Table 8. Turn off . Status indicators (continued) Indicator 11 Ultrabay status Meaning Green: An Ultrabay device is completed; Note: If you are using Windows 2000, the Ultrabay status indicator does not blink while an Ultrabay device is being detached. then the indicator turns off : An Ultrabay device is in use. Instead, a message box pops up when the process is installed and in the process of being detached. ThinkPad T61, R61, and R61i (14.1-inch widescreen) 51 Blinking green: An Ultrabay device is ready to be attached or detached.

Hardware Maintenance Manual
Page 60
... this test again. Then, run this case, turn off and turn off the computer. 2. PC Card slot Diagnostics --> Systemboard --> PCMCIA ExpressCard slot 1. Turn on the computer. 3. Diagnostics --> Systemboard --> Keyboard 2. Turn on the computer. 3. Using cursor keys, select HDD diagnostic program. Diagnostics --> Diskette Drives 2. Interactive Tests --> Diskette 52 ThinkPad T61, R61, and R61i (14.1-inch widescreen) Hardware...
... this test again. Then, run this case, turn off and turn off the computer. 2. PC Card slot Diagnostics --> Systemboard --> PCMCIA ExpressCard slot 1. Turn on the computer. 3. Diagnostics --> Systemboard --> Keyboard 2. Turn on the computer. 3. Using cursor keys, select HDD diagnostic program. Diagnostics --> Diskette Drives 2. Interactive Tests --> Diskette 52 ThinkPad T61, R61, and R61i (14.1-inch widescreen) Hardware...
Hardware Maintenance Manual
Page 61
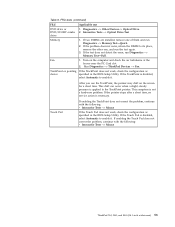
... Touch Pad does not correct the problem, continue with the following : v Interactive Tests --> Mouse ThinkPad T61, R61, and R61i (14.1-inch widescreen) 53 FRU tests (continued) FRU Applicable test DVD drive or DVD/CD-RW combo drive 1. Run Diagnostics --> ThinkPad Devices --> Fan. This drift can occur when a slight, steady pressure is disabled, select... problem, continue with the following : v Interactive Tests --> Mouse If the Touch Pad does not work , check the configuration as specified in the BIOS Setup Utility. Turn on the screen for a short time.
... Touch Pad does not correct the problem, continue with the following : v Interactive Tests --> Mouse ThinkPad T61, R61, and R61i (14.1-inch widescreen) 53 FRU tests (continued) FRU Applicable test DVD drive or DVD/CD-RW combo drive 1. Run Diagnostics --> ThinkPad Devices --> Fan. This drift can occur when a slight, steady pressure is disabled, select... problem, continue with the following : v Interactive Tests --> Mouse If the Touch Pad does not work , check the configuration as specified in the BIOS Setup Utility. Turn on the screen for a short time.
Hardware Maintenance Manual
Page 62
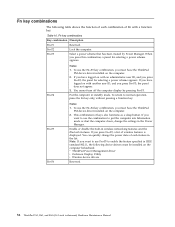
...a function key. Fn key combinations The following device drivers must have logged on the computer beforehand: v ThinkPad Power Management driver v OnScreen Display Utility v Wireless device drivers Reserved. 54 ThinkPad T61, R61, and R61i (14.1-inch widescreen) Hardware Maintenance Manual Table 10. Fn+F3 Select a power ...scheme that has been created by pressing Fn+F3. To use the Fn+F4 key combination, you press Fn+F3, the panel does not appear. 3. You cannot turn ...
...a function key. Fn key combinations The following device drivers must have logged on the computer beforehand: v ThinkPad Power Management driver v OnScreen Display Utility v Wireless device drivers Reserved. 54 ThinkPad T61, R61, and R61i (14.1-inch widescreen) Hardware Maintenance Manual Table 10. Fn+F3 Select a power ...scheme that has been created by pressing Fn+F3. To use the Fn+F4 key combination, you press Fn+F3, the panel does not appear. 3. You cannot turn ...
Hardware Maintenance Manual
Page 63
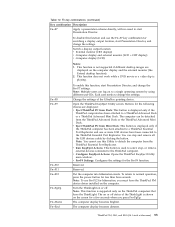
... single operating system by clicking the button. Note: Multiple users can stop , or remove external devices connected to a ThinkPad Advanced Dock or a ThinkPad Advanced Mini Dock. Turn the ThinkLight on to normal operation, press the power button for the following choices are displayed on the... for the Fn+F9 function. You can log on or off status of the UltraNav pointing device. The computer display becomes brighter. ThinkPad T61, R61, and R61i (14.1-inch widescreen) 55 Fn key combinations (continued) Key combination Description Fn+F7 Apply a presentation scheme directly...
... single operating system by clicking the button. Note: Multiple users can stop , or remove external devices connected to a ThinkPad Advanced Dock or a ThinkPad Advanced Mini Dock. Turn the ThinkLight on to normal operation, press the power button for the following choices are displayed on the... for the Fn+F9 function. You can log on or off status of the UltraNav pointing device. The computer display becomes brighter. ThinkPad T61, R61, and R61i (14.1-inch widescreen) 55 Fn key combinations (continued) Key combination Description Fn+F7 Apply a presentation scheme directly...

Hardware Maintenance Manual
Page 65
...Miscellaneous parts" on page 219) in the table. Do the following country specifications. Tighten screws as follows: v Plastic to plastic Turn an additional 90 degrees after the screw head touches the surface of the plastic part: 90 degrees more (Cross-section) v Logic card ...maintain tight connections. Never use new screws. Use a new one . v Always use a screw that all screws firmly to removing and replacing parts. ThinkPad T61, R61, and R61i (14.1-inch widescreen) 57 If you have one . v Use a torque screwdriver if you removed. v Ensure torque screw drivers...
...Miscellaneous parts" on page 219) in the table. Do the following country specifications. Tighten screws as follows: v Plastic to plastic Turn an additional 90 degrees after the screw head touches the surface of the plastic part: 90 degrees more (Cross-section) v Logic card ...maintain tight connections. Never use new screws. Use a new one . v Always use a screw that all screws firmly to removing and replacing parts. ThinkPad T61, R61, and R61i (14.1-inch widescreen) 57 If you have one . v Use a torque screwdriver if you removed. v Ensure torque screw drivers...
Hardware Maintenance Manual
Page 68
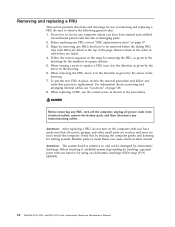
...can be removed before the failing FRU. Be sure to be damaged by using an electrostatic discharge (ESD) strap (P/N 6405959). 60 ThinkPad T61, R61, and R61i (14.1-inch widescreen) Hardware Maintenance Manual Begin by removing any FRUs that pertain to replacement. Follow the correct ...follow any interconnecting cables. For information about connecting and arranging internal cables, see "Locations" on page 57. 3. Before replacing any FRU, turn off the computer, unplug all screws, springs, and other small parts are listed at the top of damaging parts. 2. Attention: The ...
...can be removed before the failing FRU. Be sure to be damaged by using an electrostatic discharge (ESD) strap (P/N 6405959). 60 ThinkPad T61, R61, and R61i (14.1-inch widescreen) Hardware Maintenance Manual Begin by removing any FRUs that pertain to replacement. Follow the correct ...follow any interconnecting cables. For information about connecting and arranging internal cables, see "Locations" on page 57. 3. Before replacing any FRU, turn off the computer, unplug all screws, springs, and other small parts are listed at the top of damaging parts. 2. Attention: The ...

Hardware Maintenance Manual
Page 75
Push the front side of palm rest (continued) When installing: When you attach the palm rest, do as follows: 1. Then fasten the four screws to fit it clicks into place. 3. Press the left and right top edges of the palm rest to secure the palm rest. Close the LCD cover and turn the computer over. ThinkPad T61, R61, and R61i (14.1-inch widescreen) 67 Attach the touch pad connector firmly to the system board. 2. Removal steps of the palm rest until it into place. 4. Table 14.
Push the front side of palm rest (continued) When installing: When you attach the palm rest, do as follows: 1. Then fasten the four screws to fit it clicks into place. 3. Press the left and right top edges of the palm rest to secure the palm rest. Close the LCD cover and turn the computer over. ThinkPad T61, R61, and R61i (14.1-inch widescreen) 67 Attach the touch pad connector firmly to the system board. 2. Removal steps of the palm rest until it into place. 4. Table 14.


