Hardware Maintenance Manual
Page 47
... remove all but the reader that you set up for the authentication. 1830 Invalid memory configuration-Power off and install a memory module to enter SETUP 1. Remove all but not in sequence 02F7 Fail-safe timer NMI failed 1. Place the ThinkPad computer on HDD0 (Main hard disk drive) 1. System board. 2102 1. disk drive... firmware to the customer:If in the primary bay the customer is using a non-IBM or non-Lenovo hard disk drive (HDD), or an old generation IBM HDD which is installed. Remove the Wireless USB card that you set up within your HDD is plugged in -Turn off...
... remove all but the reader that you set up for the authentication. 1830 Invalid memory configuration-Power off and install a memory module to enter SETUP 1. Remove all but not in sequence 02F7 Fail-safe timer NMI failed 1. Place the ThinkPad computer on HDD0 (Main hard disk drive) 1. System board. 2102 1. disk drive... firmware to the customer:If in the primary bay the customer is using a non-IBM or non-Lenovo hard disk drive (HDD), or an old generation IBM HDD which is installed. Remove the Wireless USB card that you set up within your HDD is plugged in -Turn off...
Hardware Maintenance Manual
Page 49
.... Fan. 2. Check the status of device which you want to boot from . Failing bits: nnnn. System board. 1. If memory size has been changed, re-create the hibernation file. 1. System board. System board. System board. Reinstall the operation system. Backup... battery. 3. System board. The device you want to boot from. 2. Check that the operating system has no failure and is installed correctly. 2. Related service information 41 System board. 1. DIMM. 2. Load "Setup Defaults" in the BIOS Setup Utility. 2. Load "Setup Defaults...
.... Fan. 2. Check the status of device which you want to boot from . Failing bits: nnnn. System board. 1. If memory size has been changed, re-create the hibernation file. 1. System board. System board. System board. Reinstall the operation system. Backup... battery. 3. System board. The device you want to boot from. 2. Check that the operating system has no failure and is installed correctly. 2. Related service information 41 System board. 1. DIMM. 2. Load "Setup Defaults" in the BIOS Setup Utility. 2. Load "Setup Defaults...
Hardware Maintenance Manual
Page 54
Table 7. CMOS RAM v 242 bytes 46 ThinkPad T61, R61, and R61i (14.1-inch widescreen) Hardware Maintenance Manual Specifications (continued)... v 667-MHz PSB v 667-MHz DDR2 SDRAM (PC2-5300) v PCI bus v PCI Express bus v DMI Graphic memory chip v Intel PM965/GM965 graphics Display v 15.4-inch, 16M colors, WXGA (1280 × 800 resolution) TFT color ... limitation of the current 32-bit PC architecture, actual usable memory size is limited to 3 GB even though the physical installable memory size is 4 GB in ThinkPad T61, R61, and R61i (14.1-inch widescreen) (14.1-inch widescreen) computers.
Table 7. CMOS RAM v 242 bytes 46 ThinkPad T61, R61, and R61i (14.1-inch widescreen) Hardware Maintenance Manual Specifications (continued)... v 667-MHz PSB v 667-MHz DDR2 SDRAM (PC2-5300) v PCI bus v PCI Express bus v DMI Graphic memory chip v Intel PM965/GM965 graphics Display v 15.4-inch, 16M colors, WXGA (1280 × 800 resolution) TFT color ... limitation of the current 32-bit PC architecture, actual usable memory size is limited to 3 GB even though the physical installable memory size is 4 GB in ThinkPad T61, R61, and R61i (14.1-inch widescreen) (14.1-inch widescreen) computers.
Hardware Maintenance Manual
Page 61
... the air turbulence at the louver near the PC Card slot. 2. This symptom is necessary. If two DIMMs are installed, remove one , and run the test again. 3. If the pointer stops after a short time, no service action... a slight, steady pressure is applied to its place, remove the other one of them and run Diagnostics --> Memory Test-Full. Touch Pad If enabling the TrackPoint does not correct the problem, continue with the following : v Interactive...correct the problem, continue with the following : v Interactive Tests --> Mouse ThinkPad T61, R61, and R61i (14.1-inch widescreen) 53
... the air turbulence at the louver near the PC Card slot. 2. This symptom is necessary. If two DIMMs are installed, remove one , and run the test again. 3. If the pointer stops after a short time, no service action... a slight, steady pressure is applied to its place, remove the other one of them and run Diagnostics --> Memory Test-Full. Touch Pad If enabling the TrackPoint does not correct the problem, continue with the following : v Interactive...correct the problem, continue with the following : v Interactive Tests --> Mouse ThinkPad T61, R61, and R61i (14.1-inch widescreen) 53

Hardware Maintenance Manual
Page 84
... Intel Turbo Memory mini card (continued) Note: Step 2 is only for the models with the PCI Express Mini Card for wireless WAN, plug the red cable into the jack labeled MAIN on the card, and the blue cable into the jack labeled AUX. 4 76 ThinkPad T61, R61, and... R61i (14.1-inch widescreen) Hardware Maintenance Manual Removal steps of the arrow. 3 3 2 Step 3 Screw (quantity) M2 × 3 mm, small-head, nylon-coated (2) Color Silver Torque 0.167 Nm (1.7 kgfcm) When installing: In models with the Intel Turbo Memory Mini Card, skip step 2 ...
... Intel Turbo Memory mini card (continued) Note: Step 2 is only for the models with the PCI Express Mini Card for wireless WAN, plug the red cable into the jack labeled MAIN on the card, and the blue cable into the jack labeled AUX. 4 76 ThinkPad T61, R61, and... R61i (14.1-inch widescreen) Hardware Maintenance Manual Removal steps of the arrow. 3 3 2 Step 3 Screw (quantity) M2 × 3 mm, small-head, nylon-coated (2) Color Silver Torque 0.167 Nm (1.7 kgfcm) When installing: In models with the Intel Turbo Memory Mini Card, skip step 2 ...
Hardware Maintenance Manual
Page 120
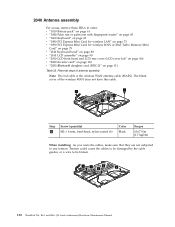
... installing: As you route the cables, make sure that they are not subjected to be damaged by the cable guides, or a wire to any tension. The blank cover of antenna assembly Note: The red cable is the wireless WAN antenna cable (MAIN). Tension could cause the cables to be broken. 2 2 2 2 2 112 ThinkPad T61..." on page 69 v "1080 PCI Express Mini Card for wireless LAN" on page 73 v "1090 PCI Express Mini Card for wireless WAN or Intel Turbo Memory Mini Card" on page 75 v "1120 Keyboard bezel" on page 80 v "1160 LCD assembly" on page 90 v "2010 LCD front bezel and LCD rear cover...
... installing: As you route the cables, make sure that they are not subjected to be damaged by the cable guides, or a wire to any tension. The blank cover of antenna assembly Note: The red cable is the wireless WAN antenna cable (MAIN). Tension could cause the cables to be broken. 2 2 2 2 2 112 ThinkPad T61..." on page 69 v "1080 PCI Express Mini Card for wireless LAN" on page 73 v "1090 PCI Express Mini Card for wireless WAN or Intel Turbo Memory Mini Card" on page 75 v "1120 Keyboard bezel" on page 80 v "1160 LCD assembly" on page 90 v "2010 LCD front bezel and LCD rear cover...

Hardware Maintenance Manual
Page 125
... 3 1 2 4 1 1 2 1 Step 4 Screw (quantity) M2 × 2.8 mm, flat-head, nylon-coated (4) Color Silver Torque 0.167 Nm (1.7 kgfcm) When installing: Make sure that the LCD cable is attached firmly. ThinkPad T61, R61, and R61i (14.1-inch widescreen) 117 2060 LCD panel and LCD cable For access, remove these FRUs in order: v "1010...on page 69 v "1080 PCI Express Mini Card for wireless LAN" on page 73 v "1090 PCI Express Mini Card for wireless WAN or Intel Turbo Memory Mini Card" on page 75 v "1120 Keyboard bezel" on page 80 v "1160 LCD assembly" on page 90 v "2010 LCD front bezel and LCD...
... 3 1 2 4 1 1 2 1 Step 4 Screw (quantity) M2 × 2.8 mm, flat-head, nylon-coated (4) Color Silver Torque 0.167 Nm (1.7 kgfcm) When installing: Make sure that the LCD cable is attached firmly. ThinkPad T61, R61, and R61i (14.1-inch widescreen) 117 2060 LCD panel and LCD cable For access, remove these FRUs in order: v "1010...on page 69 v "1080 PCI Express Mini Card for wireless LAN" on page 73 v "1090 PCI Express Mini Card for wireless WAN or Intel Turbo Memory Mini Card" on page 75 v "1120 Keyboard bezel" on page 80 v "1160 LCD assembly" on page 90 v "2010 LCD front bezel and LCD...
(English) Power Manager Deployment Guide
Page 26
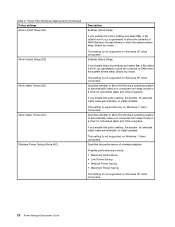
...contents of wireless adapters. Specifies the performance of RAM (Random Access Memory) when the system enters sleep (Stand by ) mode. If you enable this policy setting and select On, a file called hiberfil.sys generated to install updates. This setting is not supported on Windows 7 client computers.... (AC) Allow Wake Timers (DC) Wireless Power Saving Mode (AC) Description Enables Hybrid Sleep. This setting is generated to install updates. If you enable this policy setting and select On, a file called hiberfil.sys is not supported on Windows 7 client computers. Table 2.
...contents of wireless adapters. Specifies the performance of RAM (Random Access Memory) when the system enters sleep (Stand by ) mode. If you enable this policy setting and select On, a file called hiberfil.sys generated to install updates. This setting is not supported on Windows 7 client computers.... (AC) Allow Wake Timers (DC) Wireless Power Saving Mode (AC) Description Enables Hybrid Sleep. This setting is generated to install updates. If you enable this policy setting and select On, a file called hiberfil.sys is not supported on Windows 7 client computers. Table 2.
Hardware Maintenance Manual
Page 50
.... 3. Remove the Wireless USB card that the latest HDD firmware is not supported by pressing ESC. Power off and install a memory module to enter SETUP 1. Ensure that your main operating system. disk drive) 3. Read error on page 70. 2000...ThinkPad T61 and T61p (14.1-inch) Hardware Maintenance Manual Place the ThinkPad computer on HDD1 (Ultrabay hard disk drive) 1. Table 1. Remove the WAN card that you set up for the authentication. 1830 Invalid memory configuration-Power off and remove all but not in the primary bay the customer is using a supported IBM/Lenovo...
.... 3. Remove the Wireless USB card that the latest HDD firmware is not supported by pressing ESC. Power off and install a memory module to enter SETUP 1. Ensure that your main operating system. disk drive) 3. Read error on page 70. 2000...ThinkPad T61 and T61p (14.1-inch) Hardware Maintenance Manual Place the ThinkPad computer on HDD1 (Ultrabay hard disk drive) 1. Table 1. Remove the WAN card that you set up for the authentication. 1830 Invalid memory configuration-Power off and remove all but not in the primary bay the customer is using a supported IBM/Lenovo...

Hardware Maintenance Manual
Page 51
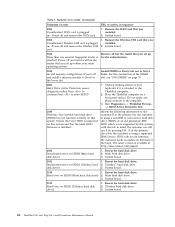
...system. 1. Reinstall the operation system. Excluded from any device. Fan error. System board. Check that the operating system has no failure and is installed correctly. 2. Thermal sensing error. Backup battery. 3. System board. 1. DIMM. 2. Device not found. 1. The device you want to what ...it was before the computer entered hibernation mode. 2. Allocation error for device. Load "Setup Defaults" in the BIOS Setup Utility. 2. If memory size has been changed, re-create the hibernation file. 1. v Enter the BIOS Setup Utility and add the device in the BIOS Setup ...
...system. 1. Reinstall the operation system. Excluded from any device. Fan error. System board. Check that the operating system has no failure and is installed correctly. 2. Thermal sensing error. Backup battery. 3. System board. 1. DIMM. 2. Device not found. 1. The device you want to what ...it was before the computer entered hibernation mode. 2. Allocation error for device. Load "Setup Defaults" in the BIOS Setup Utility. 2. If memory size has been changed, re-create the hibernation file. 1. v Enter the BIOS Setup Utility and add the device in the BIOS Setup ...

Hardware Maintenance Manual
Page 62
... 1. Run Diagnostics --> ThinkPad Devices --> Fan. Touch Pad If enabling the TrackPoint does not correct the problem, continue with the following : v Interactive Tests --> Mouse If the Touch Pad does not work , check the configuration as specified in the BIOS Setup Utility. If two DIMMs are installed, remove one , and run Diagnostics --> Memory Test-Full... a short time, no service action is necessary. If enabling the Touch Pad does not correct the problem, continue with the following : v Interactive Tests --> Mouse 54 ThinkPad T61 and T61p (14.1-inch) Hardware Maintenance Manual
... 1. Run Diagnostics --> ThinkPad Devices --> Fan. Touch Pad If enabling the TrackPoint does not correct the problem, continue with the following : v Interactive Tests --> Mouse If the Touch Pad does not work , check the configuration as specified in the BIOS Setup Utility. If two DIMMs are installed, remove one , and run Diagnostics --> Memory Test-Full... a short time, no service action is necessary. If enabling the Touch Pad does not correct the problem, continue with the following : v Interactive Tests --> Mouse 54 ThinkPad T61 and T61p (14.1-inch) Hardware Maintenance Manual

Hardware Maintenance Manual
Page 48
... authentication. 1830 Invalid memory configuration-Power off and remove all but not in Slot-0, but the reader that you installed. 2. Power off and install a memory module to the latest...disk drive. 3. System board. 42 ThinkPad T61 and T61p (15.4-inch widescreen) Hardware Maintenance Manual System board. 1820 More than one external fingerprint reader is installed. Do not apply any physical shock...which is plugged in the primary drive bay the customer is available at http://www.lenovo.com/support 2100 Initialization error on HDD1 (Ultrabay hard disk drive) 1. Reseat ...
... authentication. 1830 Invalid memory configuration-Power off and remove all but not in Slot-0, but the reader that you installed. 2. Power off and install a memory module to the latest...disk drive. 3. System board. 42 ThinkPad T61 and T61p (15.4-inch widescreen) Hardware Maintenance Manual System board. 1820 More than one external fingerprint reader is installed. Do not apply any physical shock...which is plugged in the primary drive bay the customer is available at http://www.lenovo.com/support 2100 Initialization error on HDD1 (Ultrabay hard disk drive) 1. Reseat ...

Hardware Maintenance Manual
Page 49
...found. 1. System board. v Enter the BIOS Setup Utility and add the device in sequence 1. Invalid system configuration data. System board. 1. If memory size has been changed, re-create the hibernation file. 1. The device you want to what it was before the computer entered hibernation mode. 2. Related... Error. 1. Restore the system configuration to boot from . 2. Check that the operating system has no failure and is installed correctly. 2. Error messages Symptom or error Device address conflict. Error messages Table 2. System board. 1. System board. 1. DIMM. 2.
...found. 1. System board. v Enter the BIOS Setup Utility and add the device in sequence 1. Invalid system configuration data. System board. 1. If memory size has been changed, re-create the hibernation file. 1. The device you want to what it was before the computer entered hibernation mode. 2. Related... Error. 1. Restore the system configuration to boot from . 2. Check that the operating system has no failure and is installed correctly. 2. Error messages Symptom or error Device address conflict. Error messages Table 2. System board. 1. System board. 1. DIMM. 2.

Hardware Maintenance Manual
Page 60
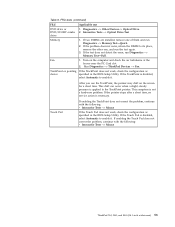
...with the following : v Interactive Tests --> Mouse 54 ThinkPad T61 and T61p (15.4-inch widescreen) Hardware Maintenance Manual FRU tests (continued) FRU Applicable test Diskette drive 1. Interactive Tests --> Optical Drive Test Memory 1. If two DIMMs are installed, remove one , and run the test again. ... not work , check the configuration as specified in the BIOS Setup Utility. Diagnostics --> Other Devices--> Optical Drive 2. Run Diagnostics --> ThinkPad Devices --> Fan. Interactive Tests --> Diskette DVD drive or DVD/CD-RW combo drive 1. Table 9. Turn on the screen for a...
...with the following : v Interactive Tests --> Mouse 54 ThinkPad T61 and T61p (15.4-inch widescreen) Hardware Maintenance Manual FRU tests (continued) FRU Applicable test Diskette drive 1. Interactive Tests --> Optical Drive Test Memory 1. If two DIMMs are installed, remove one , and run the test again. ... not work , check the configuration as specified in the BIOS Setup Utility. Diagnostics --> Other Devices--> Optical Drive 2. Run Diagnostics --> ThinkPad Devices --> Fan. Interactive Tests --> Diskette DVD drive or DVD/CD-RW combo drive 1. Table 9. Turn on the screen for a...


