(English) Access Connections Profile Deployment guide
Page 10
... you develop pre-configured profiles that allows you to individuals or groups of supported ThinkPad® systems and wireless WLAN and WAN drivers, see the following Web site: http://www.lenovo.com/pc/support/site.wss/document.do?sitestyle= lenovo&lndocid=MIGR-4ZLNJB 2 Access Connections Deployment Guide You can also manually create a location profile...
... you develop pre-configured profiles that allows you to individuals or groups of supported ThinkPad® systems and wireless WLAN and WAN drivers, see the following Web site: http://www.lenovo.com/pc/support/site.wss/document.do?sitestyle= lenovo&lndocid=MIGR-4ZLNJB 2 Access Connections Deployment Guide You can also manually create a location profile...
(English) Access Connections Profile Deployment guide
Page 13
... 3. The following steps: 1. To uninstall interactively type, \setup.exe -0x9 anything b. c) Click No to your local directory. © Lenovo 2008. d) Copy the script file generated at C:\Windows\setup.iss to restart the system later. Extract the Access Connections software package to install ... with log path specified, type: \setup.exe -S-SMS-f1\setup.iss-f2\setup.log. b) Click Uninstall when prompted. a. For example: C:\Drivers\W2k\Accon. 3. d. To install silently from a CD, type: \silent.bat Note: If you are installing Access Connections onto Windows Vista, ...
... 3. The following steps: 1. To uninstall interactively type, \setup.exe -0x9 anything b. c) Click No to your local directory. © Lenovo 2008. d) Copy the script file generated at C:\Windows\setup.iss to restart the system later. Extract the Access Connections software package to install ... with log path specified, type: \setup.exe -S-SMS-f1\setup.iss-f2\setup.log. b) Click Uninstall when prompted. a. For example: C:\Drivers\W2k\Accon. 3. d. To install silently from a CD, type: \silent.bat Note: If you are installing Access Connections onto Windows Vista, ...
(English) Access Connections Profile Deployment guide
Page 29
... integrated package as described in deploying Access Connections: v Deploy Access Connections and Location Profiles on page 7. For © Lenovo 2008. Chapter 4. Deploying Access Connections After creating the location profiles required for attended or unattended mode, as described inAppendix B,...Fn+F5 utility, and Power Management driver. 3. You can create a distribution package without exporting any profiles but only include the modified client configuration policy. After restarting the system, Access Connection is C:\Program Files\ThinkPad\ConnectUtilities). 4. Create an Access ...
... integrated package as described in deploying Access Connections: v Deploy Access Connections and Location Profiles on page 7. For © Lenovo 2008. Chapter 4. Deploying Access Connections After creating the location profiles required for attended or unattended mode, as described inAppendix B,...Fn+F5 utility, and Power Management driver. 3. You can create a distribution package without exporting any profiles but only include the modified client configuration policy. After restarting the system, Access Connection is C:\Program Files\ThinkPad\ConnectUtilities). 4. Create an Access ...
(English) Access Connections Profile Deployment guide
Page 30
...steps: v Create another .loa profile with the new version of Access Connections, recommended version of wireless LAN driver/application, Hotkey Fn+F5 utility, and Power Management driver. 2. After restarting the system, Access Connection runs automatically and will overinstall the older version without removing the ... distribution package (*.loa and *.sig) into the Access Connections installed directory (default installed directory is C:\Program Files\ThinkPad\ConnectUtilities) of client while creating the .loa file. 2. The import can be forced by using the following steps: 1.
...steps: v Create another .loa profile with the new version of Access Connections, recommended version of wireless LAN driver/application, Hotkey Fn+F5 utility, and Power Management driver. 2. After restarting the system, Access Connection runs automatically and will overinstall the older version without removing the ... distribution package (*.loa and *.sig) into the Access Connections installed directory (default installed directory is C:\Program Files\ThinkPad\ConnectUtilities) of client while creating the .loa file. 2. The import can be forced by using the following steps: 1.
(English) Access Connections Profile Deployment guide
Page 39
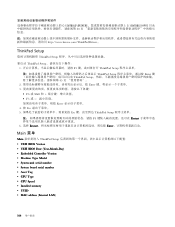
....wss/document.do ?&lndocid=MIGR-38953 v Power Management driver The Power Management driver can be downloaded at: http://www.lenovo.com/pc/support/site.wss/document.do ? Delete the following folders from the Lenovo Web site at the following package: Access Connections version 3.82 with the Lenovo ThinkPad /L3000 system BIOS. Portions © IBM Corp. 2005...
....wss/document.do ?&lndocid=MIGR-38953 v Power Management driver The Power Management driver can be downloaded at: http://www.lenovo.com/pc/support/site.wss/document.do ? Delete the following folders from the Lenovo Web site at the following package: Access Connections version 3.82 with the Lenovo ThinkPad /L3000 system BIOS. Portions © IBM Corp. 2005...

(English) Access Connections Profile Deployment guide
Page 40
... do not need to -date versions of installation type: \setup.exe /S /H /R c. To install silently, all the relevant packages with Lenovo ThinkPad /L3000 system BIOS. v IBMPM is the folder that contains the Power Management driver files. such as WLANCX2, WLLANATH, or WLLANINT. 4. To install interactively, type: \setup.exe b. Note: This package is the folder...
... do not need to -date versions of installation type: \setup.exe /S /H /R c. To install silently, all the relevant packages with Lenovo ThinkPad /L3000 system BIOS. v IBMPM is the folder that contains the Power Management driver files. such as WLANCX2, WLLANATH, or WLLANINT. 4. To install interactively, type: \setup.exe b. Note: This package is the folder...
Hardware Maintenance Manual
Page 31
...board before completing the service action. To download software fixes, drivers, and UEFI BIOS, do as follows: 1. Replace only the FRU that the latest UEFI BIOS is replaced, ensure that changed the symptoms. © Copyright Lenovo 2012 25 Follow the directions on page 26 - Use ...an mSATA solid state drive" on page 26 - Go to reach the Download Drivers and Software page. 3. Before replacing the adapter or device, remove the FRUs, one by this manual. Telephone numbers for Lenovo Support are available at: http://www.lenovoservicetraining.com/ion/ Strategy for replacing a system...
...board before completing the service action. To download software fixes, drivers, and UEFI BIOS, do as follows: 1. Replace only the FRU that the latest UEFI BIOS is replaced, ensure that changed the symptoms. © Copyright Lenovo 2012 25 Follow the directions on page 26 - Use ...an mSATA solid state drive" on page 26 - Go to reach the Download Drivers and Software page. 3. Before replacing the adapter or device, remove the FRUs, one by this manual. Telephone numbers for Lenovo Support are available at: http://www.lenovoservicetraining.com/ion/ Strategy for replacing a system...
Hardware Maintenance Manual
Page 41
... restores the Microsoft® Windows operating system. Use the arrow keys to save the ThinkPad Setup program configuration changes. Follow the instructions on the computer. For information on the ...8226; Operating System Recovery Disc (one to two hours to -FRU index" on http://www.lenovo.com/support. When the logo screen is on the computer. • Supplemental Recovery Disc:... start the recovery process. • Applications and Drivers Recovery Disc (one or more discs): This disc restores the preinstalled applications and drivers on the new drive. The length of a failure...
... restores the Microsoft® Windows operating system. Use the arrow keys to save the ThinkPad Setup program configuration changes. Follow the instructions on the computer. For information on the ...8226; Operating System Recovery Disc (one to two hours to -FRU index" on http://www.lenovo.com/support. When the logo screen is on the computer. • Supplemental Recovery Disc:... start the recovery process. • Applications and Drivers Recovery Disc (one or more discs): This disc restores the preinstalled applications and drivers on the new drive. The length of a failure...
Hardware Maintenance Manual
Page 42
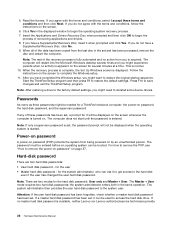
... terms and conditions, select I accept these passwords has been set, a prompt for a ThinkPad notebook computer: the power-on the screen whenever the computer is available, neither Lenovo nor Lenovo authorized service technicians provide 36 Hardware Maintenance Manual If any of the recovery process is fully automated... has been set , the password prompt will be displayed when the operating system is apparent on the screen to reinstall some device drivers. If you might need to complete the Windows setup. 11. If you might be booted. After you have a Supplemental Recovery Disc...
... terms and conditions, select I accept these passwords has been set, a prompt for a ThinkPad notebook computer: the power-on the screen whenever the computer is available, neither Lenovo nor Lenovo authorized service technicians provide 36 Hardware Maintenance Manual If any of the recovery process is fully automated... has been set , the password prompt will be displayed when the operating system is apparent on the screen to reinstall some device drivers. If you might need to complete the Windows setup. 11. If you might be booted. After you have a Supplemental Recovery Disc...
Hardware Maintenance Manual
Page 57
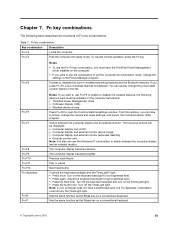
Has the same function as the Pause key on a conventional keyboard. © Copyright Lenovo 2012 51 Fn+F4 Puts the computer into hibernation mode, change the settings in the Power Manager program. You can use the combination ... you want to open the Communications settings window. Note: If your computer does not have the ThinkPad Power Management driver installed on the computer beforehand: • ThinkPad Power Management driver • OnScreen Display Utility • Wireless device drivers Press Fn+F6 to use the Fn+F4 key combination, you must be displayed: • ...
Has the same function as the Pause key on a conventional keyboard. © Copyright Lenovo 2012 51 Fn+F4 Puts the computer into hibernation mode, change the settings in the Power Manager program. You can use the combination ... you want to open the Communications settings window. Note: If your computer does not have the ThinkPad Power Management driver installed on the computer beforehand: • ThinkPad Power Management driver • OnScreen Display Utility • Wireless device drivers Press Fn+F6 to use the Fn+F4 key combination, you must be displayed: • ...
Hardware Maintenance Manual
Page 68
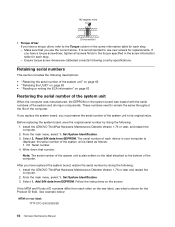
...Product ID numbers differ from each step. - Install the LENOVO ThinkPad Hardware Maintenance Diskette Version 1.76 or later, and restart the computer. 2. Read S/N data from EEPROM. Set System Identification. 3. Add S/N data from EEPROM. Ensure torque screw drivers are calibrated correctly following : 1. If you replace the ... what is also written on the screen. See example below: MTM on the rear label, use the correct screw. Install the LENOVO ThinkPad Hardware Maintenance Diskette Version 1.76 or later and restart the computer. 2. Make sure that number. Note: The serial number of ...
...Product ID numbers differ from each step. - Install the LENOVO ThinkPad Hardware Maintenance Diskette Version 1.76 or later, and restart the computer. 2. Read S/N data from EEPROM. Set System Identification. 3. Add S/N data from EEPROM. Ensure torque screw drivers are calibrated correctly following : 1. If you replace the ... what is also written on the screen. See example below: MTM on the rear label, use the correct screw. Install the LENOVO ThinkPad Hardware Maintenance Diskette Version 1.76 or later and restart the computer. 2. Make sure that number. Note: The serial number of ...

(Arabic) User Guide
Page 119
UEFI BIOS ThinkPad Setup ThinkPad C:\SWTOOLS\OSFIXES C:\SWTOOLS\DRIVERS C:\SWTOOLS\APPS Rescue and Recovery http://www.lenovo.com/ThinkPadDrivers mSATA mSATA mSATA mSATA C:\SWTOOLS UEFI BIOS 64 Windows 7 Windows (WinRE Windows 7 DVD 64ﺑﺖ Microsoft Windows UEFI/Legacy Boot ThinkPad Setup UEFI/Legacy Boot Windows SC DK FI FR : © Copyright Lenovo 2012
UEFI BIOS ThinkPad Setup ThinkPad C:\SWTOOLS\OSFIXES C:\SWTOOLS\DRIVERS C:\SWTOOLS\APPS Rescue and Recovery http://www.lenovo.com/ThinkPadDrivers mSATA mSATA mSATA mSATA C:\SWTOOLS UEFI BIOS 64 Windows 7 Windows (WinRE Windows 7 DVD 64ﺑﺖ Microsoft Windows UEFI/Legacy Boot ThinkPad Setup UEFI/Legacy Boot Windows SC DK FI FR : © Copyright Lenovo 2012
(Arabic) User Guide
Page 120
...; Windows 7 Windows 7 ThinkPad Setup Startup UEFI/Legacy Boot 32) Windows 7 Legacy Only Both Windows 7 64 Legacy Only Windows 7 64 UEFI UEFI Only F10 Windows 7 C:\SWTOOLS Intel Windows 2000/XP/Vista/7 SETUP.exe C:\SWTOOLS\DRIVERS .\INTELINF\infinst_autol Windows 7 http://www.lenovo.com/support Wake Up on...
...; Windows 7 Windows 7 ThinkPad Setup Startup UEFI/Legacy Boot 32) Windows 7 Legacy Only Both Windows 7 64 Legacy Only Windows 7 64 UEFI UEFI Only F10 Windows 7 C:\SWTOOLS Intel Windows 2000/XP/Vista/7 SETUP.exe C:\SWTOOLS\DRIVERS .\INTELINF\infinst_autol Windows 7 http://www.lenovo.com/support Wake Up on...
(Arabic) User Guide
Page 121
1×4 1×4 Ricoh Multi Card Reader Lenovo http://www.lenovo.com/support USB 3.0 Windows 7 Windows 7 USB 3.0 USB 3.0 USB 3.0 Windows 7 http://www.lenovo.com/support USB 3.0 32 64 Setup.exe C:\DRIVERS\WIN\USB3.0 ThinkPad Windows 2000/XP/Vista/7 ThinkPad Windows 2000/XP/Vista/7 C:\SWTOOLS\DRIVERS\MONITOR ThinkPad Windows 2000/XP/Vista/7 ThinkPad http://www.lenovo.com/ThinkPadDrivers C:\SWTOOLS\DRIVERS\MONITOR INF OK
1×4 1×4 Ricoh Multi Card Reader Lenovo http://www.lenovo.com/support USB 3.0 Windows 7 Windows 7 USB 3.0 USB 3.0 USB 3.0 Windows 7 http://www.lenovo.com/support USB 3.0 32 64 Setup.exe C:\DRIVERS\WIN\USB3.0 ThinkPad Windows 2000/XP/Vista/7 ThinkPad Windows 2000/XP/Vista/7 C:\SWTOOLS\DRIVERS\MONITOR ThinkPad Windows 2000/XP/Vista/7 ThinkPad http://www.lenovo.com/ThinkPadDrivers C:\SWTOOLS\DRIVERS\MONITOR INF OK
(Arabic) User Guide
Page 122
C:\SWTOOLS\DRIVERS C:\SWTOOLS\APPS http://www.lenovo.com/ThinkPadDrivers ThinkPad Setup ThinkPad Setup ThinkPad Setup F1 ThinkPad Setup ThinkPad Setup ThinkPad Setup Enter Enter F6 Shift F5 Enter Esc Esc ThinkPad Setup F9 Restart Restart Enter Main Main ThinkPad Setup UEFI BIOS Version • )UEFI BIOS Date...
C:\SWTOOLS\DRIVERS C:\SWTOOLS\APPS http://www.lenovo.com/ThinkPadDrivers ThinkPad Setup ThinkPad Setup ThinkPad Setup F1 ThinkPad Setup ThinkPad Setup ThinkPad Setup Enter Enter F6 Shift F5 Enter Esc Esc ThinkPad Setup F9 Restart Restart Enter Main Main ThinkPad Setup UEFI BIOS Version • )UEFI BIOS Date...
(Simplified Chinese) User Guide
Page 75
3. 打开 APPS 4 5. 双击 Setup 1 2. 转至 C:\SWTOOLS 目录。 3. 打开 DRIVERS AUDIO 和 VIDEO。 4 5 txt inf Windows exe Windows Update Web Lenovo 120 Rescue and Recovery Windows Rescue and Recovery 60 57 页 Rescue and Recovery Windows USB ThinkPad Setup 113 页 "Startup 菜单"。 第 5 61
3. 打开 APPS 4 5. 双击 Setup 1 2. 转至 C:\SWTOOLS 目录。 3. 打开 DRIVERS AUDIO 和 VIDEO。 4 5 txt inf Windows exe Windows Update Web Lenovo 120 Rescue and Recovery Windows Rescue and Recovery 60 57 页 Rescue and Recovery Windows USB ThinkPad Setup 113 页 "Startup 菜单"。 第 5 61
(Simplified Chinese) User Guide
Page 115
第 8 UEFI BIOS • 第 101 103 104 页 "ThinkPad Setup" • 第 115 ThinkPad C:\SWTOOLS\OSFIXES C:\SWTOOLS\DRIVERS C:\SWTOOLS\APPS 注: Rescue and Recovery http://www.lenovo.com/ThinkPadDrivers 开始前 mSATA mSATA mSATA mSATA • 将 C:\SWTOOLS 注: - 只有 64 位版的 Windows 7 UEFI BIOS 64 Microsoft ...
第 8 UEFI BIOS • 第 101 103 104 页 "ThinkPad Setup" • 第 115 ThinkPad C:\SWTOOLS\OSFIXES C:\SWTOOLS\DRIVERS C:\SWTOOLS\APPS 注: Rescue and Recovery http://www.lenovo.com/ThinkPadDrivers 开始前 mSATA mSATA mSATA mSATA • 将 C:\SWTOOLS 注: - 只有 64 位版的 Windows 7 UEFI BIOS 64 Microsoft ...
(Simplified Chinese) User Guide
Page 118
C:\SWTOOLS\DRIVERS C:\SWTOOLS\APPS 60 http://www.lenovo.com/ThinkPadDrivers。 ThinkPad Setup ThinkPad Setup 要启动 ThinkPad Setup 1 F1 ThinkPad Setup ThinkPad Setup Enter ThinkPad Setup 45 2 Enter 3 F6 或 Shift F5 Enter 4. 按 Esc 5 Esc ThinkPad Setup F9 Restart 6. 选择 Restart Enter Main 菜单 Main ThinkPad Setup UEFI BIOS Version • UEFI BIOS Date (Year-Month...
C:\SWTOOLS\DRIVERS C:\SWTOOLS\APPS 60 http://www.lenovo.com/ThinkPadDrivers。 ThinkPad Setup ThinkPad Setup 要启动 ThinkPad Setup 1 F1 ThinkPad Setup ThinkPad Setup Enter ThinkPad Setup 45 2 Enter 3 F6 或 Shift F5 Enter 4. 按 Esc 5 Esc ThinkPad Setup F9 Restart 6. 选择 Restart Enter Main 菜单 Main ThinkPad Setup UEFI BIOS Version • UEFI BIOS Date (Year-Month...
(Greek) User Guide
Page 138
... DVD Windows 7 DVD και 7 C:\SWTOOLS 8 Intel Chipset Support για Windows 2000/XP/Vista/7 SETUP.exe C:\SWTOOLS\DRIVERS\INTELINF\infinst_autol. 9 121. 120 Windows 7 64 bit Legacy Only. Windows (Windows Recovery Environment) (WinRE) στα Windows 7 64... bit του DVD Microsoft Windows UEFI/Legacy Boot ThinkPad Setup UEFI/Legacy Boot Windows SC DK FI FR GR IT JP NL NO SP SV TC US Windows 7 Windows 7 1 ThinkPad Setup. 2 Startup. 3 UEFI/Legacy Boot. 4 Windows 7 32 bit...
... DVD Windows 7 DVD και 7 C:\SWTOOLS 8 Intel Chipset Support για Windows 2000/XP/Vista/7 SETUP.exe C:\SWTOOLS\DRIVERS\INTELINF\infinst_autol. 9 121. 120 Windows 7 64 bit Legacy Only. Windows (Windows Recovery Environment) (WinRE) στα Windows 7 64... bit του DVD Microsoft Windows UEFI/Legacy Boot ThinkPad Setup UEFI/Legacy Boot Windows SC DK FI FR GR IT JP NL NO SP SV TC US Windows 7 Windows 7 1 ThinkPad Setup. 2 Startup. 3 UEFI/Legacy Boot. 4 Windows 7 32 bit...
(Greek) User Guide
Page 140
... 74. 122 4 Next Cancel ThinkPad Windows 2000/XP/Vista/7 ThinkPad Windows 2000/XP/Vista/7 C:\SWTOOLS\DRIVERS\MONITOR SSD ThinkPad Windows 2000/XP/Vista/7 ThinkPad http://www.lenovo.com/ThinkPadDrivers 1 Personalize). 2 Display 3 Change display settings). 4 Advanced Settings). 5 Monitor). 6 Properties). 7 Driver). 8 Update Driver). 9 Browse my computer for driver software Let me pick from a list of device drivers on my computer). 10 Have...
... 74. 122 4 Next Cancel ThinkPad Windows 2000/XP/Vista/7 ThinkPad Windows 2000/XP/Vista/7 C:\SWTOOLS\DRIVERS\MONITOR SSD ThinkPad Windows 2000/XP/Vista/7 ThinkPad http://www.lenovo.com/ThinkPadDrivers 1 Personalize). 2 Display 3 Change display settings). 4 Advanced Settings). 5 Monitor). 6 Properties). 7 Driver). 8 Update Driver). 9 Browse my computer for driver software Let me pick from a list of device drivers on my computer). 10 Have...


