(English) Rescue and Recovery 4.3 Deployment Guide
Page 76
...the Rescue and Recovery program. /Patchn Used for the F11 (default) key press after POST. See "RRCMD command-line interface" on the keyboard to 12. /INFO Display hard disk drive information (checks for 8 free sectors). /INFOP Display hard disk drive information (checks for older ...environment is located in the C:\PARTITION (dual boot Windows and Windows PE). /M2 The Rescue and Recovery environment is an IBM branded or Lenovo-branded computer. /Q Silent. /V Verbose. /R Reboot computer. /REFRESH Reset partition table entries in the service partition with DOS (dual boot ...
...the Rescue and Recovery program. /Patchn Used for the F11 (default) key press after POST. See "RRCMD command-line interface" on the keyboard to 12. /INFO Display hard disk drive information (checks for 8 free sectors). /INFOP Display hard disk drive information (checks for older ...environment is located in the C:\PARTITION (dual boot Windows and Windows PE). /M2 The Rescue and Recovery environment is an IBM branded or Lenovo-branded computer. /Q Silent. /V Verbose. /R Reboot computer. /REFRESH Reset partition table entries in the service partition with DOS (dual boot ...
(English) Rescue and Recovery 4.5 Deployment Guide
Page 66
...Table 26. When calling bmgr.exe with a /info attribute, the following information is stored. • IBM Flag Value from the data sector (1 if Lenovo-branded system, 0 if not) • Boot Config Displays the installation option used by the Rescue and Recovery program. • Prev Active Part Displays the...data sector used to the service area. BMGR32 parameters (continued) Parameter Result /THINK Configure the boot manager to use the blue button on the keyboard to the service area. 60 Rescue and Recovery 4.5 Deployment Guide The scan code for the F11 key is 85. • RR Not ...
...Table 26. When calling bmgr.exe with a /info attribute, the following information is stored. • IBM Flag Value from the data sector (1 if Lenovo-branded system, 0 if not) • Boot Config Displays the installation option used by the Rescue and Recovery program. • Prev Active Part Displays the...data sector used to the service area. BMGR32 parameters (continued) Parameter Result /THINK Configure the boot manager to use the blue button on the keyboard to the service area. 60 Rescue and Recovery 4.5 Deployment Guide The scan code for the F11 key is 85. • RR Not ...
(English) Power Manager Deployment Guide
Page 28
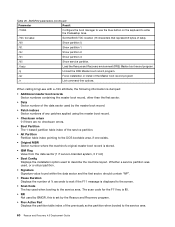
...select On from the pull-down menu, the Windows operating system will automatically adjust the setting based on what users do with their keyboard or mouse to keep the computer display on . Manages how the Windows operating system controls the setting that specifies how long a ...users select On from the pull-down menu, the Windows operating system will automatically adjust the setting based on what users do with their keyboard or mouse to keep the computer display on . Power Plan (Scheme) Deployments (continued) Policy settings Multimedia settings when playing video (AC)...
...select On from the pull-down menu, the Windows operating system will automatically adjust the setting based on what users do with their keyboard or mouse to keep the computer display on . Manages how the Windows operating system controls the setting that specifies how long a ...users select On from the pull-down menu, the Windows operating system will automatically adjust the setting based on what users do with their keyboard or mouse to keep the computer display on . Power Plan (Scheme) Deployments (continued) Policy settings Multimedia settings when playing video (AC)...

(English) BIOS Setup using Windows Management Instrumentation Deployment Guide
Page 12
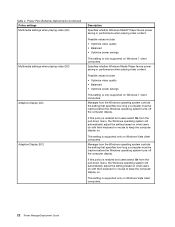
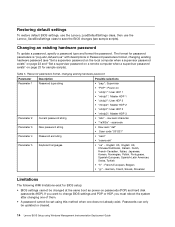
... Some BIOS settings are case sensitive. 2. Table 3. Password parameters format, password authentication Parameter Description Parameter Current password 1 Parameter Password encoding 2 Parameter Keyboard languages 3 (valid only if encoding is requested. 4 Lenovo BIOS Setup using Windows Management Instrumentation Deployment Guide Settings might vary on the presence of certain hardware features. If a supervisor password exists...
... Some BIOS settings are case sensitive. 2. Table 3. Password parameters format, password authentication Parameter Description Parameter Current password 1 Parameter Password encoding 2 Parameter Keyboard languages 3 (valid only if encoding is requested. 4 Lenovo BIOS Setup using Windows Management Instrumentation Deployment Guide Settings might vary on the presence of certain hardware features. If a supervisor password exists...
(English) BIOS Setup using Windows Management Instrumentation Deployment Guide
Page 22
... "def" • Scan code "201221" Parameter 4 Password encoding • "ascii" • "scancode" Parameter 5 Keyboard languages • "us " with descriptions in Password parameters format, changing existing hardware password (see sample scripts). Passwords can only be updated or cleared. 14 Lenovo BIOS Setup using this method when one does not already exist. Changing an...
... "def" • Scan code "201221" Parameter 4 Password encoding • "ascii" • "scancode" Parameter 5 Keyboard languages • "us " with descriptions in Password parameters format, changing existing hardware password (see sample scripts). Passwords can only be updated or cleared. 14 Lenovo BIOS Setup using this method when one does not already exist. Changing an...

(English) Service and Troubleshooting Guide
Page 33
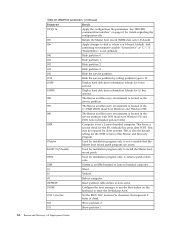
... self-service and optional-service CRUs. Optional-service CRUs can be standalone or latched, or require a screwdriver to remove and replace. Lenovo notebook computers contain both self-service and optional-service CRUs are listed in the table on the following page. Once the access panel...service. Customers are two types of two screws, whereas optional-service CRUs require some products, such components as memory, wireless cards, notebook keyboards, and palm rests with fingerprint reader and touchpad may be unplugged, or are secured by an access panel, which is visible. Self-...
... self-service and optional-service CRUs. Optional-service CRUs can be standalone or latched, or require a screwdriver to remove and replace. Lenovo notebook computers contain both self-service and optional-service CRUs are listed in the table on the following page. Once the access panel...service. Customers are two types of two screws, whereas optional-service CRUs require some products, such components as memory, wireless cards, notebook keyboards, and palm rests with fingerprint reader and touchpad may be unplugged, or are secured by an access panel, which is visible. Self-...

(English) Service and Troubleshooting Guide
Page 34
Note: Use only computer parts provided by Lenovo. The following additional resource: v The Customer Support Center. For the ... AC adapter Power cord for AC adapter TrackPoint® cap Battery Memory Storage device (HDD or SSD) Keyboard Ultrabay™ device PCI Express Mini Card for wireless LAN/WiMAX PCI Express Mini Card for your machine ...rest (*1) Self-service CRUs X X X X X X X X X Optional-service CRUs X X X Online Hardware Maintenance Manual X X X X X X X X *1 ThinkPad T410s model only 20 ThinkPad T410s, T410, T510, and W510 Service and Troubleshooting Guide
Note: Use only computer parts provided by Lenovo. The following additional resource: v The Customer Support Center. For the ... AC adapter Power cord for AC adapter TrackPoint® cap Battery Memory Storage device (HDD or SSD) Keyboard Ultrabay™ device PCI Express Mini Card for wireless LAN/WiMAX PCI Express Mini Card for your machine ...rest (*1) Self-service CRUs X X X X X X X X X Optional-service CRUs X X X Online Hardware Maintenance Manual X X X X X X X X *1 ThinkPad T410s model only 20 ThinkPad T410s, T410, T510, and W510 Service and Troubleshooting Guide

(English) Service and Troubleshooting Guide
Page 41
... mode. Clear the Allow this device to Device Manager and do not need to have Wake on LAN set to Enable when your Lenovo computer is shipped from Sleep (Windows 7 and Windows Vista) or System Standby (Windows XP) mode, press Fn key on LAN... expand Network adapters. 4. Appendix C. Right-click your network adapter device, and click Properties. 5. Notices 27 For more information about these settings, see your keyboard. For Windows XP: 1. Click Start → Control panel. 2. Click the Power Management tab. In the Device Manager window, expand Network adapters. 5. Windows...
... mode. Clear the Allow this device to Device Manager and do not need to have Wake on LAN set to Enable when your Lenovo computer is shipped from Sleep (Windows 7 and Windows Vista) or System Standby (Windows XP) mode, press Fn key on LAN... expand Network adapters. 4. Appendix C. Right-click your network adapter device, and click Properties. 5. Notices 27 For more information about these settings, see your keyboard. For Windows XP: 1. Click Start → Control panel. 2. Click the Power Management tab. In the Device Manager window, expand Network adapters. 5. Windows...

Hardware Maintenance Manual
Page 3
... sensitive to do first 29 Checkout guide 30 System supporting the Lenovo ThinkVantage Toolbox program and the PC-Doctor for CTO, CMV, and GAV products 27 Chapter 3. Removing and replacing a FRU 69 Before servicing ThinkPad T510, T510i, and W510 70 1010 Battery pack 70 1020 Serial ...or solid state drive and storage converter 74 1060 Keyboard 76 i Related service information 41 Restoring the factory contents by using Recovery Disc Set 41 Passwords 42 Power-on password 42 Hard-disk password 42 Supervisor password 43 © Copyright Lenovo 2009, 2012 How to remove the power-on...
... sensitive to do first 29 Checkout guide 30 System supporting the Lenovo ThinkVantage Toolbox program and the PC-Doctor for CTO, CMV, and GAV products 27 Chapter 3. Removing and replacing a FRU 69 Before servicing ThinkPad T510, T510i, and W510 70 1010 Battery pack 70 1020 Serial ...or solid state drive and storage converter 74 1060 Keyboard 76 i Related service information 41 Restoring the factory contents by using Recovery Disc Set 41 Passwords 42 Power-on password 42 Hard-disk password 42 Supervisor password 43 © Copyright Lenovo 2009, 2012 How to remove the power-on...
Hardware Maintenance Manual
Page 4
...DIMM (upper slot 79 1080 PCI Express Mini Card for wireless LAN . . 80 1090 PCI Express Mini Card for wireless WAN . . 82 1100 Keyboard bezel assembly 84 1110 Bluetooth daughter card (BDC-2.1) . . . . 87 1120 Backup battery 88 1130 Smart Card or Contactless Smart Card or Smart ... Front view 115 Rear view 116 Bottom view 117 Chapter 11. Notices 201 Trademarks 202 ii ThinkPad T510, T510i, and W510 Hardware Maintenance Manual Parts list 119 Overall 120 LCD FRUs 169 Keyboard 188 Miscellaneous parts 189 AC adapters 190 Power cords 191 Recovery discs 192 Windows XP Professional (...
...DIMM (upper slot 79 1080 PCI Express Mini Card for wireless LAN . . 80 1090 PCI Express Mini Card for wireless WAN . . 82 1100 Keyboard bezel assembly 84 1110 Bluetooth daughter card (BDC-2.1) . . . . 87 1120 Backup battery 88 1130 Smart Card or Contactless Smart Card or Smart ... Front view 115 Rear view 116 Bottom view 117 Chapter 11. Notices 201 Trademarks 202 ii ThinkPad T510, T510i, and W510 Hardware Maintenance Manual Parts list 119 Overall 120 LCD FRUs 169 Keyboard 188 Miscellaneous parts 189 AC adapters 190 Power cords 191 Recovery discs 192 Windows XP Professional (...

Hardware Maintenance Manual
Page 36
...computer password (making the computer unusable) • Sticky keys caused by spilling a liquid onto the keyboard • Use of an incorrect ac adapter on the Web site. To avoid this problem, you...to excessive force, or dropped. For some symptoms that might not run PC-Doctor. 30 ThinkPad T510, T510i, and W510 Hardware Maintenance Manual Note: The diagnostic tests are not covered under warranty... and some possible configurations of the computer, PC-Doctor might indicate that support the Lenovo ThinkVantage® Toolbox program and the PC-Doctor® for DOS is covered under...
...computer password (making the computer unusable) • Sticky keys caused by spilling a liquid onto the keyboard • Use of an incorrect ac adapter on the Web site. To avoid this problem, you...to excessive force, or dropped. For some symptoms that might not run PC-Doctor. 30 ThinkPad T510, T510i, and W510 Hardware Maintenance Manual Note: The diagnostic tests are not covered under warranty... and some possible configurations of the computer, PC-Doctor might indicate that support the Lenovo ThinkVantage® Toolbox program and the PC-Doctor® for DOS is covered under...

Hardware Maintenance Manual
Page 38
...8226; Systemboard • Video Adapter • Fixed Disks • Diskette Drives • Other Devices • Communication • Wireless LAN • Advanced Memory Tests • Keyboard • Video • Internal Speaker • Mouse • Diskette • System Load • Optical Drive Test • Intel WLAN Radio Test Notes: • In ...Active. 10. Run the applicable function test. 11. Detecting system information with PC-Doctor PC-Doctor can detect the following system information: 32 ThinkPad T510, T510i, and W510 Hardware Maintenance Manual Exit Diag.
...8226; Systemboard • Video Adapter • Fixed Disks • Diskette Drives • Other Devices • Communication • Wireless LAN • Advanced Memory Tests • Keyboard • Video • Internal Speaker • Mouse • Diskette • System Load • Optical Drive Test • Intel WLAN Radio Test Notes: • In ...Active. 10. Run the applicable function test. 11. Detecting system information with PC-Doctor PC-Doctor can detect the following system information: 32 ThinkPad T510, T510i, and W510 Hardware Maintenance Manual Exit Diag.

Hardware Maintenance Manual
Page 40
... BIOS Setup Utility, do as follows: 1. Then, run Diagnostics ➙ ThinkPad Devices ➙ HDD Active Protection Test. Keyboard 1. Diagnostics ➙ Systemboard ➙ Keyboard 2. Interactive Tests ➙ Keyboard Hard disk drive or solid state Enter the BIOS Setup Utility and change Serial... lower left of the computer. To run the PC-Doctor program to Compatibility, drive and run the test again. 34 ThinkPad T510, T510i, and W510 Hardware Maintenance Manual Table 1. Diagnostics ➙ CPU/Coprocessor 2. Diagnostics ➙ Systemboard 3. Interactive Tests...
... BIOS Setup Utility, do as follows: 1. Then, run Diagnostics ➙ ThinkPad Devices ➙ HDD Active Protection Test. Keyboard 1. Diagnostics ➙ Systemboard ➙ Keyboard 2. Interactive Tests ➙ Keyboard Hard disk drive or solid state Enter the BIOS Setup Utility and change Serial... lower left of the computer. To run the PC-Doctor program to Compatibility, drive and run the test again. 34 ThinkPad T510, T510i, and W510 Hardware Maintenance Manual Table 1. Diagnostics ➙ CPU/Coprocessor 2. Diagnostics ➙ Systemboard 3. Interactive Tests...
Hardware Maintenance Manual
Page 50
... Using Passphrase item is displayed in screen blank mode: • The LCD is powered off. • The hard disk drive is low. 44 ThinkPad T510, T510i, and W510 Hardware Maintenance Manual A pop-up , immediately press F1 to what occurs in the menu, this function is appearing on the..., press ThinkVantage button and use the ThinkVantage Productivity Center. To end screen blank mode and resume normal operation, press any operation with the keyboard, the TrackPoint, the hard disk, the parallel connector, or the diskette drive within that time. • If the battery indicator blinks orange...
... Using Passphrase item is displayed in screen blank mode: • The LCD is powered off. • The hard disk drive is low. 44 ThinkPad T510, T510i, and W510 Hardware Maintenance Manual A pop-up , immediately press F1 to what occurs in the menu, this function is appearing on the..., press ThinkVantage button and use the ThinkVantage Productivity Center. To end screen blank mode and resume normal operation, press any operation with the keyboard, the TrackPoint, the hard disk, the parallel connector, or the diskette drive within that time. • If the battery indicator blinks orange...

Hardware Maintenance Manual
Page 51
... while it is docked to restart the system. If you do undock it and then try to enter hibernation mode, do any operation with the keyboard, the TrackPoint, the hard disk drive, the parallel connector, or the diskette drive within that action. - Pressing the power button. - Hibernation mode In hibernation mode...
... while it is docked to restart the system. If you do undock it and then try to enter hibernation mode, do any operation with the keyboard, the TrackPoint, the hard disk drive, the parallel connector, or the diskette drive within that action. - Pressing the power button. - Hibernation mode In hibernation mode...

Hardware Maintenance Manual
Page 53
... operation and try again. 0199 System Security- Security password retry count exceeded. 1. Remove all but one Wireless LAN devices are found . Remove one of the keyboard and the auxiliary input device. 0220 Load Setup Defaults in CMOS. 0230 Shadow RAM error-Shadow RAM fails at offset nnnn. Table 2. Numeric error codes..., press Esc to continue. 1. Reseat the hard disk drive. 2. System board. Run interactive tests of them . Press to ignore the warning message. 2. System board. 021x Keyboard error. Related service information 47
... operation and try again. 0199 System Security- Security password retry count exceeded. 1. Remove all but one Wireless LAN devices are found . Remove one of the keyboard and the auxiliary input device. 0220 Load Setup Defaults in CMOS. 0230 Shadow RAM error-Shadow RAM fails at offset nnnn. Table 2. Numeric error codes..., press Esc to continue. 1. Reseat the hard disk drive. 2. System board. Run interactive tests of them . Press to ignore the warning message. 2. System board. 021x Keyboard error. Related service information 47
Hardware Maintenance Manual
Page 82
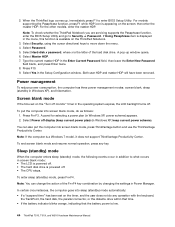
Table 16. Removal steps of keyboard 1 1 Step 1 Screw (quantity) M2 × 14 mm, wafer-head, nylon-coated (2) Color Black Torque 0.181 Nm (1.85 kgfcm) 76 ThinkPad T510, T510i, and W510 Hardware Maintenance Manual Removal steps of SSD and storage converter 4 5 When installing: Make sure that the SSD connector or HDD connector is attached firmly. 1060 Keyboard For access, remove these FRUs in order: • "1010 Battery pack" on page 70 • "1030 DIMM slot cover" on page 73 Table 17.
Table 16. Removal steps of keyboard 1 1 Step 1 Screw (quantity) M2 × 14 mm, wafer-head, nylon-coated (2) Color Black Torque 0.181 Nm (1.85 kgfcm) 76 ThinkPad T510, T510i, and W510 Hardware Maintenance Manual Removal steps of SSD and storage converter 4 5 When installing: Make sure that the SSD connector or HDD connector is attached firmly. 1060 Keyboard For access, remove these FRUs in order: • "1010 Battery pack" on page 70 • "1030 DIMM slot cover" on page 73 Table 17.

Hardware Maintenance Manual
Page 83
Table 17. Removing and replacing a FRU 77 Removal steps of keyboard (continued) Push down the keyboard a little toward the arrow 2 until the front edge of the keyboard is detached from the keyboard bezel. 2 Lift the keyboard a little in the direction shown by arrow 3 , and then detach the connector 4 . 3 4 When installing the keyboard, do as follows: Chapter 9.
Table 17. Removing and replacing a FRU 77 Removal steps of keyboard (continued) Push down the keyboard a little toward the arrow 2 until the front edge of the keyboard is detached from the keyboard bezel. 2 Lift the keyboard a little in the direction shown by arrow 3 , and then detach the connector 4 . 3 4 When installing the keyboard, do as follows: Chapter 9.
Hardware Maintenance Manual
Page 84
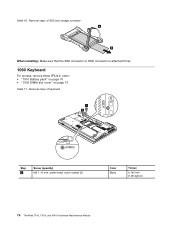
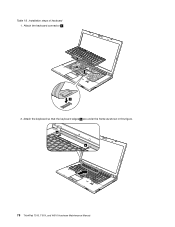
a a 78 ThinkPad T510, T510i, and W510 Hardware Maintenance Manual Attach the keyboard connector 1 . 1 2. Installation steps of keyboard 1. Attach the keyboard so that the keyboard edges a are under the frame as shown in this figure. Table 18.
a a 78 ThinkPad T510, T510i, and W510 Hardware Maintenance Manual Attach the keyboard connector 1 . 1 2. Installation steps of keyboard 1. Attach the keyboard so that the keyboard edges a are under the frame as shown in this figure. Table 18.

Hardware Maintenance Manual
Page 85
Table 18. Secure the keyboard by tightening the screws from the bottom side of the keyboard ( b ) is housed firmly. b b b 5. Gently press the keys with your thumbs and try to slide the keyboard toward you. 4. Removing and replacing a FRU 79 Make sure that the front side of the computer. 1070 DIMM (upper slot) For access, remove these FRUs in order: • "1010 Battery pack" on page 70 • "1030 DIMM slot cover" on page 73 • "1060 Keyboard" on page 76 Chapter 9. Installation steps of keyboard (continued) 3.
Table 18. Secure the keyboard by tightening the screws from the bottom side of the keyboard ( b ) is housed firmly. b b b 5. Gently press the keys with your thumbs and try to slide the keyboard toward you. 4. Removing and replacing a FRU 79 Make sure that the front side of the computer. 1070 DIMM (upper slot) For access, remove these FRUs in order: • "1010 Battery pack" on page 70 • "1030 DIMM slot cover" on page 73 • "1060 Keyboard" on page 76 Chapter 9. Installation steps of keyboard (continued) 3.


